
Fallout 4 AA & VSync Tweak Guide
Author: Koroush Ghazi
Last Modified: September 2019
Introduction
I really enjoyed Fallout 3, so now that I've finally started playing Fallout 4, I'm happy enough with the fact that it seems to be more of the same, with upgraded graphics. I've also been tweaking Bethesda's Gamebryo/Creation engine since Morrowind back in 2002, so I'm familiar with its many quirks. Unfortunately, these days I no longer publish detailed game tweak guides (as explained here), but luckily there's a comprehensive Fallout 4 Guide which you can use to find out more about the game's settings and main tweaks.
What I want to quickly cover here are a few methods to specifically address what I consider the major visual and performance problems with the game.
The first problem has to do with jagged edges and/or blurriness in the game. It's probably the first thing you'll notice about Fallout 4 once you enter the outside game world. Depending on your settings, things will either look too jagged and will distractingly shimmer and crawl as you move around, or else everything will look overly hazy and blurry, almost cartoonishly so.
This occurs primarily because of the new deferred lighting system used in Fallout 4 - the developers have dropped support for traditional forms of Anti-Aliasing (AA) to smooth jagged edges, such as MSAA (Multi-Sample Anti-Aliasing). Instead, they only offer two forms of post-process AA: FXAA (Fast Approximate Anti-Aliasing), which is relatively basic; and TAA (Temporal Anti-Aliasing), which is more advanced. While both forms of AA have minimal performance impact, they also significantly blur the screen, making the already mediocre-looking surface textures look even worse.
The second problem relates to poor performance, primarily major FPS drops and mouse lag. Aside from general optimization issues to do with an old and somewhat quirky game engine, this occurs largely because Vertical Synchronization (VSync) is enabled by default in Fallout 4, and there are no in-game settings available to disable it.
Below I cover the solutions to these two major issues, starting with Anti-Aliasing.
Update: As of September 2019, the guide has been edited to incorporate new instructions for the latest version of ReShade, as its interface changed substantially between 2014 and 2019. I've also added a potential fix for a major problem that now confronts Fallout 4 players: long loading times in exterior/interior transitions. The updated portions are prominently noted in bold.
TAA + Sharpening
TAA is the superior Anti-Aliasing setting in Fallout 4, as it does an excellent job of addressing jagged lines on geometry and foliage, while also completely quashing shimmering in motion. So I recommend starting off with TAA selected for the Antialiasing setting in the Fallout 4 launcher. But to counter the Vaseline-like blurriness of TAA, we will use a free post-process injector utility called ReShade to apply sharpening over the TAA, rectifying the blurriness and improving texture crispness while retaining TAA's smooth edges and lack of shimmering. The screenshots below demonstrate the difference:

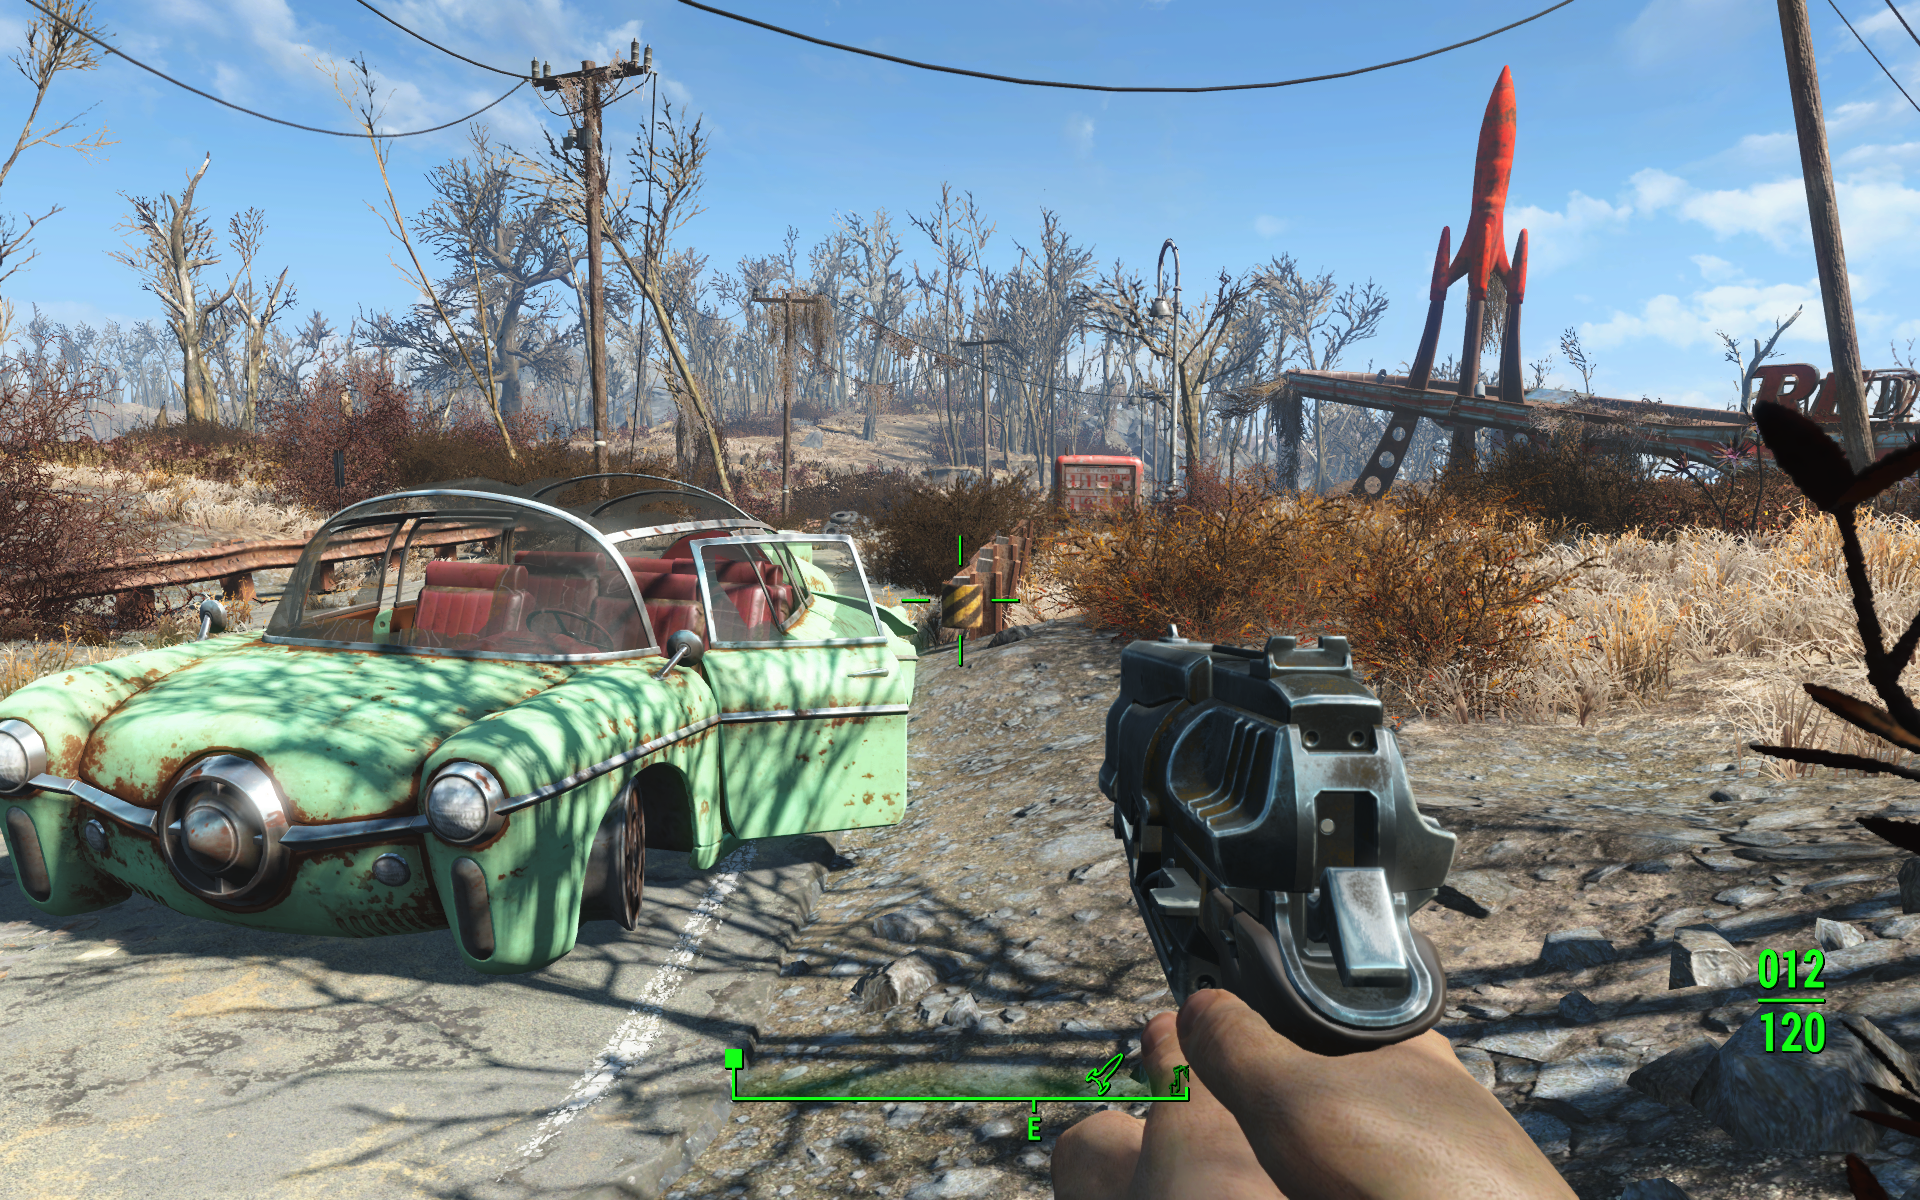
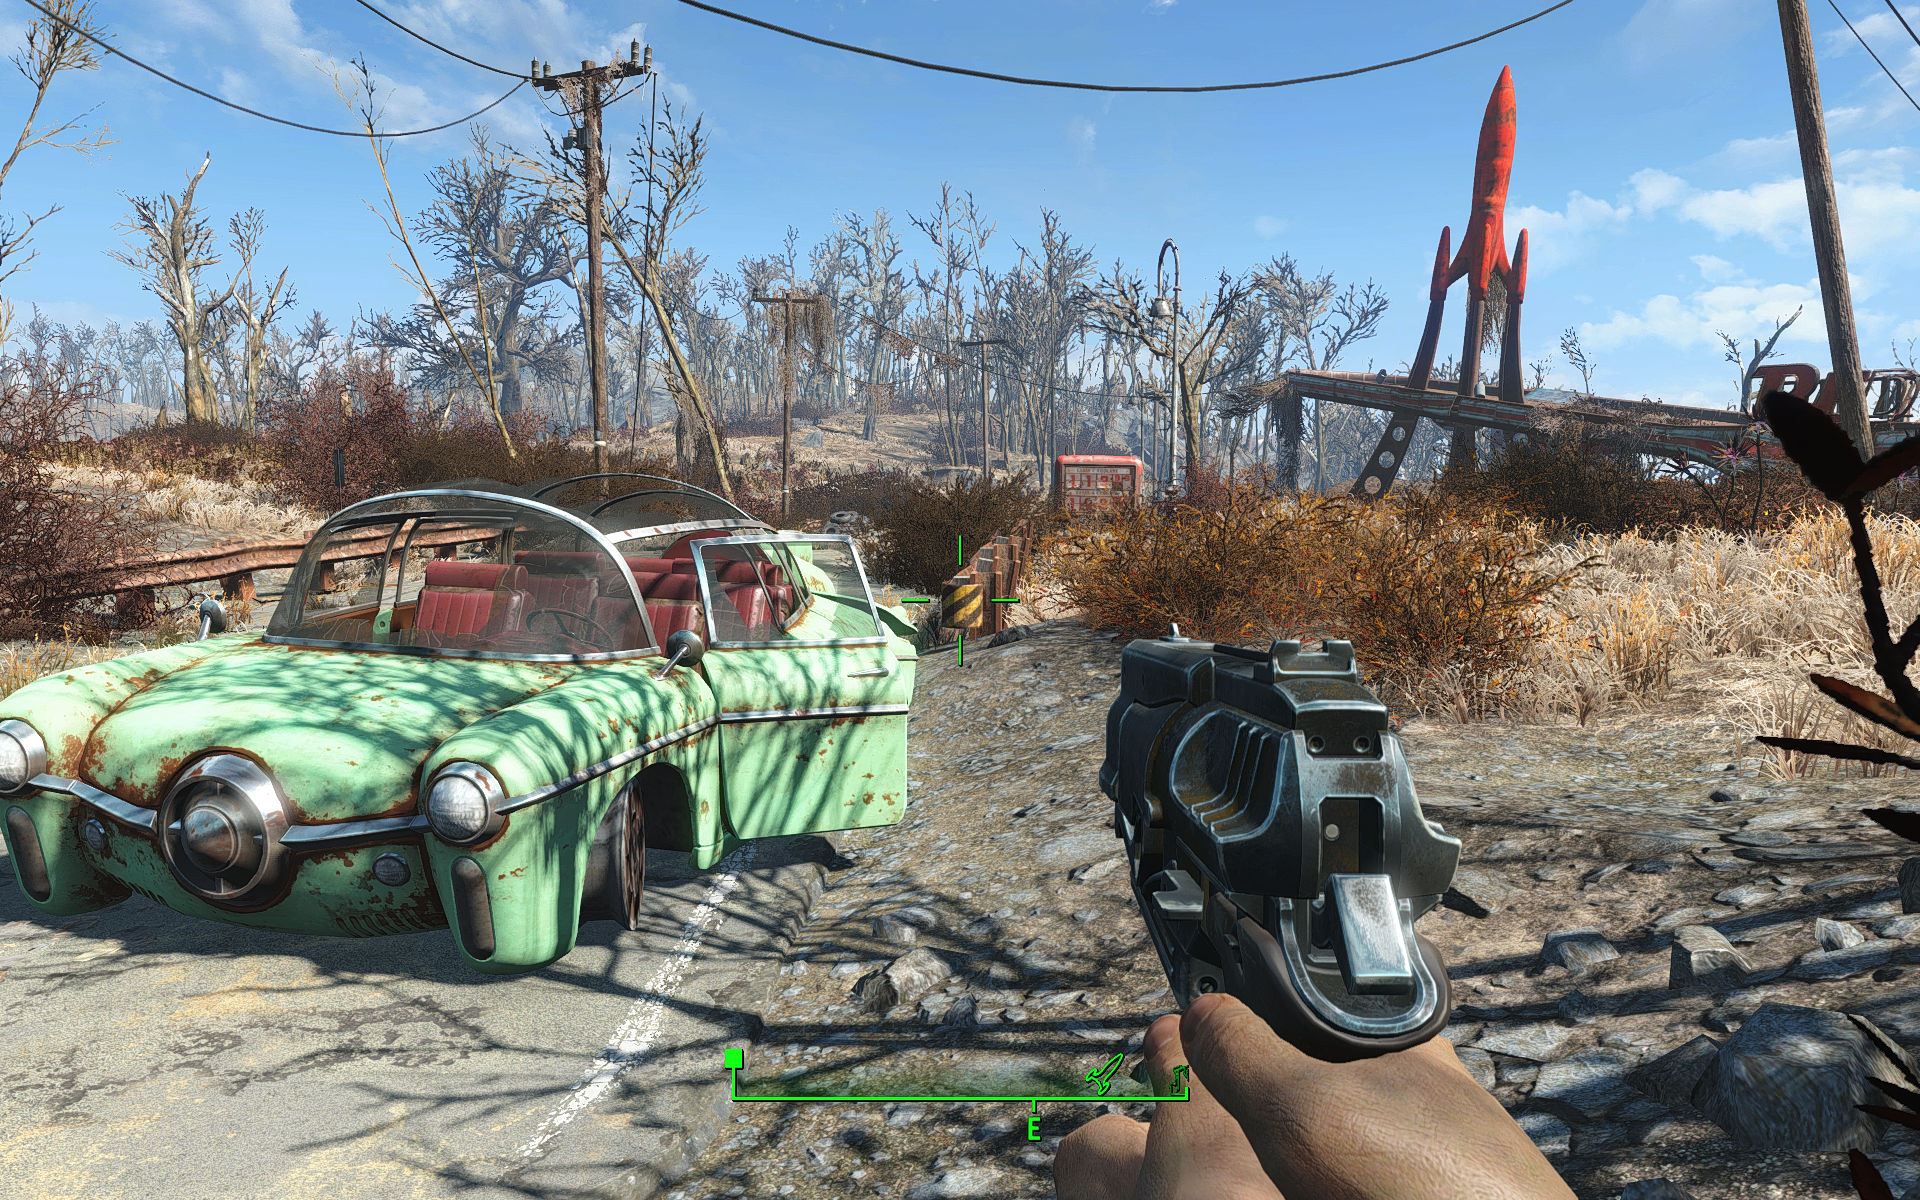
In the first screenshot, the total lack of AA provides a crisp, but overly jagged and brittle-looking game world. The second screenshot, using TAA, smooths everything out, but the foliage in particular loses a lot of definition, with bushes and branches turning into smeared clumps. The third screenshot, using TAA but with shader-injected sharpening, returns most of the definition, but also retains the smooth edges. As an added bonus, textured surfaces also become more distinct (e.g. the rust on the car, the ground near the crosshair, and the fuel prices on the sign). A small animated GIF highlighting the texture improvement from adding sharpening to TAA can be seen here.
It's important to note that screenshots can't fully capture the difference - it's much more pronounced in-game.
September 2019 Update: The instructions for using the ReShade utility have been completely updated for the latest version.
To implement TAA + sharpening in Fallout 4, follow the instructions below. These instructions for using ReShade should also apply to many other games:
1. Download the free ReShade utility to any directory on your system.
2. Launch the Reshade_setup.exe file you downloaded in step 1.
3. Click the large 'Select a game...' button, and browse to where your Fallout4.exe file resides, typically C:\Program Files (x86)\Steam\steamapps\common\Fallout 4, select Fallout4.exe and click Open.
4. When prompted to select the rendering API, click the Direct3D 10+ option at the bottom.
5. Importantly, when prompted to download a collection of standard effects, click Yes. These are the pre-defined effects that ReShade will use to implement things like sharpening.
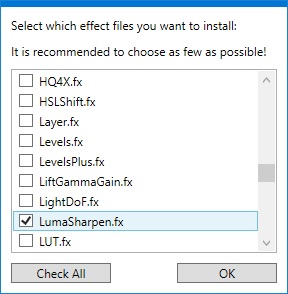
6. As the utility itself says, it's best to choose as few effects as possible; select only the ones you know you need. For the purposes of this guide, click the Uncheck All button, then scroll through the list and only tick the LumaSharpen.fx and SMAA.fx items, and click OK.
7. You can now close the ReShade utility by clicking the X at the top right corner. It doesn't need to run in the background for the Reshade effects to function in your game.
8. Launch Fallout 4 as normal, and make sure TAA is enabled in the Antialiasing setting of the launcher options before continuing.
9. As the game starts, you should see some ReShade initialization text in the top left corner of the screen. Continue from your last save as normal.
10. Press the Home key to bring up the ReShade settings. Note: if your mouse can't reach all of the interface areas, press ESC to go back into the game, then press ESC again to bring up the in-game Menu screen, then press Home, and the mouse should work properly now.
11. Go through the ReShade tutorial as prompted. When completed, go to the Settings section of ReShade and make sure you assign an unused key to the Effects Toggle function - ScrLk is recommended as it's almost always unused in games. We need to use this key in-game to toggle all ReShade effects On/Off, thus letting you see precisely what difference they make.
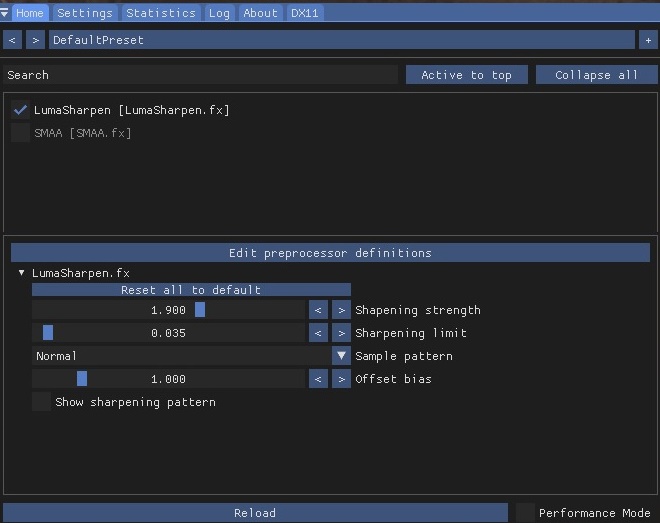
12. Under the Home section of ReShade, tick LumaSharpen. Use the Search box if you can't find it among the installed effects. At the bottom of the screen, alter the Sharpening Strength to increase (higher values) or decrease (lower values) sharpening. You'll have to guess a value to begin with, because if you've opened up ReShade while on a Menu screen it's difficult to see the change. Press ESC and ESC again to get back into the game, and press the Effects Toggle key (ScrLk) to see the precise impact of your chosen sharpening strength. I use a value of 1.90 to suit my tastes, but experiment to see what suits you.
That's pretty much it. Simply by setting a value in the ReShade interface, it's automatically saved, loaded up and applied each time you launch Fallout 4 from now on. There's no need to run the ReShade utility in the background, it's installed the necessary files in your Fallout 4 directory. To remove ReShade effects completely from this game, launch the Reshade utility as per Steps 1 & 2 above, click the big button at the top and follow the prompts.
SMAA
If you don't like TAA + Sharpening, an alternative is to use ReShade to apply SMAA (Subpixel Morphological Anti-Aliasing) instead. SMAA is less effective than TAA in reducing jaggedness and shimmering, but does not induce any blurring, and carries very little in the way of a performance hit. See the screenshots below:

The screenshots compare no AA on the left with SMAA on the right. The addition of SMAA subtly smooths out jagged geometry and foliage without any significant reduction in crispness or texture resolution. Unfortunately, when in motion, the use of SMAA doesn't completely remove distracting shimmering. Still, it may be preferable to some people over any form of TAA.
To use ReShade to apply SMAA in Fallout 4, follow steps 1-11 further above, with the exception of disabling TAA in Step 8, then substituting SMAA for Lumasharpen in Step 12.
Of course ReShade offers far more image tweaking options than the two covered above. But personally, my priority as soon as I started playing Fallout 4 was to find some practical way to balance crisp image quality with smooth Anti-Aliasing, and I believe the use of in-game TAA with ReShade sharpening achieves that extremely well. Give it a try!
If you're an Nvidia GPU owner who's really into Anti-Aliasing and want the absolute best results at the expense of a significant hit to performance, see the DSR feature on this page, and the Sparse Grid Supersampling options in Nvidia Inspector on this page, of my Nvidia GeForce Tweak Guide.
VSync-Related Performance Issues
Vertical Sync, or VSync for short, is the synchronization of your graphics card with your monitor's capability to display a certain number of whole graphics frames per second on the screen. This is known as a monitor's Refresh Rate, measured in Hz. For example, a 60Hz monitor refreshes the screen fast enough to display 60 whole frames per second (60 FPS). When VSync is enabled, the GPU becomes locked to the monitor's refresh rate, passing one whole frame to the monitor at a time, and only when it is ready to refresh. VSync is covered in detail on this page of the Gamer's Graphics & Display Settings Guide.
VSync is enabled by default on all systems in Fallout 4, and there are no in-game options to control it. The main benefit of VSync is that it prevents a graphical phenomenon known as 'tearing', which occurs any time your GPU and monitor go out of sync, and the GPU is providing more frames than the monitor can display in a refresh cycle. What winds up being displayed is two or more overlapping partial frames. If the scene is in motion, these partial frames will be slightly different from each other, and thus the scene will look like it's been horizontally torn in two and the top and bottom portions will look misaligned. A screenshot demonstrating the effect is provided here.
The other important benefit of VSync being enabled in Fallout 4 is that the game engine timing is tied to framerate. If the framerate in Fallout 4 exceeds a certain amount - generally 60 FPS - serious physics, animation and audio glitches, and game-breaking bugs, start occurring. When VSync is enabled, the maximum possible framerate becomes capped to the same value as the refresh rate. E.g. on a 60Hz monitor, the maximum possible framerate with VSync on is 60 FPS. Thus VSync prevents these glitches in Fallout 4 by capping your FPS.
Unfortunately, when VSync is enabled, it can also cause two performance issues. Firstly, whenever the framerate is lower than the refresh rate, overall performance can drop, sometimes by as much as 50%, due to a timing quirk whereby the GPU is underutilized while waiting for the next refresh cycle. Secondly, there may be noticeable mouse/input lag, due to slight delays between when a frame is rendered by the GPU and when it is displayed on the monitor.
The first step towards improving overall performance and preventing mouse lag in Fallout 4 is to disable VSync by going to your C:\Users\[Username]\Documents\My Games\Fallout4\ directory, and editing the Fallout4Prefs.ini file with a text editor such as Notepad. Open the file, and search for the following line:
iPresentInterval=1
Change the 1 to a 0 (i.e. iPresentInterval=0), then save and exit the file. Also make sure that VSync is not forced on in your graphics card's control panel. For example, in the Nvidia Control Panel under Manage 3D Settings, make sure the 'Vertical Sync' option is set to 'Use the 3D application setting'.
The next time you launch Fallout 4, VSync will be disabled. You can confirm this by using an FPS measurement utility such as FRAPS or Afterburner (both covered on this page) - your FPS in the intro and loading screens will be in the several hundreds, and you'll probably be able to hear some coil whine from your GPU. Once you start playing, you'll notice that your framerate is higher because it's no longer capped, you'll experience less performance drops, and your mouse movements will feel more responsive. On the downside, you may also start seeing some tearing.
However, as noted earlier, the game engine will run into serious problems whenever you get very high framerates. So when you disable VSync, you must cap your maximum FPS using one of the following methods:
1. Frame Rate Limiter - For AMD GPU owners, to cap your maximum framerate, use the 'Maximum Frame Rate' option in the Catalyst Control Center or the frame rate limiter in the free Rivatuner Statistics Server utility. For Nvidia GPU owners, use the 'Frame Rate Limiter' option in the free Nvidia Inspector utility - see the Nvidia Inspector section on this page for full details of how to download and configure Nvidia Inspector. In either case, it is strongly recommended that you cap your maximum framerate to 58 FPS, regardless of your monitor's refresh rate. This ensures that the game never exceeds 60 FPS in practice, and thus never glitches. Unlike VSync however, simply capping your maximum framerate does not result in a reduction in performance or mouse lag.
2. Adaptive VSync - For Nvidia GPU owners with 60Hz or 120Hz monitors only, the option to use Adaptive VSync is also available. Adaptive VSync is a hybrid form of VSync which dynamically switches VSync on or off depending upon your framerate: it automatically enables VSync whenever your framerate exceeds the refresh rate, and disables it whenever your framerate falls below the refresh rate. This caps your framerate to the refresh rate, prevents the performance drop usually associated with VSync, provides smoother framerates, and reduces input lag and tearing. However, Adaptive VSync can't completely eliminate tearing, and it may still result in some input lag, unlike option 1 above. To enable Adaptive VSync, in the Nvidia Control Panel under Manage 3D Settings, go to the 'Program Settings' tab, select the 'Fallout 4 (fallout4.exe)' profile, and go to the 'Vertical Sync' option - for a 60Hz monitor select Adaptive; for a 120Hz monitor select 'Adaptive (half refresh rate)'. This will cap your maximum framerate to 60 FPS.
If both options are available to you and you're not sure which is best, basically option 1 ensures absolutely no VSync-induced mouse lag or performance drops, but you will get tearing; option 2 minimizes tearing and also ensures there are no VSync-related performance drops, but you may still experience some mouse lag.
Long Loading Times
September 2019 Update: A major annoyance in Fallout 4 that became prominent several years after the game came out is long loading times when transitioning from interior to exterior areas, and vice versa, on some systems. This has nothing to do with poor system specs, slow drives, etc. It's a game engine quirk related to VSync. The simplest solution is to download the free Load Accelerator Mod. Extract the two files in the mod and place them in the same directory as your Fallout4.exe file. Then launch the game as normal, and it will automatically come into effect. You should see small green >->-> moving arrows at the bottom right corner of loading screens, confirming that it is working. It should reduce loading times successfully, but please read the caveats and instructions on the mod's page as it can also cause other issues or may require you to change other settings for it to work properly.
Finally, keep in mind that some performance drops in certain areas of the game are not due to VSync, but are related to the fact that the game engine may not be optimized, or you may need to lower your settings - refer to the guide linked at the top of this page. For additional tweaks, see this guide.
![]()