
Nvidia GeForce Tweak Guide
[Page 6] Nvidia Control Panel (Pt.2)
Antialiasing - Mode: This setting determines how Antialiasing is applied in games. It works in conjunction with the Antialiasing - Setting option covered further below.
There are four available options for this setting: Off, Application-Controlled, Enhance the Application Setting and Override any Application Setting. If Off is selected, the Nvidia Control Panel will attempt to forcibly disable all Antialiasing in games. If Application-Controlled is selected, no AA will be implemented via the NVCP, however each game can still use its own built-in Antialiasing settings as required. If Enhance the Application Setting is selected, firstly it will only work for a game if that game has a traditional Antialiasing setting of its own and it is enabled, and secondly you must choose a level of AA to use as an enhancement under Antialiasing - Setting (covered further below). This setting will then attempt to further improve the existing level of AA in the game. If Override any Application Setting is selected, it will ignore any AA set using the in-game settings, and instead attempt to forcibly apply the type of AA you specify under Antialiasing - Setting.
It is recommended that Antialiasing - Mode be set to Application-controlled under Global Settings. This will provide the greatest compatibility and flexibility in all games. To then force Antialiasing in individual games, switch to the settings found in that game's profile under the Program Settings tab. It is always preferable to use the game's own AA settings if any exist, as a game's built-in AA methods are the most compatible and hence the most likely to work as intended. If there are no in-game AA settings, then you can use the Override any Application Setting option, and attempt to force a particular type of AA on the game. However, this will often fail to work in modern games, as the rendering method used in many games is incompatible with common AA methods such as MSAA. If a game has built-in traditional (i.e. MSAA or SSAA-based, not shader-based) Antialiasing settings, then by enabling one of those and selecting Enhance the Application Setting option and choosing an AA level, you stand the greatest chance of improving the overall Antialiasing used in the game.
If the above seems confusing, that's because forcing AA via the graphics driver is a hit-and-miss affair requiring experimentation for each game, and will often fail to work. The key issue is compatibility: forced AA will only work if the type of AA being used doesn't conflict with the game's rendering method and/or matches the type of AA already implemented in the game. That's why using the Enhance the Application Setting option is more likely to succeed than using the Override any Application Setting option, because the driver can more readily determine how to enhance an existing implementation of AA in a game. Even then it's only really likely to work in games that have an MSAA implementation.
Antialiasing - Setting: Here you can select the type and level of Antialiasing to attempt to forcibly apply to a game if the Enhance the Application Setting or Override any Application Setting options are chosen in the Antialiasing - Modes setting as covered above.
The available options for this setting will differ depending upon your particular GPU, and the version of the GeForce drivers you are using. The most basic options that all users should see are: Application-controlled, 2x, 4x and 8x. If Application-controlled is selected here, no AA will be implemented via the NVCP, even if you've set the Antialiasing - Mode setting to Enhance the Application Setting or Override any Application Setting; each game can still use its own built-in Antialiasing settings as required. If a sample rate of 2x, 4x or 8x is selected here in conjunction with the enhance or override options in the Antialiasing - Mode setting, then the NVCP will attempt to force 2x Multi-Sample Antialiasing (MSAA), 4x MSAA or 8x MSAA as relevant. Higher sample rates provide progressively smoother image quality results at the cost of significantly larger drops in overall performance. As noted, depending on your GPU and driver version, you may also see higher sample rates and additionall AA modes available here.
As discussed earlier, attempting to force MSAA, or AA methods based on MSAA, such as Coverage Sampling Antialiasing (CSAA) or Multi-Frame Sampled Antialiasing (MFAA), will only work for some games. Primarily, forcing MSAA or CSAA is best suited to older DirectX 9 games, or modern games with built-in MSAA settings, which can then be enhanced via the NVCP. In most other cases, modern game engines use rendering techniques that are completely incompatible with MSAA-based methods. So if you still wish to attempt to force AA on such games, you will need to use Supersampling-based AA methods such as Sparse Grid Supersampling AA (SGSSAA) via the Nvidia Inspector utility (covered in the Advanced Tweaking section); shader-based methods such as FXAA (covered further above) or Subpixel Morphological Antialiasing (SMAA); or, for a relatively foolproof but performance intensive AA method that will work in all games, use the Dynamic Super Resolution (DSR) feature, covered further below.
I recommend that the Antialiasing - Setting option be set to Application-controlled under Global Settings, and only set to a particular sample rate under the Program Settings tab for games which already support that type of AA. Importantly, the Antialiasing - Mode setting must be set to Enhance the Application Setting or Override any Application Setting for this setting to have any impact.
Antialiasing - Transparency: To represent lots of small objects, such as leaves on trees or blades of grass in a field, game developers often use textures with transparent portions, also known as Alpha Textures, instead of rendering each small object as a unique set of polygons. The classic example is leaves on a tree branch: rather than making each leaf an individually rendered complex object, a group of leaves are drawn as a single texture with a transparency effect around each leaf. This is much more efficient in terms of reducing processing load, but it also causes problems - traditional Antialiasing such as standard MSAA can't address the jaggedness and shimmering of the objects drawn within alpha textures. Therefore, this setting exists to specifically address the appearance of jaggedness on transparent textures, such as leaves, grass, chain-link fences, small windows, shiny edges on glassy or metallic objects, and so on.
The available options for this setting are Off, Multisample, 2x (supersample), 4x (supersample) and 8x (supersample). When set to Off, no additional Transparency Antialiasing (TRAA) is applied to any game via the NVCP, but this doesn't prevent a game from applying its own built-in methods (if any exist). If set to Multisample, the graphics driver will augment MSAA such that it also subtly smooths out alpha textures at a reasonably low performance cost. If set to Supersample, jagged edges within alpha textures are more noticeably smoothed, with higher sample rates providing progressively better results but also a much greater performance hit.
Importantly, this setting is reliant on a standard form of Antialiasing (typically MSAA) first being applied, either within the game itself, or forced via the Antialiasing - Setting option in the NVCP, otherwise it will have no impact. Equally, the sample rate of standard AA being applied should match the sample rate of TRAA you are attempting to use. For example, if you're using 4x MSAA in a game for standard Antialiasing, then you should select either the general Multisample option, or the 4x (supersample) option for the Antialiasing - Transparency setting to match.
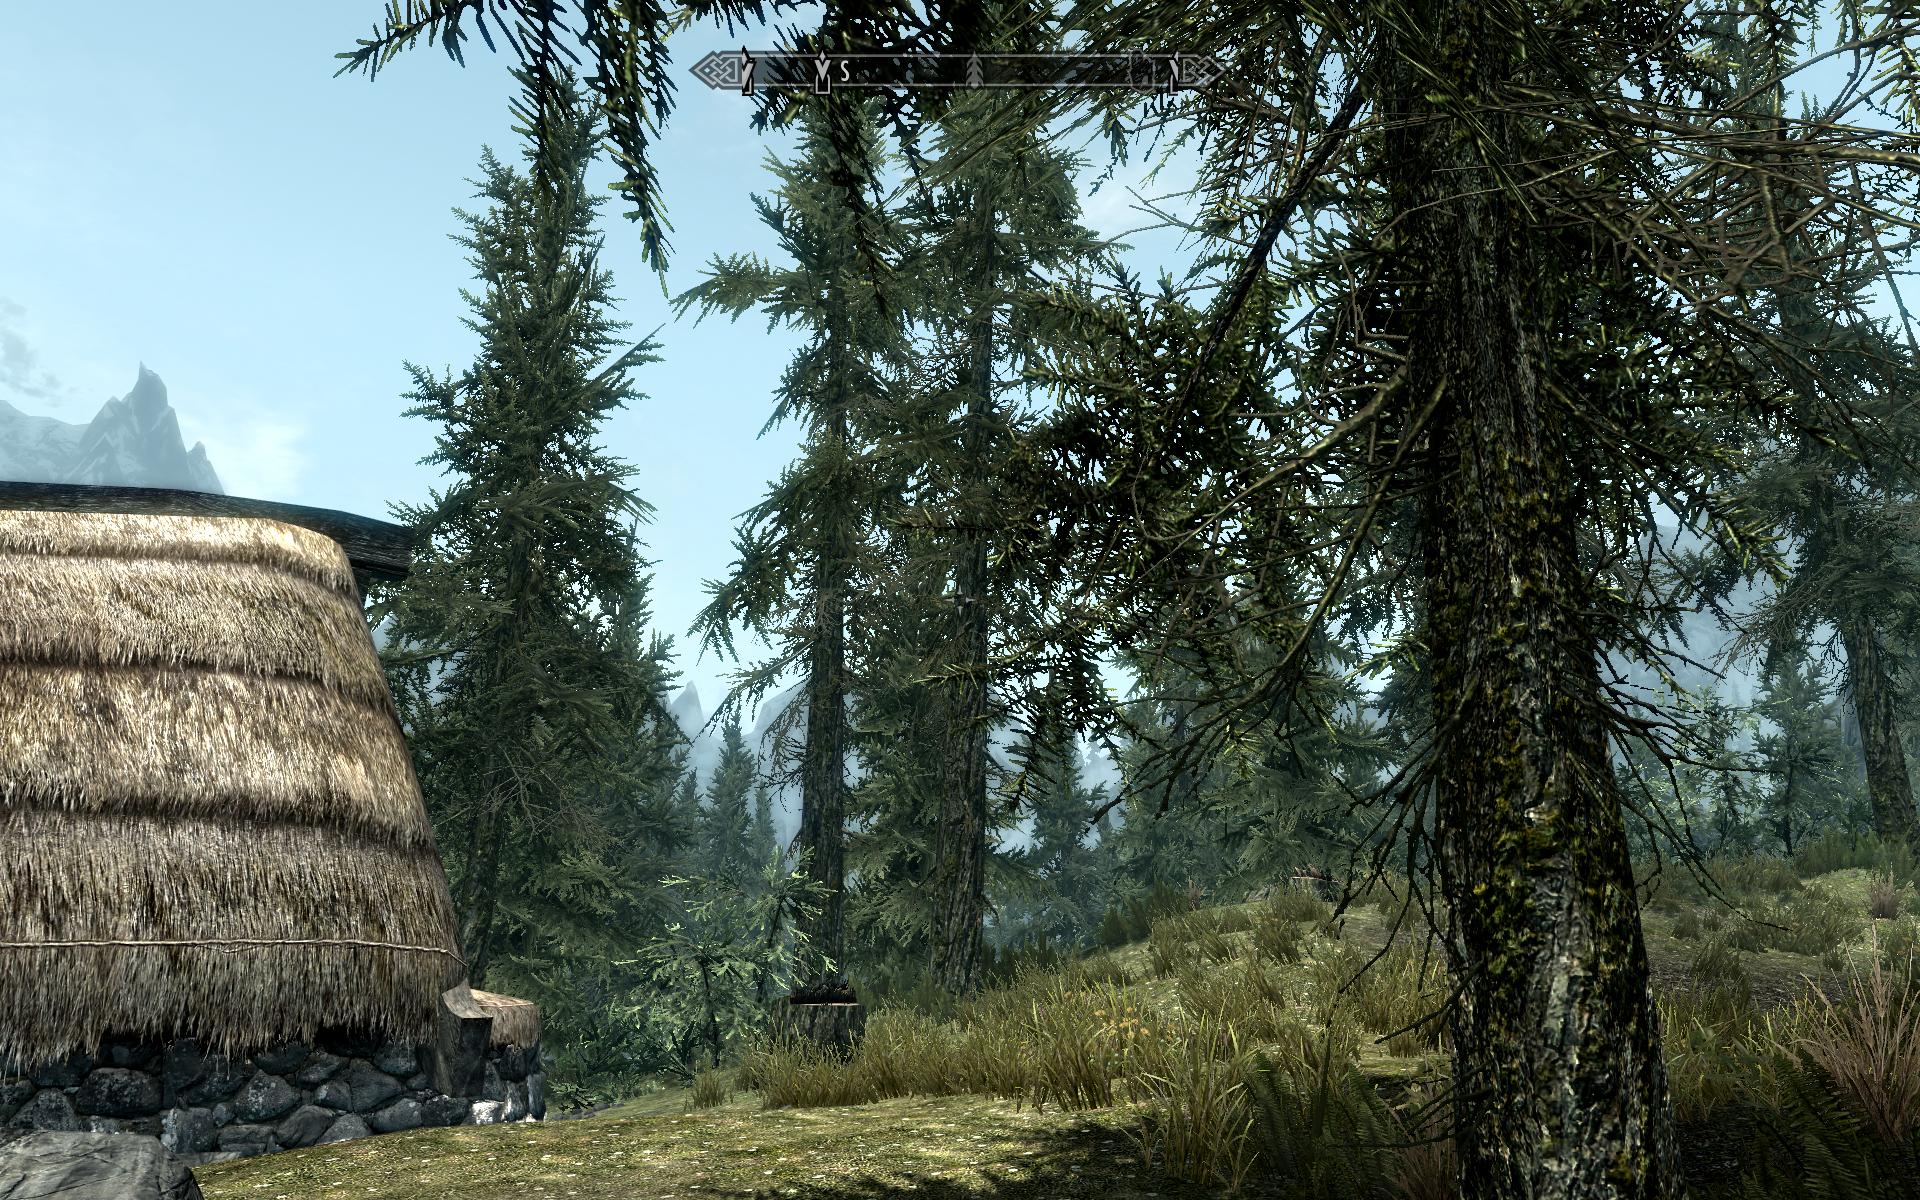
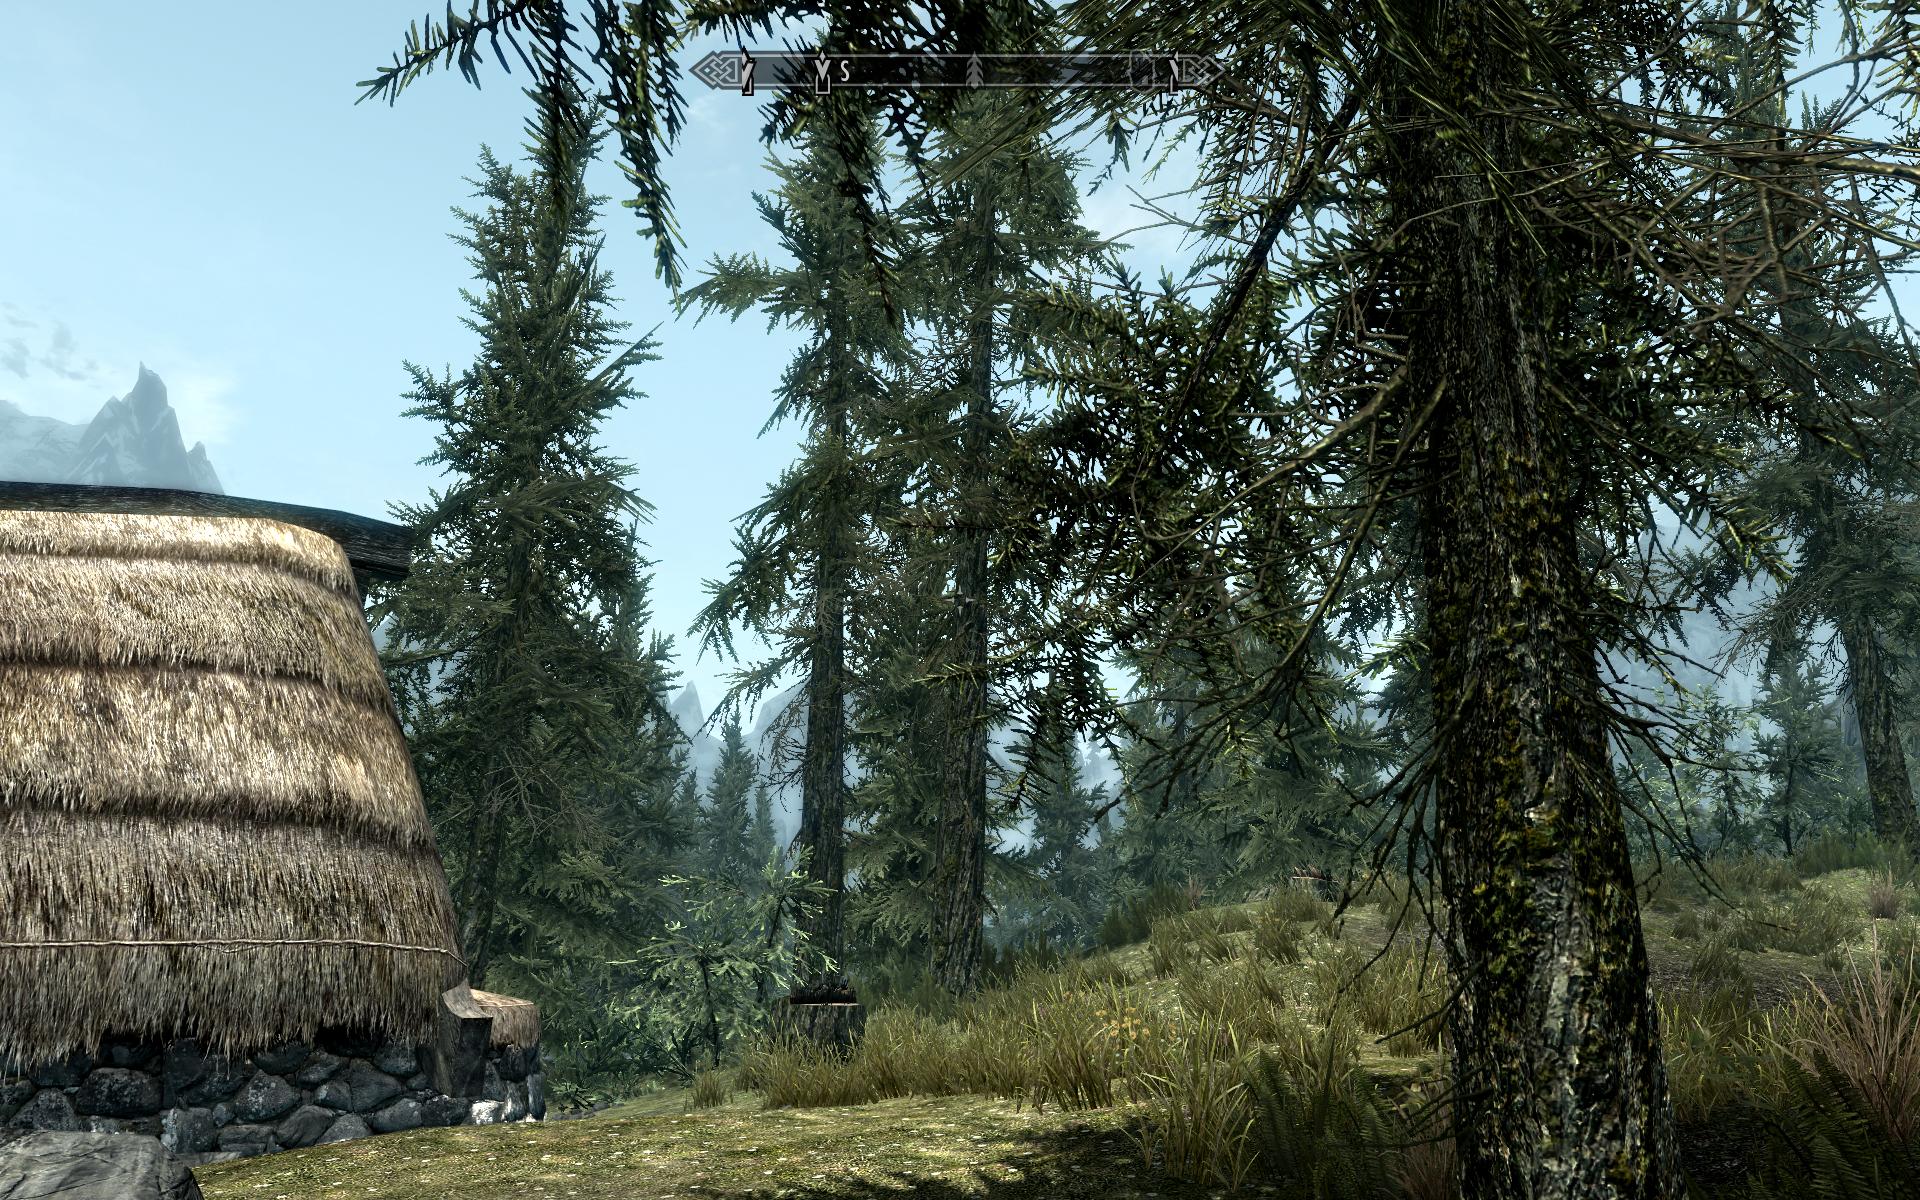
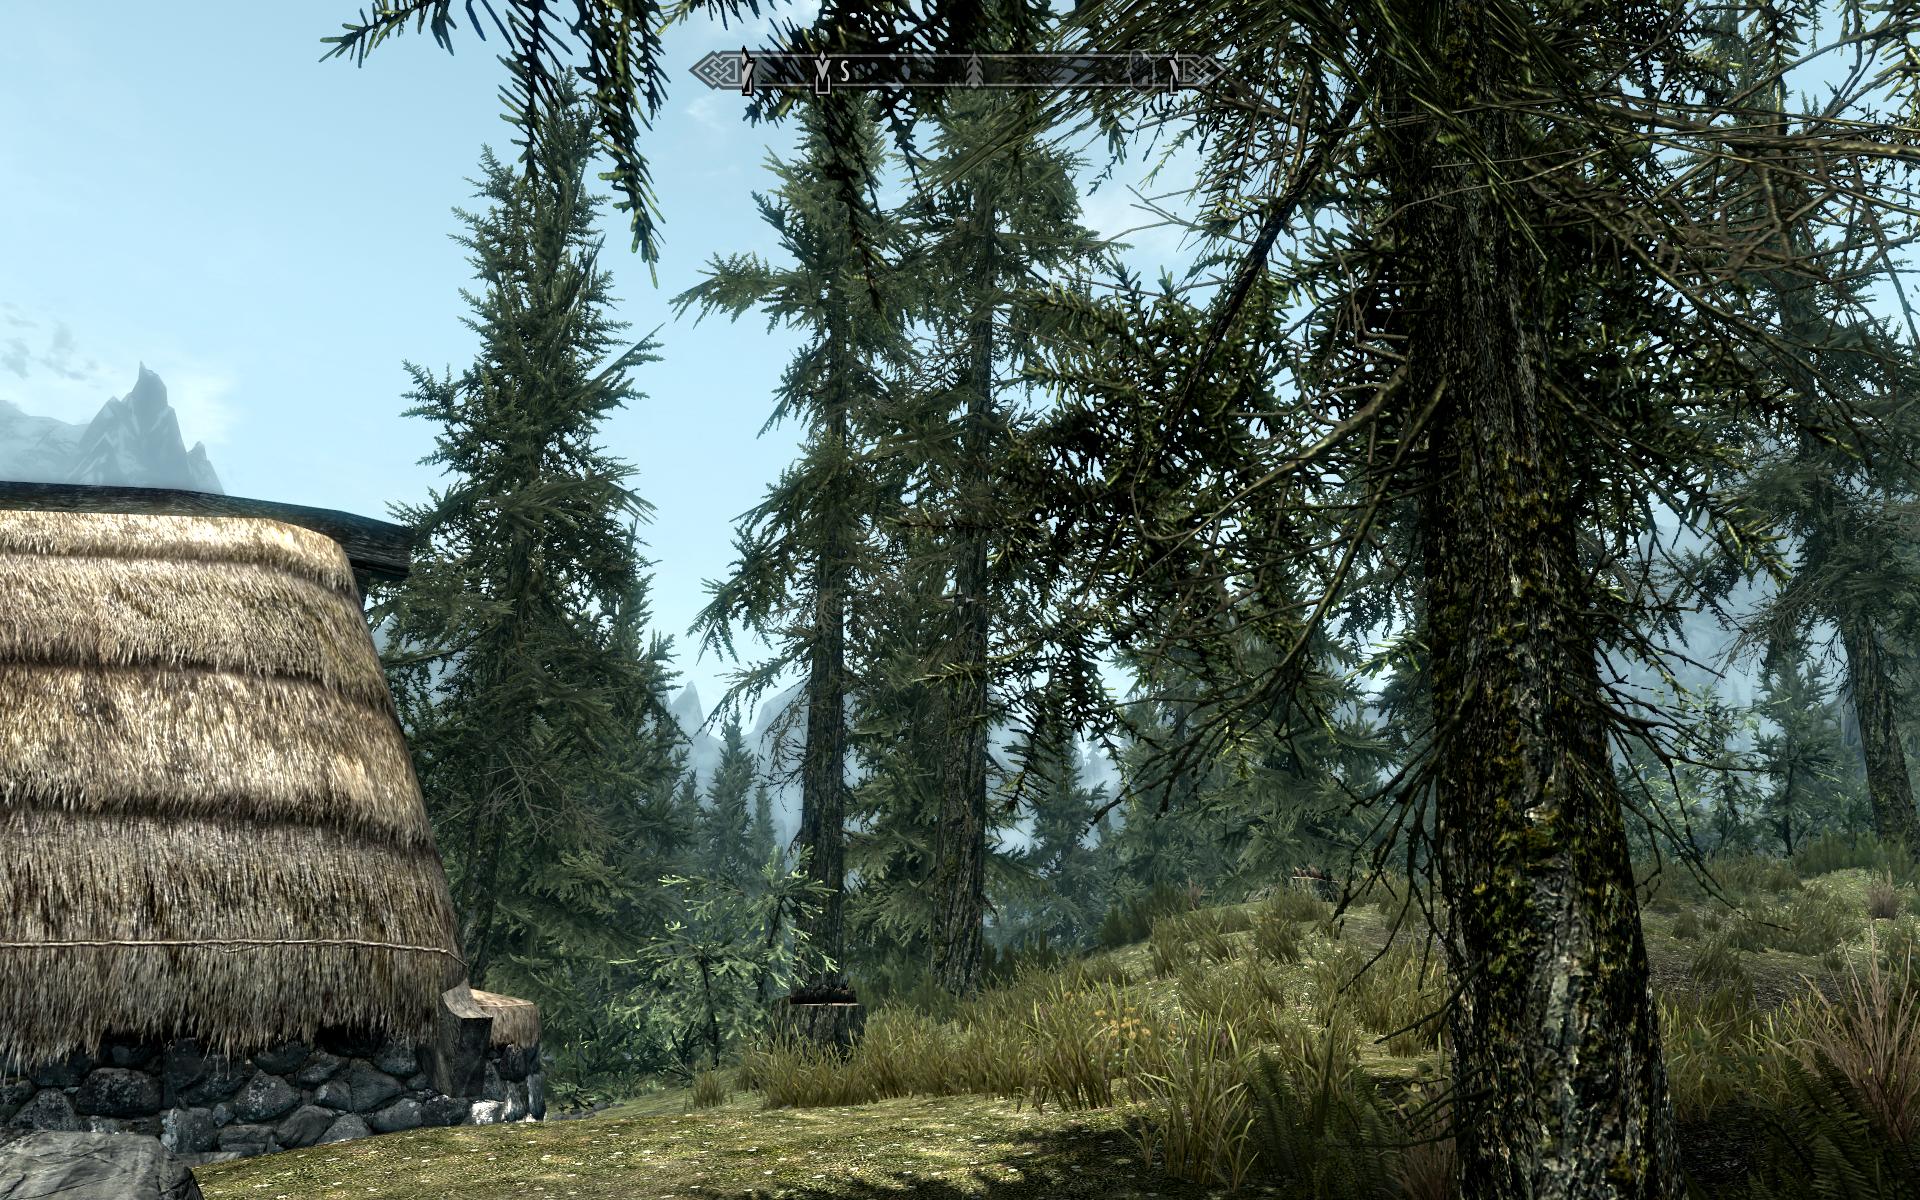
The screenshot comparison above demonstrates a scene with alpha textures in the form of pine trees and tufts of grass. The first screenshot is using 8x MSAA applied via in-game settings, but no TRAA, which means that foliage outlines remain quite jagged; the second screenshot shows the subtle improvement to jaggedness on the trees and grass when Antialiasing - Transparency is set to Multisample; the third screenshot shows the more significant smoothness resulting from it being set to 8x (supersample) instead. Even then, static screenshots can't really demonstrate the noticeable reduction in the distracting movement of jagged lines (shimmering) which would otherwise occur when moving around the game world.
It is recommended that Antialiasing - Transparency be set to Off in the Global Settings, as otherwise it will cause performance and/or compatibility issues in most games. Instead, where supported with working standard (MSAA-based) Antialiasing, TRAA can be enabled for specific games under the Program Settings tab. Keep in mind that where TRAA is not supported by a particular game, shader-based AA methods such as FXAA and SMAA, and Supersampling-based AA methods such as SGSSAA and DSR are compatible with most games, and also work in reducing aliasing on transparent textures.
Further discussion of the various AA types and how to apply them, including successfully forcing Antialiasing in unsupported games using the Nvidia Inspector utility, is provided in the Advanced Tweaking section of this guide. On their own, the various Antialiasing settings in the standard Nvidia Control Panel do not provide sufficient options to properly apply working AA in most modern games, which is why it is necessary to learn about the third party alternatives if you're genuinely interested in forcing AA in your games.
CUDA - GPUs: Compute Unified Device Architecture (CUDA) is a parallel computing architecture developed by Nvidia and designed to allow software to utilize the power of a GPU for general computing tasks, not just graphics. For gaming purposes, components such as PhysX physics simulations or AI processing can be GPU accelerated using CUDA to improve performance. This setting allows you to select which Nvidia GPU(s) on your system are allowed to be used as a CUDA processor.
It is recommended that CUDA - GPUs be set to All on single GPU and multi-GPU systems under Global Settings. This will allow the driver to determine how to use your GPU(s) for CUDA processing, which should be optimal. If you wish to experiment, on SLI systems you can set specific games to use a particular GPU for CUDA processing under the Program Settings tab, such as by forcing CUDA onto an underutilized GPU. Finally, you can completely disable CUDA support by unticking all available GPU(s), but this is not recommended unless troubleshooting a CUDA-specific problem. Note that disabling CUDA support also disables GPU accelerated PhysX - see the PhysX setting later in the guide.
DSR - Factors: Dynamic Super Resolution (DSR) is a feature that allows you to render a game at a higher resolution than your monitor's native resolution (its maximum supported resolution), and then rescales the resulting higher resolution image back down to match your native resolution, so it can be displayed on your monitor. Basically, DSR simplifies a traditional technique commonly known as Downsampling, and is also much the same as basic (Ordered Grid) Supersampling. It's essentially a "brute force" method of Antialiasing by taking more pixel samples of everything in a scene, giving smoother edges on all objects, even transparent textures. Unlike normal Antialiasing however, DSR works with every game, new or old. DSR can also improve the clarity of textures, shadows and shader effects to a certain extent.
The procedure to use DSR in a game is as follows:
1. Tick the higher resolution(s) you wish to use in a game under the DSR - Factors setting. The resolutions are provided as multiples of your native resolution. For example, if your monitor's native resolution is 1920x1080, then ticking the 4.00x (native resolution) box will enable support for 3840x2160 resolution in your game. Notice that 4.00x native resolution actually equals 2x the width and 2x the height, not 4x width and 4x height, which gives 4x the total number of pixels: 1920x1080=2,073,600 pixels, 3840x2160=8,294,400 pixels, and 8,294,400/2,073,600 = 4. If you're not sure which particular DSR resolution will result from your selection, or which will work best, tick as many boxes as you wish; this will simply tell the game to allow those resolutions to be available as options in the in-game Resolution setting.
2. Select a level of smoothing to apply to the rescaled image using the DSR - Smoothness setting, as covered further below in more detail. If in doubt, leave it at the default of 33%.
3. Launch the game as normal.
4. Go to the game's settings screen and select the Resolution setting. Additional resolutions higher than your native resolution should now be available to be selected. How many additional resolutions, and the precise resolutions shown, depend on your monitor's native resolution and which boxes you ticked under the DSR - Factors setting in Step 1 above.
5. Upon selecting the new DSR-derived resolution in the game and applying it, DSR is now in effect.
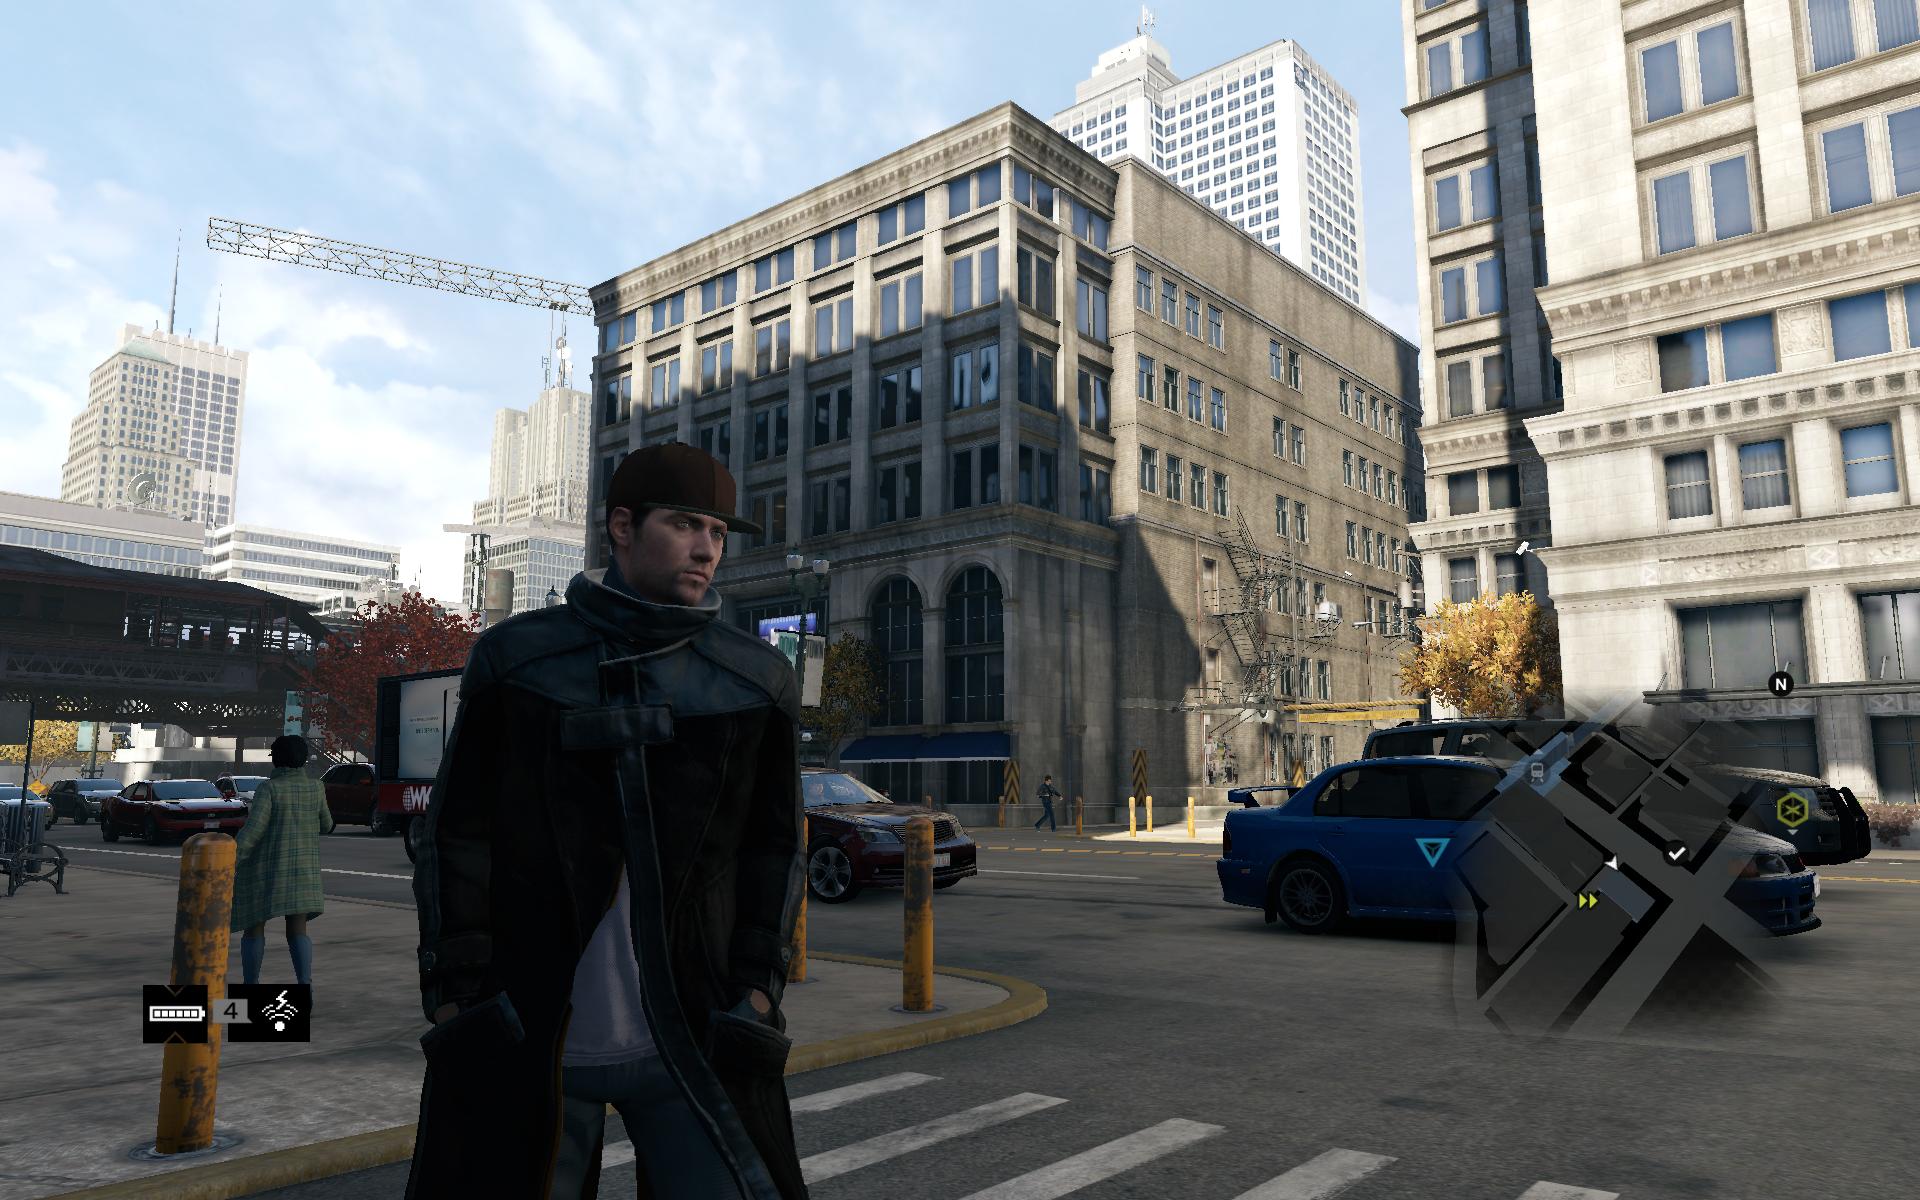
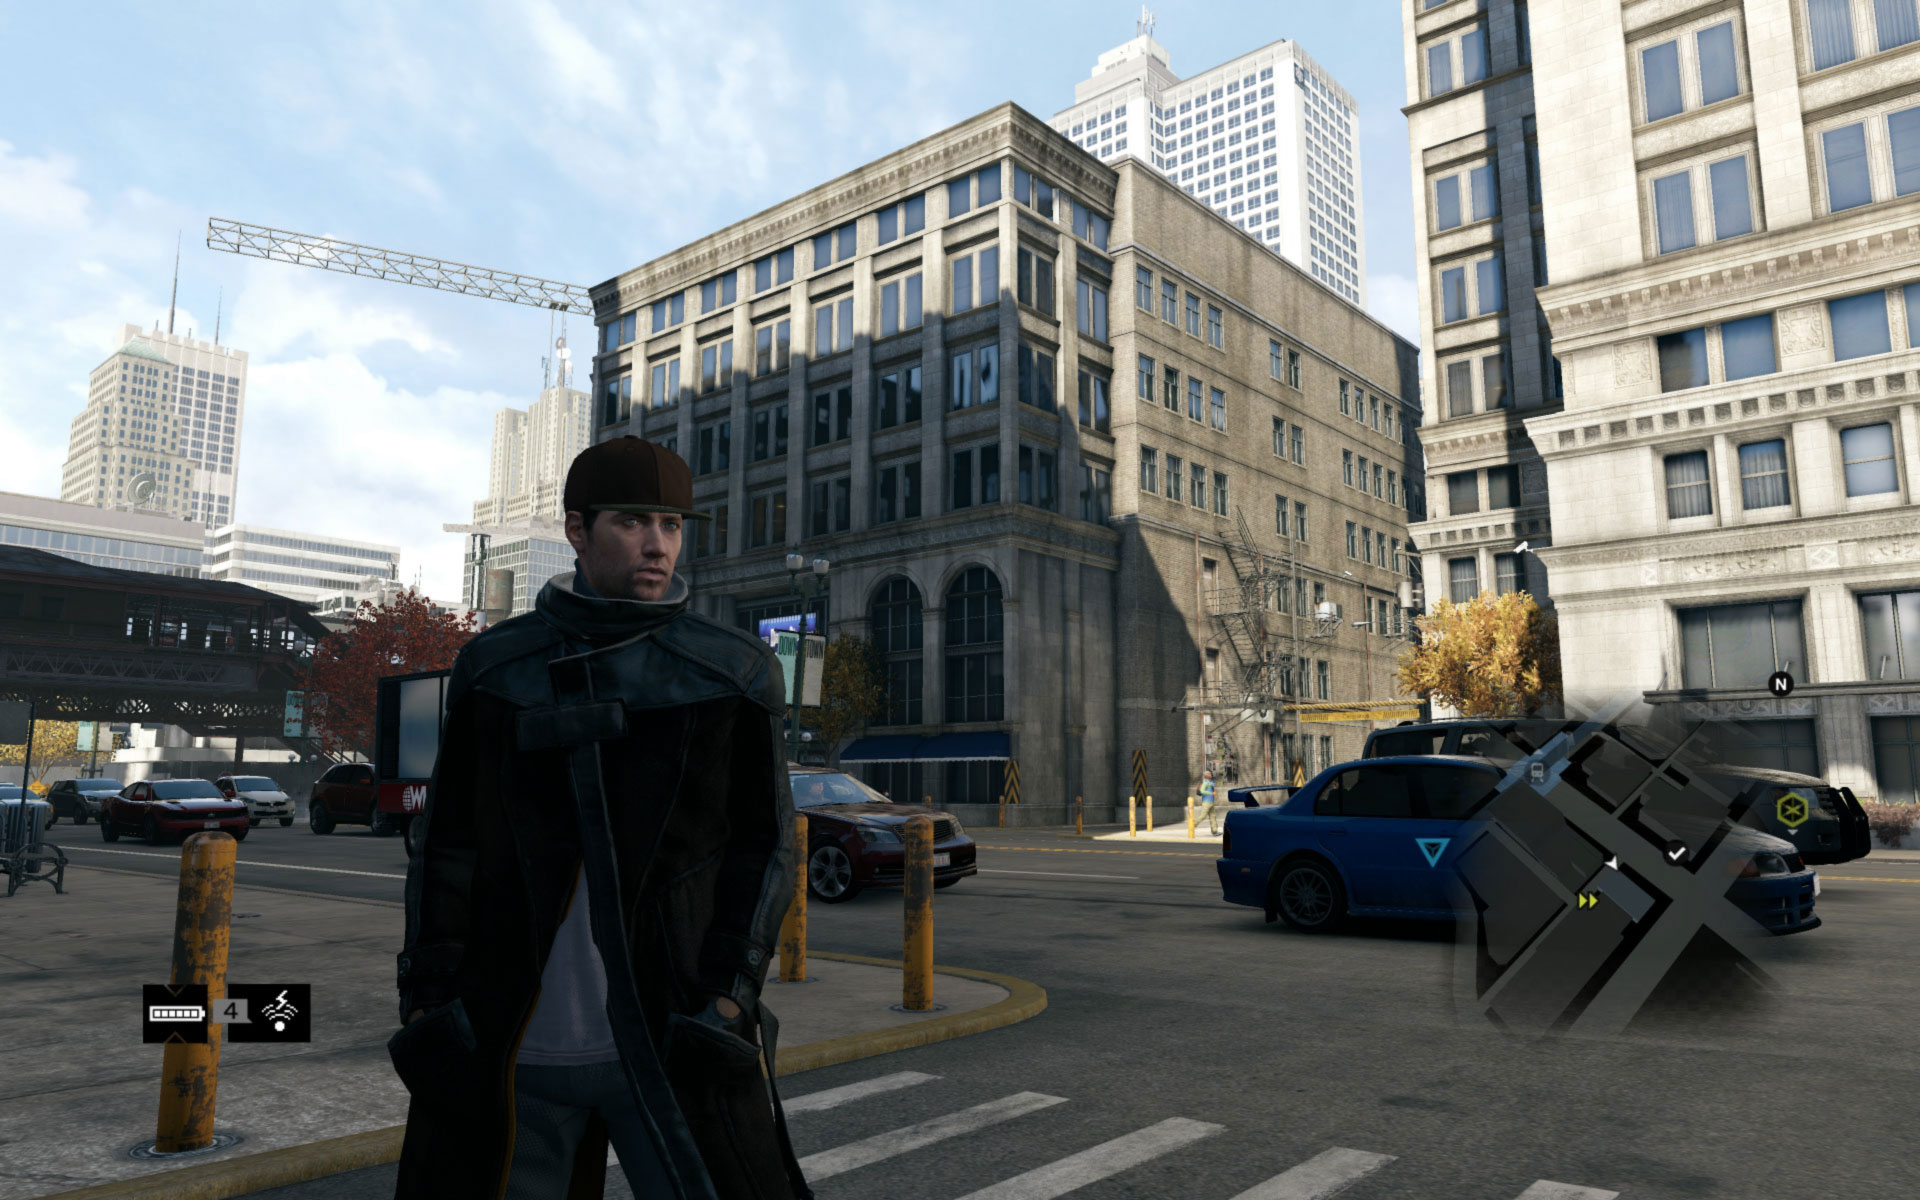
A screenshot comparison is provided above, but note that this is a simulated screenshot of DSR. The reason is that software capture tools can't grab a proper screenshot of DSR; all you get is the original image at its higher resolution prior to any DSR-based downscaling and filtering. It requires a hardware capture device to properly grab a DSR screen as it is sent to the monitor. So in this case I've downscaled and suitably Gaussian blurred a 4.00x resolution screenshot to give a result which is extremely close to that which I saw on my screen when 4.00x DSR with default 33% smoothing was used in the game. For completely accurate DSR screenshots, refer to this article.
In any case, while not perfectly accurate, the screenshot comparison above is still useful for readily highlighting some important differences which can result from DSR. The biggest change is that the jaggedness, most visible on the crane to the top left, the fire escape on the wall to the right, and around the windows above the fire escape, has been significantly reduced. Additional benefits include slightly improved textures, such as the surface of the sidewalk immediately to the left of the character, as well as subtle improvements in shadowing. All of these benefits derive from the fact that a DSR scene contains more pixel samples of the original 3D image due to having originally been rendered at a higher resolution before being downsampled. How much better the image looks will depend on the DSR resolution used. There will of course be some blurring from the DSR filtering applied during rescaling, controlled by the DSR - Smoothness setting. Another potentially undesirable side-effect of running at a higher resolution via DSR is that interface elements such as the HUD, in-game text and menus may be smaller, sometimes too small. The degree to which the interface elements shrink, if at all, depends on how well the game supports higher resolutions.
Using DSR will have a significant performance impact at progressively higher resolutions, as the GPU is processing much more data, and also using larger amounts of Video RAM to store this data. As an Antialiasing method, DSR is best used in games with few or no built-in AA options, particularly older games where the performance impact of DSR is less noticeable. An additional benefit of DSR is that it can be combined with any other form of Antialiasing - for example, you can combine a moderate DSR resolution with FXAA, SMAA or 2x MSAA to achieve a much smoother overall image than simply using traditional AA on its own.
It is recommended that the DSR - Factors setting be set to Off (all boxes unticked) under Global Settings initially until you wish to use it. Note that DSR is only supported on GTX 400 and newer GPUs, and only on systems running a monitor with a native resolution lower than 4K (i.e. lower than 3840x2160).
DSR - Smoothness: This setting comes into effect when the DSR - Factors setting, covered above, is enabled. It provides a 0 - 100% slider which controls the intensity of the Gaussian filter applied to the DSR image. The reason this filter is applied is because whenever an image is downscaled during the DSR process, the graphics driver has to calculate how best to blend/fit a larger number of pixels into a smaller number of pixels without creating too many artifacts (unintended image quirks). This is one of the major drawbacks of downsampling, and there are various interpolation methods used to combat it. DSR's 13-tap Gaussian filter attempts to offset any image artifacts from rescaling, and largely succeeds, at the cost of some blurring. This setting exists precisely so that you can choose a level of filtering/blur in each game that suits your taste. There is no noticeable performance impact from changing this setting.
As noted further above, DSR cannot be captured in screenshots without appropriate hardware tools, so for an accurate set of screenshots demonstrating the different levels of DSR Smoothness, refer to this article. Basically, while 0% on the slider will remove blurring and provide crisp images, it also results in a somewhat harsh image with distracting aliasing and shimmering; conversely, as we get close to 100% on the slider, the image will look far too blurry and lose too much detail to be acceptable to most people. The default of 33% is not too bad, but some people will still find that a little too blurry. I suggest experimenting to see what suits your tastes - I prefer 20% for most games.
It is recommended that DSR - Smoothness initially be set to Off in the Global Settings, and whenever DSR is enabled, adjusted as required. The optimal level of smoothness will vary based on a combination of the DSR resolution being used, the game, and individual taste.
If you're interested in other methods of downsampling, you can use the free but somewhat complex GeDoSaTo (Generic DownSampling Tool) which provides many more options than DSR. It won't be covered in more detail in this guide; for most users who want to downsample, DSR is the simplest and thus recommended method.
The next page continues the descriptions of Nvidia Control Panel settings.
|
|