
Nvidia GeForce Tweak Guide
[Page 5] Nvidia Control Panel
This section covers the Nvidia Control Panel (NVCP), which is the central location for configuring the GeForce driver settings for your GPU. The Nvidia Control Panel is automatically installed as part of the mandatory Nvidia Graphics Driver component of the GeForce driver package, covered on the previous page.
There are four ways to launch the Nvidia Control Panel:
If the Nvidia Control Panel won't open when launched, open the Services utility (Start>Services.msc) and make sure the 'Nvidia Display Driver Service' is set to Automatic or Manual, not Disabled. See the Advanced Tweaking section for more details. If the Nvidia Control Panel is missing important files, giving errors, or otherwise behaving strangely, do a clean installation as covered on Page 3, then download and install the latest GeForce driver package.
To prevent this guide from becoming overwhelmingly lengthy, only the 3D Settings section of the Nvidia Control Panel is covered in detail below. I consider this the most critical section of the NVCP, containing the key settings that apply to every Nvidia GPU user, providing the greatest control over performance and image quality in games. Settings specifically related to less common configurations (e.g. 3D Vision and Virtual Reality, Surround and multiple displays), as well as the more common multi-GPU SLI settings and features, have been omitted because I personally don't use or have access to such configurations for testing purposes. Apologies to readers who use these configurations.
3D Settings
This is the main section for configuring important graphics and performance-related settings on your Nvidia GPU. There are three major sub-components here: Adjust Image Settings With Preview; Manage 3D Settings; and Configure Surround, PhysX. These are detailed over this and the next three pages.
Adjust Image Settings With Preview
Here you can set the overall manner in which your GPU determines which settings to use:
Let the 3D Application Decide: Selecting this essentially disables the impact of any Nvidia Control Panel settings on games. Only settings you actually select in a game will be in effect. This is not recommended, as it reduces your ability to enhance and further control game graphics quality and performance via the NVCP.
Use the Advanced 3D Image Settings: This is the recommended setting, as it allows the NVCP settings to override/enhance games, and gives you a great many options to do so via the Manage 3D Settings section of the NVCP, as covered further below.
Use my preference emphasizing: This setting is not recommended. Selecting this option allows you to use a slider to adjust the NVCP settings that are automatically applied to all games, as shown in the following table:
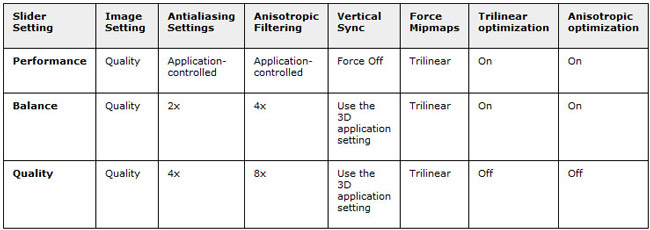
So for example, if you select the Quality option on the slider and click Apply, it will automatically change your NVCP settings such that it will globally force 4x Anti-aliasing and 8x Anisotropic Filtering, as well as general texture filtering changes, on every game you play. This is clearly not optimal under all circumstances, often resulting in lower image quality and/or lower performance than desired in various games.
It is strongly recommended that you select the 'Use the Advanced 3D Image Settings' option here and then proceed to the Manage 3D Settings section of the NVCP to customize each setting as necessary.
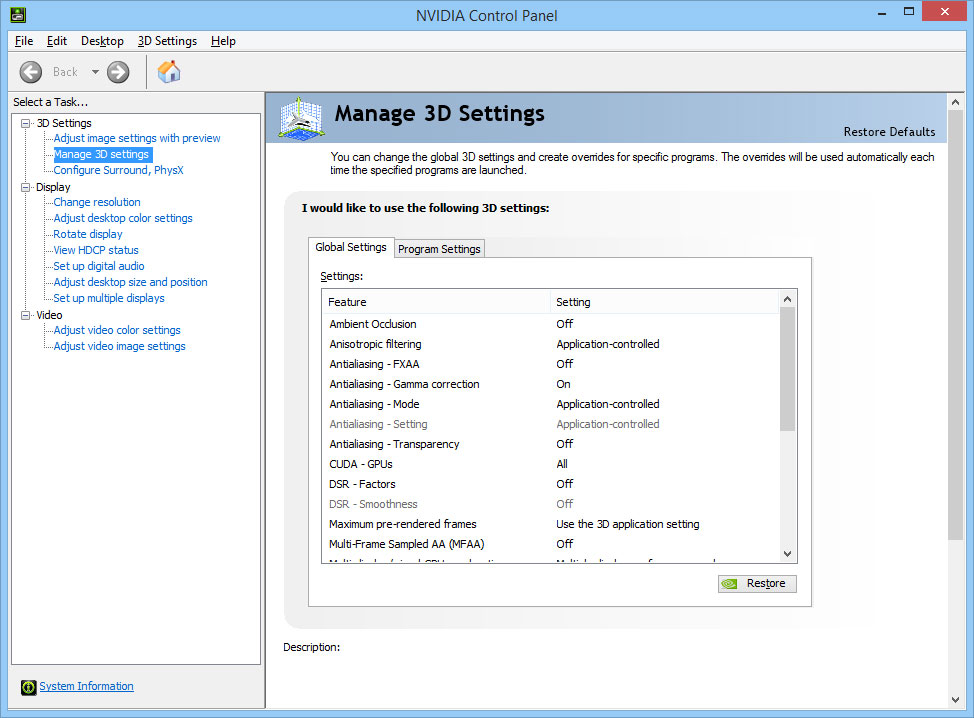
Manage 3D Settings
This section displays a range of graphics settings grouped under a Global Settings tab, and the same settings displayed again under a Program Settings tab. The simple distinction is that any setting you change under Global Settings applies to all games and other 3D applications on your system, while those you change under Program Settings only apply to the specific game or program you select in the drop-down box at the top. Note that if you can't find the name of a game installed on your system under the Program Settings tab, untick the Show Only Programs Found On This Computer box and manually scroll through the list of game titles in the drop-down box. Alternatively, click the Add button and select from the list displayed, or click Browse and navigate to the main executable file for the game you wish to add as a profile under Program Settings.
Each setting found under the Global Settings tab is covered in detail below:
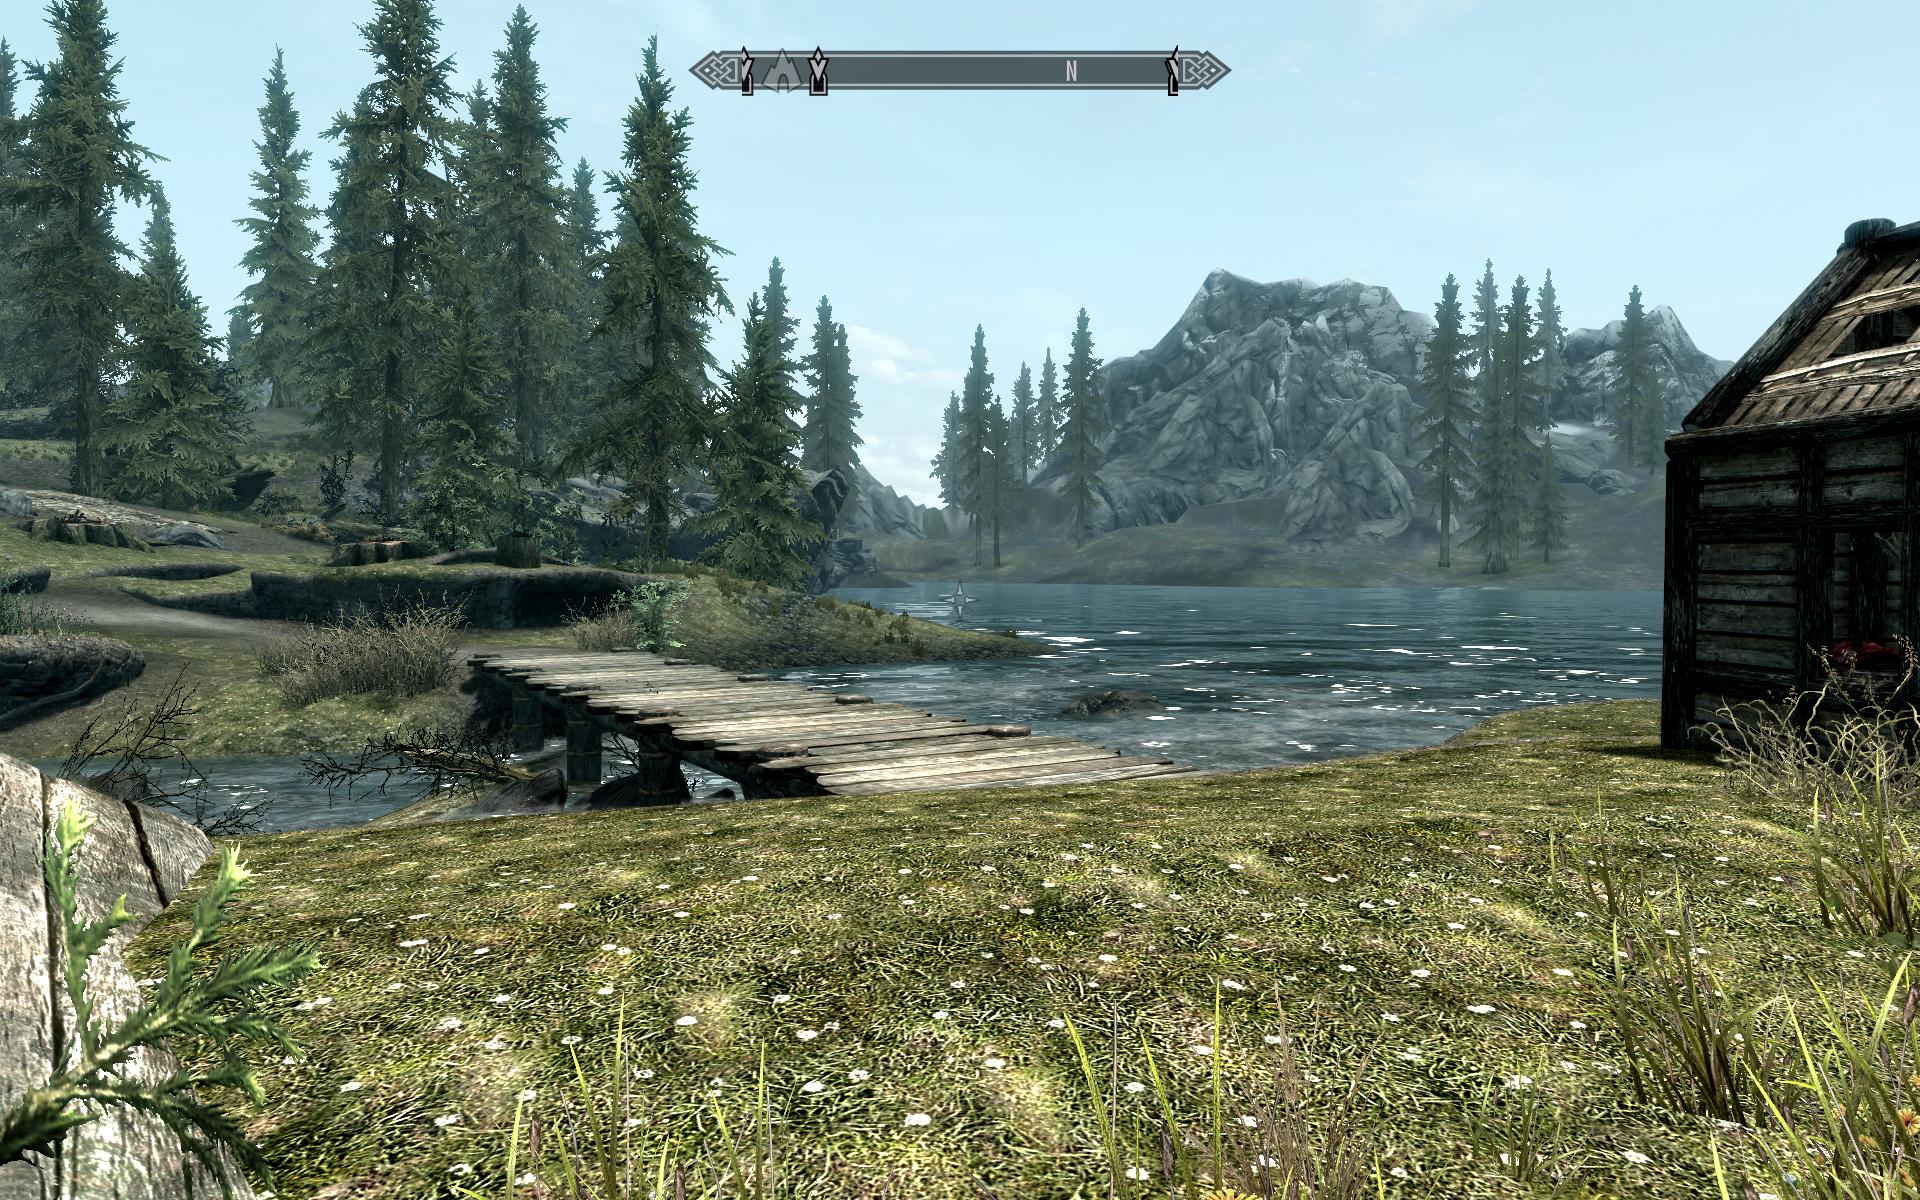
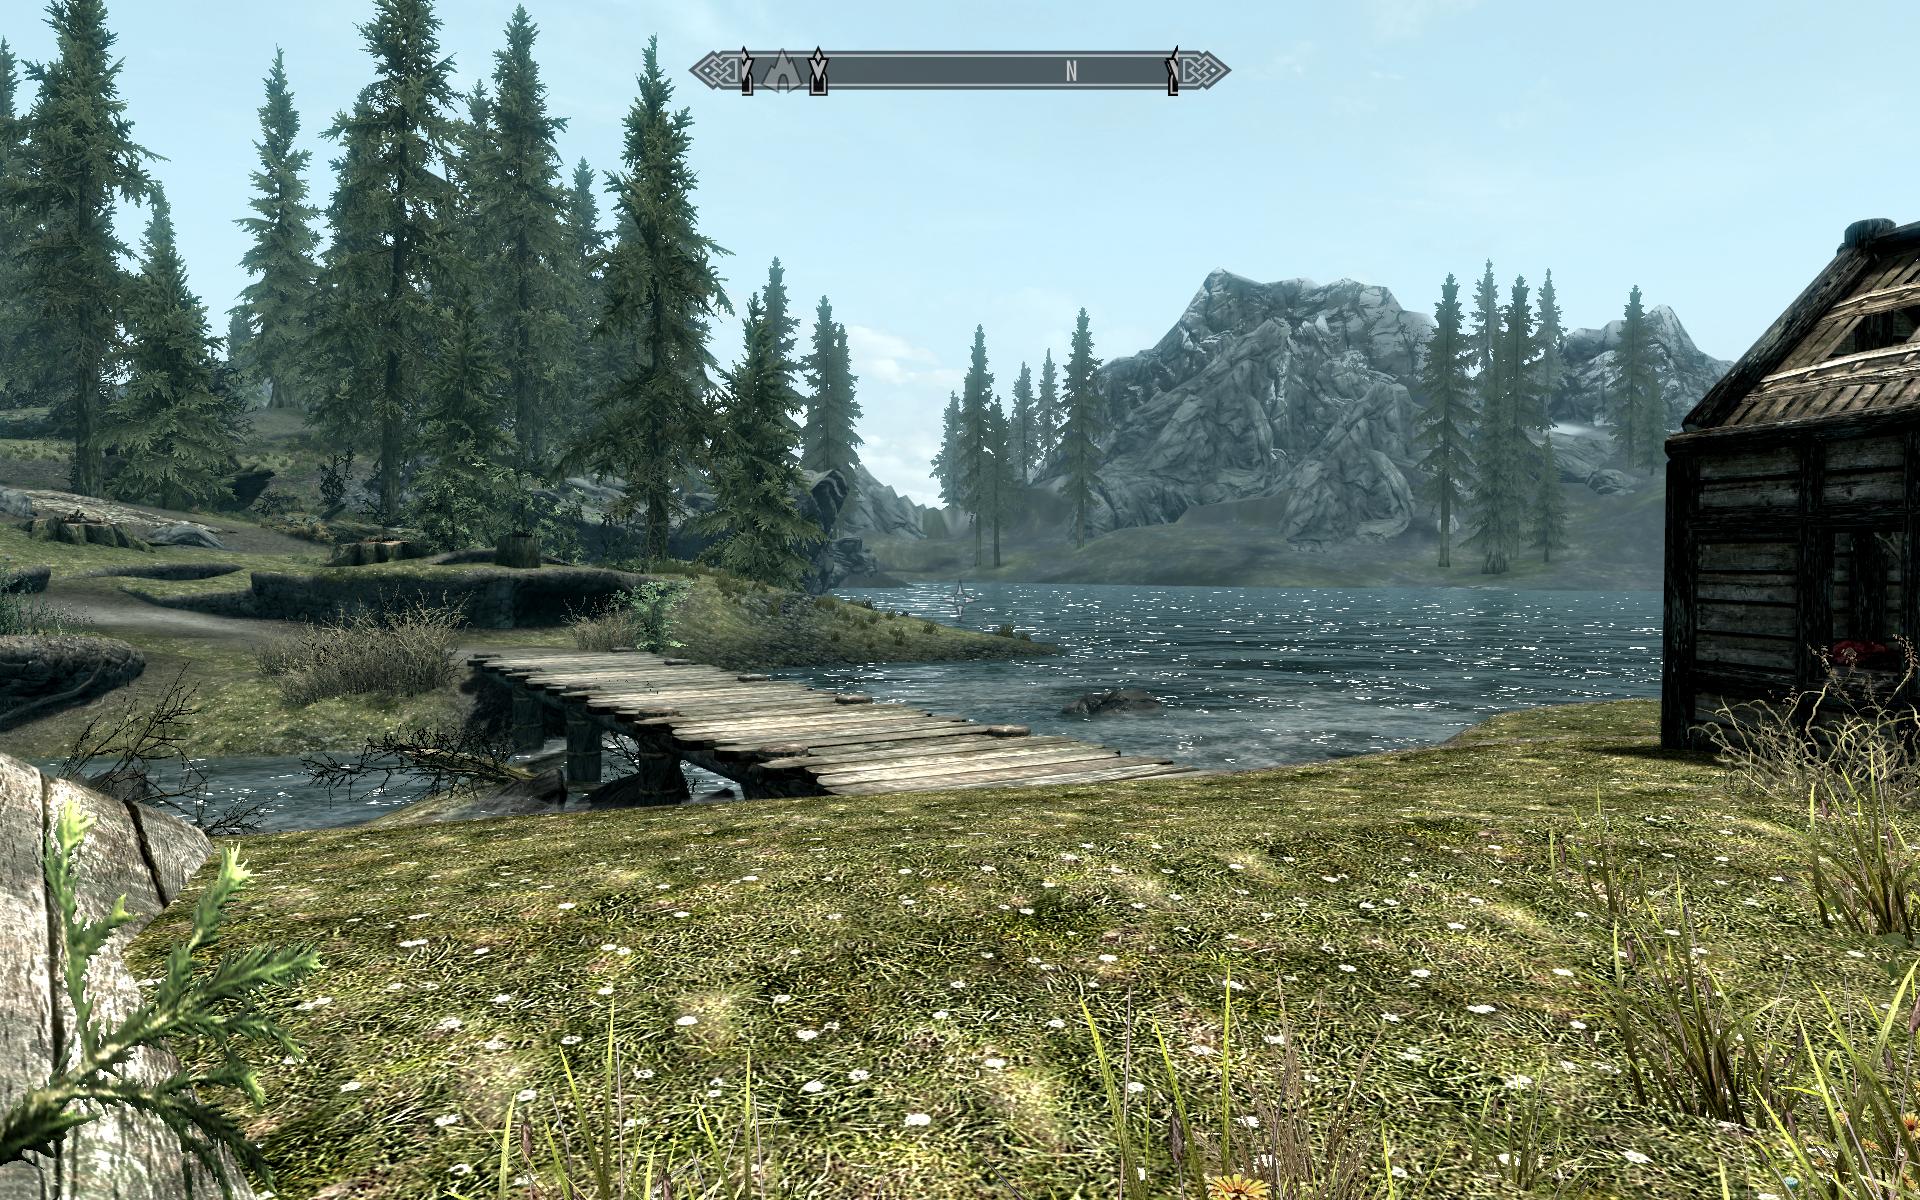
Ambient Occlusion: This setting can be used to force Ambient Occlusion (AO) in supported games. The specific form of AO implemented is HBAO+. If enabled, the game graphics are enhanced as ambient light generates more realistic shadows, adding greater depth. However, this setting can also noticeably reduce performance.


The available options for this setting are Off, Performance and Quality. The Performance option enables a slightly less realistic but less performance-intensive form of AO, while the Quality mode enables full AO for optimal image quality at a greater cost in terms of performance. The difference is demonstrated in the screenshots above. With AO enabled and set to Performance, the scene gains richer shadowing, most noticeable around the tufts of grass, bushes, and the building and rocks in the distance; at Quality, the shadowing increases further. More examples are provided in the link further above.
If a game already has an in-game setting for any form of Ambient Occlusion, such as SSAO (Screen Space Ambient Occlusion), HBAO (Horizon Based Ambient Occlusion) or HDAO (High Definition Ambient Occlusion), it's best to first try that rather than to force AO from the NVCP. This is because the game's own built-in AO implementation generally gives the cleanest result, minimizing the chance of shadow glitches. Furthermore, you shouldn't combine in-game AO with NVCP AO; select one or the other, once again to prevent shadow glitches, performance issues or other bugs.
It is recommended that Ambient Occlusion be set to Off under Global Settings, and only enabled for specific games under the Program Settings. This allows you to determine which games support this form of forced AO, as any game which doesn't support it won't allow you to access the Ambient Occlusion setting in its profile. You can still attempt to force AO in such games by using the Nvidia Inspector utility, which also gives you access to a High Quality AO mode, as covered in the Advanced Tweaking section later in the guide.
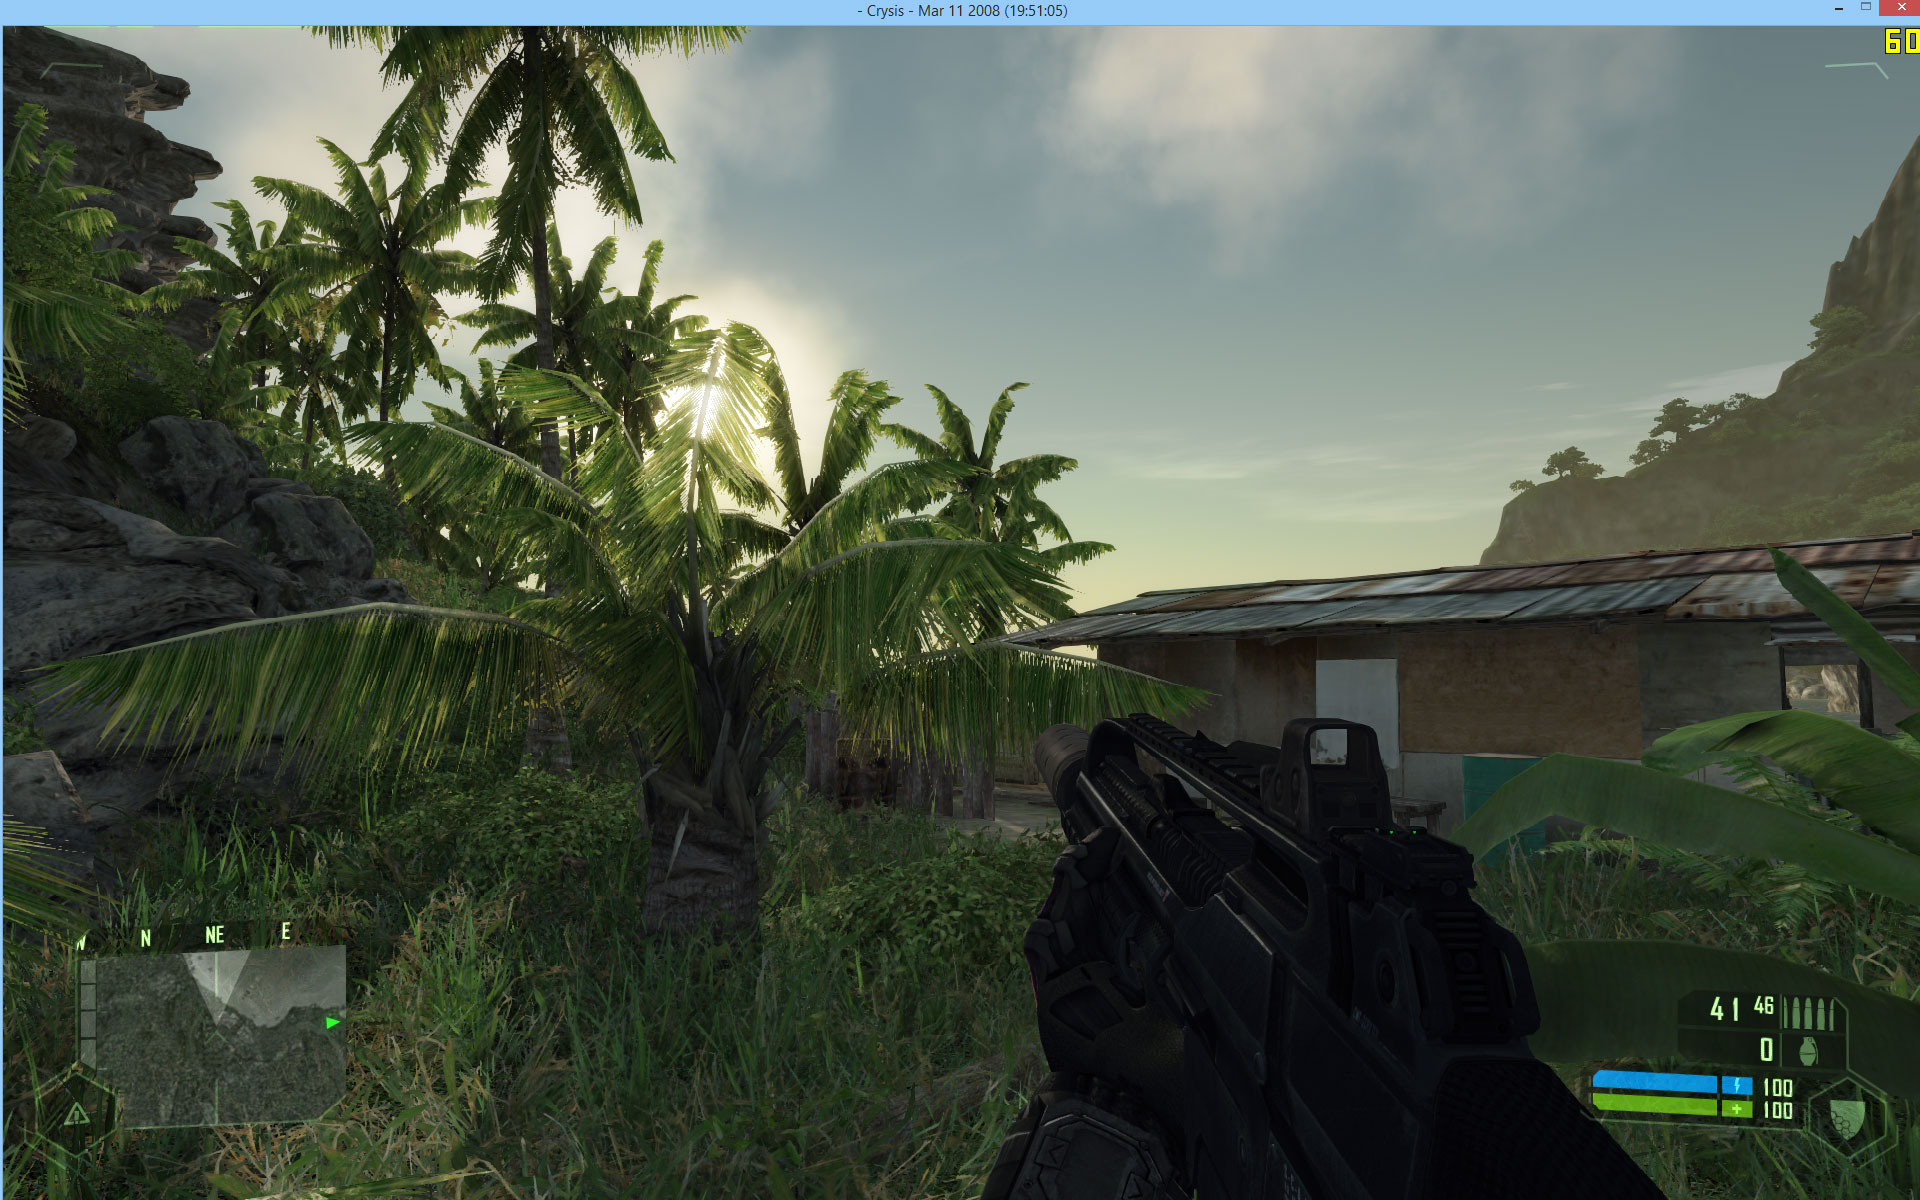
Anisotropic Filtering: Anisotropic Filtering (AF) is a non-linear texture filtering technique that helps make textures - the 2D images covering the surface of all 3D objects in games - appear clearer and more detailed. The higher the level of Anisotropic Filtering used, the crisper and clearer surfaces will look, especially when they appear at an angle to the viewer, such as the ground or walls as they recede into the distance. For more information, read the bottom of this page of the Gamer's Graphics & Display Settings Guide.
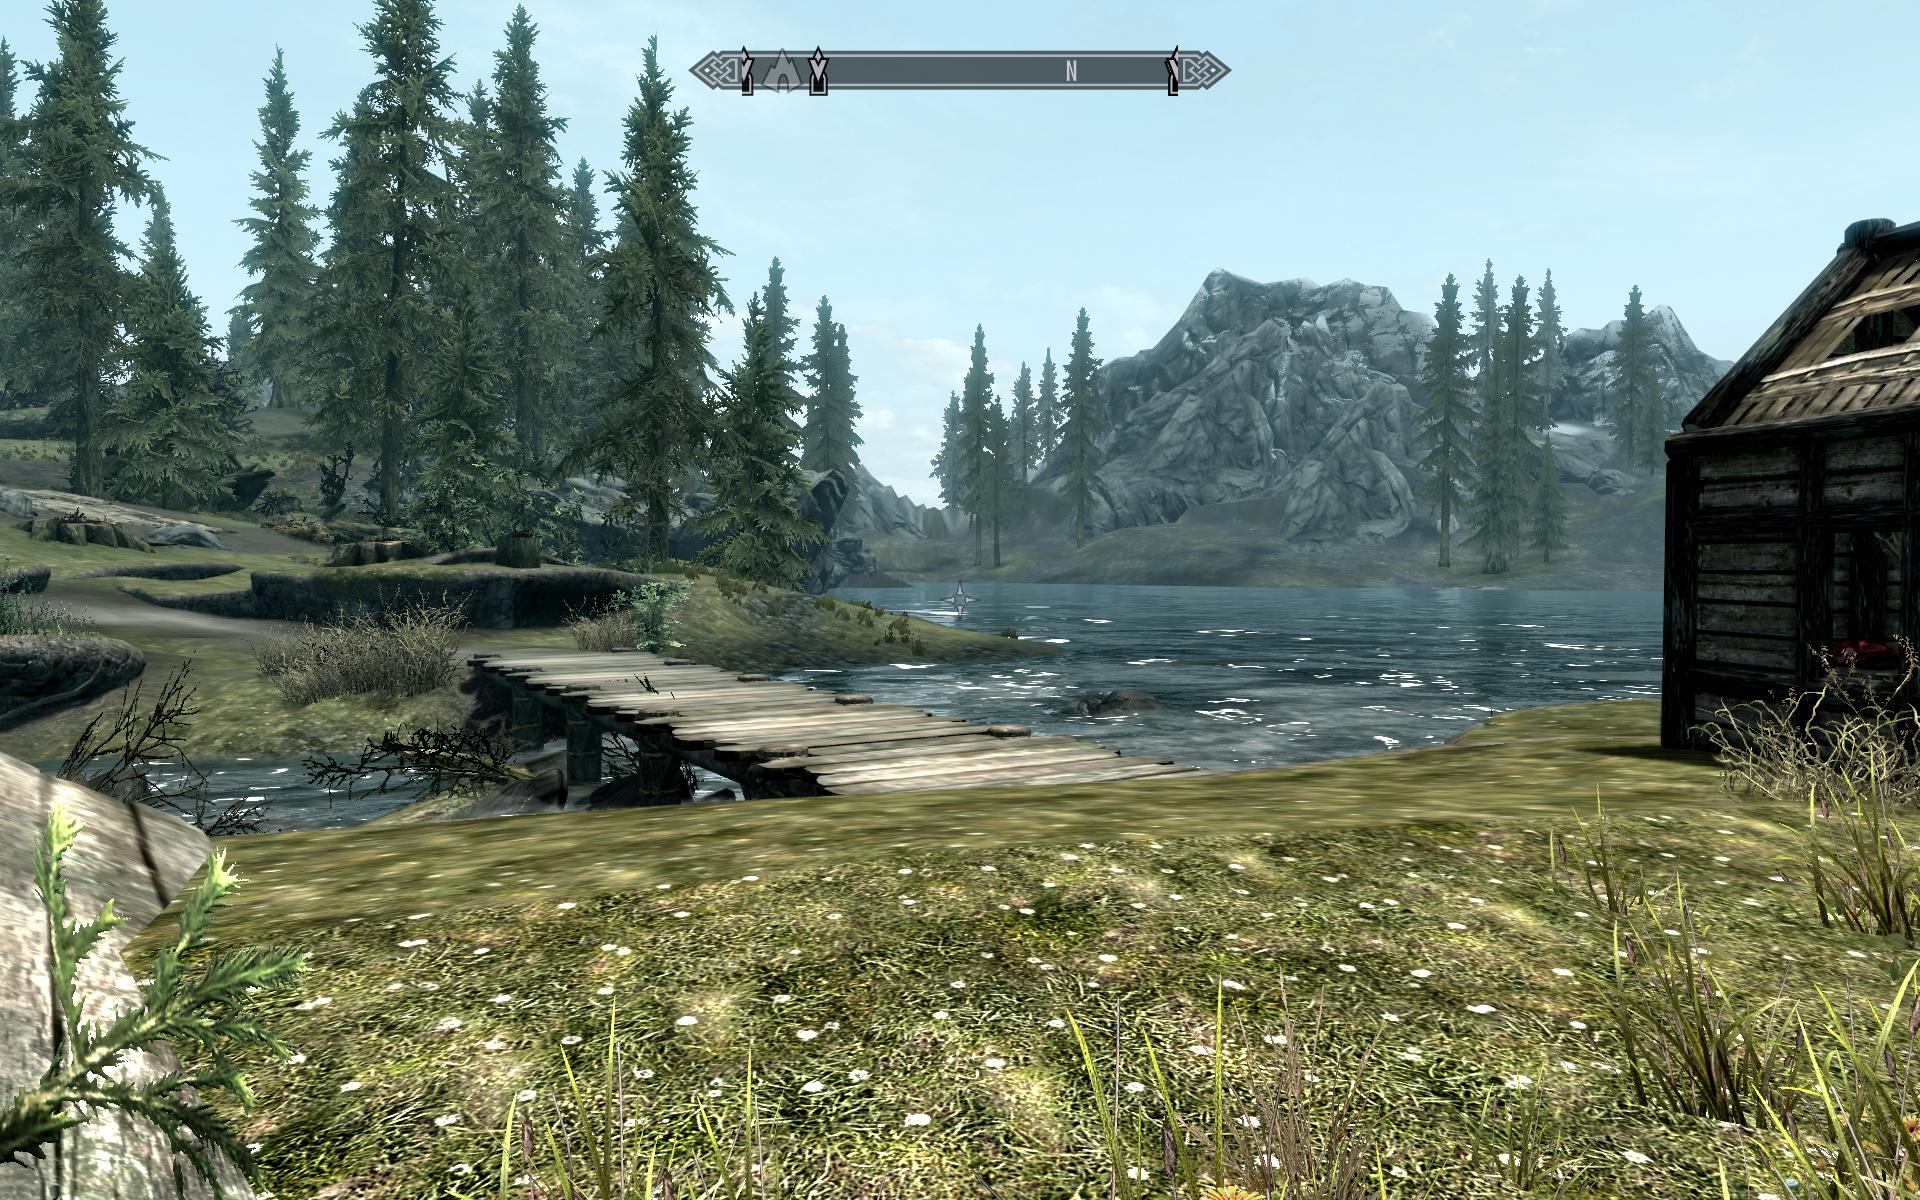
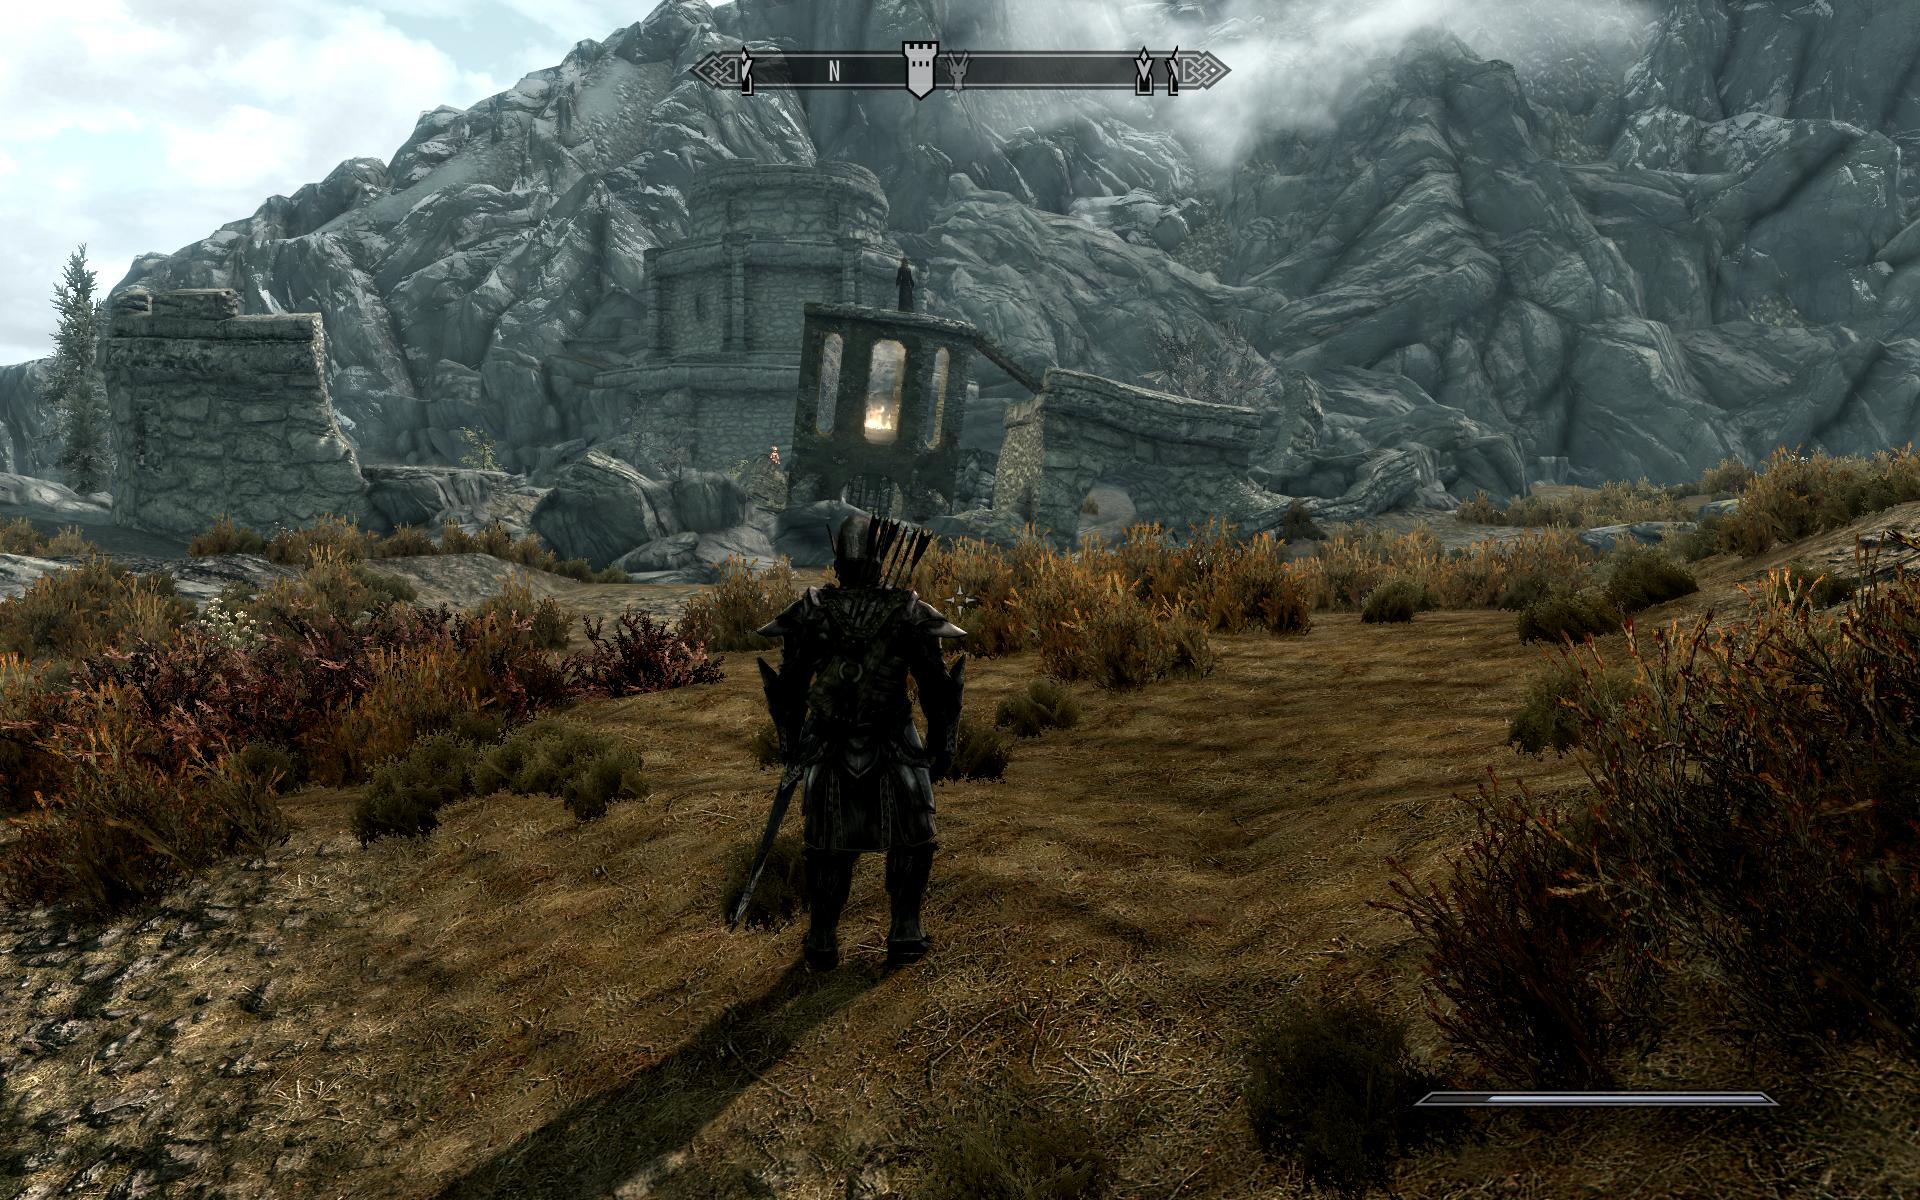
The available options for this setting are Application Controlled, Off, 2x, 4x, 8x, and 16x. If set to Application Controlled, this allows each game to use its own Anisotropic Filtering method, if any, without any interference. If set to Off, this disables all AF, which may improve performance at the cost of image quality. If a particular sample rate is selected (i.e. 2x, 4x, 8x or 16x), then that level of AF will be forced upon games, regardless of their own texture filtering settings. The performance impact of Anisotropic Filtering is usually negligible on most GPUs. The image quality impact on the other hand can be quite significant, as shown in the screenshot comparison above, demonstrating AF Off, versus 16x AF as set in the in-game options, versus 16x AF as forced by the Nvidia Control Panel setting. The additional surface detail when going from no AF to 16x in-game AF is quite apparent, particularly on the ground and the wooden bridge. But of equal interest is the fact that when using the NVCP 16x AF setting instead of the in-game 16x AF setting, we gain additional detailing on the water's surface, and on the trees and rocky mountain in the distance. In my testing, using the NVCP AF setting will benefit most games.
Note: The image quality of Anisotropic Filtering can also be affected by the other four Texture Filtering-related settings in the Nvidia Control Panel, as covered later in this guide.
It is recommended that you use 16x AF wherever possible, as it provides a noticeable improvement in image quality with negligible performance impact on most systems. You can set the Anisotropic Filtering option to 16x in the Global Settings to ensure that it's used in all games, but you must then make sure that in every game you run, you turn off any AF in the in-game settings to prevent a potential conflict. Alternatively, set Anisotropic Filtering to Application Controlled under Global Settings, then set it to 16x on a per-game basis under Program Settings. Again, most games will benefit from using forced 16x AF via the NVCP, so you should at least try it and compare the results with the game's own AF setting. If a game has no texture filtering-related settings, then it is almost guaranteed that it will look better with forced NVCP 16x AF. If running an old system or in desperate need of FPS, try lower levels of AF, such as 8x AF or 4x AF; even 2x AF can provde a noticeable quality improvement.
Antialiasing: Antialiasing (AA), also referred to as Anti-aliasing, is a technique used to smooth the appearance of aliasing (jagged lines), at the cost of some performance depending on which particular method and what level of AA is used. For more details on antialiasing, and the various AA methods, see this page of the Gamer's Graphics & Display Settings Guide, as well as the SweetFX/ReShade and Nvidia Inspector utilities in the Advanced Tweaking section later in this guide. For an example of the visual and performance impact of the various basic types of AA in a recent game, see this Crysis 3 Antialiasing page.
There are up to seven settings related to Antialiasing in the Nvidia Control Panel. Five are covered below; the sixth - Multi-Frame Sampled AA (MFAA) - and seventh - Dynamic Super Resolution (DSR) - are covered later on.
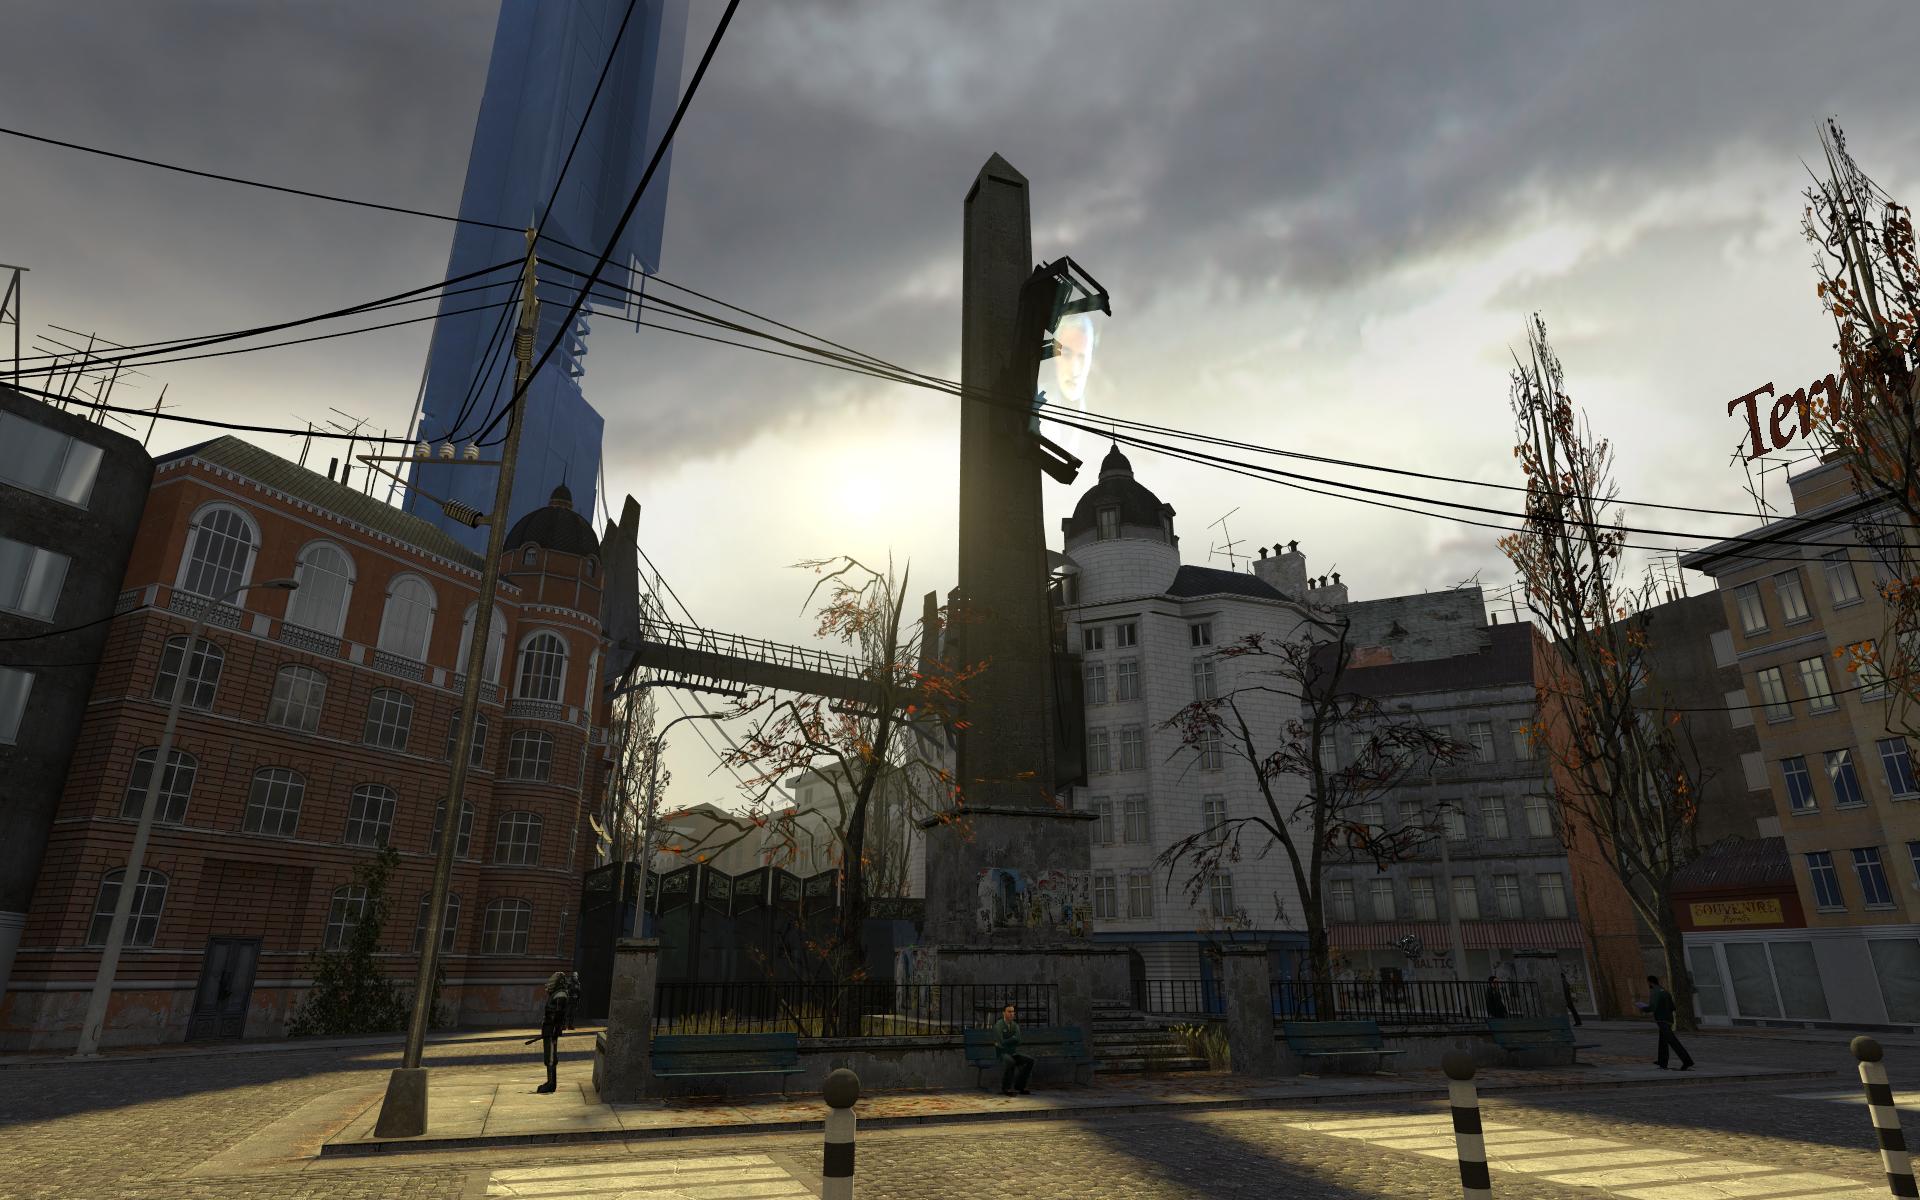
Antialiasing - FXAA: One method of Antialiasing is FXAA (Fast Approximate Anti-Aliasing). It is an efficient and moderately effective means of reducing the jaggedness of all lines in a scene, including those on transparent textures such as foliage. As a post-processing shader-based AA method, FXAA basically works by smoothing out a scene after it's been rendered, which means it doesn't perform any complex performance-sapping algorithms to detect and remove aliasing. But this also means that it's not highly effective in targeting and removing jaggedness in the scene, and blurs the image slightly as well.

The screenshot comparison above demonstrates the difference between having no AA of any kind, and forcing FXAA on the same scene using this NVCP setting. As you can see, the jaggedness of the palm trees, the grass, and the roof of the shack on the right all diminish when FXAA is applied. But there is also some additional blurring, most noticeable around the palm trees. Note that to successfully capture NVCP forced FXAA in a screenshot, you must switch the game to windowed mode and use ALT+PRTSCN, as I've done above.
FXAA can also be combined with other forms of AA, for example you can apply MSAA using in-game settings, then apply FXAA on top of that via the NVCP. This can be useful given that, unlike MSAA, FXAA also reduces the jaggedness and shimmering of transparent textures, such as those most commonly seen on foliage and chain-link fences - see the Antialiasing - Transparency setting below for more details. The performance impact of FXAA is minimal in all cases. The primary disadvantage of forcing FXAA via the NVCP is that it may also be applied to inappropriate elements, such as interface text or the HUD, reducing their legibility. Many games now come with a built-in form of FXAA, or similar shader-based AA method. It is recommended that if you wish to use FXAA, you first try the game's own implementation of it, as it is likely to provide better overall quality without affecting interface text. As a general rule, if a game already has its own FXAA implementation, it won't support FXAA forced via the NVCP anyway.
It is recommended that FXAA be set to Off under Global Settings, as many games don't support it. Worse still, applying FXAA globally can cause it to apply to all general rendering, such as in video players and the Windows Desktop, resulting in blurred text. Only enable FXAA for specific games under the Program Settings tab, allowing you to determine which games support this form of forced AA.
Antialiasing - Gamma Correction: This setting is designed to adjust the brightness level of the image using Gamma Correction, or Gamma for short, specifically so that any Antialiased edges are shown with an appropriate level of contrast. There is no performance impact from using this setting.

The available options for this setting are Off and On. The screenshot comparison shows the same antialiased scene when the Antialiasing - Gamma Correction setting is set to Off and then On. The primary difference is that the trees and the antennas on the rooftops are thinner when Gamma Correction is enabled. This may be more accurate, but it may not be visually pleasing for some people. I took the screenshots above in Half Life 2, which is an old game; in testing several modern games, I was unable to observe any difference whatsoever from changing this setting. Note also that the description in the Nvidia Control Panel, and earlier versions of this guide, previously incorrectly reported this setting as only applying to OpenGL games. This is not true; this setting can also affect DirectX games, as the HL2 screenshots above confirm.
It is recommended that Antialiasing - Gamma Correction be set to Off under Global Settings, as it appears to have no impact on modern games, which are most likely already appropriately adjusting for gamma, and it may actually cause issues with the appearance of thin lines in older games if enabled. You can experiment with individual games, particularly older games, to see if you prefer to have it enabled under the Program Settings tab for each game.
The next page continues the descriptions of Nvidia Control Panel settings.
|
|