
Nvidia GeForce Tweak Guide
[Page 4] GeForce Driver Package
If you've performed one of the clean installation procedures listed on the previous page, or if you're starting with a fresh installation of Windows, or if you've already got a previous version of the GeForce drivers installed and are absolutely certain that your system is currently problem-free, then you can proceed with downloading and installing the latest GeForce driver package as covered in this section of the guide.
Update: This page and the previous one have been updated as of October 2019.
Downloading the GeForce Driver Package
To obtain the latest GeForce driver package for your GPU, go the GeForce.com Driver Download page or the Nvidia.com Driver Download page. Under the Manual Driver Search section, select your GPU model series and model number - see the Identifying Your GPU section on the previous page if you're unsure of these. Next, select your current operating system and importantly whether it's 32-bit or 64-bit. Then select your language, driver type, select All, click the 'Start Search' button and a list of all the available GeForce drivers for your GPU will be shown.
Below are some important things to note regarding the GeForce driver download:
32-bit vs. 64-bit: You cannot install 32-bit drivers on a 64-bit version of Windows and vice-versa. Make sure you correctly specify your Windows version and 32-bit or 64-bit to obtain the correct driver package. If you're unsure whether you're running 32-bit or 64-bit Windows, open the Windows Control Panel, launch the System component, and look at the 'System type' field.
Supported GPUs: The latest GeForce drivers only support GeForce 600 series or newer GPUs. Older GeForce drivers are available for earlier generation GPUs, but they may have different features from those detailed in this guide. If you can't find your GPU series listed, select Legacy in the first drop-down box under the Manual Driver Search section.
Nvidia Drivers vs. Manufacturer Drivers vs. Windows Update Drivers: The GeForce graphics driver package provided by Nvidia is recommended for all brands and models of supported GPUs. For example, if you have an EVGA manufactured Nvidia graphics card, you should still obtain and install the latest official GeForce drivers directly from Nvidia via the link above, instead of those on the EVGA website or on any driver disc which comes with your GPU, as the latest GeForce drivers are always more recent. The same advice applies to any graphics drivers that you see listed in Windows Update; the GeForce driver package from Nvidia's website is always newer and in most cases better than those on Windows Update.
WHQL Certified Drivers: Windows Hardware Quality Labs (WHQL) certified drivers undergo a special testing process before they can be released as WHQL Certified. The process involves Nvidia running a series of tests on third-party hardware or software, and then submitting the log files to Microsoft for review. Microsoft may then also run their own tests on a wide range of hardware and Windows editions. However, WHQL certification is not a guarantee that a driver is problem-free or optimal for your system.
Hotfix Drivers: Nvidia releases Hotfix drivers from time to time that are a full GeForce graphics driver package that can be installed as normal, but which contain specific fixes for more serious issues reported in the latest WHQL driver set. These are not necessary unless you are experiencing any of the issues noted for the Hotfix, as they are otherwise typically the same in terms of performance and features as the latest WHQL driver release. The main reason for these Hotfix releases is so that Nvidia can get a working solution to an issue out as soon as possible, without waiting for them to be incorporated into the next public build of their drivers.
Beta Drivers: Nvidia releases Beta (pre-final) drivers as a means of providing drivers which contain the latest bug fixes or features without first having to wait for the WHQL process to be completed. Beta drivers are unsupported and may contain major bugs, so Nvidia recommends that users back up their system before using them. But in practice Nvidia's Beta drivers are quite stable and perfectly safe to install, and are often eventually released as WHQL certified with few or no additional changes.
Signed vs. Unsigned Drivers: 64-bit versions of Windows, as well as some 32-bit versions of Windows, require that a driver have a valid digital signature. This signature indicates that the publisher of the driver is who they claim to be, and that the contents of the driver package have not been tampered with in any way after the drivers were signed. For security purposes I don't recommend installing any GeForce driver that causes Windows to raise a driver signature-related warning prompt, such as "This driver hasn't been signed". All official GeForce driver packages, including Beta releases, are digitally signed by Nvidia. To check this, right-click on the driver package, select Properties, and look under the Digital Signatures tab.
Standard vs. DCH Drivers: An important new development in Windows 10 is the transition to Universal Windows Drivers (UWD), also referred to as Windows Modern Drivers, or, as in this case, Declarative Componentized Hardware (DCH) drivers. The goal of this driver model is to have a unified driver package that can install across a range of devices, and removes bloatware. This single driver package is restricted to containing: a base driver for core functionality; optional component packages for any customizations or additional settings; and a support app, such as a control panel. The general idea of UWD is that it makes driver installation easier: you run the installer, and regardless of which hardware you're running, it determines the correct driver for your system, installs it, along with any necessary add-ons, and an optional supporting app like a control panel. However, for this very reason, I prefer and recommend the Standard version, which provides the greatest control over what you can install, and what you can exclude. All of the instructions in this guide refer to the Standard version of the GeForce drivers.
Which driver version should you use? I recommend installing the latest available standard version of the GeForce drivers as often as possible, whether Beta or WHQL, especially if you play recent games, but even if you don't. The latest GeForce drivers contain performance optimizations and fixes for the latest games, as well as the latest features and general bug fixes, but most importantly, they address any known security vulnerabilities that older versions of the driver may have, some of which can be quite serious.
If you've read a range of user feedback on forums indicating that there may be a genuine problem with the latest GeForce driver that would apply to your system, then you can install either the latest Hotfix driver if one is available, or the next most recent WHQL GeForce driver. Please be aware however that users often blame drivers for problems that are not directly related to the drivers themselves, but rather to a lack of correct system maintenance, so check several sources to ensure there is a genuine problem attributable to the drivers.
In any case, I strongly advise against constantly experimenting with newer and older GeForce driver versions, as this will create a mess of driver residue on your system and only increase the potential for problems. If you must revert from a newer version to an older version, then follow one of the clean installation methods on the previous page each time. More detailed information about drivers, including general driver optimization and troubleshooting tips, can be found in the Windows Drivers chapter of the TweakGuides Tweaking Companion.
Installing the GeForce Driver Package
Installation of the GeForce driver package is relatively simple, but there are several aspects you should consider while installing the drivers to achieve optimal results. These are covered in the steps below:
1. Once you've downloaded the latest official GeForce driver package, or you've created a custom version of the same using NVSlimmer as detailed on the previous page, then double-click on it to launch the driver installation wizard.
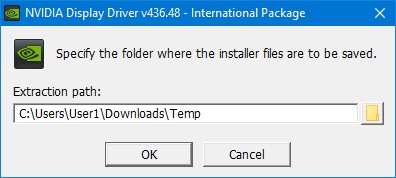
2. The driver package will first prompt you for a directory to save the installation files for the GeForce drivers, typically C:\NVIDIA\DisplayDriver\[version number]\[package name]\[language] by default. This directory is just the location where the driver package's files will be temporarily unzipped for use during installation; it is not where the final driver files will be installed. I recommend that you specify an empty folder of your own choosing, e.g. a Temp folder under your Downloads directory: C:\Users\[username]\Downloads\Temp. Then after installation is complete, you can safely delete this Temp directory and its contents, as well as the downloaded GeForce driver package, as neither is required by your system.
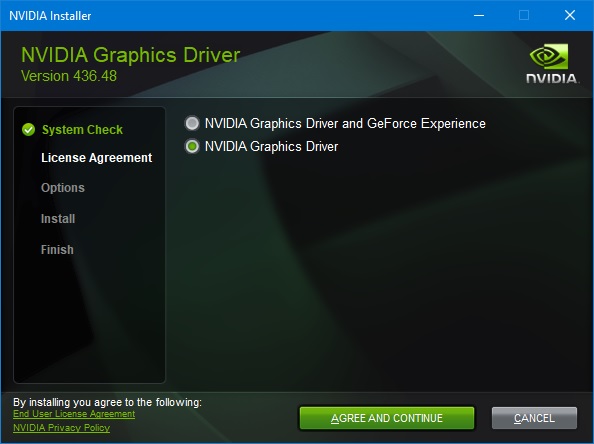
3. Once the driver wizard has done a check to make sure that your system is compatible with the latest GeForce drivers, you can choose whether to install the GeForce Experience software along with the drivers by select 'Nvidia Graphics Driver and GeForce Experience', or if you don't want GeForce Experience - and it is generally not recommended unless you specifically need one of its features - then select 'Nvidia Graphics Driver' instead. If in doubt, skip installing GeForce Experience for now, and you can always download it separately and install it from here. Note: If you've customised the driver package to remove GeForce Experience, then you won't see this screen. Click the 'Agree and Continue' button to continue.

4. Next, you will see the main Installation Options: you can select either an Express install, which installs all the driver components on a fresh installation of Windows, or updates any existing driver components to the newer versions and retains all of your existing settings; or you can select Custom to give you a greater range of installation options. It is strongly recommended that you select Custom - selecting Express may install/update components that you don't need. It is assumed in the rest of the steps below that Custom is selected.
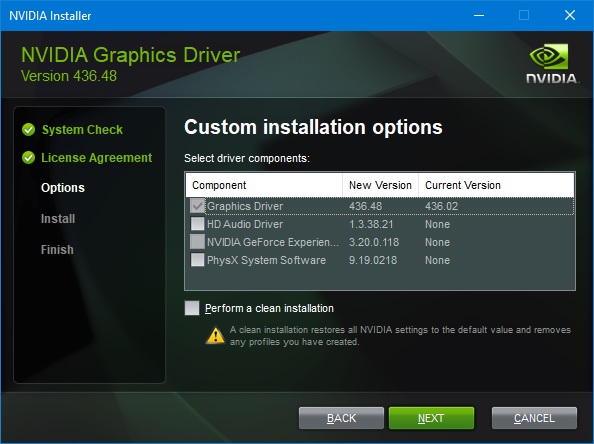
5. On the Custom installation screen you will see a range of driver components listed, as well as the New Version number of each component in the driver package versus the Current Version number of that component if already installed on your system. Tick the particular driver component(s) you want to install, and untick those which you don't wish to install. Most of these components are unnecessary on the average system. This is an important step, because installing unnecessary components only results in wasted resource usage, longer Windows startup time, and the potential for software conflicts on your system. If you've used NVSlimmer, as covered on the previous page, to create a custom installation package, then some of these packages will not be shown.
To determine which components you actually need, see the descriptions below:
Graphics Driver: This component must always be installed, and cannot and should not be unticked, as it contains the core graphics driver required for your Nvidia GPU to function efficiently, as well as the Nvidia Control Panel utility for accessing and adjusting the graphics driver's settings and features.
3D Vision Controller Driver: The 3D Vision-related components, including this one and the 3D Vision Driver below, are related to 3D Vision support for Nvidia GPUs. 3D Vision allows users who own appropriate hardware, namely a GPU and monitor that support 3D Vision, a pair of 3D Vision active shutter glasses, and Windows Vista or newer, to experience games and 3D movies in stereoscopic 3D. Specifically, the 3D Vision Controller Driver installs the driver for the USB Infrared emitter in your PC, which is required to sync your PC with the 3D glasses. If you're not using 3D Vision, you should not install this component.
3D Vision Driver: As above, this component relates to 3D Vision functionality. Specifically, it installs the core 3D Vision software, and adds a Stereoscopic 3D section to the Nvidia Control Panel. If you're not using 3D Vision, you should not install this component.
Note: As of April 2019, Nvidia has officially dropped 3D Vision support in its standard 'Game Ready' GeForce drivers. Therefore, you should no longer see these components listed.
HD Audio Driver: This driver component provides support for native HD audio output in the following formats via the HDMI port of supported Nvidia GPUs. If your Nvidia GPU is connected to a display using the HDMI port, then for optimal audio quality you should install this driver. However, it is not absolutely necessary, because if the Nvidia HD Audio Driver is not installed, Windows will use its own built-in driver to provide HDMI audio functionality. Furthermore, this driver is not required for, and has nothing to do with, the audio output from your motherboard's onboard audio or a sound card, which require their own drivers. I recommend not installing this driver to begin with, and only installing it if you then experience audio problems when using the GPU's HDMI connection.
Miracast Virtual Audio: This driver component enables the use of Miracast wireless streaming technology on systems running Windows 8.1 or newer. Miracast allows video and audio to be streamed over Wi-Fi to Miracast-capable displays and devices. Unless you specifically require this wireless streaming functionality, this driver component does not need to be installed.
Nvidia GeForce Experience: Nvidia's GeForce Experience is a software utility that provides additional non-core functionality for your GPU. If installed, it will provide features including: automatic customization of game settings; automatic GeForce driver updating; Nvidia Shield streaming; and Shadowplay gameplay footage recording and streaming on GTX 600 series and newer GPUs. If you want any of these features, you will need to install GeForce Experience. It is best not to install GeForce Experience unless you absolutely need any of its functionality. If in doubt, you can skip installation of this component now and download and install it separately from the link above at any time.
PhysX System Software: This driver component enables support for Nvidia PhysX, a physics simulation technology used in certain games, on GeForce 8 series and newer GPUs. With hardware accelerated PhysX enabled in a supported game, your GPU will process additional data which makes the physics and special effects in the game world more detailed. It is recommended that you install PhysX so that it can be used when needed. It does not consume any background resources when not in use nor does it take up much drive space.
If you untick any component that was previously installed on your system, the GeForce driver installer will not only not install the latest version of that component on your system, it will also uninstall any previous version as well. However, in my testing this still left some active driver residue on the system. The 'Perform a clean Installation' check box is covered on the previous page, and if you're unticking any GeForce driver components currently installed on your system, it is recommended that you also tick this option before clicking Next, or click Cancel and use one of the other, more comprehensive, clean installation methods and then start the installation process again. If you're only updating the same existing installed components, then you don't have to perform a clean install each time.
6. Once you click Next, the driver wizard will commence installing and uninstalling its various components as specified in the previous step. Depending on which components you selected, you may be prompted to reboot at the end of the installation, which you should do as soon as possible. Typically the audio and graphics driver components require a reboot if any are uninstalled.
At this point the GeForce driver is installed and should be functioning properly.
Tidying Up
You can now safely delete the folder you created in Step 2 above, and also delete the C:\NVIDIA directory and all of its contents, if it exists on your system. These folders hold the extracted file contents of each GeForce driver package and are used only during installation, not afterwards. They can take up a lot of drive space over time, so make sure you delete them.
You may have seen advice that says you can also safely remove the contents of the C:\Program Files\NVIDIA Corporation\Installer2 directory, however this is not entirely correct. This folder can grow to be quite large, but the files in this directory are required if you ever wish to use the Windows driver rollback functionality, or uninstall the driver components from Windows Control Panel>Programs and Features. So while deleting the Installer2 directory won't harm your current GeForce driver installation, it can cause problems in the future. More details are provided here. To keep the installer2 folder from taking up a lot of drive space, I recommend that you either frequently use the 'Perform a clean install' option whenever installing the latest GeForce driver package, or that you periodically delete the folder as part of a clean installation using the Manual Method or by using DDU, as covered on the previous page.
Manual Driver Installation
If you want to manually install/update a single GeForce driver component, or install an unofficially released (leaked or modified) driver component, you can do so by using Device Manager instead of using the GeForce driver installer. This method involves finding the appropriate device in Device Manager, then pointing it to a location on your system where a suitable INF File resides, along with the appropriate driver files, so that Windows can install them for the device. It's a procedure that is only recommended for medium to advanced users.
For example, to update your GPU with just the latest graphics driver component follow these steps:
1. Download and run the standard (not DCH) GeForce driver package, and as per Step 2 of the section above, extract the contents to a folder of your choosing, then Cancel out of the installer. The extracted folder will have sub-folders containing the required files for each driver component of the GeForce package. Alternatively, download the required driver files from a trusted website, but for security purposes make absolutely sure that it is directly from the trusted site, not a third party file hosting site or P2P network.
2. Open the Device Manager from the Windows Control Panel.
3. Under the 'Display Adapters' category, double-click on your graphics card's name. Go to the Driver tab, click 'Update Driver', then select 'Browse my computer for driver software'.
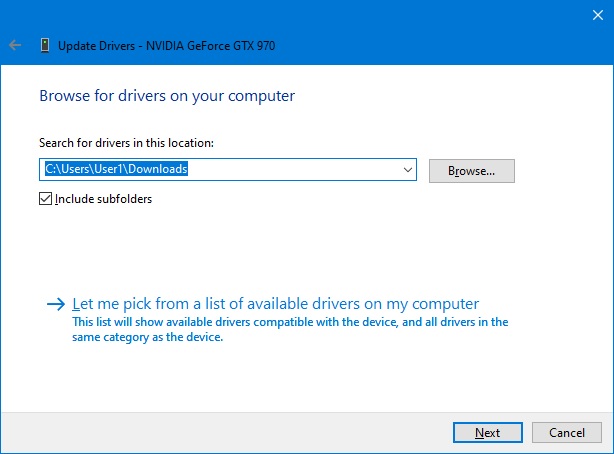
4. Click the Browse button and browse to the directory which contains the relevant driver files. In our example, since we're updating just the display driver component using the files extracted from the GeForce driver package, we want to browse to its extracted \Display.Driver directory. Click Next.
5. Windows will automatically find the required .INF file and install the driver if it is considered newer than your currently installed driver. If this fails, go back to Step 3 above, and this time select 'Let me pick from a list of device drivers on my computer', then click 'Have Disk', click the Browse button and go to the same directory and manually select the appropriate .INF file - in our example this is nv_dispi.inf - and select your device from the list shown, then click Next.
Note: Step 5 is also handy if you want to manually switch to another version of the driver already installed on your system, if your device is listed more than once in the hardware window.
In the next section we look at how to correctly configure the GeForce driver settings using the Nvidia Control Panel.
|
|