
Nvidia GeForce Tweak Guide
[Page 7] Nvidia Control Panel (Pt.3)
Maximum Pre-Rendered Frames: This setting controls the size of the Context Queue, also known as the Flip Queue or Render Ahead Queue, as explained in this article. The context queue is a buffer (storage area) for custom data which has been prepared specifically for processing by the GPU. In simple terms, this option controls the maximum number of frames the CPU prepares in advance of being rendered by the GPU. The benefit of having frame data buffered in advance of being processed by the GPU is that it helps keep the GPU consistently fed with data, smoothing out any small variations in rendering times. The disadvantage of buffering frame data in advance of displaying it is that it can increase latency, i.e. a delay between your input via keyboard or mouse, and the resulting impact on the image displayed, commonly referred to as input lag.
The available options for this setting are Use the 3D Application Setting, 1, 2, 3 and 4. When set to Use the 3D Application Setting, games will either use their own value, possibly determined by an in-game setting, or the Windows default of 3. If you wish to override this, you can specify precisely how many frames can be pre-rendered here ranging from 1 to 4 frames. In theory, higher values ensure smoother framerates but with potentially more input lag, while lower values can help reduce input lag, but may result in stuttering or lower performance. In practice however, the impact of altering this setting appears to be quite complex. In some cases, lowering this setting may actually reduce stuttering or improve performance, likely on systems where the CPU is much slower than the GPU. So some experimentation is required to determine the optimal setting for each game on your system.
Maximum Pre-Rendered Frames setting is not the same as Triple Buffering, a setting that is covered in more detail further below. The key difference is that Maximum Pre-Rendered Frames controls the size of the data queue feeding rendering commands to the GPU to maintain smooth framerates, while Triple Buffering is a back-buffer configuration designed specifically to prevent a significant reduction in performance whenever the framerate falls below the refresh rate while Vertical Sync is enabled. Game developers sometimes confuse the issue further by using variations or amalgamations of these two setting names in an unclear fashion (e.g. "GPU Max Buffered Frames").
It is recommended that Maximum Pre-rendered Frames be set to Use the 3D Application Setting under Global Settings. For particular games where you are experiencing stuttering, first try changing this setting to a high value of 4 under Program Settings to see if it helps smooth things out. If that makes things worse, or you can't tolerate the input lag, experiment with progressively lower values. Of course if a game has its own settings related to frame buffering or precaching, use those in the first instance. Keep in mind that stuttering has numerous other causes if changing this setting has no impact. Finally, note that this setting only works in DirectX games, not OpenGL games.
Multi-Frame Sampled AA (MFAA): An Antialiasing method only supported on GTX 900 and newer GPUs, Multi-Frame Sampled AA, or MFAA for short, is designed to provide MSAA-like Antialiasing quality at a much lower performance cost. It does this by using sample patterns that aren't fixed, as they are with traditional AA, rather MFAA's sample patterns can be customized to vary from frame to frame, or even within a frame, to remain optimal.
The available options for this setting are Off or On. To enable MFAA in a particular game, that game must first support MFAA - see this list of supported games. If a game supports MFAA, then to implement it you must first set the Multi-Frame Sampled AA setting to On, then launch the game and select a level of MSAA to apply. Once MSAA is enabled at 2x or above, MFAA comes into effect, increasing the quality of your chosen MSAA level without a drop in performance. For example, if you enable MFAA in the NVCP, then select 2x MSAA in a game, you will get the equivalent of 4x MSAA quality without any extra drop in performance; set 4x MSAA in the game and MFAA will convert it to 8x MSAA quality for free, and so on.

The screenshot comparison above shows the same scene first with no Antialiasing of any kind, highlighting the most jagged areas, particularly the rooftop around the crosshair. The second screenshot shows the same scene with in-game 4x MSAA and no MFAA. The third screenshot has in-game 2x MSAA and MFAA enabled, boosting the result to be roughly equivalent to 4x MSAA. A close comparison of the two reveals some differences, with the MFAA screenshot having slightly rougher edges. But look at the framerate counter at the top right: the MFAA screenshot shows a much higher framerate. Benchmarks and additional screenshots, such as in this article, confirm that MFAA does deliver higher MSAA quality at roughly the same performance cost as an MSAA level one increment lower.
It is recommended that Multi-Frame Sampled AA be set to On under Global Settings, as it only comes into effect in supported games when MSAA is enabled, and in such cases always provides an improvement in MSAA quality at no additional performance cost. If you're worried about potential compatibility issues or even the slightest drop in image quality from MFAA, then set it to Off globally and enable it for selected games under Program Settings.
Multi-display/Mixed-GPU Acceleration: This setting determines how OpenGL games and applications, which are not all that common, handle rendering when connected to multiple displays and/or if using two or more different types of Nvidia GPUs. This does not affect single or multiple displays running on single or multiple GPUs (SLI) under DirectX, which encompasses most games and the Windows Desktop. As such, the setting is largely irrelevant to most users.
If you have a multiple display or mixed-GPU setup, and run OpenGL games or applications, then the available options to consider are Single Display Performance Mode, Multiple Display Performance Mode, and Compatibility Performance Mode. If you have only one display, or are having problems with the other modes, the Single Display Performance Mode option should be used. If you are using multiple displays then select the Multiple Display Performance Mode, but if you experience any issues with particular programs, select the Compatibility Performance Mode.
It is recommended that Multi-Display/Mixed-GPU Acceleration be set to Single Display Performance mode on single display systems, and Multiple Display Performance Mode on multi-display systems, or simply left at its default of Multiple Display Performance Mode on all systems under Global Settings, as it has no impact in most cases.
Power Management Mode: This setting makes use of a modern GPU's abilities to support different performance levels depending on how much power is required. Normally, the graphics card will monitor GPU load, and when under minimal load, will lower its clock speeds (downclock) to what is known as 2D or Idle clock speeds - the lowest possible speed - in order to save power and reduce temperatures. This occurs when using the Windows Desktop for example. This setting does not alter that behavior, instead it controls what happens when the GPU is operating at what is known as 3D clock speeds, which are activated when running games and other 3D applications.
The available options are Adaptive and Prefer Maximum Performance. If Adaptive is chosen, the graphics card automatically steps down in clock speed in games and 3D applications if they aren't generating a high GPU load. If Prefer Maximum Performance is chosen, when running any game or 3D application, the GPU will maintain its maximum clock speed regardless of load. The Adaptive setting shouldn't cause any problems in modern games, as the GPU will always run at full speed when required without interruption. However, in old games which generate much lower GPU loads, the graphics card may constantly downclock when set to Adaptive, and this may cause issues such as fluctuating performance and stuttering. Alternatively, using the Prefer Maximum Performance option should also be fine, as most games require maximum clock speeds for optimal performance, but you may run into situations where the GPU does not properly downclock back to 2D clock speeds once the game is exited.
Update:
Optimal Power As of the 368.22 GeForce drivers, a new Optimal Power mode is available and set as the default. As yet I can't find an official Nvidia source to reference what this option does, but it was apparently alluded to at some point in the GTX 1080 launch conference. Basically, when Optimal Power is selected, while the PC is idle and nothing is changing on the screen, the GPU will not render any new frames; the driver will simply re-use the last rendered frame in the framebuffer. This should further reduce power consumption without any negative performance impacts. Once I have a confirmed source, I will update this description.
I recommend that Power Management Mode be set to the default of Optimal Power under Global Settings. For any games for which you believe your GPU is constantly downclocking, you can change this setting to Prefer Maximum Performance under the Program Settings tab to ensure the highest possible clock rates at all times. Remember that this setting only relates to games and other 3D applications, not to 2D applications or the Windows Desktop. Note also that if you run a multi-monitor and/or high refresh rate display your idle clocks may be slightly higher regardless of this setting, which is normal.
Shader Cache: Shaders are programs written to implement customizeable visual effects in games, such as various lighting, shadow and surface effects. These shader programs are often compiled (prepared for execution) during loading screens, or in open-world games they may be compiled as you move to a new area or see new objects. The act of compiling shaders can increase loading times, and if the shaders are compiling during gameplay, this can increase CPU usage, reducing performance and also possibly resulting in stuttering. Worse still, compiled shaders are usually discarded after you exit a game, so the process is repeated the next time you run the game. The Shader Cache feature in the GeForce drivers is designed to create a storage location for compiled shaders on your drive so that the next time you run a game and it needs to use particular shaders, it can use the precompiled stored shaders rather than compiling them again. This should speed up loading times, improve performance and reduce the potential for stutter.
The available options for this setting are On and Off. If set to On, the next time you run a game, the driver will begin storing any compiled shader files in the following location on your primary system drive: C:\Users\[username]\AppData\Local\Temp\NVIDIA Corporation\NV_Cache. It will store up to 256MB of precompiled shaders, and once that limit is reached, older shaders are automatically purged to make way for newer ones, so there is no need to manually clean out the Shader Cache folder. Indeed if you regularly use an automated cleaning utility like CCleaner, you should make sure it isn't set to clean out the Windows Temp folder where the Shader Cache resides - in CCleaner untick the 'Temporary Files' box under the System category. If you're running an SSD and are worried about the impact of Shader Cache writes on drive longevity, you can move the entire Windows Temp folder to another drive if you wish. Open the Windows Control Panel, launch the System Component, select Advanced System Settings, then click the Environment Variables button and Edit the paths for both the TEMP and TMP entries. This really isn't necessary, as contrary to popular belief SSDs actually have tremendously long lifespans and can take a huge amount of writes - see the Solid State Drives section under the Drive Optimization chapter of the TweakGuides Tweaking Companion for more details.
I recommend that the Shader Cache be set to On under Global Settings. The Shader Cache folder should also be kept on your fastest drive for optimal performance, even if it's an SSD, as it is only 256MB in size at most and will have a negligible impact on drive longevity. If you wish to set the Shader Cache on or off on per-game basis, you can do so under the Program Settings tab.
Texture Filtering: Textures are the images covering all of the objects, characters and surfaces in a game world. These two-dimensional images are wrapped around wireframe polygons to create the illusion of a 3D object, viewable from every angle and distance. However, it's precisely because textured surfaces are often viewed at an angle, and at various distances, that they must have texture filtering applied to them in order to maintain optimal appearance. Like Antialiasing, this texture filtering process can be achieved using different methods, with different results. If done poorly, textures will exhibit visual glitches, such as blurriness, a noticeable gradation between lower and higher detailed areas, blockiness, shimmering and texture "noise".
There are up to five settings related to Texture Filtering in the Nvidia Control Panel. Four are covered below; the other - Anisotropic Filtering - is covered earlier in the guide.
Texture Filtering - Anisotropic Sample Optimization: Covered earlier in the guide, Anisotropic Filtering (AF) is the highest quality texture filtering method, providing excellent results. When Anisotropic Filtering is used in a game and this setting is enabled, it attempts to optimize the AF technique to reduce its performance impact.
If the Texture Filtering - Quality setting (covered further below) is not set to High Quality, then you can adjust this setting. The available options are On and Off. If set to On, it limits the number of samples that any Anisotropic Filtering uses based on the size of the texels (texture pixels). This optimized texture sampling provides potentially faster performance when using AF, but it may result in slightly lower image quality, or image quirks such as shimmering. If set to Off, AF is applied at maximum possible quality.
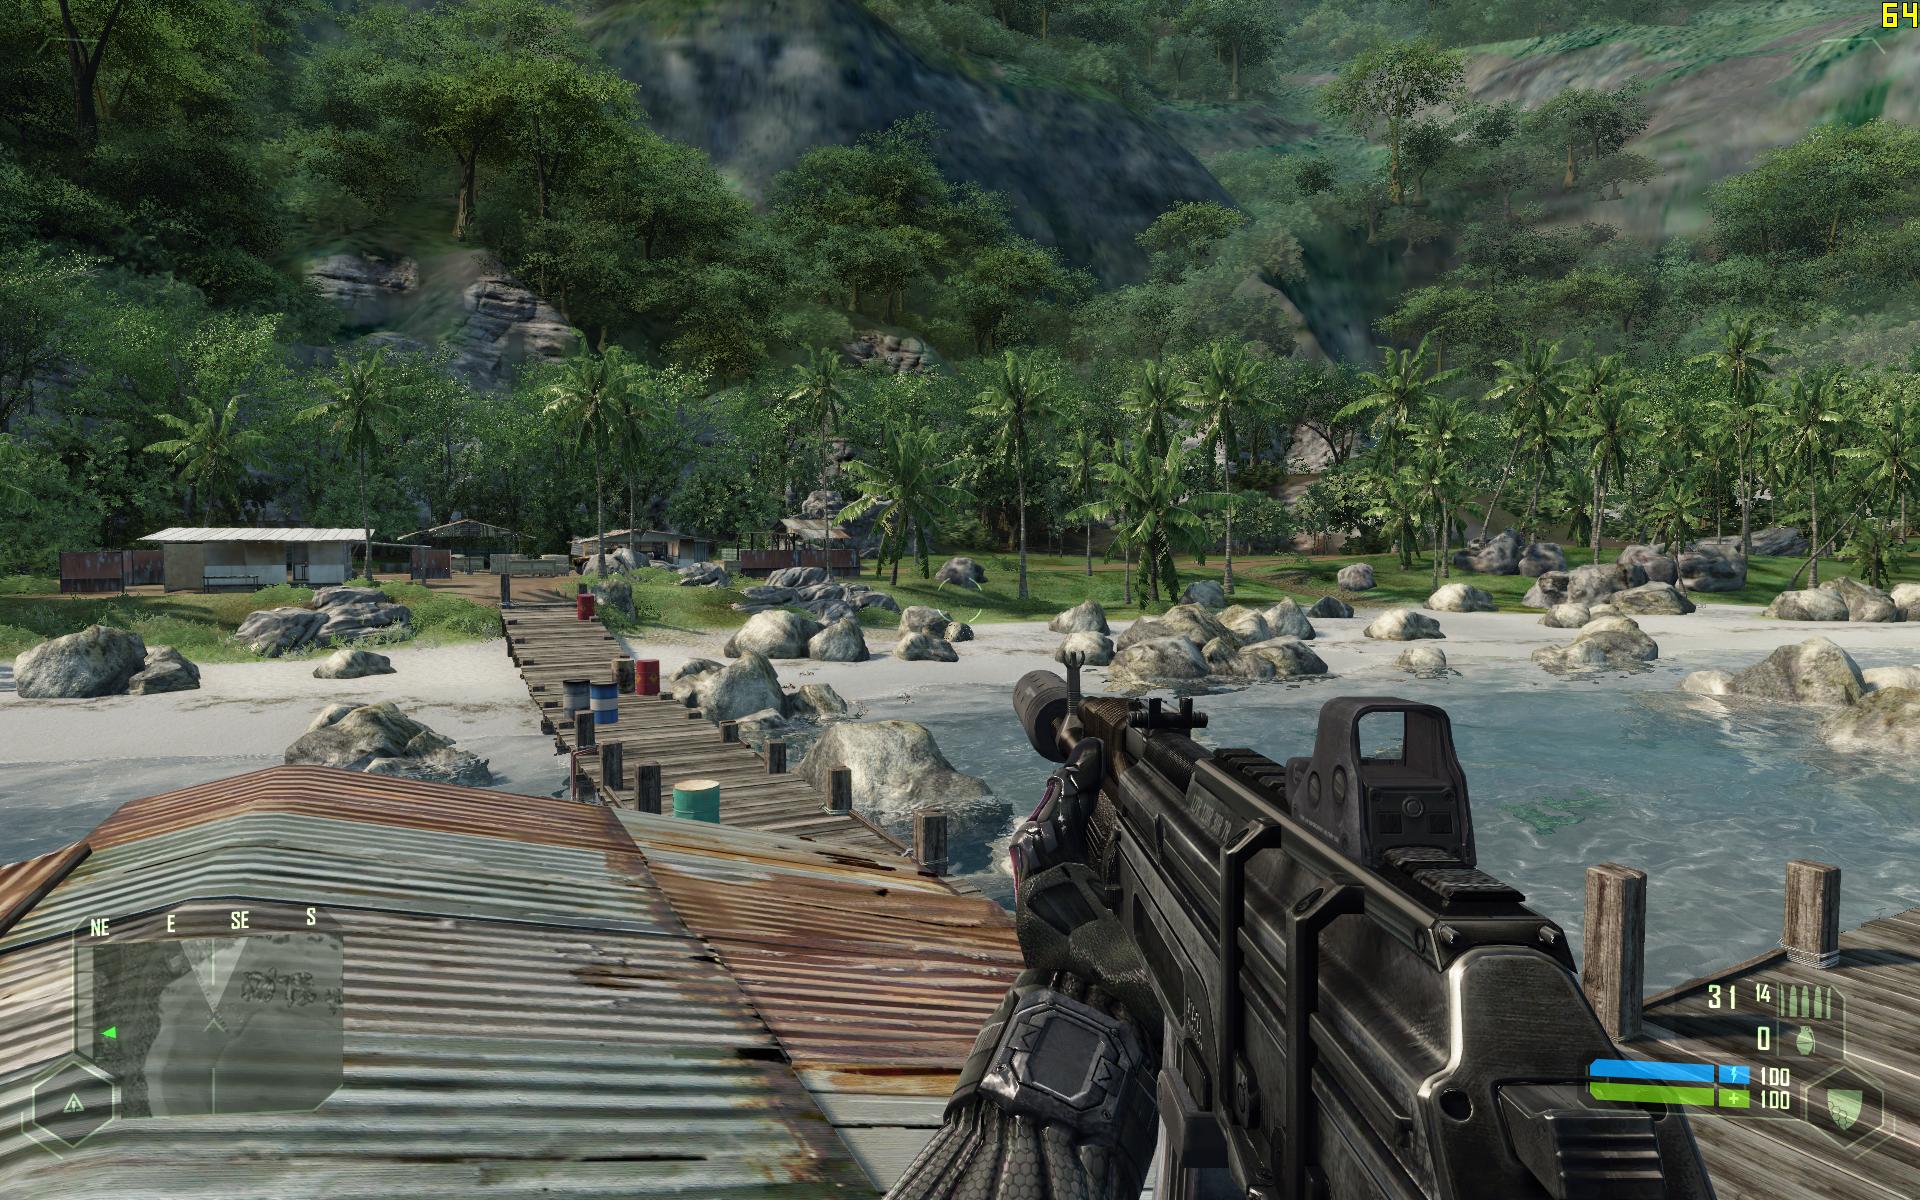

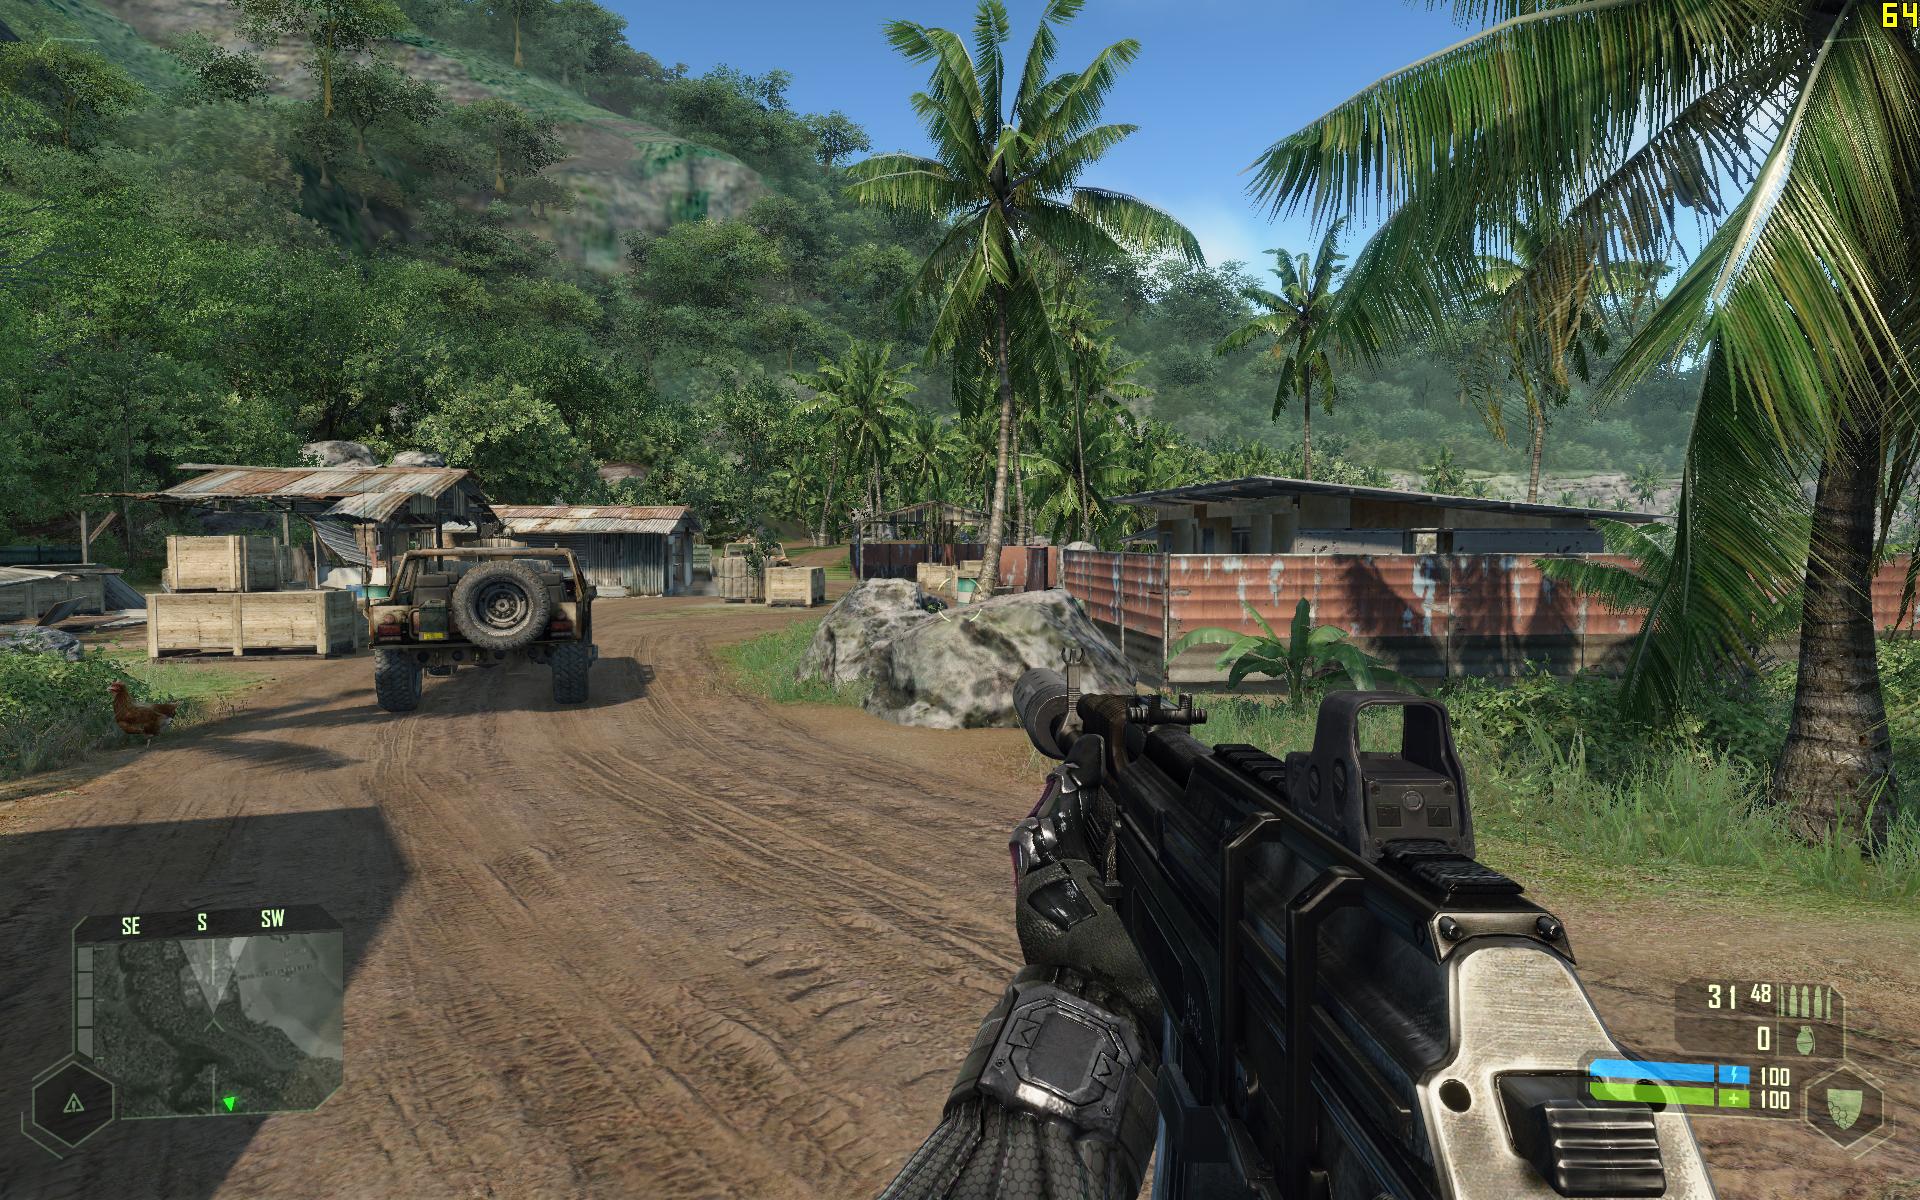
The screenshot comparison above shows a scene with 16x AF (and 8x AA) with Anisotropic Sample Optimization Off versus On. Looking closely at areas where any reduction in AF quality would become apparent - such as the wood texture on the pier as it recedes into the distance, and the protruding rocky surfaces on the mountain - shows absolutely no difference between the two screenshots. Only when flicking rapidly between the two shots, and discounting the normal movement of the trees and water, do a couple of tiny shadow differences become apparent in the distance. I have confirmed via testing in several other games that for all intents and purposes, there is no discernible reduction in image quality when Anisotropic Sample Optimization is enabled. But as the framerate counter at the top right of the screenshots shows, and again confirmed with testing in several games, there is also no real performance difference either. Since Anisotropic Sample Optimization can theoretically introduce motion-based artifacts such as shimmering, I did an in-game comparison of the two settings in several games looking for additional shimmering, but once again found no detectable difference in that regard while the scene was in motion.
It is recommended that Texture Filtering - Anisotropic Sample Optimization be set to Off under Global Settings to ensure the highest image quality when Anisotropic Filtering is in use. In practice the performance benefits of Anisotropic Sample Optimization are insignificant or non-existent on most systems, given full quality Anisotropic Filtering has minimal performance impact anyway. It is assumed that if you are using any level of AF in the first place that you want to improve image quality, so it is better not to also enable anything that can potentially work against that improvement. Note that this setting only applies to DirectX games, not OpenGL.
Texture Filtering - Negative LOD Bias: LOD is short for Level of Detail, and adjusting the LOD Bias is a method of sharpening details on textures. The LOD Bias controls texture detail by determining when different Mipmaps are used. Mipmaps are a precomputed series of textures each of a certain resolution used to improve performance. When you look at a surface close to you, a higher resolution mipmap is loaded; as you move further away from that surface, progressively lower resolution mipmaps of it are displayed instead. The default LOD Bias in a game is typically 0.0, but by using a negative value for LOD Bias (e.g. -1.5), you can force mipmap levels to be moved further away, which can improve texture sharpness at the cost of introducing shimmering when textures are in motion. In general, it is better to just use Anisotropic Filtering to improve texture detail, rather than lowering LOD Bias, as there is no shimmering and the performance impact is minor.
The available options for this setting are Allow and Clamp. Modern games automatically set the LOD Bias, which is why this setting exists, so that you can either select Clamp to lock out and thus forcibly prevent any negative LOD Bias values from being used, or Allow it. Unfortunately, Nvidia has explicitly noted in its release notes for the GeForce drivers for several years now that: "Negative LOD bias clamp for DirectX applications is not supported on Fermi-based GPUs and later." In other words, this setting currently has no impact on the majority of games on GTX 400 and newer GPUs; you cannot prevent negative LOD bias in most games.
It is recommended that Texture Filtering - Negative LOD Bias be set to Clamp under Global Settings, and that Anisotropic Filtering be used instead to improve texture clarity. At the moment this will only work for OpenGL games, which are relatively rare. If Nvidia re-introduces this feature for DirectX games, then the recommendation above will remain the same for optimal image quality.
Note: For details of how to manually adjust the LOD Bias value in some games, particularly useful in counteracting certain forms of Antialiasing which introduce blurriness to the image, see the Nvidia Inspector utility covered under the Advanced Tweaking section of the guide.
Texture Filtering - Quality: This setting serves to provide an overall method of controlling any texture filtering optimizations applied by the graphics driver. The main settings it alters are Texture Filtering - Anisotropic Sample Optimization (covered further above), and Texture Filtering - Trilinear Optimization (covered further below).
The available options are High Performance, Performance, Quality and High Quality, and each setting has the following impact:
The driver may also be controlling other forms of texture filtering optimizations with these settings, but it is unclear what these are, if any.
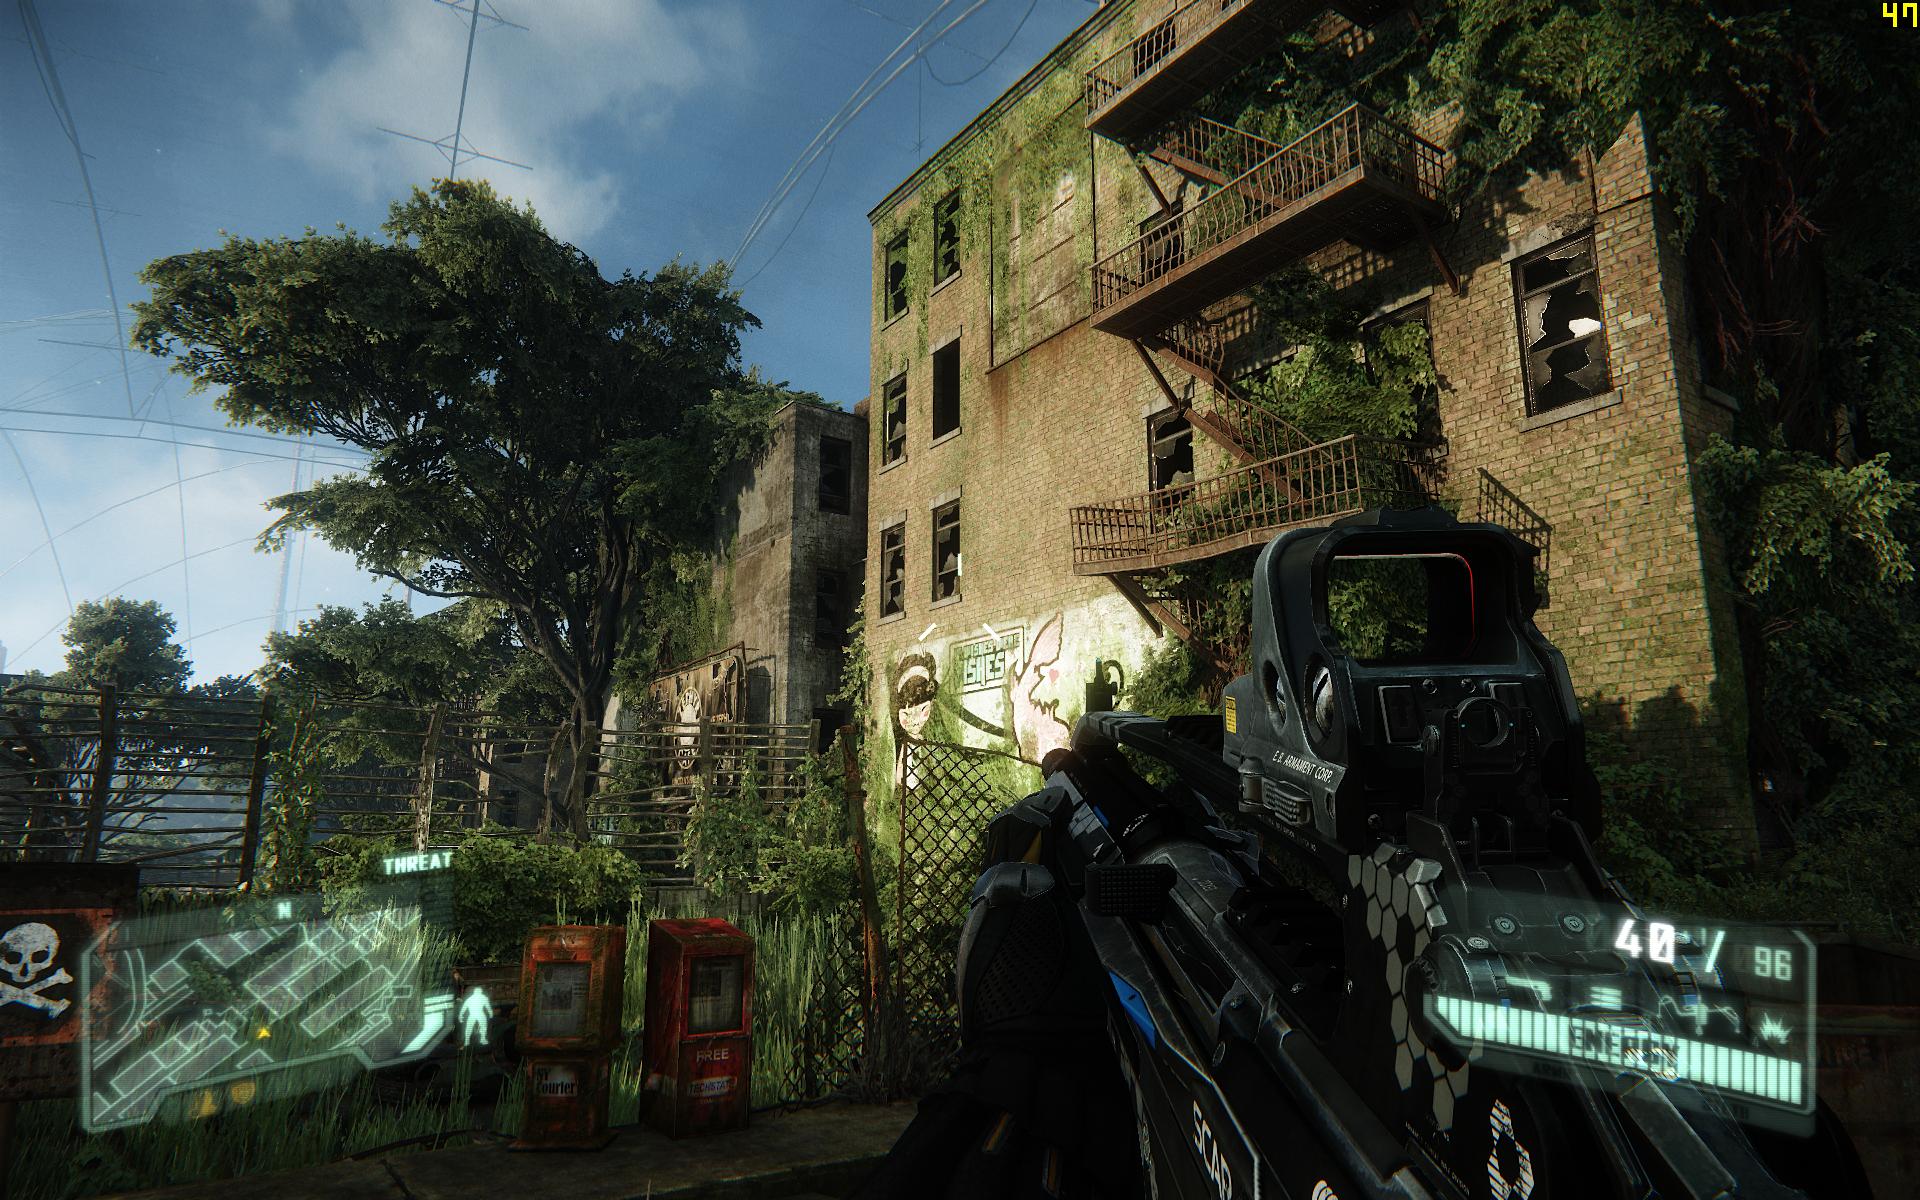
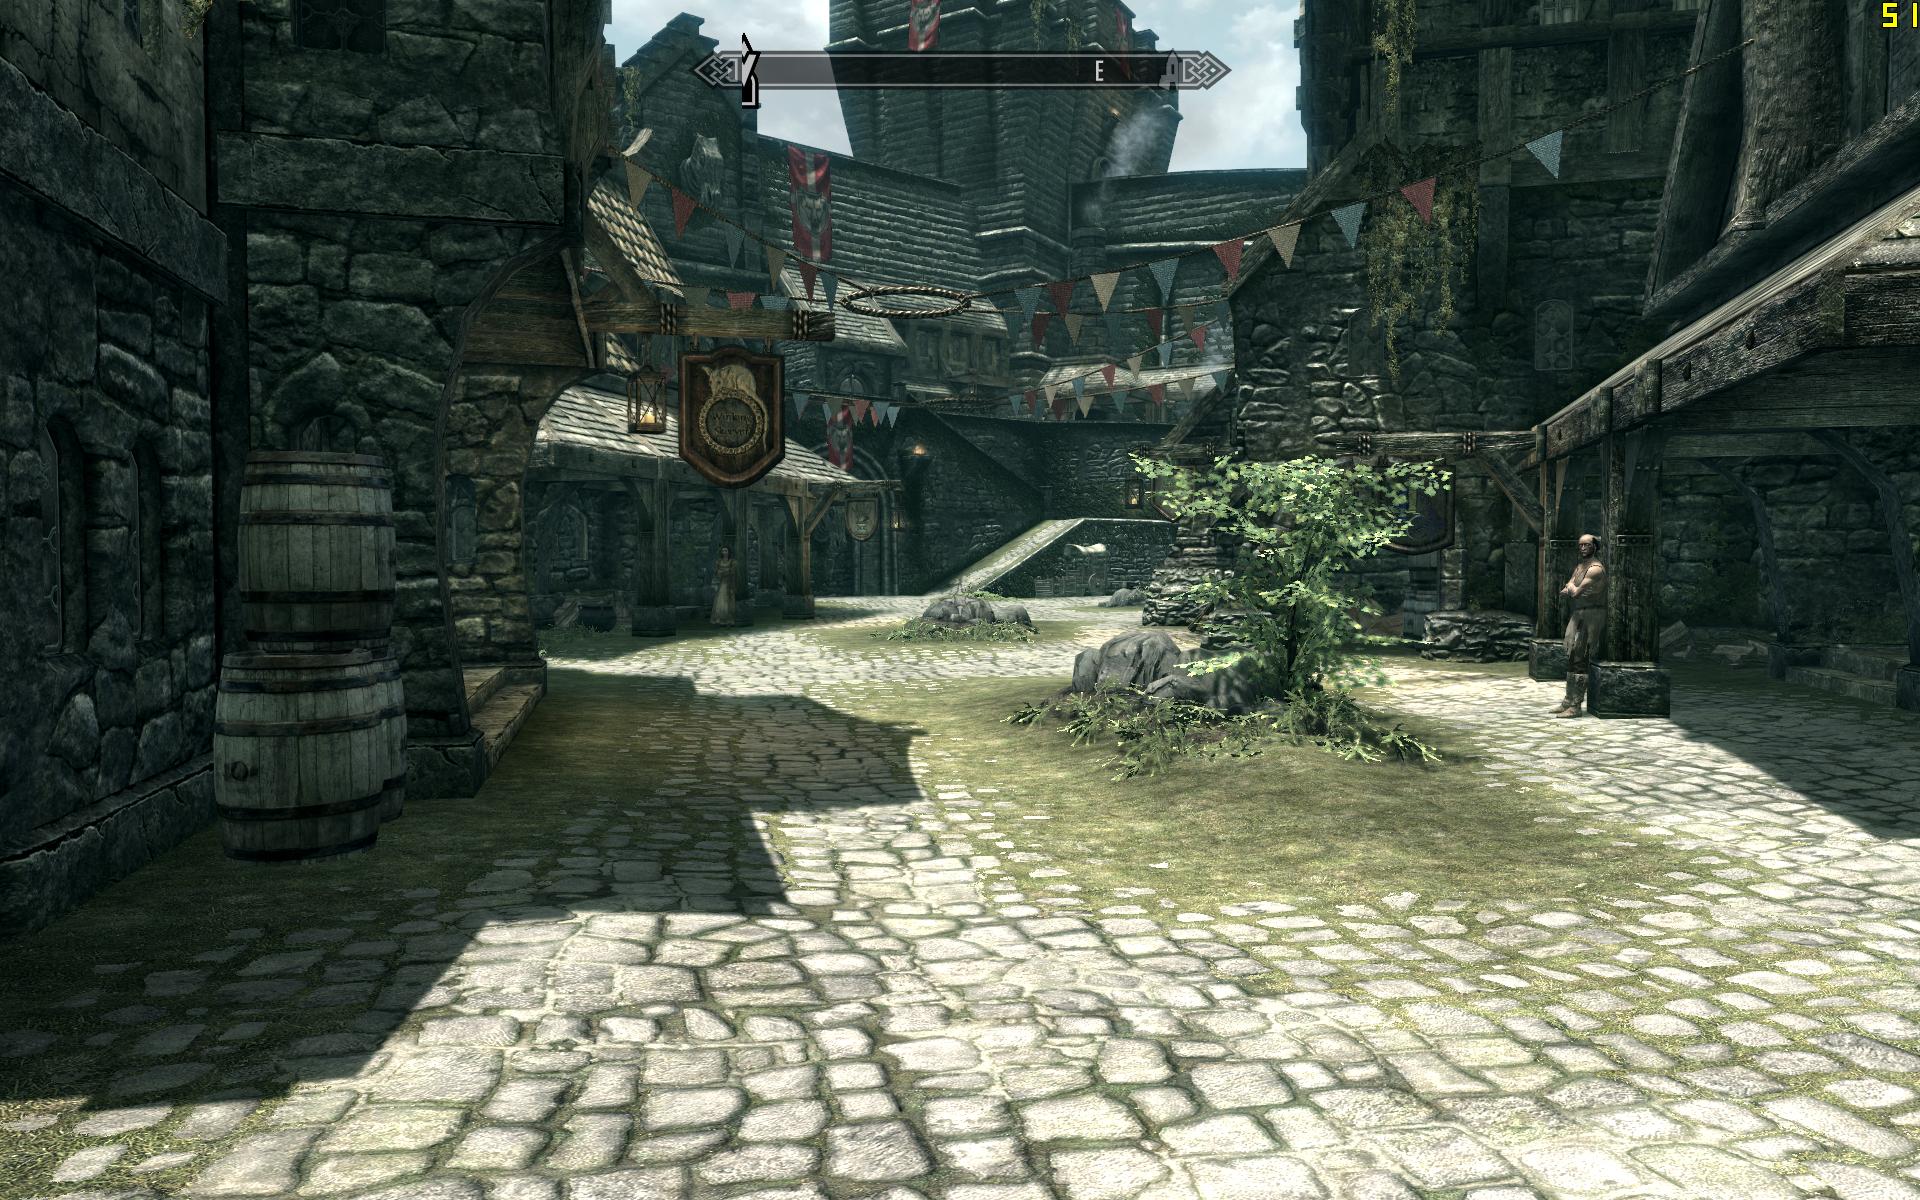
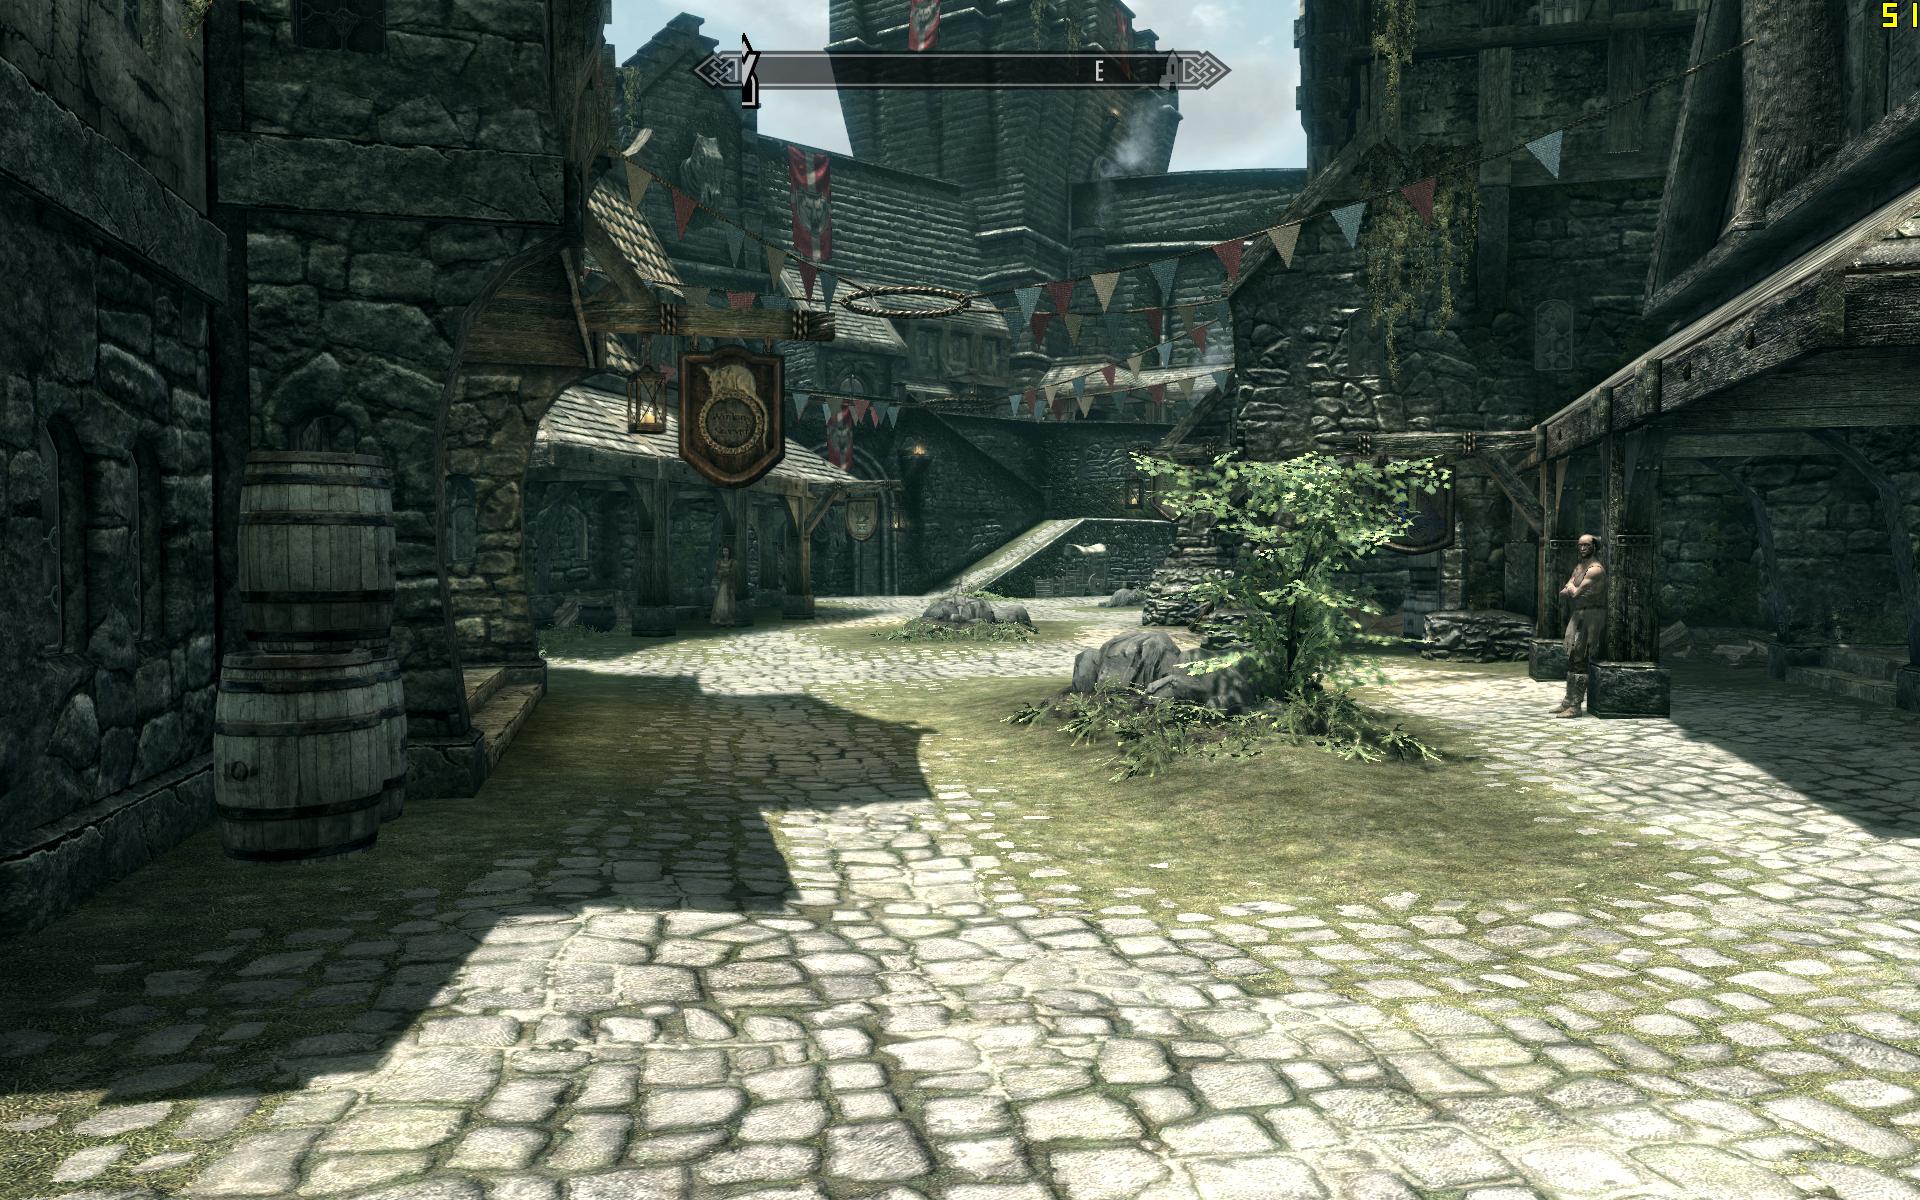
To better demonstrate the image quality and performance impact of this setting, four sets of screenshots are provided across several different games, each comparing the two extremes of High Performance and High Quality. Each game has had 16xAF applied via the NVCP. The areas to examine most carefully for texture quality differences are long angled surfaces (e.g. brick walls, walkways, the ground) and the surfaces of distant objects (rocks, buildings, tree trunks).
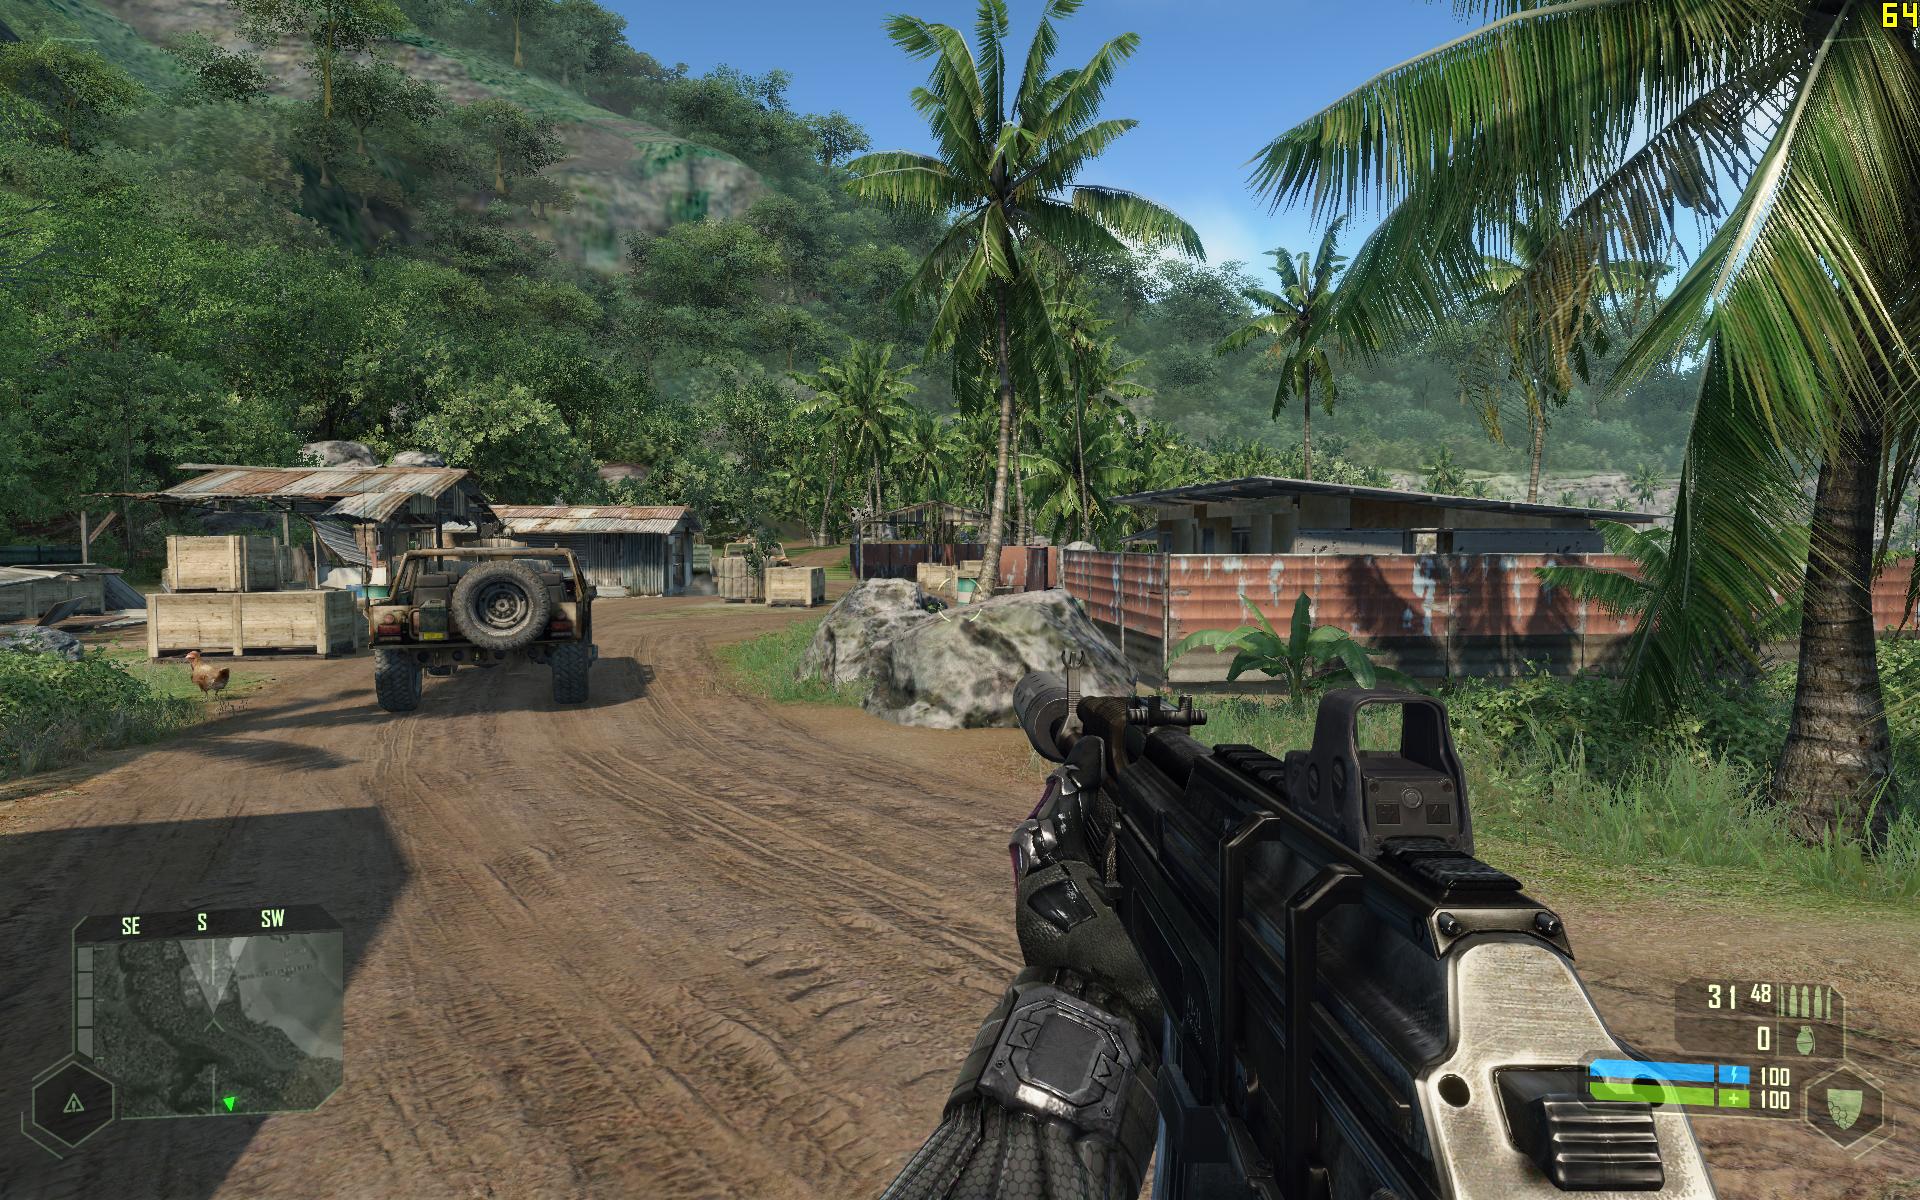
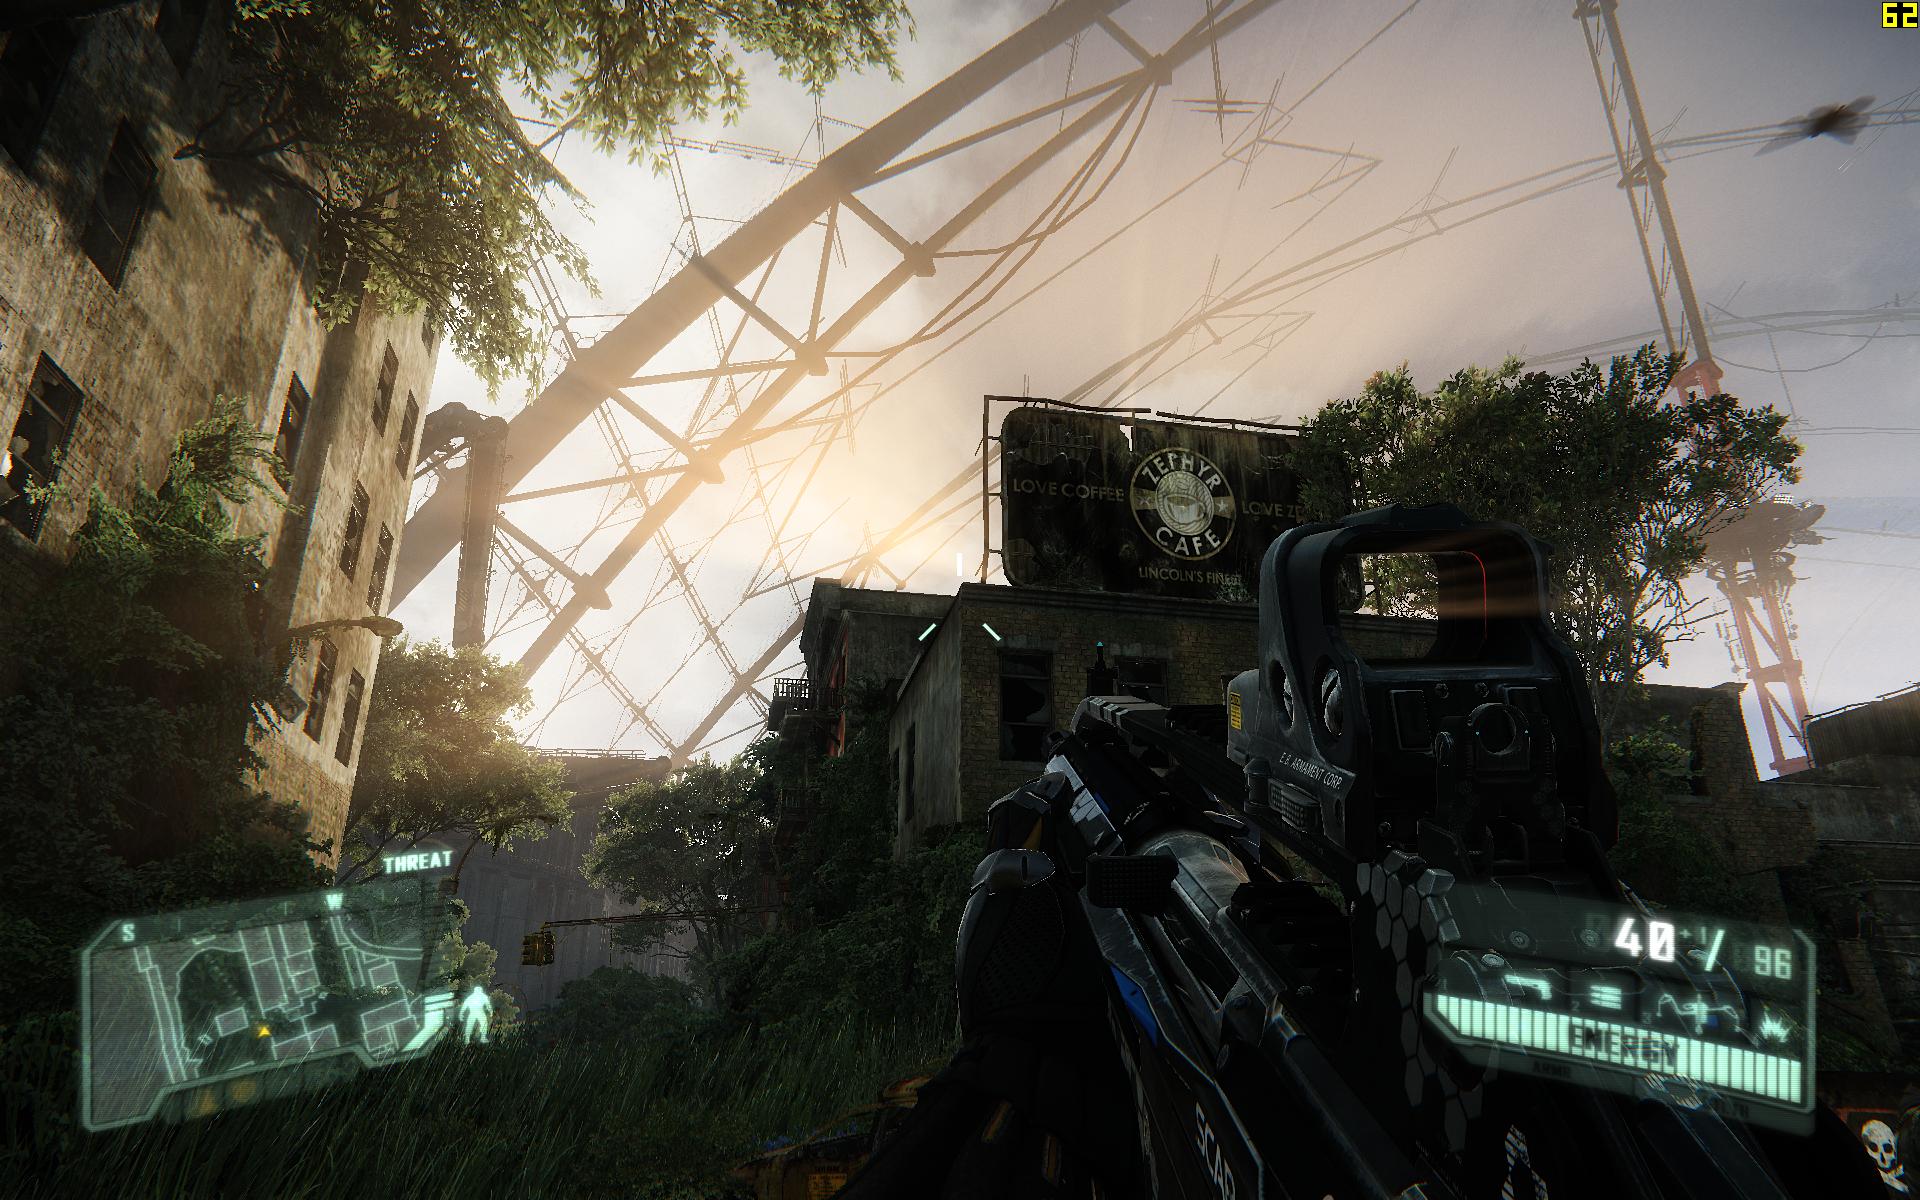
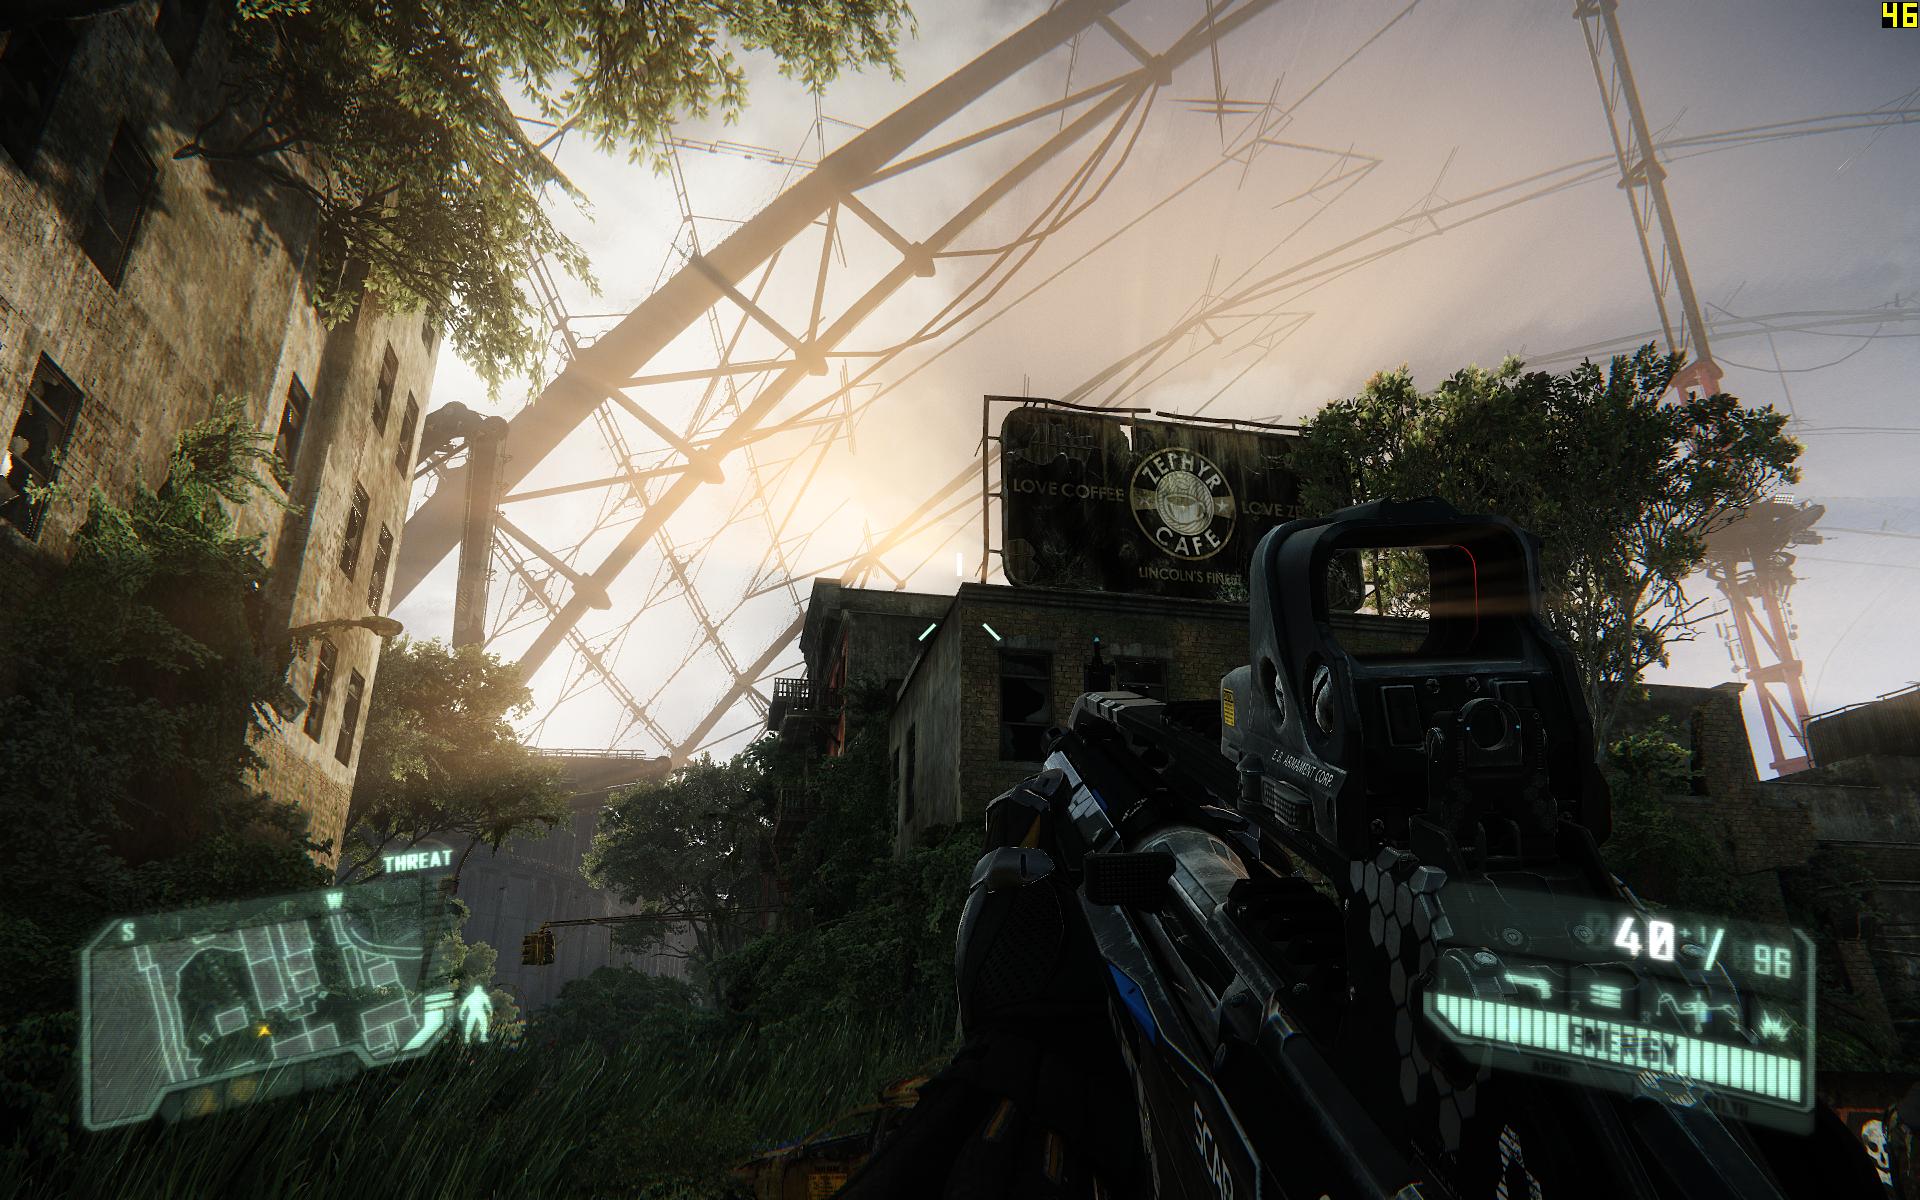
The first set of screenshots above, taken in Crysis 1, shows no discernible image quality difference and no performance difference.
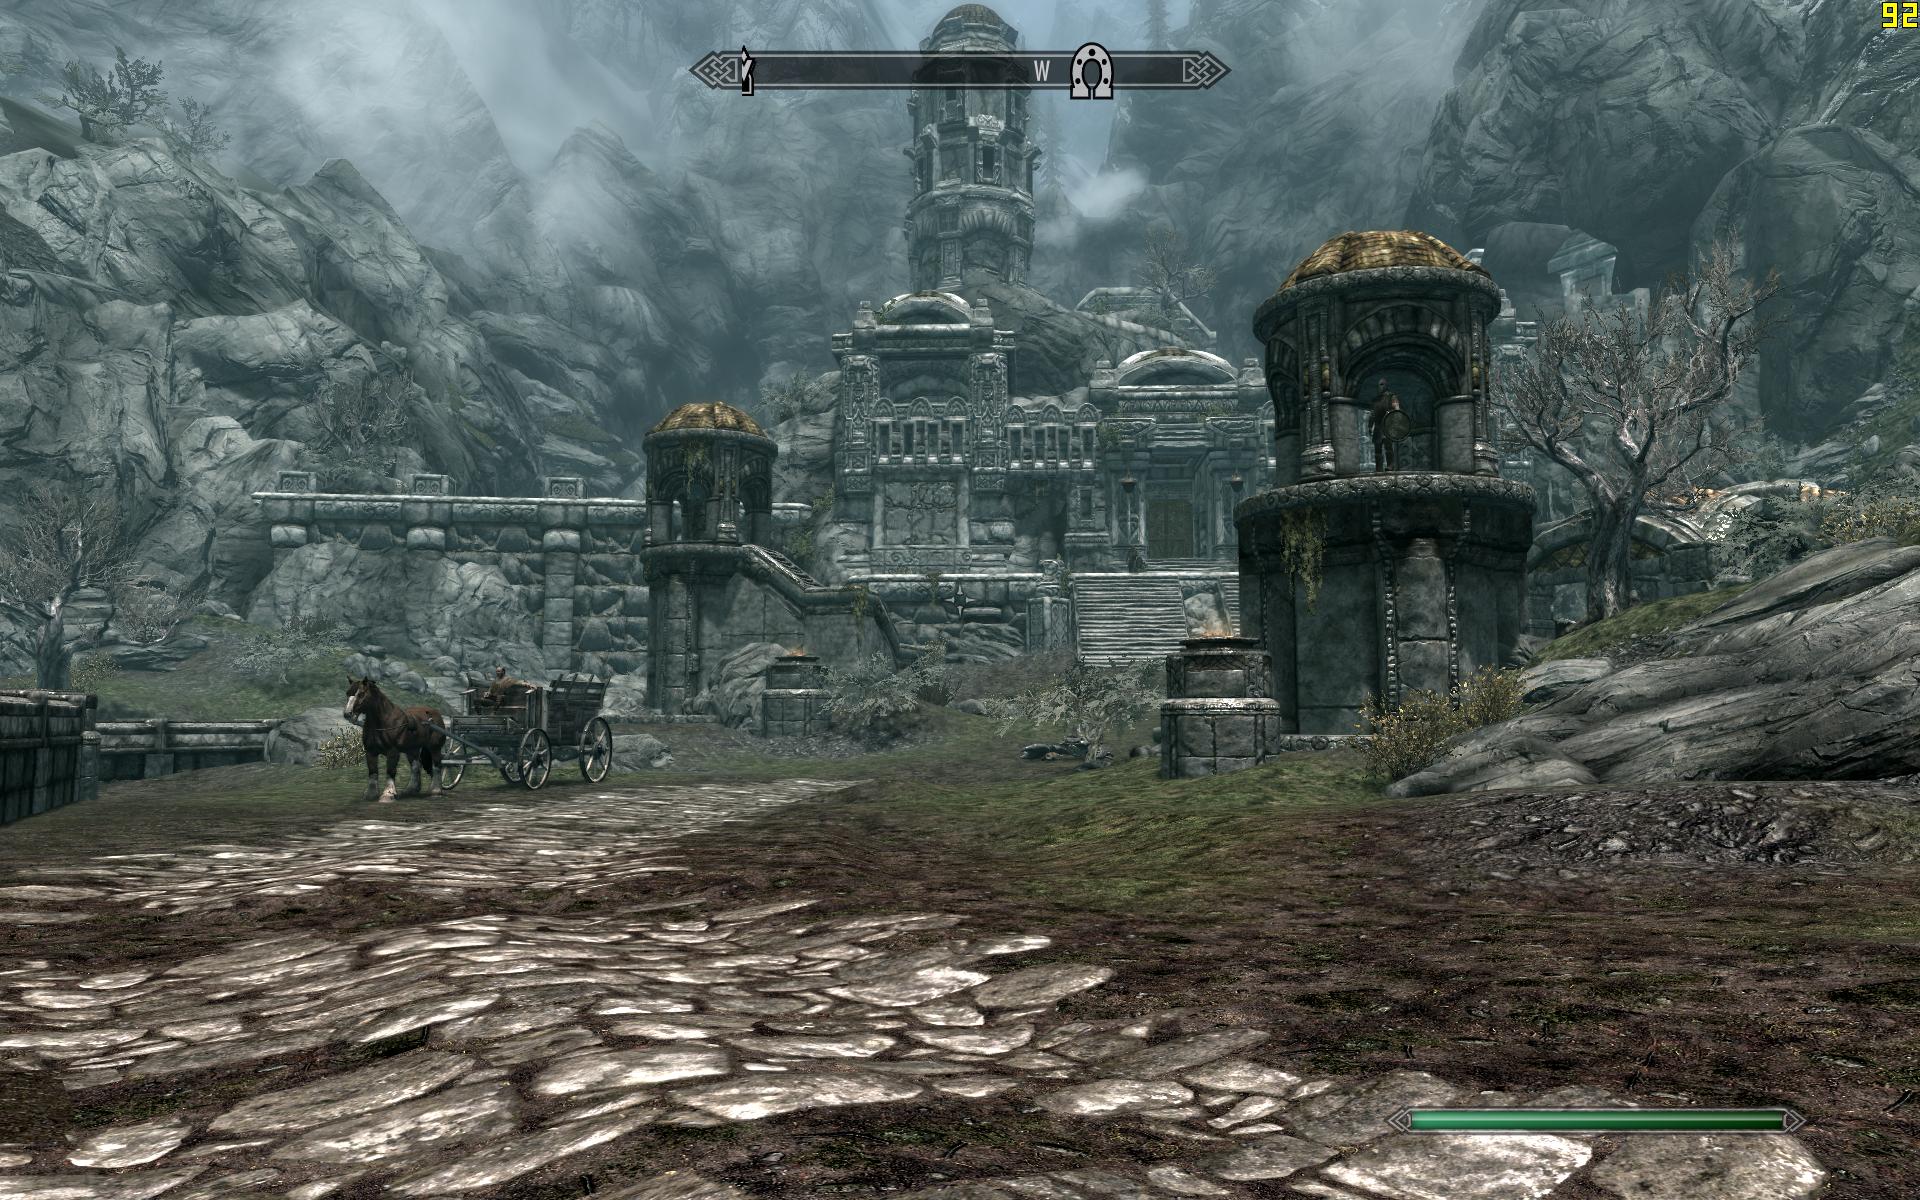
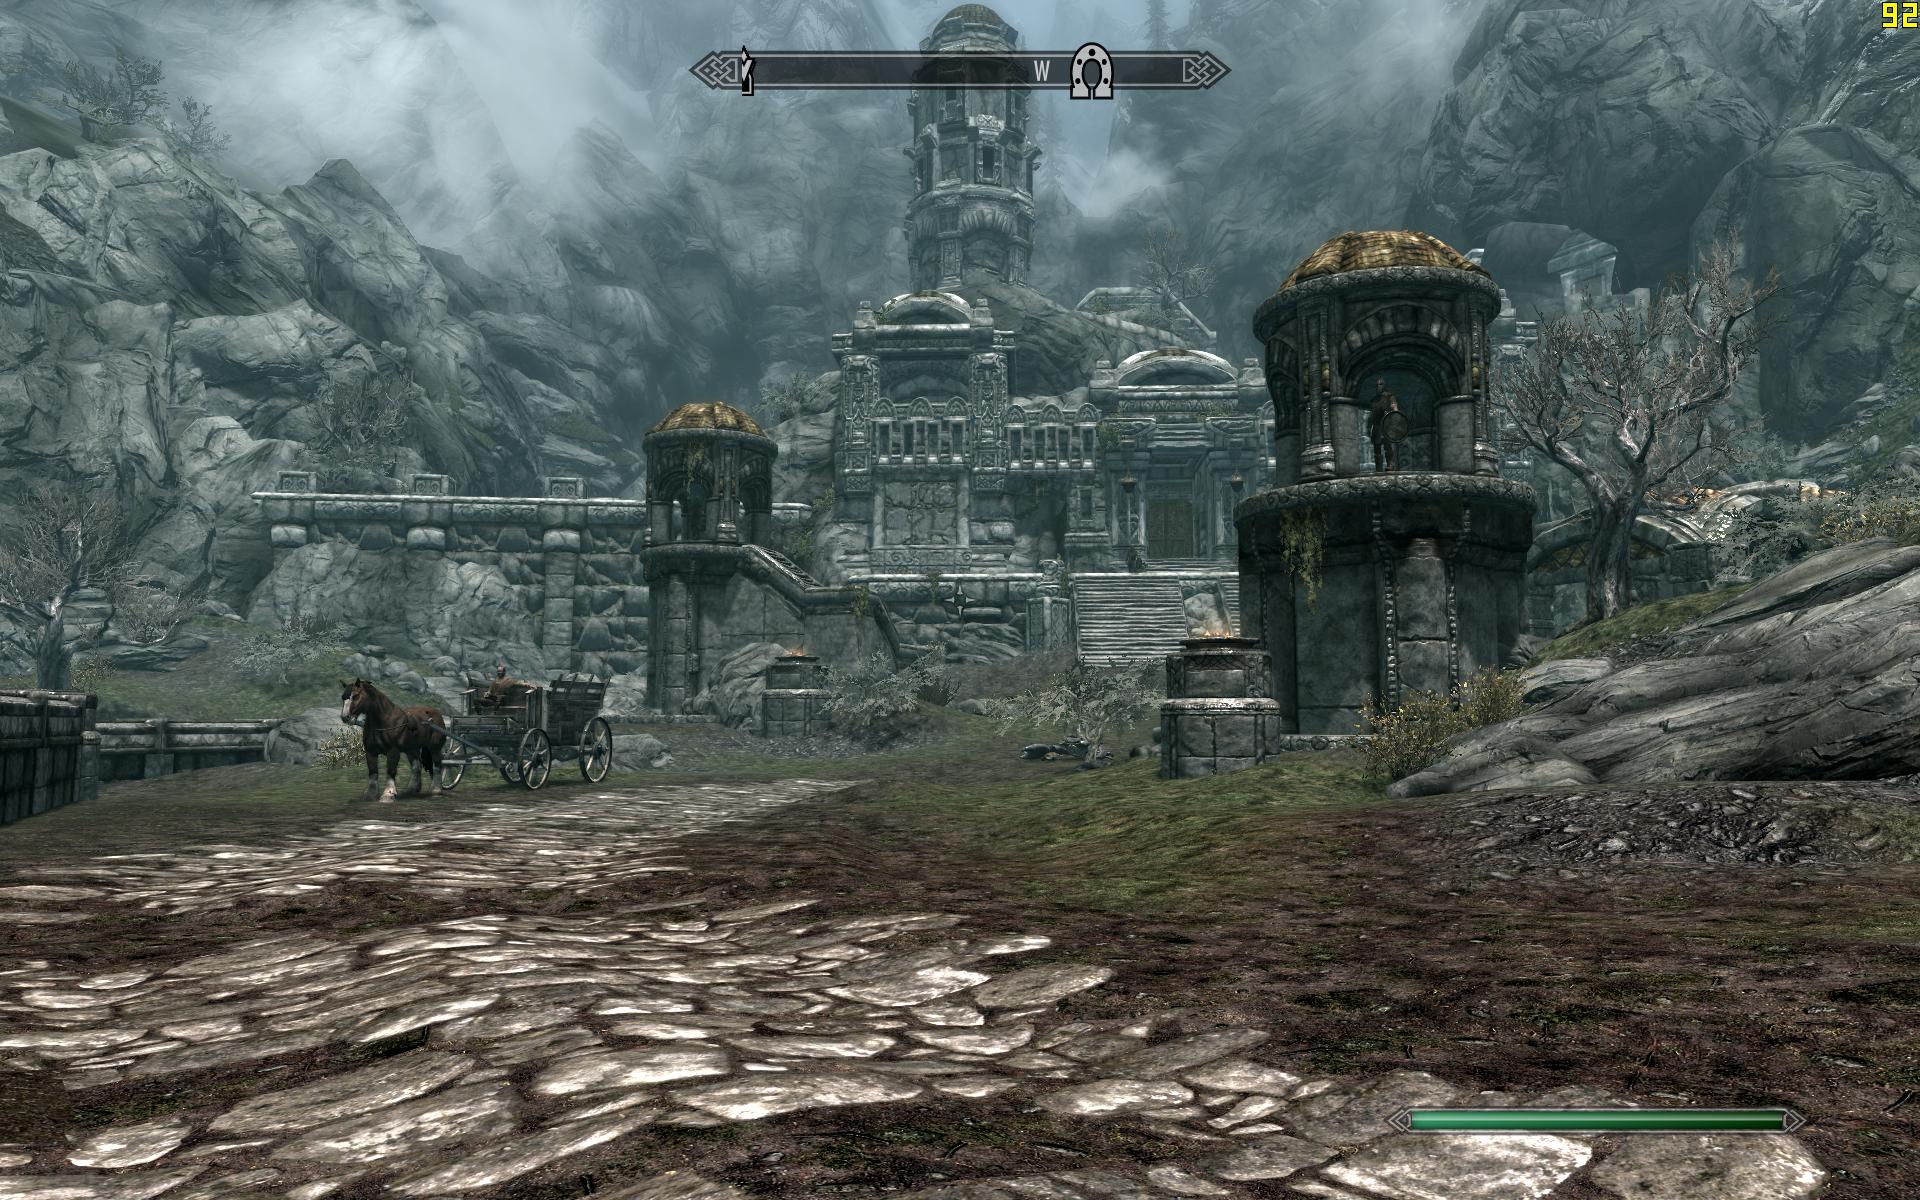
The second set of screenshots above, taken in Skyrim, shows no discernible image quality difference and no performance difference.
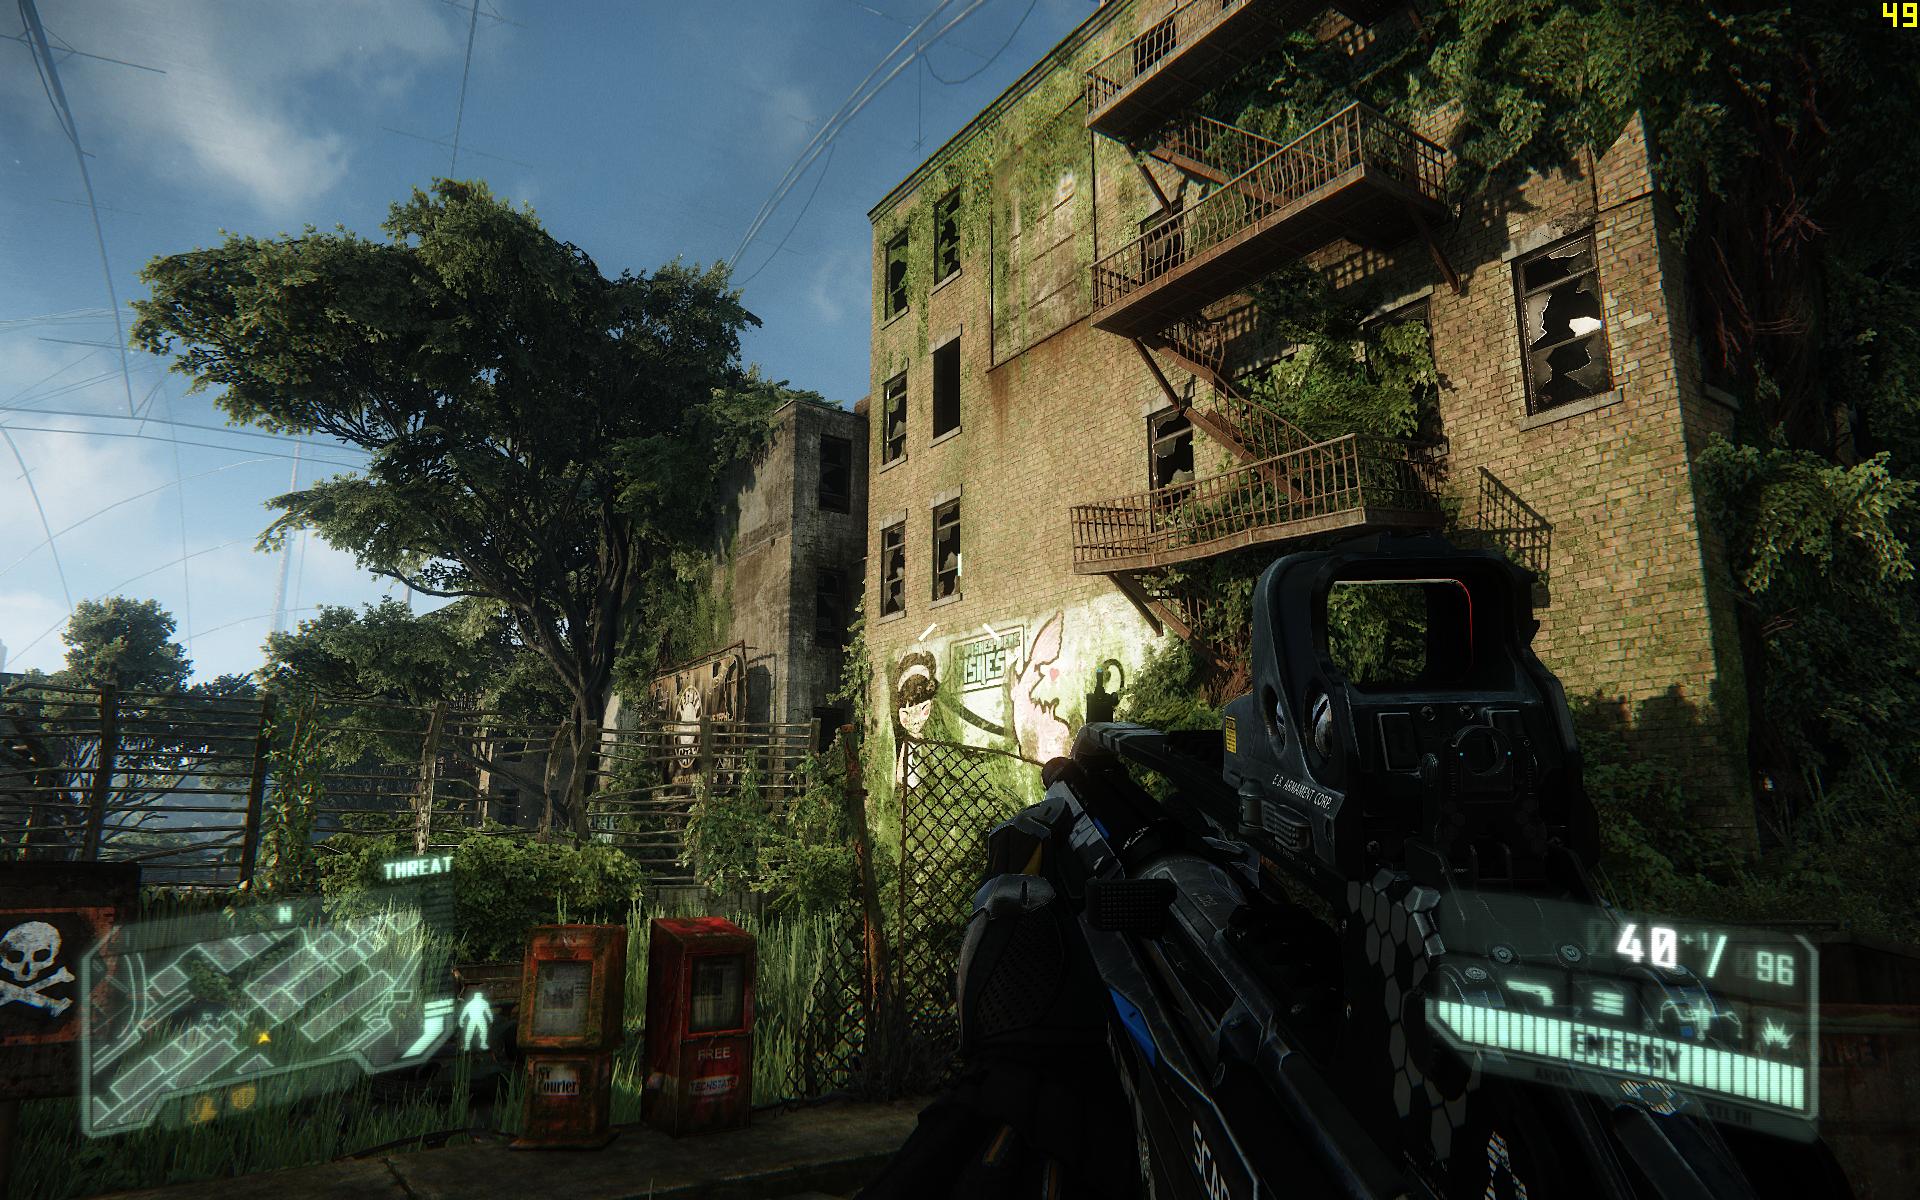
The third set of screenshots above, taken in Crysis 3, shows no discernible difference in texture quality, but a 4% performance improvement is evident from using High Performance (49 FPS vs 47 FPS). Note however that there is very slight camera movement between the two shots, as Crysis 3's checkpoint save system doesn't allow creation of identical screenshots in any given location. So the FPS variation could simply be attributed to this discrepancy.
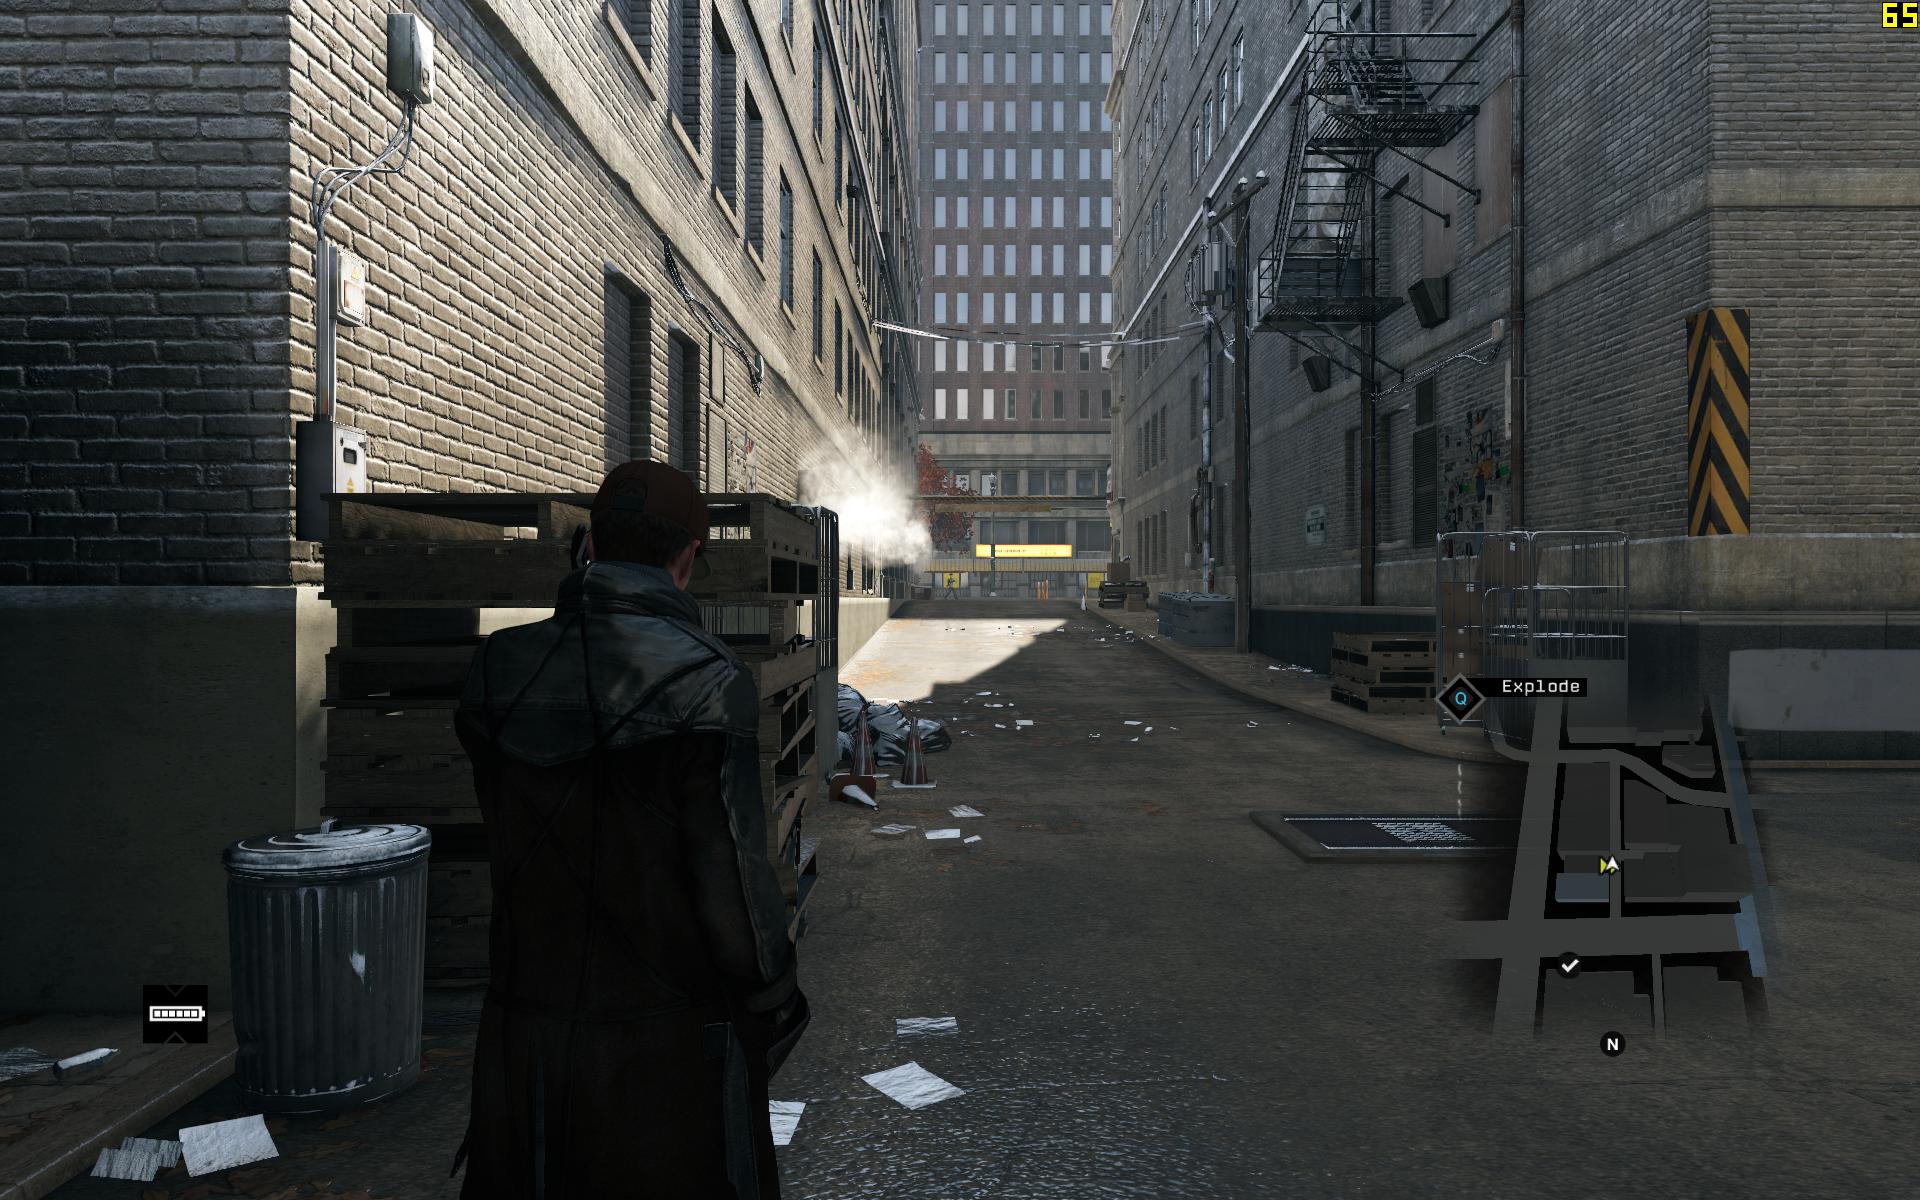

The final set of screenshots above, taken in Watch Dogs, shows no noticeable difference in texture quality, and an almost 2% performance improvement using the High Performance option for this setting (65 FPS vs 64 FPS). Once again, Watch Dog's checkpoint save system doesn't allow strictly comparable screenshots to be taken, so the FPS difference could solely be due to this factor.
As noted before, an aspect of texture filtering quality not readily visible in screenshots is texture shimmering, as it is largely a motion-based artifact. Playing each game briefly at these settings, I was unable to detect any real difference in terms of texture shimmering between High Performance and High Quality.
The general conclusion from this small sample of games is that the Texture Filtering - Quality setting may have an impact, but mostly in terms of performance rather than image quality. Furthermore, the performance impact appears to be insignificant, but might be more significant on low-end GPUs.
It is recommended that Texture Filtering - Quality be set to High Quality on medium and high-end systems, and High Performance on low-end systems under Global Settings. For particular games where you have performance to spare, you can select High Quality, and for those which are more strenuous, you can select High Performance under Program Settings as required. I can see no real reason to bother with using the Performance or Quality options for this setting, given the performance and image quality difference is extremely small even at the extremes of High Quality and High Performance. It's best just to use High Quality if you prefer the highest image quality, or High Performance if you prefer a potential performance boost. Additionally, there's no need to adjust the Texture Filtering - Anisotropic Sample Optimization and Texture Filtering - Trilinear Optimization settings separately; use this setting as your primary control over texture filtering and allow those to be adjusted automatically by this setting.
Texture Filtering - Trilinear Optimization: Unlike Anistropic Filtering, covered earlier in this guide, which is a non-linear and higher quality texture filtering method, Trilinear Filtering is a more basic linear texture filtering method. It is usually combined with Anisotropic Filtering to provide the highest quality of overall texture filtering currently available.
If the Texture Filtering - Quality setting (covered above) is not set to High Quality, then you can adjust this setting. The available options are On and Off. If set to On, it substitutes Bilinear Filtering on textures in parts of the scene where Trilinear Filtering is not considered necessary. Bilinear Filtering is a lower form of texture filtering than Trilinear, but performs slightly better, so this optimization may improve performance at the cost of image quality.
The screenshot comparison above shows a scene with 16x AF and Trilinear Optimization Off versus On. There is no detectable texture quality difference between the two, and as the framerate counter at the top right shows, no performance difference either. The main reason is that Trilinear Filtering has a negligible performance impact on modern GPUs, even with AF applied on top of it, and if any AF is being used in a game (which is strongly recommended), then any small difference between Bilinear and Trilinear Filtering will be all but completely covered up anyway.
It is recommended that Texture Filtering - Trilinear Optimization be set to Off under Global Settings to ensure the highest image quality, especially when Anisotropic Filtering is in use. As with Anisotropic Sample Optimization, in practice the performance benefits of Trilinear Optimization are insignificant or non-existent on most systems. Note that when the Texture Filtering - Quality setting is set to High Quality, this setting will become inaccessible but will show as being On. In effect it is Off because the setting will not be used. Finally, this setting only applies to DirectX games, not OpenGL.
The next page concludes the descriptions of Nvidia Control Panel settings.
|
|