
Nvidia GeForce Tweak Guide
[Page 9] Advanced Tweaking
The Nvidia Control Panel, as detailed over the previous four pages, is the central location to access and alter the GeForce driver settings. But the ability to implement various software-based changes to GPU settings doesn't stop there. Thanks to the work of several talented programmers, as well as a community of enthusiasts, numerous other methods now exist for safely tweaking a range of image quality and performance options for your graphics card. This section of the guide covers the key utilities and methods for performing more advanced tweaking. The best part is that all of these tools and methods are completely free; all they will cost you is an investment in the time it takes to learn how to use them correctly.
Once again, to prevent the guide from becoming incredibly long, I focus on what I consider to be the most useful tools and methods. I also cover them in a relatively superficial manner, since my goal is more to make you aware of these tools and methods, than to exhaustively list every possible setting and tweak that can be accomplished with them. Covering the Nvidia Inspector utility in full detail for example could easily fill up most of this 11 page guide just on its own. So we'll stick to examining the fundamentals of advanced tweaking here, but there's plenty to keep you interested.
Disable Unnecessary Nvidia Startup Programs & Services
A critical step as part of general system optimization is to minimize the number of background programs that launch at Windows startup. These background applications and services are typically quietly added to your Windows startup by software you have installed. Some of them are necessary; most of them are not. The issue isn't how much memory they consume in the background, or the drive space they use up, as both of these aspects are inconsequential on modern systems with plenty of RAM and storage space. The key problem is that aside from increasing Windows startup time, background programs can and do cause software conflicts, resulting in stuttering, crashes and odd behavior in games. This Microsoft Article for example confirms that background programs can interfere with your games.
Correctly identifying and removing all unnecessary background programs in Windows is too lengthy a procedure to cover properly here, so please refer to the Startup Programs and Services chapters of the TweakGuides Tweaking Companion for all the required details.
So how is any of the above relevant to this guide? It's relevant because the GeForce driver installs a range of Nvidia background startup programs and services, depending upon which driver components you choose to install, and on the average system most of them are completely unnecessary. Refer to page 4 of this guide for a full list of the GeForce driver components and what they do. Below is a list of all of the services and startup programs potentially installed by the GeForce driver package, and whether they are actually necessary on your system.

Update: I haven't been able to update the entire guide since it was last updated in 2016, however, as of October 2019, pages 3 and 4 have been updated. Importantly, the best method to prevent unnecessary services and startup programs, especially the Nvidia Telemetry-related ones, is to use the NVSlimmer and DDU utilities covered on page 3 to remove them from the driver package prior to installation, and do a clean installation of the drivers, removing all prior versions.
Services
Nvidia Display Driver Service: This service is installed with the core Graphics Driver component. It must be set to Automatic or Manual for the Nvidia Control Panel to open. If you don't need to use the Nvidia Control Panel (e.g. you use Nvidia Inspector instead) it can be set to Disabled with no other negative impact; any customized settings in the NVCP will continue to be applied as normal.
Nvidia Stereoscopic 3D Driver Service: This service is installed with the 3D Vision Driver component. Unless you use 3D Vision functionality - i.e. you have a 3D Vision-capable monitor and 3D glasses - then you can set this service to Disabled. It is recommended that instead of altering the service, you uninstall the 3D Vision-related driver components. Open the Windows Control Panel, launch Programs and Features, and find and uninstall the Nvidia 3D Vision Driver and Nvidia 3D Vision Controller Driver components.
Nvidia GeForce Experience Service: This service is installed with the GeForce Experience component. Whether the service is set to Automatic, Manual or Disabled, GeForce Experience will still launch. If you actually use GeForce Experience for anything other than ShadowPlay, set this service to Automatic or Manual, otherwise it can be Disabled.
Nvidia Network Service: This service is installed with the GeForce Experience component. Whether the service is set to Automatic, Manual or Disabled, GeForce Experience will still launch. However, if it is set to Disabled, launching GeForce Experience will result in an 'Unable to connect to Nvidia; try again later' error dialog box, followed by a slight delay before GeForce Experience finally opens. Disabling this service also prevents the updating features in GeForce Experience from working correctly, including driver update notifications and optimal game setting updates. If you actually use GeForce Experience for anything other than ShadowPlay, set this service to Automatic or Manual, otherwise it can be Disabled.
Nvidia Streamer Service: This service is installed with the GeForce Experience component. Whether the service is set to Automatic, Manual or Disabled, GeForce Experience will still launch. If it is set to Disabled, you will not be able to stream from your PC to a Shield portable device. If you don't have a Shield device, this service can be Disabled.
To view or alter any service in Windows, use the Windows Services utility by going to Start, typing Services.msc and pressing Enter. Double-click on the relevant service name, select the startup type from the drop-down box, and click Apply.
Startup Programs
Aside from the services above, the GeForce driver package may also install several startup programs:
Nvidia Backend (NvBackend.exe): This startup item is typically related to the game optimization and update functionality in GeForce Experience, but in more recent GeForce drivers may be installed even if you don't install GeForce Experience. If you don't use the game optimization or driver update notification features, it can be disabled with no negative impact.
Nvidia Settings (nvtray.exe): This startup item controls the small Nvidia icon in the Notification Area. This can be easily disabled and removed from Windows startup by opening the Nvidia Control Panel and unticking the Show Notification Tray icon item under the Desktop menu at the top. Note that this step is also necessary if you've disabled NvBackend.exe to prevent it from restarting.
Nvidia Capture Server (nvspcaps64.exe): This startup item is installed along with GeForce Experience, and is required for the video capture functionality of ShadowPlay.
To view and alter all types of startup programs I recommend using the free Autoruns utility. If you need help using Autoruns, refer to the Startup Programs chapter of the TweakGuides Tweaking Companion.
If you've only installed GeForce Experience to access the ShadowPlay feature, see the ShadowPlay section further below for details of how to first correctly configure ShadowPlay and then disable the genuinely unnecessary GeForce Experience-related startup programs and services. If you don't use ShadowPlay or any other GeForce Experience features, then it's best to open the Windows Control Panel, launch Programs and Features, and simply uninstall the Nvidia GeForce Experience component.
In short, you can safely disable all of the Nvidia services and startup programs above and the GeForce driver will continue to function correctly. The recommended configuration for most systems however is that you keep the Nvidia Display Driver Service available when required by setting it to Manual, so that you can launch the Nvidia Control Panel whenever necessary. On systems using ShadowPlay a slightly different configuration procedure is recommended, as covered further below.
One last important note regarding background programs: if you have any hardware monitoring/overclocking utilities, such as Afterburner or GPU-Z (as covered later in the guide), running in the background, be aware that it is a documented issue that they can cause stuttering in games. This can occur if the hardware polling rate - the frequency with which the hardware monitoring features take new readings - is set too often.
Game Capture Tools
If you're a PC gamer then at some point you will have wanted to capture either a screenshot or a video of your game in order to share it with others. This could be for entertainment purposes, such as uploading a gameplay video to YouTube, or for troubleshooting purposes, such as posting a screenshot of a visual glitch you're experiencing on your favorite forum. There are several free tools available to capture screenshots, audio and video from games.
To start with, the simplest method of capturing a single screenshot requires no third party utility: at any time in a game press the PRTSCN button on your keyboard, which copies the currently displayed frame to memory. You must then paste this screenshot into a paint program such as MS Paint or Photoshop in order to save it in a particular format. Most people will need a more comprehensive method, which is where the following tools may be useful:
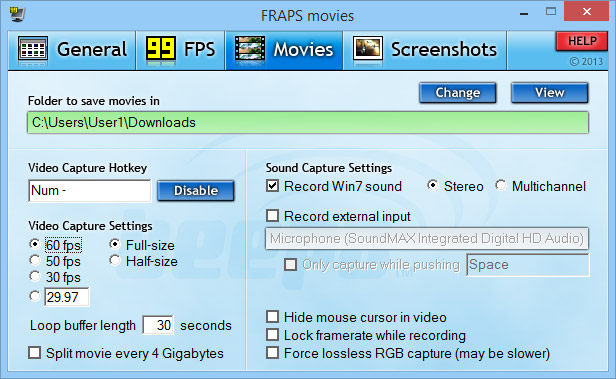
Fraps is a screenshot, video capture and framerate benchmarking utility. The main uses for Fraps are for displaying a framerate counter in games, capturing screenshots in several different formats, and its capability to record high quality uncompressed video. Unfortunately the free trial version of Fraps is quite limited for anything other than displaying a framerate counter or taking screenshots in BMP format; video capture is restricted to 30 seconds and is watermarked. Furthermore, video capture with Fraps can be very performance intensive, as it puts a significant load on the CPU and storage system, resulting in a large drop in FPS as well as potential stuttering.
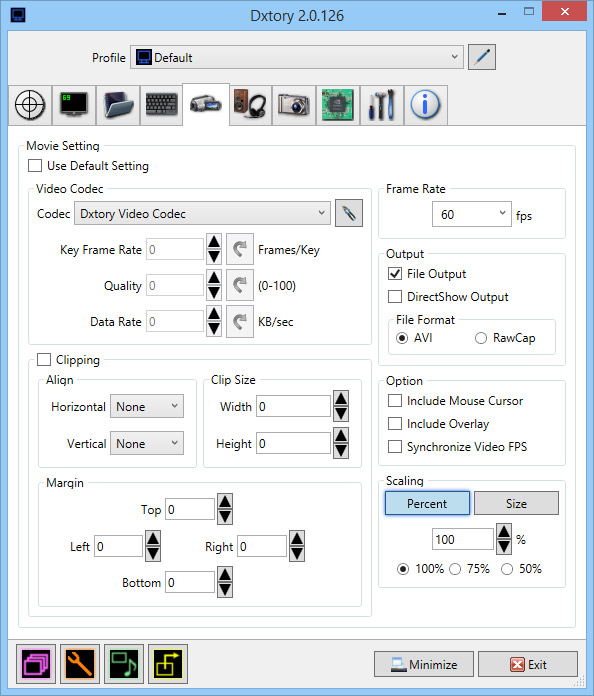
Dxtory has similar functionality to Fraps, including screenshot and video capture, as well as framerate measurement. The key difference is that Dxtory has a far greater number of settings and recording options. As with Fraps, Dxtory is only free as a trial, and watermarks capture output until purchased. Video capture with Dxtory is not as performance intensive as Fraps.
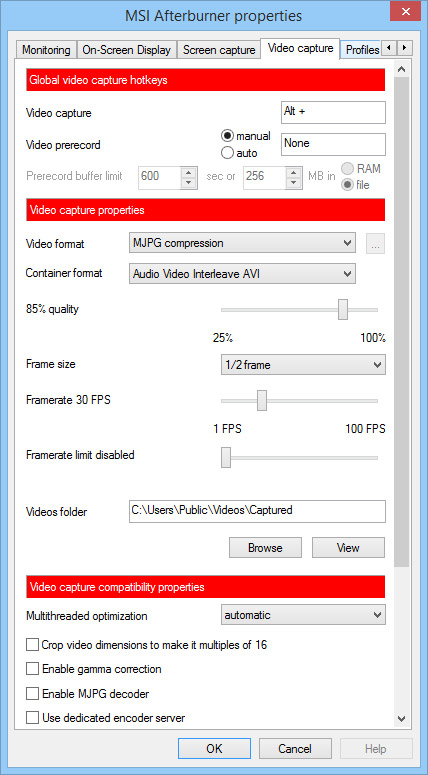
The MSI Afterburner utility is covered in more detail on the next page of this guide. It works on all brands of Nvidia GPUs, not just MSI, is completely free, and has numerous useful features (powered by Rivatuner Statistics Server). Of relevance to this section are Afterburner's framerate display, screenshot and video capture capabilities. These can be accessed by launching Afterburner, and clicking the small cog icon in the center of the Afterburner interface to open the Properties window.
To display a framerate counter in games, go to the Monitoring tab in the properties window, highlight Framerate in the list of Graphs shown, place a tick next to it, and then further down the same tab, tick the Show in On-Screen Display box. In the On-Screen Display tab you can then configure the OSD further by clicking the More button.
To configure screenshot capture in Afterburner, go to the Screen Capture tab in the properties window. Here you can set which key triggers a screenshot capture, as well as the format and location of the screenshot.
To configure video recording in Afterburner, go to the Video Capture tab in the properties window. Here you can set which keys trigger video capture, as well as the format and location of the video. The performance impact of recording is relatively low, as Afterburner's video capture uses some of the same technology which underpins ShadowPlay, as covered below. Note that you can even record in highest quality uncompressed format should you need it.
ShadowPlay is a free feature of the GeForce Experience component, providing very effective video capture and encoding functionality. Shadowplay relies on three key Nvidia features, explained here, that require a GTX 600 series or newer GPU in order to function: the NVENC hardware H.264 encoder, NVFBC (Nvidia Frame Buffer Capture) and NVIFR (Nvidia Inband Frame Readback). The hardware encoder provides GPU-accelerated H.264 encoding for good quality compressed video, while NVFBC and NVIFR provide efficient hardware-level frame capturing capabilities to minimize the performance impact. The end result is that, as long as you have a GTX 600 or newer GPU, you can use ShadowPlay as a completely free all-in-one video capture and encoding tool with only around 5% loss in FPS while recording. This article compares Shadowplay's video recording performance impact to Fraps and Dxtory, and finds it to generally be the lowest of the three.
The only major drawback of ShadowPlay, aside from its hardware requirements, is that it necessitates the installation of the GeForce Experience (GFE) component of the GeForce drivers, which in turn installs a lot of unnecessary services and startup programs (as covered earlier). Nvidia has deliberately integrated ShadowPlay into GeForce Experience, and it cannot be installed separately on its own. Fortunately, there is a way to significantly strip back the unwanted bloat of GeForce Experience while leaving the ShadowPlay functionality intact.
The first step is to configure ShadowPlay. Launch GeForce Experience - if you can't find its icon, go to C:\Program Files (x86)\NVIDIA Corporation\NVIDIA GeForce Experience\ and launch the GFExperience.exe file. If that directory doesn't exist, you will need to install GeForce Experience, and you can download the latest version and install it separately from here.
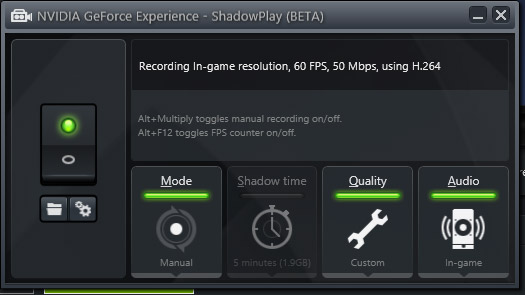
In GeForce Experience, click the ShadowPlay button at the top right. A small configuration window will appear. To enable ShadowPlay, click the "switch" on the far left, and an Activating ShadowPlay prompt will appear, followed by a green light and the enabling of all of the ShadowPlay options. Importantly: all of the Nvidia services and startup items (covered earlier in the guide) must be running in order to successfully activate ShadowPlay. Specifically, the Nvidia GeForce Experience Service, Nvidia Network Service, Nvidia Streamer Service and Nvidia Backend (NvBackend.exe) and Nvidia Capture Server (nvspcaps64.exe) items must all be enabled and running. Once ShadowPlay is activated, most of these can then be disabled as covered further below, whilst leaving ShadowPlay functionality intact.
In the ShadowPlay configuration window, you should now go through and customize all of ShadowPlay's settings. Click the Mode button - the important distinction to note here is that Manual mode refers to the ability to use ShadowPlay like a normal video capture tool, activating video recording with certain key(s), and turning off and saving the captured video with the same key(s). Shadow mode on the other hand will record your gameplay constantly in the background, by default storing the last 5 minutes as a temporary file on your drive, ready to be permanently saved if you press the relevant Shadow mode capture key(s). You can configure the amount of time used for Shadow mode buffering by clicking the Shadow Time button. However, unless you have a separate hard drive you can dedicate to its constant output, it is recommended that Shadow mode be turned off by selecting Manual under Mode. This is because enabling Shadow mode and outputting to your primary drive can result in stuttering in games, as well as excessive wear if it is an SSD.
Click the Quality button to set the quality of video capture, and I recommend selecting Custom as it gives you further options, and also because the presets can set an incorrect in-game resolution if your native resolution is different to 1920x1080. Generally speaking, around 22Mbps (equivalent to the Medium preset) and above gives a reasonably good compromise between file size and image quality, but bear in mind that because ShadowPlay videos are automatically encoded using H.264, the results can never look quite as good as pure uncompressed video. Finally, clicking the Audio button only really allows you to select whether you wish to combine microphone input with in-game audio, or disable audio capture altogether. The audio quality is currently not configurable, and remains set at 96Kbps AAC encoded. Advanced users can attempt to use the AAC Patch section of this guide to adjust AAC quality using a hex editor.
Additional options for configuring ShadowPlay are available by either clicking the small Cogs icon under the ShadowPlay activation switch, or clicking the Preferences tab in the main GFE window and selecting ShadowPlay on the left side. Here you can firstly configure where the Camera, ShadowPlay recording Status Indicator, and FPS Counter appear when the relevant feature is enabled. We'll focus on the last two. Click the Status Indicator button at the top, and under Position, click on the corner of the rectangle where you wish the small green ShadowPlay indicator to appear on your screen; your selection will be reflected on the monitor graphic to the right. This status indicator is very important, particularly when using Manual mode, as it shows you when ShadowPlay recording is active while playing a game. Do the same thing for the FPS Counter, if you use that feature, to determine which corner of the screen the FPS counter appears in when enabled.
You can set the keyboard button(s) to trigger various ShadowPlay features, such as Manual mode recording, by scrolling down to the Keyboard Shortcuts section, and assigning keys as appropriate. For example, if Alt+F9 is set for Manual mode, then pressing the ALT and F9 keys together while playing a game will commence video recording, and pressing the same key combination will stop recording and save the final encoded video. You can set the location for saved videos by scolling further down the same screen and entering a path in the Save Location box. The Temporary Files Location is where unsaved ShadowPlay video data is held before being finalized, and it's best for performance and wear purposes to assign this to a non-system hard drive if available, especially if you want to enable Shadow mode.
If you've only installed GeForce Experience to use ShadowPlay, the final step involves disabling all of the unnecessary GFE-related services and startup items. Close GeForce Experience, and do the following:
1. Open the Windows Services Utility (Start>Services.msc), and set the following services to Disabled: Nvidia GeForce Experience Service, Nvidia Network Service, and Nvidia Streamer Service. To do this, double-click on each one, select Disabled in the Startup type drop-down box, click the Stop button, click Apply and click OK.
2. Disable the NvBackend (Nvbackend.exe) startup item, either by using the Windows Registry Editor to go to HKEY_LOCAL_MACHINE\SOFTWARE\Microsoft\Windows\CurrentVersion\Run and right-click on and delete the NvBackend entry, or use the Autoruns utility (covered earlier) to untick the NvBackend entry. Importantly: the Nvidia Capture Server (nvspcaps64.exe) startup item must be left enabled for ShadowPlay to work. Refer to the Windows Registry, Startup Programs and Services chapters of the TweakGuides Tweaking Companion if you're unfamiliar with how to use the above tools.
3. Open the Nvidia Control Panel and under the Desktop menu at the top, untick the Show Notification Tray Icon item.
4. Reboot Windows.
You can now initiate ShadowPlay to record video at any time during a game by pressing the appropriate key(s) that you assigned earlier to its various functions. GeForce Experience and its associated services and startup programs - aside from Nvidia Capture Server - don't need to be running in the background for ShadowPlay to work. You can still manually launch GeForce Experience at any time if you want to reconfigure ShadowPlay, but you will see an error prompt before GFE starts, and some of GFE's other features may not function correctly. It will also launch the NvBackend program, but it won't add it back to your Windows startup routine.
Determining which game capture software is best depends on your needs and hardware. For displaying a framerate counter in games, any of the above utilities is suitable, but Afterburner provides the best selection of on-screen display categories in addition to framerate, so on balance Afterburner is recommended, and covered in more detail shortly. For screenshot capture, Afterburner is again a good choice as it's completely free and reasonably configurable. For the same reasons, Afterburner is also recommended for normal video capture requirements, especially on systems which don't have a GTX 600 or newer GPU, and hence can't access ShadowPlay. Remember that Afterburner contains some of the same technology as ShadowPlay to improve its capture performance, and also has the option to record the highest quality uncompressed video if needed. If you can access ShadowPlay though, then it is the recommended tool for most video capture needs as it's very efficient, minimizing any performance impact, and combines video capture with H.264 encoding in a single step, making it much quicker and easier to upload videos to YouTube for example. For more specialized needs requiring a highly configurable video capture and screenshot tool, then Dxtory is the best option if you're willing to purchase the full version. But again, for most people Afterburner and ShadowPlay are best as they're completely free and more than sufficient.
The Advanced Tweaking section continues on the next page.
|
|