
Prey Tweak Guide
[Page 7] In-Game Settings (Pt.3)
[Advanced 2]
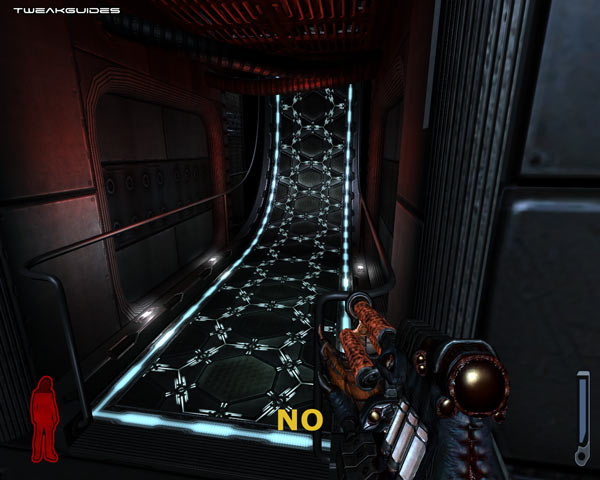
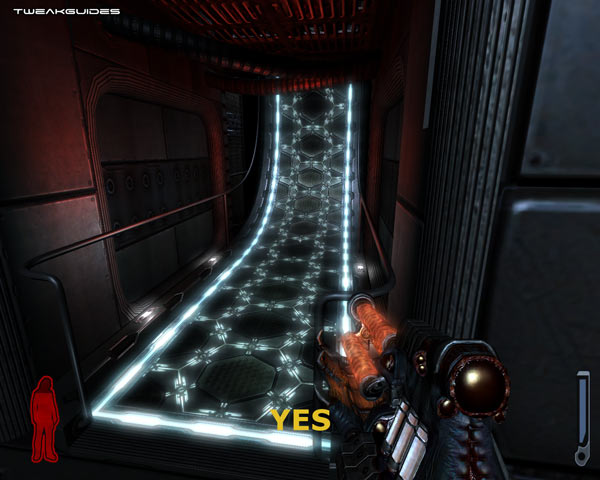
Use Glow: This option, as the name suggests, controls the glow effect surrounding various objects in the game. See the screenshot comparison above to see a clear example - when glow effects are turned off, the lit walkways and even your own gun are much less bright. Enabling this option can have an impact on FPS, but it is also forms part of the atmosphere of much of the alien ship, so only turn it off if you really need the FPS.

High Particle Detail: This option controls the quality of particle effects in the game. Particle effects are what give a feeling of richness and general atmosphere, and control the volume of things like smoke and fog for example. To see what I mean, look at the screenshot comparison above - with High Particle Detail set to On, the lights have a more realistic effect and interact with the air around them, giving the impression that the air is rich and humid, which is what the inside of the ship is meant to be. With the effect disabled, while FPS improves, sometimes significantly on older systems, realism is also reduced. This is most noticeable in areas which usually have smoke or steam.
High Quality Skinning: After taking many screenshots with High Quality Skinning set to Off and On, I could not for the life of me see the difference. In theory I believe it is supposed to affect the quality of certain textures like gun models, but close examination of screenshots shows me absolutely no difference either way, so if you know what exactly this setting does, please contact me.
Image Anisotropy: This setting controls the level of Anisotropic Filtering used in the game. The higher the rate of Anistropic Filtering, the crisper textures will appear as they recede into the distance. For more details see my Gamer's Graphics & Display Settings Guide. This setting has options from Off all the way up to 16x depending on your graphics card. The higher the rate of Anistropy, the better the image quality but the lower your performance. In general Anisotropic Filtering has a noticeable but not significant impact, and most systems should be able to run some level of Image Anisotropy, but if you want maximum framerates, set this to Off. Note that you should set the Anisotropic Filtering to 'application preference' in your graphics card's control panel so it doesn't conflict with this setting.
Audio
[Audio Settings]
Effect, Music Volume: These sliders controls the volume for sound affects and music respectively. Adjust each according to your tastes as they have no performance impact.
Level Load Music: If set to Yes, during periods when a new level is loading, background music/sound effects will be played. If you find these annoying and prefer to sit in silence as a new level loads up, set this option to No. There is no performance impact as such.
Sound System: This setting lets you choose the audio API (application programming interface) for playing back all sound in Prey. The Default setting will work on all systems, but the OpenAL system can provide better performance and audio quality. Before setting this option to OpenAL, first you must make absolutely certain you have downloaded and installed the latest audio drivers for your sound device. See the TweakGuides Tweaking Companion for details on how to find out more about your system hardware and how to update its drivers. Next, to find out if your sound device provides full support for OpenAL, go to your \Windows\System32 directory and look for the presence of an OpenAL32.dll file. If the file is there, you should enable OpenAL mode here, and you should experience excellent audio and minimal performance loss. If this file is not present, you can still enable OpenAL mode, however if you experience any problems, set this back to Default.
Note that SoundBlaster X-Fi owners who want to use OpenAL mode (recommended) should update to the latest Official X-Fi Drivers with OpenAL support. These drivers have a specific fix for issues with Prey in them.
[Mixer Settings]
What appears here will differ depending on which Sound System option you've enabled above.
Sound Device: If you are using the OpenAL Sound System, you can select your audio device here. Usually if you have a specific sound card, it will be listed here for you to select. If the device isn't listed first make sure you've installed the latest drivers for the sound device. If it still fails to list, select the 'Generic Hardware' option.
EAX Advanced HD: This option only appears if you're using the OpenAL sound system with a sound device which supports EAX Advanced HD. Most recent Creative Audigy and X-Fi sound cards support Advanced HD. This audio standard adds a range of special effects to audio if enabled, at the cost of a slight reduction in performance. You must also have installed the latest Advanced HD drivers for your card which can be downloaded here - see further above for X-Fi card owners.
Speaker Setup: This option appears if you are using the Default Sound System. You can only choose between Stereo and Surround Speaker Setup here - choose the one which suits your actual speaker setup, and make sure that this is also matched in your speaker choice in Windows (under Control Panel>Sounds and Audio Devices>Speaker Settings>Advanced). Note that selecting Surround mode can reduce performance slightly due to extra processing requirements, and may also cause some audio glitching on certain systems.
Reverse Channels: This option only appears if using the Default Sound System. If set to Yes, your left and right channel speaker output will be swapped. This is not something most people would want, so only enable this if your speakers are actually physically reversed (i.e. if your left speaker is sitting on your right and vice versa).
Once you're done adusting all the settings, you can go back to the main menu. Note that certain changes may require you to close and restart Prey before they come into effect, so I recommend doing so to make sure they are implemented properly and to prevent crashes/lockups. Also see the Advanced Tweaking section for details of how to further customize/troubleshoot sound-related issues in Prey.
The next section looks at advanced tweaking for Prey.
|
|