
Need for Speed: Most Wanted Tweak Guide
[Page 5] In-Game Settings
The following are the main in-game settings for Need for Speed: Most Wanted which can be changed to alter image quality and performance. Each is covered in detail under the relevant section. I note the image quality and performance impacts of each setting, however keep in mind that obviously the impacts will differ depending on your particular system hardware. Make sure to view the descriptions and associated screenshot/animated comparisons carefully and find your own balance of image quality vs. performance.
The best way for you to arrive at the optimal settings on your system is to read the descriptions below, then experiment by using FRAPS, a free utility which shows the number of frames per second (FPS) in the corner of the screen. Adjust your settings and note your FPS - the higher your FPS, the smoother your gameplay will be. You'll notice in the screenshots below, you can see the FRAPS counter in the top left in yellow digits. Fraps is also handy since it allows you to take screenshots of gameplay and even record demos.
To access the main game options, scroll to the Options icon at the bottom right of the screen, and click on it or press Enter. Under the Options section, there are five sub-sections: Audio, Video, Gameplay, Player and Controls. Each is covered below:
Audio
Volume Controls: The five sliders here control the various volume levels for the main audio elements of the game. Adjust according to your tastes - none have any performance impact. Moving a slider to the far left to disable a particular element will not give you a performance boost. To turn off music completely, and not just lower its volume, see further below.
Interactive Music: This setting controls the generic game background instrumental music, not the EA Trax songs. For example, when being chased by police in the Roadblock Challenge, the background music will become more tense, but if you are evading police and in Cooldown mode, the music will ease up. There may be a slight performance impact due to the extra CPU usage when this is enabled, but it is for all intents and purposes negligible, so set to suit your taste.
EA Trax: This setting controls whether the tracks performed by various artists are played throughout the game. No performance impact as such, set to suit your tastes. See the Conclusion section to find out more about the game music.
Audio Mode: The main options here are Stereo or Mono, and although Mono may provide slightly better performance on low-end systems, there should be no reason to choose anything other than Stereo.
Turning Off Music: If you want to prevent NFSMW from loading up any music into memory, you can't just use the volume sliders. To prevent music data from loading, go to your \Program Files\EA GAMES\Need for Speed Most Wanted\SOUND\PFDATA directory and rename the files MW_Music.mus and MW_Music.mpf to something else (e.g. MW_Music.REAL_mus) - don't delete them as they are needed for installing patches. Now whenever you start up NFSMW, the game will not load up this data, and for those with lower amounts of RAM and/or who experience a lot of in-game stuttering, the stuttering should be noticeably reduced. Thanks to ashes48 for this tip.
Video
On the main Video settings screen, you will see a 'Level of Detail' slider and a Resolution setting. I strongly recommend that you ignore these and manually adjust the various Advanced elements below for optimal performance and image quality. To access the Advanced graphical menu, click the Advanced icon at the top right, or simply press the number 2 on your keyboard.
Note, as the game suggests, adjust your monitor's brightness (or use you graphics card's control panel) by looking at the twin EA Games logos in the center of the screen and following the written instructions.
Advanced
Resolution: This setting controls the pixel width by pixel height of the image on the screen. The higher the number of pixels on the screen, the more detailed the image but the lower your performance. Choose a resolution which is not too high, as resolution has a major impact on performance in the game.
Full-Screen Anti-Aliasing: Full-Screen Anti-Aliasing (FSAA, or simply AA), is a method of smoothing jagged lines on the screen. The higher the slider is taken here above the far left, the higher the sample rate of antialiasing used, and the smoother jagged lines will appear in the game. You can read more about FSAA and see examples in my Gamer's Graphics & Display Settings Guide. In NFS:MW moving the slider one notch to the right from the far left provides an instant reduction in the jaggedness of lines, however it also brings with it a major performance hit. Further moving the slider to the right doesn't noticeably improve image quality, but further reduces performance. I recommend that if you need the FPS, you set the slider to the far left (disable AA). If you really want to smooth out jagged lines, only move the slider one notch to the right, as any higher will severely drain performance for little or no visible image quality gain. Also make sure to set your Antialiasing settings in your graphics card's control panel to 'Application Preference' to minimize conflicts with this setting.
Texture Filtering: This setting affects the way textures (the 2D surfaces of all 3D objects) appear in the game. Once again refer to my Gamer's Graphics & Display Settings Guide for more details and graphical examples. This setting does not change the actual texture resolution or overall texture quality as such, it only implements texture filtering which affects the crispness of textures as they fade into the distance. For an animated screenshot comparison which demonstrates the impact of the various levels of the slider, click this link: Texture_Filtering.gif (432KB). Look closely at the cracks in the road in the far distance, the edges of the sidewalk and the white lines on the road - at higher settings they appear much sharper in the distance. However as you can see by the brick wall to the left, the actual texture quality remains the same throughout. The performance impact of Texture Filtering is not as dramatic as that of antialiasing, however at the Highest level it can reduce FPS noticeably on older/slower graphics cards. Once again, make sure to set your Anisotropic Filtering settings in your graphics card's control panel to 'Application Preference' to minimize conflicts with this setting.
VSync: Vertical Synchronization (VSync) is the synchronization of your monitor and graphics card's abilities to draw a certain number of frames per second (or FPS) on the screen. This is referred to as the Refresh Rate, and is measured in frequency per second (Hz). If this option is enabled (i.e. set to Yes), your maximum FPS cannot exceed your current refresh rate at your chosen resolution, and more importantly your overall FPS will be reduced. For this reason it is strongly recommended that you set this option to No. The only down side is that if VSync is disabled, you may notice some image 'tearing' - that is the bottom and top halves of the screen may appear to tear apart slightly at times. This causes no damage to your monitor, but if it really annoys you enable VSync. Once again, I want you to understand that with VSync enabled, not only is your maximum FPS capped, but your average FPS will also fall. For example, with VSync disabled, if you get 37FPS in a particular section, with VSync enabled you will get 30, as VSync rounds down the FPS. Verify this for yourself using FRAPS and you'll see what I mean. Once again, refer to my Gamer's Graphics & Display Settings Guide for details.
World Level of Detail: This setting controls the level of detail in the surrounding objects in the game world, such as trees, mailboxes, poles, etc. The best way to see the impact of the various levels of this slider is for you to look at this animated screenshot comparison: World_Detail.gif (438KB). Look closely at the trees in the distance, and the sign to the right. As the level of detail rises, more trees are visible, and at one notch from the far right (High) almost everything is visible, but the sign only appears at the Highest setting (slider to the far right). The performance impact of this setting is most noticeable at the Highest level, so Medium or High would be a good choice for most people. The precise impact depends to some extent on your CPU power, and to a greater extent on your graphics card to draw all those additional details. The biggest impact of this setting will be felt when going through forest areas, and also when combined with the Shadow Detail setting. At High for example there will be lots of trees as well as lots of shadows, which will slow down most systems.
Road Reflection Detail: This setting controls the level of detail given to reflections on the road's surface. I didn't find any significant performance or visual quality difference whatsoever when changing it on my machine from lowest to highest. In theory when at the lowest setting (slider to the far left), the surrounding objects will not reflect on the road's surface, and when set to the highest, all reflections will show. Set this to one notch from the left if you want a good balance of visual quality and performance, otherwise in most parts of the game there is no significant image quality or performance impact that I can see.
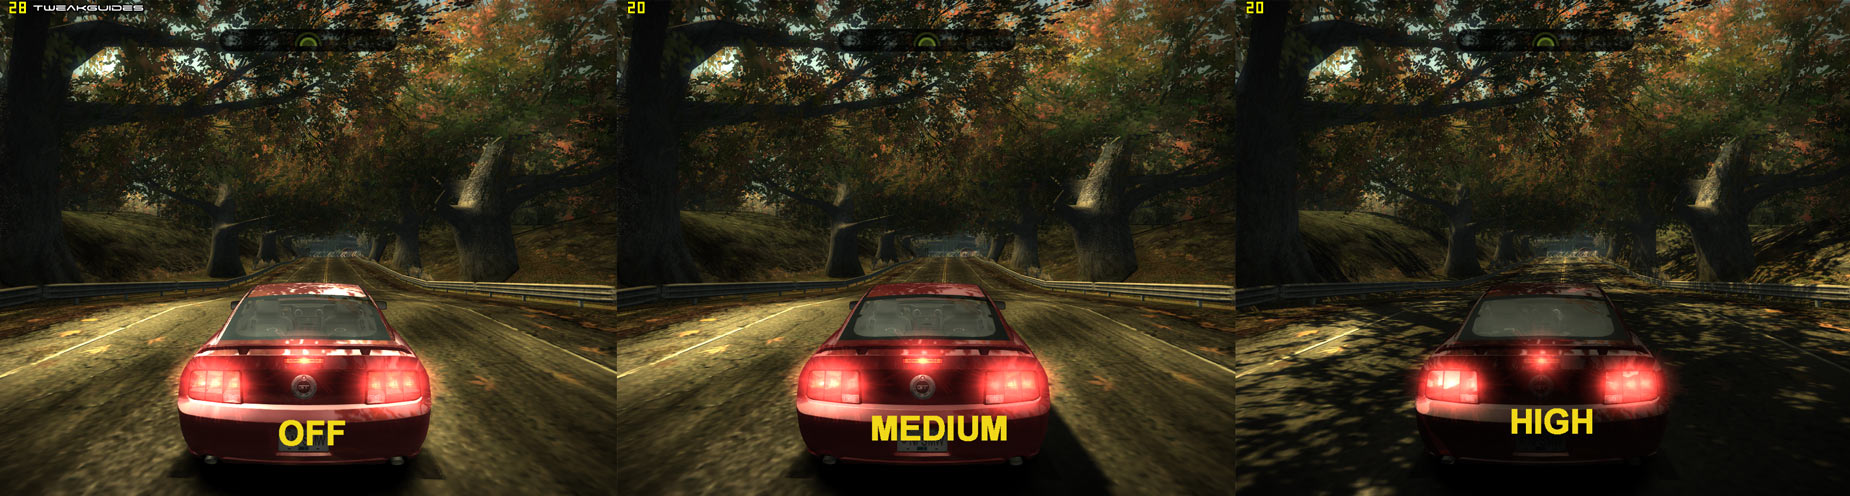
Shadow Detail: This setting controls whether shadows for various objects are shown, and to what extent. To better see what this means, look at the screenshot comparison above. With the slider to the far left (Off), virtually no shadows are visible, save for the basic car shadow. At the middle slider setting (Medium), the car casts a more accurate shadow, but still no shadows from the trees. With the slider to the far right (Highest), the trees cast detailed shadows on the car and the surrounding surfaces. The performance impact will vary by system, but in general selecting the highest setting will see lots of slowdowns in areas with lots of detailed objects, such as forests and complex city scenes and/or lots of vehicles. This is made worse if you have a high World Detail setting. The best performance is seen at the lowest setting, and since visually the Medium setting is not much better, disable shadows is highly recommended to most people for gaining a great deal of FPS and avoiding slowdowns.
Car Geometry Detail: This setting controls the number of polygons used to draw the vehicles in the game. When set to High, the car models are as detailed as possible, with lower performance compared to when set to Low. However I couldn't see any major differences between these two settings, and in general the cars still look quite good at the Low setting.
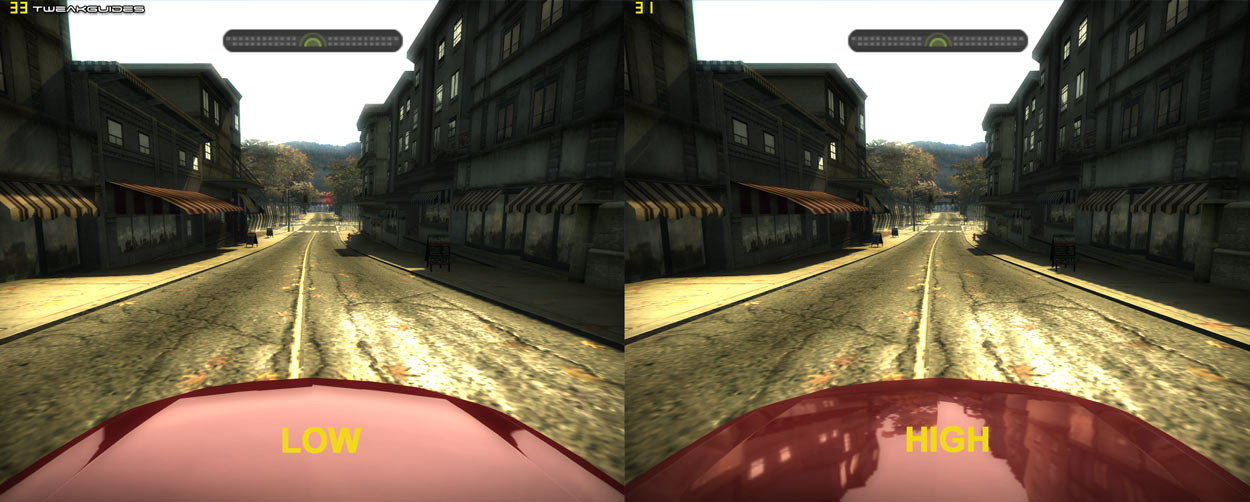
Car Reflection Detail: This setting controls the way in which vehicles reflect the surrounding objects. Look at the screenshot comparison above, noting the reflections on the hood. When set to Low, no detailed reflections are shown of the surrounding buildings, yet when set to High, these are reflected accurately in the hood, and on other parts of the car. For the most part this setting has variable impact depending on which view you use (i.e. if you can see your own car or not), and whether other vehicles are in view as well. The more vehicles are visible, the greater the impact on your FPS, which can be quite noticeable on some systems.
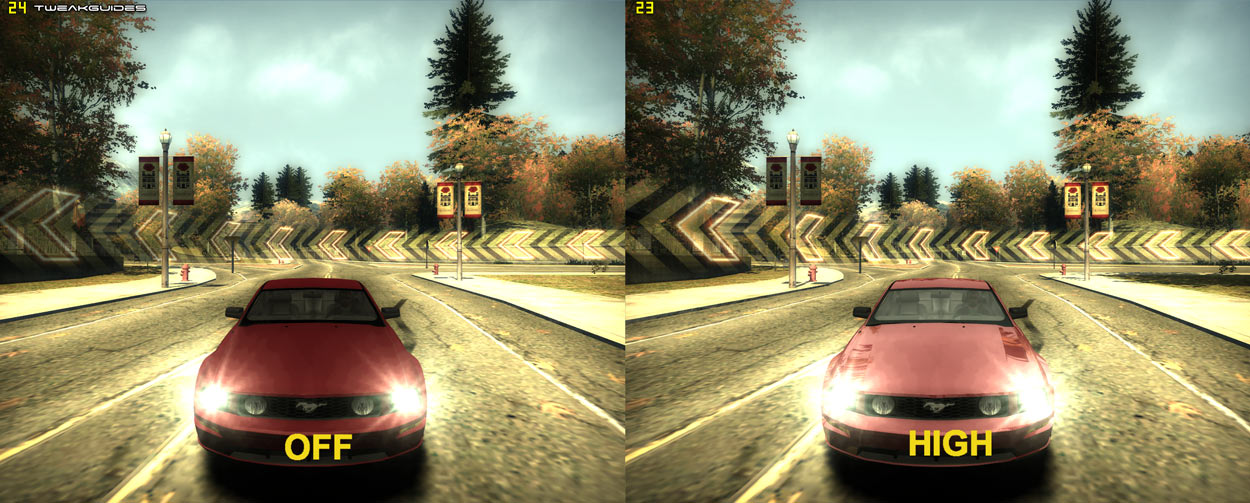
Car Reflection Update Rate: This setting controls the rate at which reflections are updated on the car models. That means the higher this setting, the more smoothly reflections move over the body of the car; the lower the setting, the more jerky reflections seem to be as they are reflected around the car. Firstly if you've lowered the 'Car Reflection Detail' setting above, this setting will obviously have less of an impact. However if you've left that setting at High, moving this slider further to the right will increase the realism of the reflective surfaces of vehicles in return for reduced performance, depending on how many vehicles are visible on screen. The screenshot comparison above shows the difference between the lowest and highest setting, because anything above the lowest setting looks fairly much the same in static screenshots. The best way to check for the impact of this setting is to use the Close rear view of your car, and as you drive around, note the smoothness or otherwise of how reflections move across the car's body.
Rain Effect: This setting doesn't control whether rain is visible or not. It controls whether the 'rain effect' - namely droplets of water on the screen - are visible or not. If set to On, whenever driving through rain your screen will show small droplets of water which distort anything visible through them. If set to Off the rain will still be visible, but those droplets won't appear on the screen. The performance impact is not major for most systems, however some people may simply prefer not to have distortionary droplets on the screen.
The next page continues our look at the in-game settings.
|
|