
Need for Speed: Most Wanted Tweak Guide
[Page 6] In-Game Settings (Pt.2)
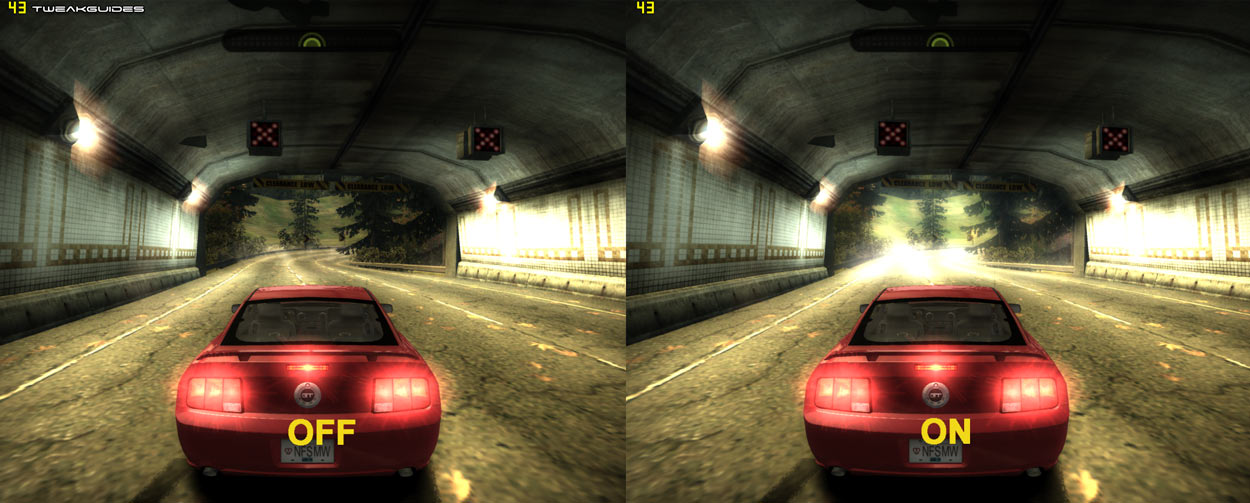
Over Bright: This setting controls the rather strong "bloom" effect shown in the sky for example. It simulates HDR (High Dynamic Range) lighting. It does not control the overall lighting quality of the game, which is controlled by the 'Visual Treatment' setting below. The screenshot comparison above shows what I mean by this - when set to On, you can see that the light at the end of the tunnel is overly bright and intentionally glary. However when set to Off, while you can see that the lighting at the end of the tunnel is not so bright, the tunnel lights and the remaining glare of the car's tail-lights etc. remain the same. The major impact of this setting is primarily in reducing or increasing road/sky glare. Performance-wise, the impact depends on your particular graphics card, and for most systems there shouldn't be a major impact, so set to suit your tastes.
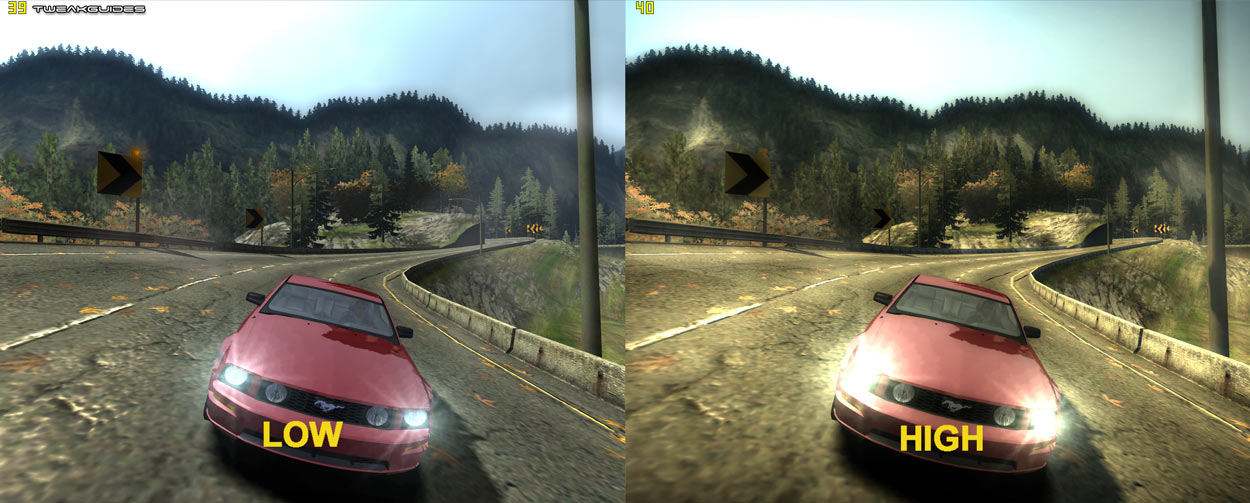
Visual Treatment: This setting controls the overall 'atmospheric' image quality of the game. It is controversial in that some people like it (like me), and some people hate it. The game developers have purposely designed the lighting and color of the game to be very rich and almost photo-realistic in places when 'Visual Treatment' is enabled. However, it is a stylized image quality which may not suit some people. Fortunately the designers have provided this setting for you to enable/disable this feature, and the concurrent image quality impacts are shown in the screenshot comparison above. As you can see, with this setting at Low the colors and lighting are much closer to that of other games, and when set to High they take on a completely different characteristic. This setting also controls the various motion blur effects as well. Choose whichever you believe is more realistic to you, and note that the performance impact will vary depending on your graphics card's age - older graphics cards may get a noticeable reduction in FPS with this enabled.
Note: If you only want to disable certain elements of the Visual Treatment (such as motion blur) but not lose all the appearance of High Visual Treatment, see the Advanced Tweaking section.
Gameplay
Autosave: When set to On, your game progress will automatically be saved as you win/lose races and challenges. If set to Off, you will be prompted to save at certain points, and you will also have to remember to save your profile regularly if you want to keep things updated.
Game Moment Camera: If set to On, particular circumstances in the game will be slowed down and played from a third-person detached camera angle. For example certain car jumps, running through certain objects, etc. may trigger this behavior. If you find this distracting or annoying, set this to Off.
Car Damage: If set to On, your vehicle will show the damage and marks from collisions throughout the game. If set to Off, no damage is shown and the car remains pristine. This can improve performance slightly, but obviously reduces realism.
Rearview Mirror: If set to On, whenever you race in Hood or Bumper view your rear view mirror will be visible at the top of the screen. There may be a slight performance impact on some systems from enabling this option.
Units: Determines whether you use the Metric or Imperial scale for gauges shown in the game (e.g Miles vs. Kilometers).
Race Map Mode: This setting determines whether the Race Map is disabled (Off), shown in the bottom left corner and rotating to always correspond with the way you're facing (Rotate), or shown but static (Static). Set to suit your taste, disabling the map may gain a small performance boost.
Player
Transmission: Determines whether you race with Automatic (Auto) or Manual transmission in the car. If set to Manual, make sure to check your key bindings under the Control section to assign a Shift Up and Shift Down function to the relevant keys.
Camera: This determines by default where your viewpoint is when driving your vehicle. The options are Close, Far, Bumper and Hood. Close and Far show your car from close rear or far rear positions. Bumper shows you the street-level view devoid of any of your vehicle's details. Hood view shows only your hood. Choose one which suits your driving style, but note the performance impacts: Close provides the greatest performance hit, since your vehicle takes up a large portion of the screen, and vehicle details, reflections etc. can reduce performance. Far is next in terms of performance impact, while Hood provides moderately good performance since only the hood is visible, but if 'Car Reflection Detail' is set to High this can reduce performance. Bumper provides you with the best performance since no part of the vehicle is visible.
Gauges: If set to On, your speedometer/tachometer gauge is shown in the bottom right of the screen. If set to Off, this is removed and might provide a mild performance improvement. However this is an important part of the display and generally should not be disabled, particularly as it also shows your Nitrous and Speedbreaker levels (See below).
Race Information: This is the display at the top right of the screen, showing you your current race position, race time and % completed (depending on the game mode). Enable or disable to suit your tastes, has no performance impact.
Split Time: This setting controls whether a split time is shown at certain points as you race around a track. Enable or disable to suit your tastes, has no performance impact.
Score: This setting enables or disables the display of your cumulative score in modes in which you earn a score. Enable or disable to suit your tastes, has no performance impact.
Leaderboard: This setting enables or disables the leaderboard display at the top right of the screen, showing you your relative position against the other players, and their times. Enable or disable to suit your tastes, has no performance impact.
Controls
This section determines your keyboard bindings for various controls in the game. Make sure to go through carefully and adjust to suit your playing style. In particular note the following commands which you may not be familiar with:
Speedbreaker: This is a new feature to the Need for Speed series, and works much the same way as 'bullet time' in Max Payne, or the 'SlowMo' function in F.E.A.R. - it slows down time for a short period allowing you to think through your manoeuvres more carefully and with more precise control. Make sure to assign an easily-accessible key to this function. The orange Speedbreaker bar is shown at the top of your gauge and regenerates over time.
N20: This is the Nitrous Oxide key, and in many game modes this allows you to use a short burst of Nitrous to boost your speed. Bind it to a handy key and keep in mind that the green nitrous bar is shown at the bottom of your gauge, and regenerates depending on how fast you are going.
The next section provides details on the Advanced Tweaking possible in NFS:MW.
|
|