
Hardware Confusion 2019
[Page 5] System Core: Optimal BIOS Settings
The main purpose of my experimentation wasn't so much to find my maximum overclock; I wanted to find a completely stable but fast set of 24/7/365 UEFI BIOS settings for this CPU. I'll spare you the gory details of my research and clumsy attempts, and just report my final findings in the form of what I call my Everyday Mode, as well as a Performance Mode I'll explain later.
Everyday Mode
This is the mode I use the majority of the time, and here are the UEFI BIOS settings for it, and what they mean:
Ai Overclock Tuner: As noted earlier, to get your RAM to run at its advertised frequency and timings, XMP must be enabled and set to XMP II. For my Corsair RAM, this automatically assigns a fixed DRAM Frequency of 2400MHz, specifies the key timings explicitly (14-16-16-31), and sets DRAM Voltage to 1.20v.
BCLK Frequency: I've left the Bus Clock at the default and generally recommended value of 100.00. If BCLK is raised above this, it affects other components running on the same bus, whereas I just want the CPU to clock higher.
CPU Core Ratio: There are two approaches to this setting. If you want the CPU and the motherboard's Ai to always determine the best core speed at any particular time, leave this at Auto - which is my preference. To manually set a target frequency, select Sync All Cores, and you can then specify the core speed in one box and it will apply to all of the other Cores equally. E.g., if BCLK is 100, then entering a value of 49 results in a 4.9GHz target frequency across all cores.
ASUS Multicore Enhancements: This has been manually Disabled because of the potential issues it can cause, as discussed in more detail in the next section.
CPU Core/Cache Voltage: Truth be told, I lack the patience to manually dial in a precise voltage that will result in the highest possible speed but is also perfectly stable, with the least amount of heat and risk to the CPU in the long term. So I've entrusted the all-important Core Voltage setting to the ASUS Ai by selecting Adaptive Mode here. This allows the motherboard to dynamically increase or decrease my voltage on the fly, working with the CPU's hardware C-States to use the least amount of power, especially when relatively idle. I strongly recommend this mode, as it has benefits that will become clearer as you read on.
CPU Load-Line Calibration: Again, I wasn't satisfied with constant LLC experimentation to determine the right level; I don't want to risk using an LLC level that's too high. Switching this to Auto allows the ASUS Ai to automatically work out the correct LLC level at any time in conjunction with the Core Voltage and the target frequency.
AVX Instruction Core Ratio Negative Offset: I manually set this to 3 so as to reduce maximum possible speeds by 300MHz, preventing the more strenuous AVX instruction set from overwhelming my system under any sort of load. AVX is discussed in more detail later.
Turbo Mode: Enabling Turbo Mode is a requirement for allowing the CPU to boost to its rated maximum speeds. If Turbo mode is disabled, the CPU can only do a maximum of 3.6GHz, its nominal base clock speed, which is a terrible waste of a good CPU. There's no reason to disable Turbo, because the TDP Limit and TJMax are on by default and prevent the CPU from boosting itself into a dangerously unstable state.
Intel SpeedStep: SpeedStep gives the system more flexibility to dynamically adjust the voltage and frequency of the CPU, further reducing power usage and heat, without reducing performance when required. This is an important setting as we'll see. I set this to Enabled to ensure that the CPU has the greatest leeway in making necessary adjustments to its clock speeds.
Intel Speed Shift: Speed Shift allows the CPU, rather than the OS, to manage its Turbo mode, which generally results in faster and finer changes in CPU frequency. This is another important setting which unfortunately overclockers often recommend turning off. On the contrary, I manually Enabled this to give the CPU more frequencies it can use when switching between boost levels.
CPU C-States: Some overclockers advise that the C-States be disabled. This is a bad move in my opinion. The various C-States are a hardware-level management method for the CPU to determine just how far it goes in ramping down its power usage when idle. Even if you disable them while testing your overclocks, I strongly recommend turning on all C-States afterwards. The benefits are demonstrated shortly.
If you want to see the full range of settings I use in my UEFI BIOS for my Everyday Mode, or you're just curious as to the precisely what sort of options are available in the UEFI BIOS on the latest motherboards, you can download this 60 image BIOS Screenshot Collection (6MB).
The BIOS settings above are the quickest, easiest and safest way for anyone with a similar motherboard to run the i7 9700K while also getting excellent performance. Aside from the changes noted above, and of course any changes in the BIOS you need to make for other components in your system, such as storage and networking, everything else is left at its default, typically Auto. So all power and thermal limits (including TDP and TJMax) and monitoring features are on and protecting the CPU at all times.
The results of this basic, fully automated, Everyday Mode method are as follows:
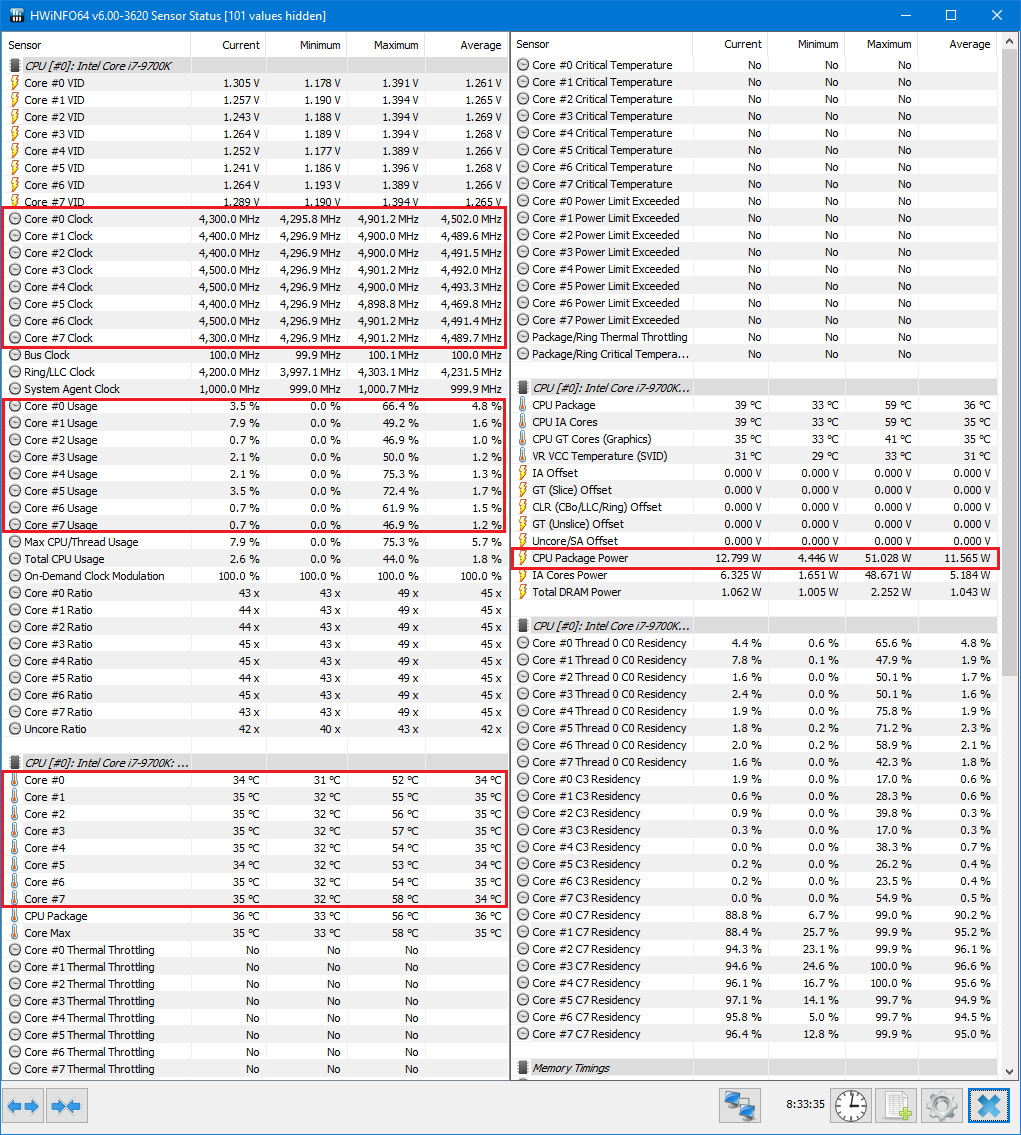
The screenshot above shows a range of system data captured by the HWInfo utility as it sat in the background while I was using my system for a range of tasks over an 8.5 hour period. The tasks included typing a Word document, checking email, listening to music, watching a high-bitrate MKV movie in VLC, browsing the Internet, and some basic file compression and copying.
Please focus on the areas highlighted in red. You can see that although the CPU is nominally rated to drop to as low as 800MHz per core when idle, and to sit at a base clock speed of 3600MHz before boosting higher when loads require it, my i7 9700K has a minimum per-core speed of roughly 4.3GHz, even when load has fallen to 0% across all cores. The maximum load during this period was roughly 50-75% across the 8 cores, resulting in a boost in speed to 4.9GHz on the cores when required, and my average CPU usage over the entire 8.5 hour period is 4.5GHz on each core.
Here's the impressive part: during this period of typically low-load usage, with brief jumps to a maximum of 75% load and 4.9GHz on the cores, the CPU idles with a 4W minimum, hits a maximum of only 51W power usage, and averages just under 12W. This is despite the fact that it never falls below 4.3GHz on all cores, averaging 4.5GHz over the 8 hours, and achieving its full 4.9GHz burst speed with the TDP limit in place, normal air cooling, and a maximum temperature of 52-58C across the cores during summer. This is hardly the hot, power hungry Intel CPU I'd heard about.
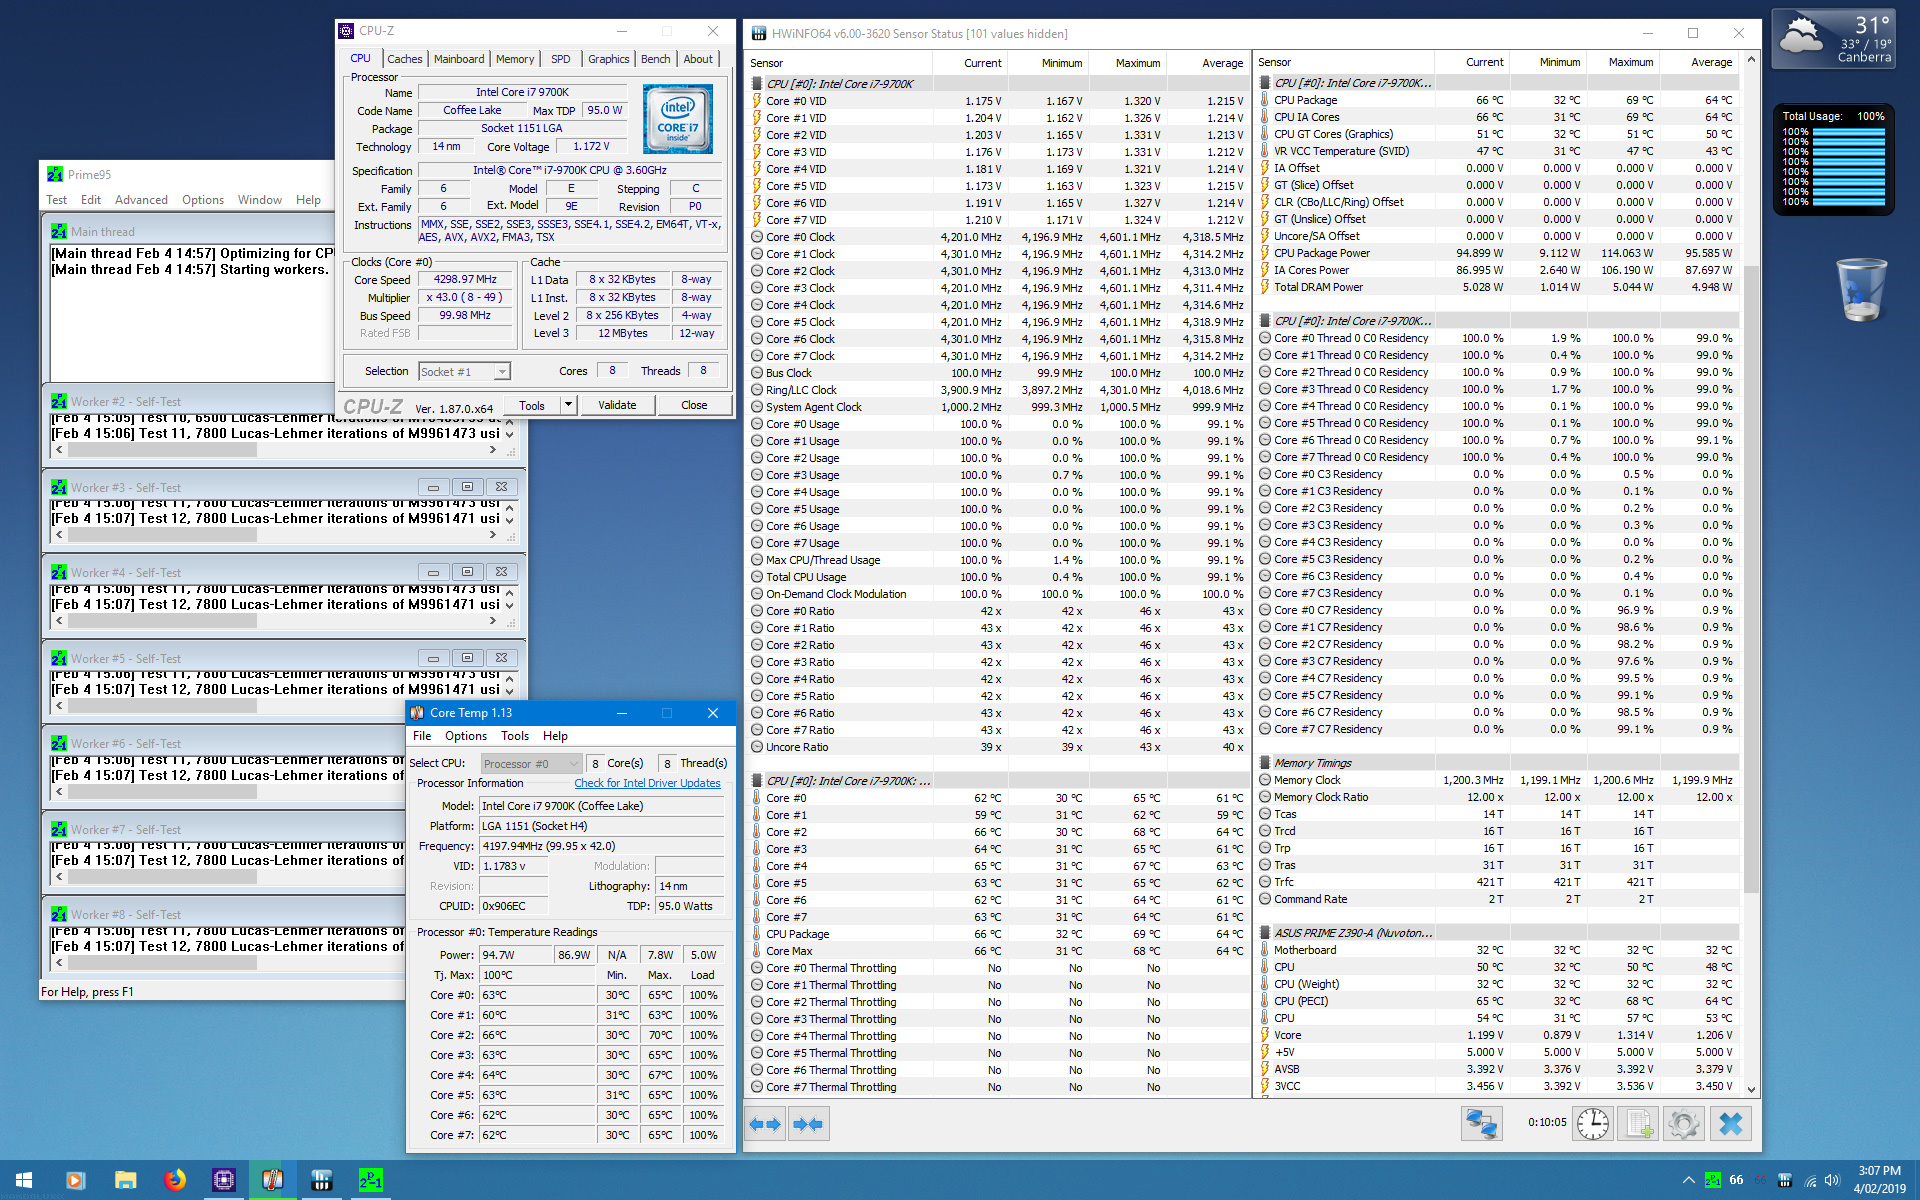
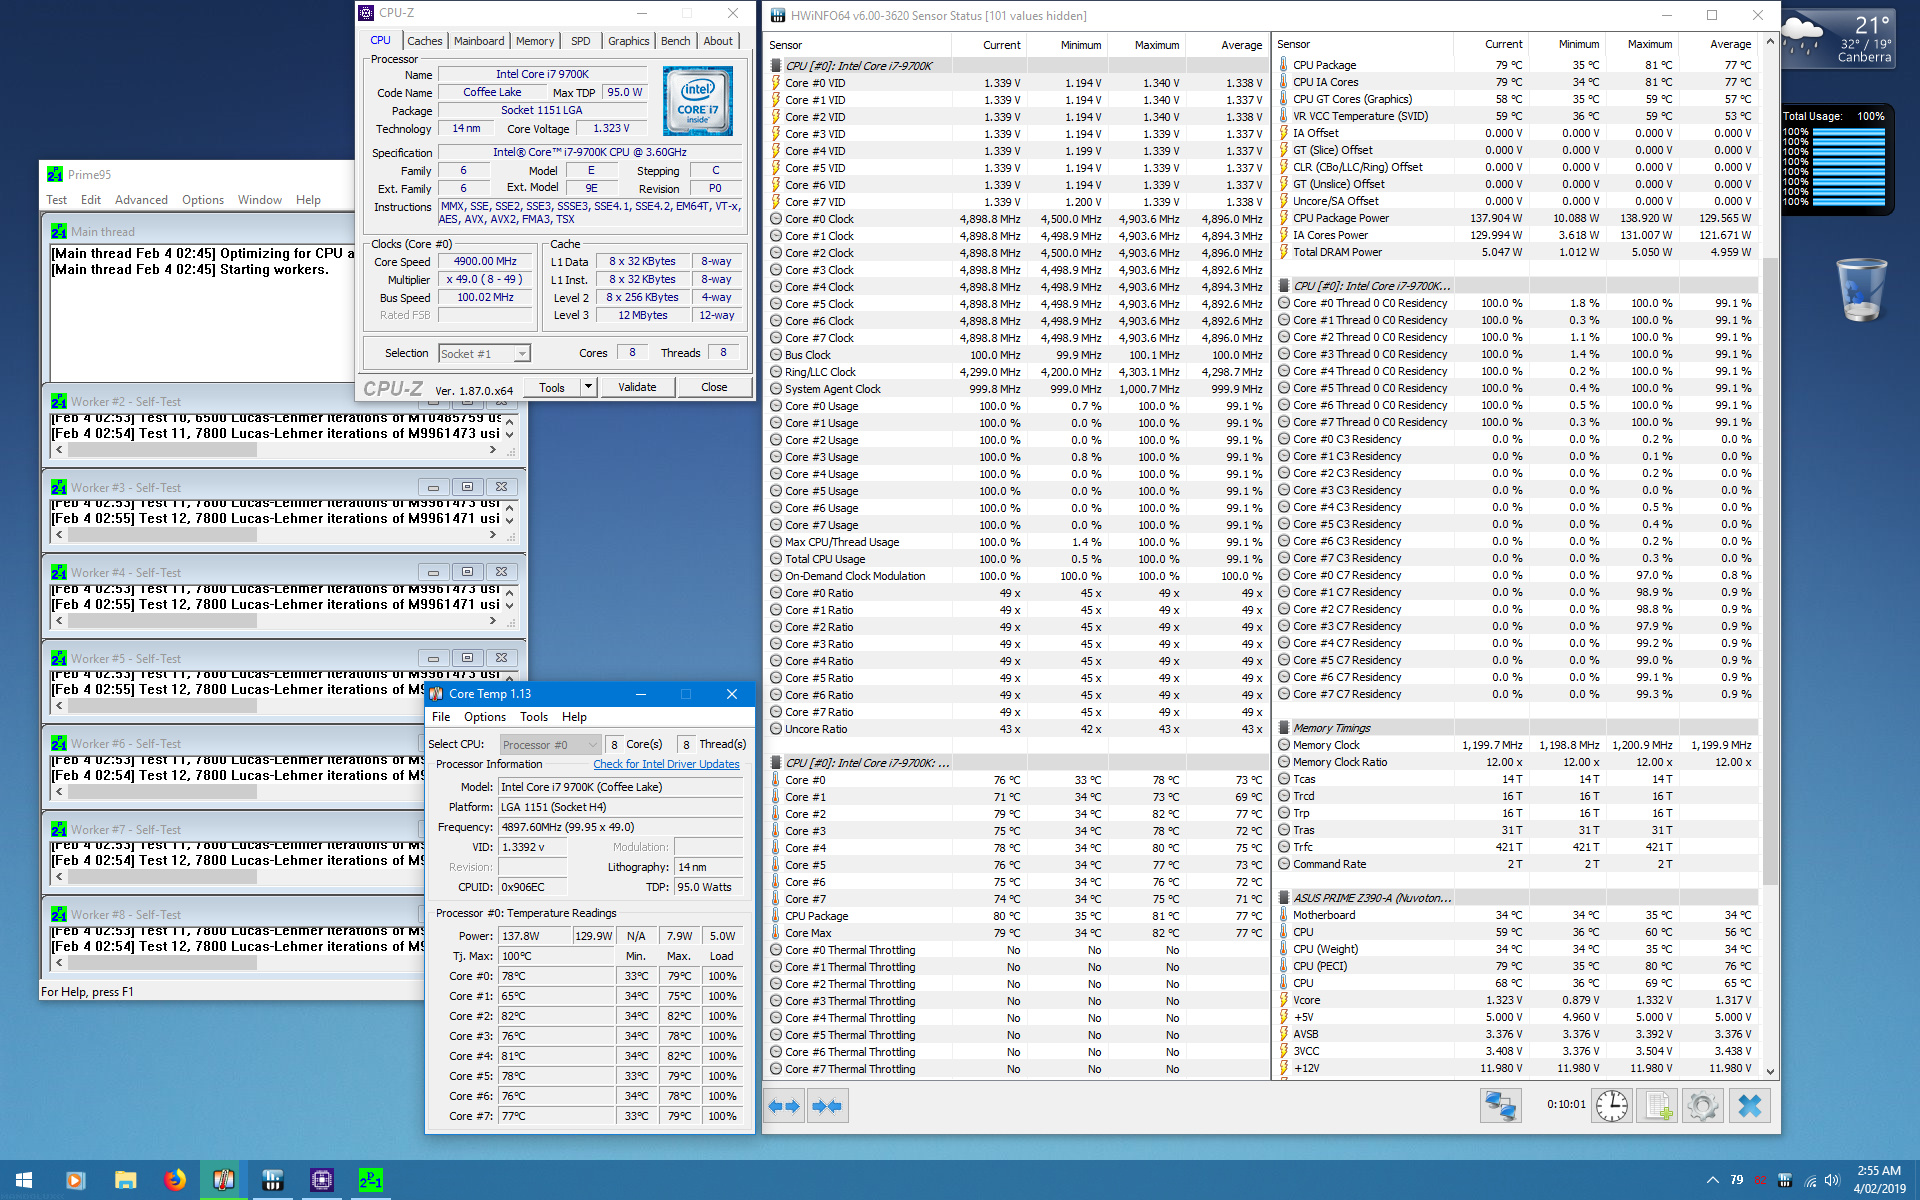
OK, so how does she run under sustained full load? Keeping the same settings, and with the TDP limit still in place, I ran Prime95 26.6 for 10 minutes. The results are shown above: a 4.2GHz base clock speed across all cores at all times, averaging 4.3GHz, periodically boosting to 4.6GHz on all cores as required. Since I only had HWInfo open for a few seconds before I started Prime95, the average CPU Package Power matches the TDP limit of 95W. It did briefly start off at 9W idle load as you can see under the minimum column, and rose to 114W maximum for a short while, but as expected, the built-in TDP limit automatically curbed it to 95W for the majority of the run. Core Voltage ranges from 1.17v to 1.33v, averaging 1.22v. Maximum temps hit 68C, but averaged 64C at most, well below the 100C maximum for this CPU. Once again, keep in mind the limitations of my circumstances: simple air cooling, closed case, Summer heat wave.
If you're wondering why the CPU never downclocks to its lowest 800MHz state in the screenshots above, then you're not alone; it had me puzzled too. I also wondered why the CPU wouldn't boost the way it was advertised to do, i.e., hitting 4.9GHz on only one core, 4.8GHz on two cores, etc.
The short answer is: I'm an idiot. The long answer is: I'm an idiot, but a lucky one. It turns out that even if you enable all of the power-saving options in the BIOS, including all available C-States, as I had done, you need to set a power plan under the Power Options in Windows that is based on the Balanced or Power Saver templates. In the past I used the Performance plan as the template for my custom power plan, and adjusted the Maximum Processor State to 100%, Minimum Processor State to 5% and the System Cooling Policy to Active, and this had allowed my Core i7 920 to behave exactly as advertised, falling to 1.6GHz when idle and rising to 2.8GHz maximum boost. This seems to have changed - a Balanced or Power Saver-based plan must be used, regardless of the actual settings, for the latest Intel CPUs to behave as expected.
I created a new power plan based on the Balanced profile, altered the power options to match those I used before, rebooted, and yes, the 9700K would now clock all the way down to 800MHz when idle, and actively and independently adjust individual cores up and down between 800MHz and 4.9GHz as required. I ran HWInfo in the background as before for several hours, and sought to see what difference this would make:
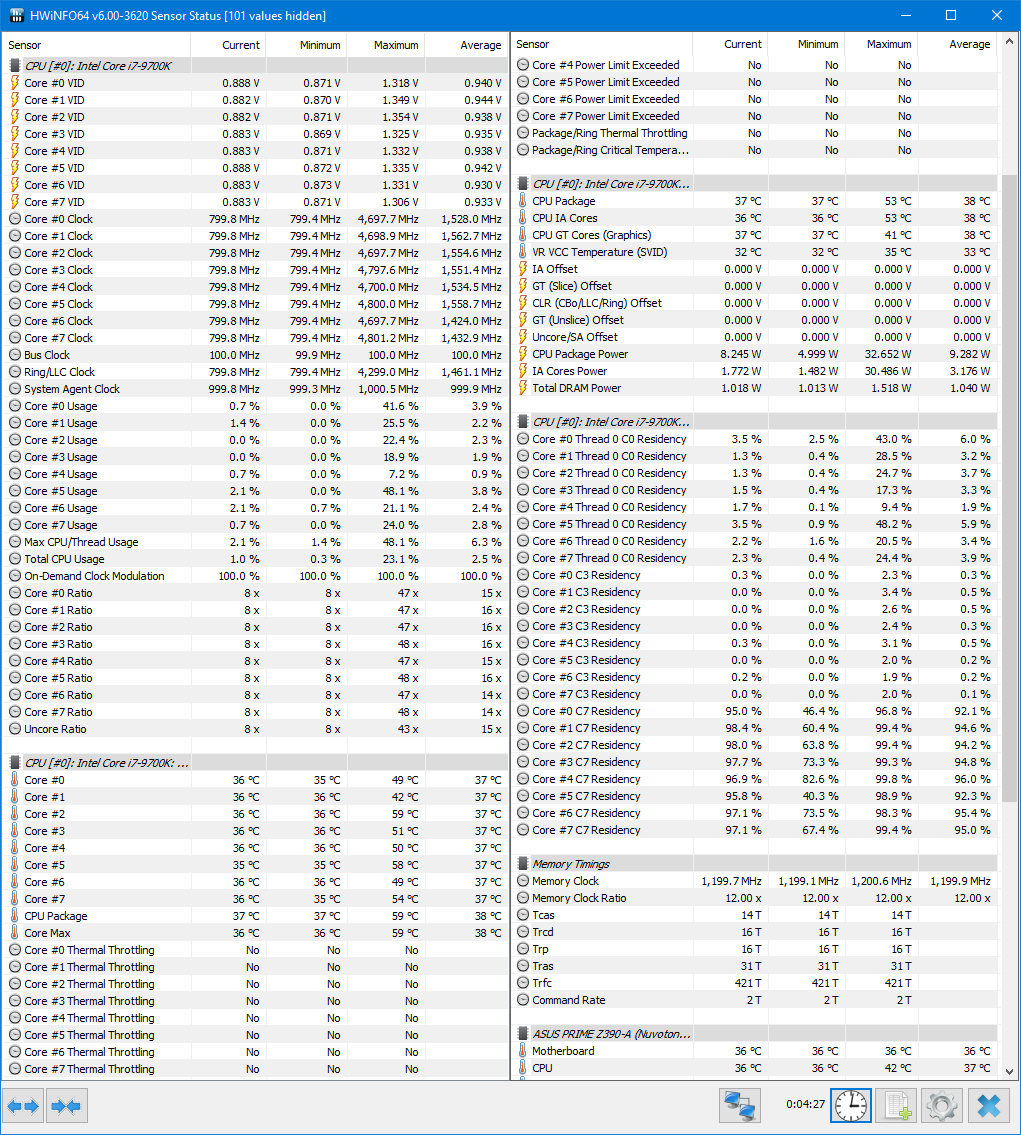
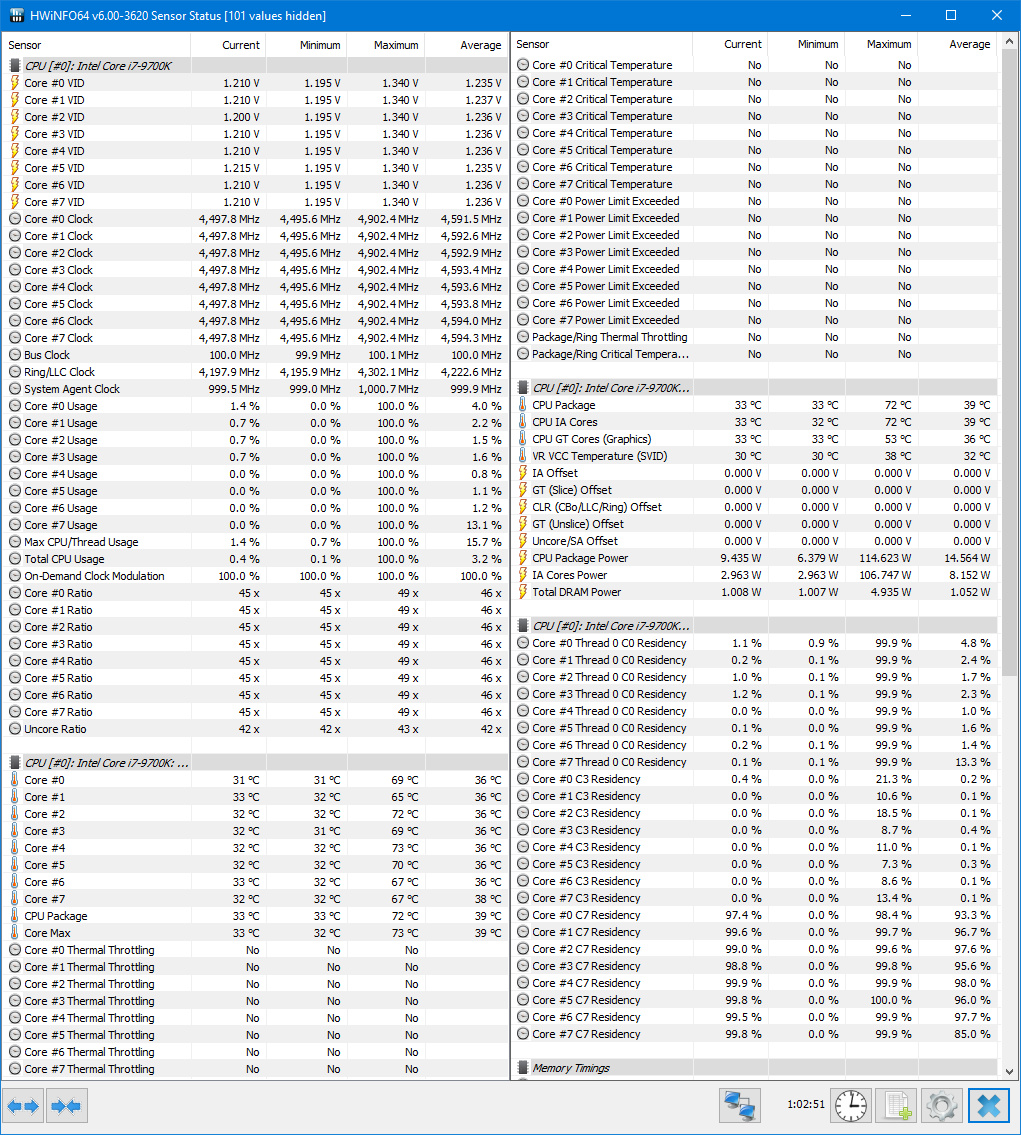
The screenshot above analyzes the CPU's behavior when idling and under low load on the desktop for over 4 hours, using the same Everyday Mode settings I covered earlier, basically fully automated overclocking. As you can see, the CPU now has its full ability to downclock to 800MHz minimum across all cores, as opposed to being restricted to a 4.2GHz minimum, and reaches 4.7-4.8GHz across the cores under slightly heavier loads. Voltages also fall to a lower minimum, down to 0.87v across all cores.
Yet, over the four hours it was monitored as I used it, this newfound freedom granted to the CPU to behave as it was designed, didn't seem to result in much of a benefit. The table below summarises the differences:
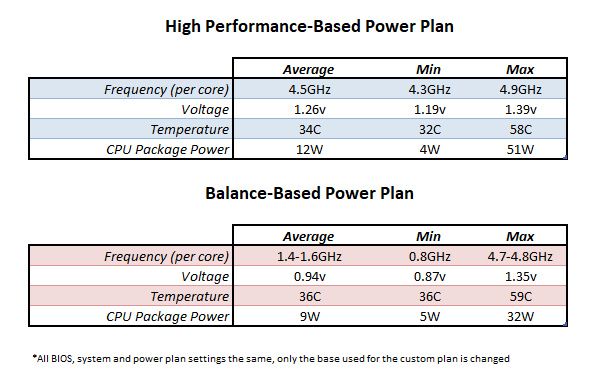
With full leeway to adjust core speeds, the CPU tends to operate at a much lower speed most of the time, roughly one-third of the speed it had before, for a savings of 3W on average (9W vs. 12W), and more substantial drop in average voltage from 1.26v to 0.94v, but with no noticeable improvement in temperatures. It also peaked at a lower maximum speed across the cores. One clear negative I found on my system is that the constant cycling of speeds across each core makes the CPU fan alter its RPMs constantly, which can become quite annoying.
So based on my findings, I recommend running a power plan based on High Performance. While voltages may drop quite a bit, and average power usage drops slightly - I would argue, negligibly given they're quite low in both scenarios - temperatures don't seem to benefit greatly, in fact they were slightly worse in my results. In return, the CPU runs at a much, much lower speed most of the time, and doesn't boost to maximum across all cores. I prefer to have a 4.5GHz daily CPU that keeps constant speed across all cores, and boosts to its full 4.9GHz. So I quickly returned to a custom power plan based on High Performance.
Interlude: 9700K vs. 2700X Efficiency
While we're talking about the 9700K's power consumption figures, let's stop for a minute and compare these results to the reputedly far more efficient 2700X. Most reviews unfortunately report total system power, which is not comparable to the data I've provided here. This article shows for example that at stock speeds the 9700K idles at 53W and hits 238W at full load, while the 2700X idles at 68W and reaches 220W at full load. When taking into account the fact that under full load, the 9700K hits 4.9GHz vs. the 2700X's 4.3GHz, that actually makes these CPUs roughly equivalent in terms of efficiency.
For a comparison of CPU Package Power only, not the full system wattage, I turned again to my old stomping grounds the Overclockers Australia forums, where I had a heated, but generally quite educational discussion with AMD Ryzen users. One Ryzen owner provided his CPU Package Power usage results, which I've summarized in the table below, along with my own figures for rough comparison. Note: his Ryzen 7 2700X is generally stock, but he's using a custom loop liquid cooler, and his HWInfo data comes from 185 hours of continuous usage, covering a wide range of activities, including gaming.
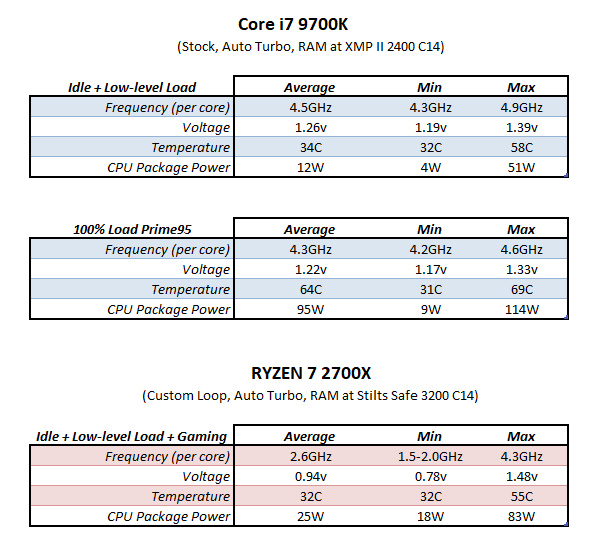
The data isn't necessarily fully comparable, given the differences in cooling, the different time periods over which we each measured the data, different clock speed policies, and different loads. You can draw your own conclusions from it, but from my perspective, I think it simply adds weight to the notion that neither the 2700X, nor the 9700K, is significantly more power hungry than the other.
Performance Mode
Instead of leaving the clock speeds entirely up to the system, performance-oriented users such as gamers can remove the TDP limits and manually set any clock speed they wish, and given the right voltage and cooling, the system will attempt to stay at that frequency, ensuring maximum performance at all times. However, once you dial in a voltage and LLC, as well as target frequency, then even when doing very little on your system, it will maintain the target voltage, generating greater heat and potentially reducing the lifespan of your CPU.
A better solution if you want maximum performance when required, but minimal power usage when it's not needed, is to make a couple of minor modifications to the Everyday Mode settings covered earlier. This will help the CPU to sustain its maximum stable frequency across all cores when needed, but also downclock and reduce voltages when not required. I call this Performance Mode.
Start off with the Everyday Mode UEFI BIOS settings I provided earlier. Now remove the CPU's TDP limits by changing the Long Duration Package Power Limit, Package Power Time Window, and Short Duration Package Power Limit settings to their maximums - a quick way is to enter a very large number like 999999 for each, and press Enter. Next, specify your target CPU speed by changing the CPU Core Ratio setting to Sync All Cores, and entering a value that you know the system can do with stability (based on your prior testing ). In my case, I set the CPU Core Ratio to Sync All Cores, assigned a value of 49 for the Core speeds, giving me an overall target CPU speed of 4.9GHz on all cores. This is my target because over time, the ASUS Ai Tweaker has analyzed my system and come up with 4.9GHz as my 100% stable maximum overclock - due largely to the relatively lower level of cooling I have.
These are the key settings that make this Performance Mode work: make sure that CPU Core/Cache Voltage is set to in Adaptive Mode; and Load Line Calibration is set to Auto. While it's true that manually adjusting the voltage and LLC, as well as a range of other settings, provides the best overclocking results, it also takes a lot more time, effort, money and skill. The major benefit of this method, aside from making it much easier and much safer to reach a stable overclock and keep your system there, is that when your system is at low or idle load, the motherboard's AI will automatically reduce voltage, reducing power usage and heat.
In this mode, running 10 minutes of Prime95 26.6 as usual to simulate a stressful CPU load, the results above show a major increase in performance. Under full sustained load, the CPU doesn't flinch now, keeping its 4.9GHz target value across the maximum and average columns - the minimum is slightly lower because the CPU was at 4.5GHz for a couple of seconds between launching HWInfo and starting Prime95. Otherwise, with these settings, whatever performance-oriented task you're performing gets the full 4.9GHz boost power of this CPU at all times, across all cores, under full load; it won't downclock unless it hits the TJMax of 100C.
Voltages are solid and within acceptable ranges, with the average (1.338) being extremely close to the maximum (1.340) - meaning minimal VDroop. Power usage sits in the 130-139W range, while the average and maximum temperatures are in a sustainable band of 70-80C across the cores, and that's with my basic air cooling. So as a gamer, or indeed anyone who wants the full 4.9GHz advertised power of the 9700K, you can run this Performance mode quite easily and safely as your normal mode, without any worries about accidentally overvolting the CPU.
The screenshot above demonstrates the real benefit of this mode. It provides data from an hour of idle and normal Desktop usage. When fully idle, the CPU can completely minimize its power usage, downclocking to a still-impressive 4.5GHz base clock across all cores. At this idle speed, it uses only 1.20v and 6W; over the full hour of regular usage, the CPU has averaged 4.6GHz speeds on all cores at 1.24v, using 15W and sitting around 40C.
Performance Mode is perfect if you want to safely tap into the full potential of your CPU, boosting all cores to whatever speed you've determined through prior testing to be your stable maximum, for as long as required. But you're still protected by TJMax, you're also protected by the fact that the motherboard is automatically determining optimal voltage and LLC, and as a consequence of that, you also get the benefit of lower voltages and less heat/power when at lower load. And you don't need to be an expert overclocker.
I use Everyday Mode at the moment, simply because I don't need the extra power of Performance Mode right now. Everyday Mode ensures that I still get 4.5GHz average speed, but it keeps power usage and heat so low that my system is completely silent, which is what I prefer right now.
In the next section, I run through some concluding thoughts and tips on the System Core components described thus far.
|
|