
Hardware Confusion 2019
[Page 6] System Core: Misc. Tips
In this section I provide various learnings on several issues and some additional thoughts I have on the System's core components, which I didn't want to pad out the previous sections with, but are still important enough to consider in my opinion.
Stress Testing & Benchmarking
I've used Prime95 almost exclusively in this article to test my CPU/system core's stability. It's hotly debated among overclockers as to whether Prime95 is excessive as a CPU or general system stress test, the argument being that it doesn't reflect real-world loads. I agree - Prime95 is indeed excessive, and doesn't accurately reflect real-world loads. But it's for that very reason that it's an excellent stress tester. Unlike benchmarks, stress testers aren't supposed to reflect real-world loads, they're meant to put significant stress on your system in order to bring out instabilities much more quickly. I don't have the luxury of setting my PC aside to run days and days of less stressful tests each time I change a setting, just to determine if the system is genuinely stable.
Prime95 is basically a time saver; if you can run just 10-15 minutes of its default Blend test on your system, then in my experience it's almost certain that everything else you do on your system that relies on the CPU, motherboard or RAM should be stable too. Once you get the system Prime95 stable, then you can run other popular free general system stability tests, benchmarks, and strenuous games. These will help stress test other aspects of the system that Prime95 was never designed to push: the GPU, your storage sub-system, or your network devices for example.
Concerns also center around the use of the AVX instruction set in newer versions of Prime95. AVX can generate even greater loads, which may not reflect real-world usage given AVX loads are less common. This is the reason why many overclockers recommend running the much older Prime95 version 26.6 which was the last version not to incorporate AVX. Alternatively, you can theoretically disable AVX in the latest version of Prime95 by launching it at least once, then closing it, going to your Prime95 directory and editing the newly-created Local.txt file to make sure that CpuSupportsAVX=0. Another solution is that if your UEFI BIOS has an AVX Instruction Core Ratio Negative Offset value, use it to automatically reduce your clock speed by a set amount whenever an AVX load is encountered. This helps protect the CPU so that it doesn't need to be overvolted to maintain its speed when running AVX instructions. I use an AVX Offset of 3, meaning my 4.9GHz overclock target automatically drops to 4.6GHz when I run AVX-dependent programs.
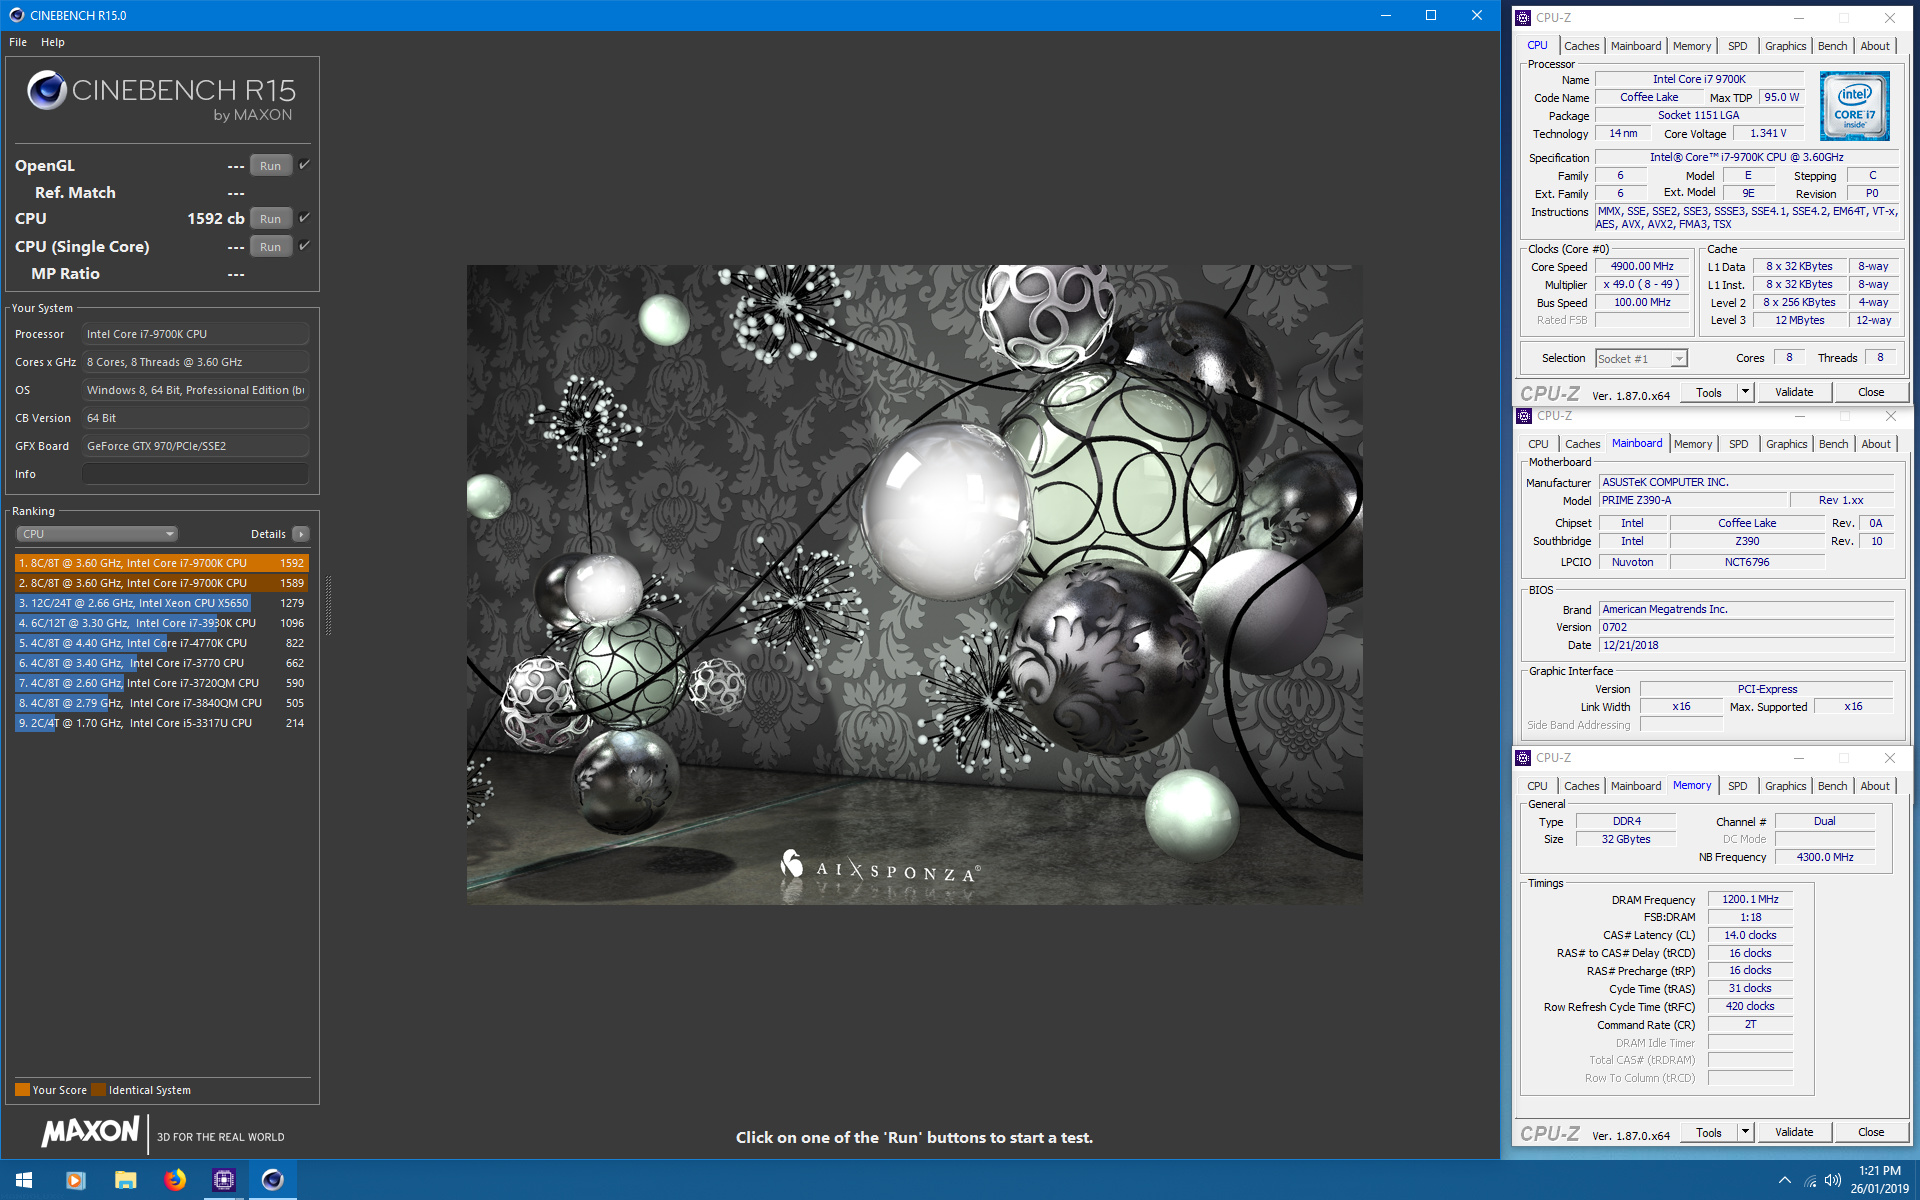
As for other stress tests and benchmarks, opinions are sharply divided; everyone has their favorites, often because they give better results on the particular hardware they have. CineBench for example is currently in vogue, including the newer and more stressful CineBench Extreme mod. As a benchmark, it's not reflective of real-world usage unless you work on 3D modelling or related tasks; it doesn't remotely reflect real-world CPU usage during gaming or normal tasks. It is a good stress tester though, because like Prime95, it artificially pushes your system to the limit, especially the CPU, and quickly fails or results in a bluescreen if the system is unstable.
I cover some of the classic benchmarks and stress tests in the Performance Measurement & Troubleshooting chapter of the TweakGuides Tweaking Companion (See the Windows 10 Optimization section later in this article). For more recent recommendations, the built-in Windows Memory Diagnostic is quite good for testing your RAM outside of the Windows environment. Additional system core benchmarks and testers include: Geekbench, AIDA64 and Linpack. The free CPU-Z and HWInfo utilities have built-in benchmarks, while the free 7-Zip utility also has a benchmark that I consider more of a real-world measure, particularly as it's a tool most people actually use quite often.
There is no single all-round perfect stress tester. The closest thing to that would be the very latest graphically intense, open-world game, at maximum possible settings. Load up a heavily populated and visually detailed area, then run or drive around fairly rapidly. This will require the CPU (AI), GPU (visuals), Audio (spatial sound), RAM and primary drive (general data throughput), and possibly even your network connection (if it's multiplayer), to work together under a sustained heavy load. Any system instability (crashes, bluescreens, or sudden reboots) or quality issues, such as insufficient speeds or bandwidth to the memory or storage (stuttering), insufficient cooling (noticeable slowdowns, graphical anomalies, connection dropouts), and the like will soon be exposed.
Lastly, common sense comes into play here: if you notice any strange behavior from your system, then it is probably not stable at your chosen overclock. No two systems are the same, even if they have the same components, come out of the same factory, and have the same settings. So when looking at benchmark results be very wary of the fact that some people get their systems sufficiently stable enough to complete a benchmark, as opposed to having it rock solid, day in and day out. You can choose which you prefer.
Multicore Enhancements
The ASUS Multicore Enhancement setting in the UEFI BIOS is another area where some people appear to run into difficulties. It's not very well explained. Essentially, if this is set to Enabled or Auto, it uses ASUS' proprietary method of boosting the CPU, as opposed to the standard Intel Turbo pattern. This can result in more aggressive, and thus higher, clock speeds across all cores. But it also seems to result in higher voltages, which can be a worry. My experience confirms this. Enabling this setting on my CPU, which already seems to prefer higher voltages, pushes voltages into the uncomfortable zone above 1.4v. I don't think it's worth the risk, so I've set it to Disabled.
Like Turbo, it should only come into effect when you're not manually overclocking your CPU. But there's a safer method if you want the CPU to have a high boost equally across all cores, and keep your system speed much higher across all cores at low or idle loads: use a High Performance-based power plan in Windows. This keeps all cores synchronized, prevents the CPU from downclocking below 4.3GHz, while also boosting to 4.9GHz across all cores, with minimal voltage or heat impact. See the previous page for details.
CPU Not Downclocking or Boosting Properly
If you've read the article thus far, you'd see that the main reasons a modern Intel CPU like the 9700k won't downclock to 800MHz or boost the way it's supposed to are: the Multicore Enhancements setting is on (Enabled or Auto); your Windows power-plan is based on the High Performance template; the TDP limit has kicked in, preventing you from reaching your target frequency, and as heat builds up, may even see you dropping below your rated speeds in order to keep the CPU functional; and later in the Windows 10 Optimization section, you should read about the Intel Management Engine. These are the four main causes for the CPU to not behave as you would expect.
Multiple Reboots on Cold Startup
This is a quirk that seems to be unique to ASUS motherboards, and certainly one I'd never seen before. When the system is fully power cycled, i.e., a "cold" reboot, where the PSU or wall socket power switch is turned off and/or the plug is removed from the power socket and/or you've installed a new BIOS version, and then it's restarted again, it will rapidly reboot itself multiple times within a matter of less than a minute, before it eventually can enter the UEFI BIOS or let Windows load. It's occurred for me at every cold boot, regardless of my settings. Fortunately, cold boots don't occur all that often. There's a thread about this issue on the ASUS RoG Forums. The latest semi-official answer from an ASUS moderator in that thread says that this is normal:
This behavior is normal and depends on the UEFI config. Certain controllers require a power cycle, as well as memory training routines to ensure stability. Moreover, if the memory overclock is unstable and unable to pass POST stress tests the system will attempt to retrain again, resulting in further power cycles. Once memory stability has been checked correctly one can enable MRC Fast Boot to retain the last POST memory parameters in NVRAM.
As the response says, to resolve this issue and also help improve your BIOS bootup time, once you've finalised your RAM timings and you're certain your RAM is stable, then under the Ai Tweaker>DRAM Timing Control section in the UEFI BIOS, find the MRC Fast Boot setting near the bottom, and change it from Auto to Enabled. I can confirm that this worked to ensure that I boot up normally after a cold start, with no multiple reboots.
Fans Not Displaying in BIOS
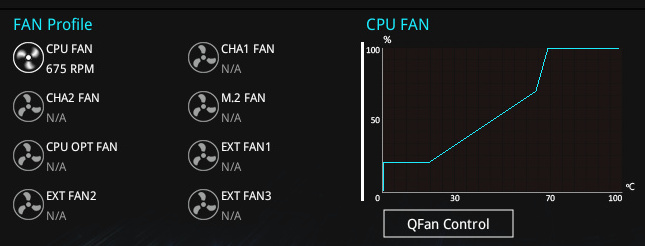
This is another quirk that may cause some concern. My Fractal Design R6 case comes with a handy Fan Hub on one side, positioned out of view behind the motherboard supports. The 4-pin CPU fan, and the three 3-pin case fans that come with my case, can all be connected to this single hub making the cabling much neater. There's a single 4-pin fan cable that comes out of the hub, which I've connected to the CPU fan header on the motherboard, as per the case manual's instructions.
This configuration can cause some confusion when checking the UEFI BIOS, because the BIOS only reports the CPU fan as turning, and provides its RPMs; the case fans appear dead and are listed as not applicable (NA). This is completely normal. I've visually confirmed that my case fans are all on and operating appropriately, changing their speed with load. The CPU Fan header on the motherboard, to which the fan hub cable connects, cannot discern the fact that multiple separate fans are connected to the hub, that's all. The fans will all change speed due to heat and load as required, lead by the CPU fan.
Note: make sure you select PWM for fan type in the UEFI BIOS, because that's the mode the Hub requires to operate properly, given it's using a 4-pin cable.
Correct Motherboard Configuration
When you install your components in a motherboard, you must read the motherboard manual and take the time to determine in advance which component needs to be installed in what slot. This is now more important than ever before, because the latest components are often extremely bandwidth-dependent, and most of them use the PCI-e Bus.
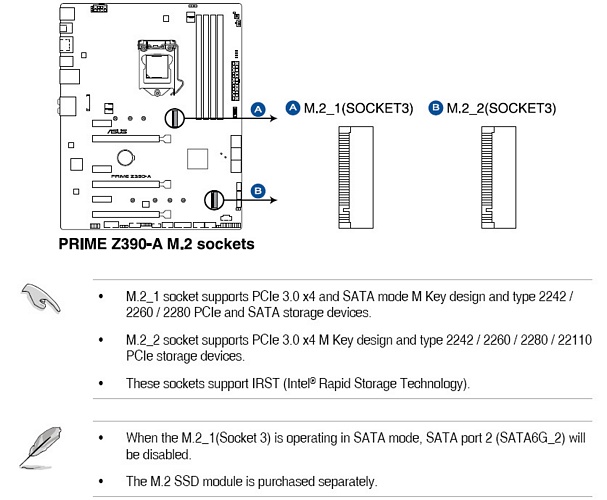
The new Intel Z390 chipset which caters to the 8th and 9th Gen Intel CPUs has numerous PCI-e lanes, but it's imperative to follow the motherboard's instructions as to how to connect your PCI-e devices correctly to ensure that they each have sufficient bandwidth. On my system, my GTX 970 GPU, the NVMe SSD, and the Wi-Fi card are all PCI-e devices, with the GPU requiring Gen 3.0 16x speed, the NVMe performing best at Gen 3.0 4x speed, and the Wi-Fi card can make do with 1x speed. There are multiple ways to confirm that each device is configured for the highest possible bandwidth, as we'll see. The current interface speed for the Samsung 970 EVO SSD is shown on the main screen of the Samsung Magician tool, as well as in the Advanced>Onboard Devices Configuration section of the BIOS under the PCIEX16_3 Bandwidth setting; the GPU's speed is shown BIOS under the Advanced>System Agent Configuration>PEG Port Configuration section, in the free GPU-Z utility under Bus Interface; in the free CPU-z utility, at the bottom of the Mainboard tab.
Similarly, it's been standard for many years that RAM DIMMs need to be installed in certain DIMM sockets on the motherboard in order to work properly. The 2x16GB DDR4 RAM DIMMs I bought needed to each be installed in a separate cluster of DIMM socket on their own, in the slots closest to the front of the case (DIMM A2 and B2 on my system). If they aren't, they may not be detected properly, and won't function in Dual Channel mode. In practice, a range of real-world benchmarks such as these show that there is no significant difference between single, dual and quad channel memory configurations on the latest Intel consumer-level platforms. To be safe, buy your memory in at least 2 DIMMs (e.g., buy 2x8GB DIMMs instead of 1x16GB DIMM) so you can at least use dual channel mode, as that appears to provide the most significant potential benefit.
I'm reiterating this point here because once you've installed a component, they can be a huge pain to uninstall and move around if the configuration is incorrect. See the Primary Drive section on the next page to see what I mean (hint: it involves tiny screws!).
HyperThreading & SMT
One of the ways Intel decided to distinguish the top-end Core i9 9900K from the Core i7 9700K I purchased was to remove their proprietary Simultaneous Multi-Threading (SMT) feature, known as HyperThreading (HT), from the latter, cheaper model. This caused a great deal of angst and controversy among some who claim that this is an "artificial distinction" created by Intel in order to sell the 9900K at a higher price. They're absolutely right. Manufacturers have long created artificial tiers within their product range, not due to necessity, cost, or manufacturing limitations, but precisely to segment products in order to maximize profit. There's nothing underhanded about it.
The upshot of this is that my i7 9700K has 8 cores and 8 resulting threads, whereas the i9 9900K has the same 8 cores, but can handle 16 threads at once using HyperThreading, giving it what is known as 16 Logical Cores. This matches the Ryzen 7 2700X, which also has 8 Cores but uses SMT to provide 16 logical cores.
SMT/HT can boost multi-core performance on CPUs equipped with it, especially in applications where more threads can be used at once to perform tasks in parallel (alongside each other). But outside of benchmarks, and a handful of tasks which few users will undertake, very few programs actually used by consumers can take advantage of 16 threads, logical or physical. In fact, HyperThreading can reduce performance unless the extra threads are actually needed. Some game developers even recommend disabling HT/SMT for that reason, as this Review of SMT in Final Fantasy 15 concludes.
Worse still, HyperThreading adds more variables into the equation, both in terms of additional sources of problematic behavior such as crashes - as a major bug in HT demonstrated in 2017 - and can provide more opportunities for side-channel security exploits, such as the recent PortSmash attack vector. The much-hyped Spectre and Meltdown exploits from early last year also continue to cast doubts over the dubious benefits SMT/HT provides versus its potential security risks. In short, buying a CPU without HyperThreading or even SMT, may not necessarily be a bad thing, and may save you the headache of tracking down an SMT/HT-related problem or performance issue which isn't readily obvious.
Spectre & Meltdown
The Spectre and Meltdown vulnerabilities generated a great deal of negative publicity for Intel last year, and rightly so. They are a greater danger to your system if you run an Intel CPU. It's significant therefore that the Coffee Lake Refresh (Intel 9th Gen) CPUs, such as my i7 9700K, are the first Intel CPUs to contain hardware fixes for the main variants of these vulnerabilities. These hardware-level fixes will continue to be implemented as newer chips come out, because they reduce and eventually remove reliance on the operating system or firmware upgrades - which can potentially degrade performance - to mitigate the vulnerabilities. As I noted above, it's also a major reason why I have absolutely no issue with a lack of HyperThreading my 9700K.
To check your system's current exposure to Spectre and Meltdown, use the free InSpectre and Ashampoo Spectre Meltdown CPU Checker utilities. My results were confusing:
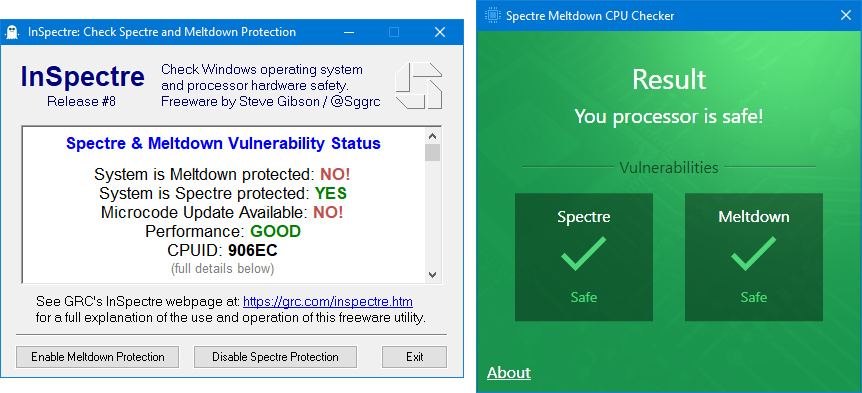
InSpectre is not picking up the hardware-level fix for Meltdown that the new Core i7 provides because the latest version of InSpectre was released in April 2018. Ashampoo appears to correctly detect the fact that my system is not affected by the main variants of these vulnerabilities, due to a combination of my hardware, and the fact that I've installed all available security patches for Windows 10. Even if you're not considering new hardware, you should make sure you install the latest available BIOS and security patches if Ashampoo determines that your system is at risk.
System Lighting
I didn't cover component lighting when talking about my motherboard, as it's largely irrelevant to my needs and tastes. I'm running a closed-case setup, so the interior of the case isn't visible, and I was also aiming for a more mature, understated, business-like build aesthetic which means minimal lighting. The only lights visible anywhere on my system are a small blue LED on the ASUS Wi-Fi card at the rear of my case that flashes with any network activity; a barely visible red glow from the Toslink optical digital audio port in the rear of the case; and a soft white LED that surrounds the power button on the case's front panel - it lights up to show that the PC is on, flashes gently to indicate drive activity, and generally looks quite sophisticated and cool in its subtlety, in my opinion.
However, given the trend towards more LED and RGB lighting as enthusiasts want to showcase their components, ASUS has included a feature called the Aura Lighting System that may be of interest to you. You can see it in action in this video. There's also Aura Sync, which allows you to synchronize the lighting on any other components you've installed, even non-ASUS ones, with the main Aura Lighting. Aura is on by default, but you can control it in the Onboard Devices Configuration section of the UEFI BIOS. Enabling Stealth Mode disables all lighting, which includes Aura and all system LEDs, even the power/drive activity indicator. My preferred option is Aura Off which disables Aura lighting, but leaves the important system LEDs active when the PC is on, which is exactly what I need.
Side note: Many years ago I bought a couple of packets of original Light Dims and they've been incredibly handy. The ones I bought are basically translucent matte black stickers of various sizes that can be used individually or stacked, letting you greatly dim or totally block out LED lighting from devices with overly bright and/or badly-located LEDs. For example, my Samsung monitor's bright blue front-facing power LED is annoyingly distracting, ditto my TV's red power LED, ruining dark room viewing; everything has an LED on it these days. Anyway, Light Dims work, they don't come off too easily and don't stick out like a sore thumb on expensive electronics. Also, in some cases, you don't want to totally block off all light, as the LED is a status indicator, so just a single Light Dim will smother the bright light without blocking it.
Speeding Up BIOS Boot Time

Windows 10 has a feature called Fast Boot, first introduced in Windows 8. It can make booting into Windows 10 incredibly fast, but has pros and cons. I've never had any problems with it, so I leave it enabled. The discussion here is about reducing the BIOS Boot Time. This is the time it takes from when you press the power button, until your BIOS can hand off to Windows. If you want a measure of it, right-click on the Windows Taskbar and select Task Manager, make sure you click the More Details link at the bottom, then go to the Startup tab and look in the top right corner.
There are a few very simple things you can do to increase this speed. These are the key settings I use in my BIOS to minimize BIOS Boot Time, with some brief descriptions - refer to your motherboard's manual for more details:
Fast Boot: Enabled - This option has nothing to do with Windows Fast Boot, it refers to skipping unnecessary BIOS functions to load faster, so it can be enabled if your system is stable.
Boot Logo Display: Disabled - If Enabled, it wastes some boot time displaying the ASUS logo.
POST Report: 1 sec - The Power On Self-Test (POST) is a status display of some basic system diagnostics. If your system is stable, there's no need to waste any time at each bootup displaying this.
Wait for 'F1 If Error: Enabled - This is best left enabled. If you have an error during BIOS boot, this pauses the system allowing you to see the error and lets you press F1 to enter the UEFI BIOS.
Option ROM Messages: Keep Current - Option ROM messages are details passed onto your BIOS from the connected devices during boot. Once your system is stable, use Keep Current to skip them.
Interrupt 19 Capture: Disabled - If Enabled, this option allows some connected devices to control the system or undertake certain functionality during boot. On most desktop PCs, it's not necessary.
Setup Mode: Advanced Mode - This simply refers to whether the UEFI BIOS loads into EZMode or Advanced Mode by default whenever you enter it. I recommend Advanced Mode, but you can toggle between either by pressing F7 at any time in the BIOS.
On most modern PCs, the boot time is only a few seconds, so it doesn't allow you much time to get into the BIOS. There are several ways to get into the UEFI BIOS that don't involve madly trying to press the right key just before Windows loads. These are covered in the Windows 10 Optimization section.
Well that covers the System Core - phew! Next up, I look at the star performer of this new system, the Primary Drive.
|
|