
Hardware Confusion 2019
[Page 4] System Core: Overclocking
A common justification for buying a particular CPU is that it's an "excellent overclocker". The idea is that you save lots of money by buying a cheaper CPU, and simply adjust its clock speed to the point where it matches or beats the performance of a much more expensive one. It's a great idea in theory, but in the past I've advised against it because while overclocking is easy, overclocking properly is hard, and you often risk your system's stability, your data, even your hardware, just to save a few bucks.
In 2019, things have changed. You'll be glad to know that the entire debate is now moot; more and more components are specifically designed to self-overclock as part of their normal operation, so it's unavoidable. We're all overclockers now, whether we like it or not.
Fortunately, there are a lot more safeguards and options provided to do so. The ASUS Prime Z390-A mid-range motherboard I bought to complement my i7 9700K is quite advanced in providing not only a range of detailed options, but also a proprietary ASUS artificial intelligence (AI) system that learns about your system's performance and cooling over time, and can automatically adjust a range of parameters to keep things running optimally. As an overclocking noob, I've found it incredibly useful.
But first, for those of you, like me, who may not be overly familiar with precisely how the newer generation of CPUs work, here's a rundown on their basic operation.
The latest consumer-oriented Intel CPUs all come with relatively low "base clocks" - this is the speed at which they're guaranteed to run under most circumstances: Core i5 9400F = 2.9GHz, i5 9600K = 3.7GHz, i7 9700K = 3.6GHz, and the i9 9900K = 3.6GHz. They can reach their much higher advertised "boost speeds" under specific circumstances, and typically only on some of the cores. The detailed 9700K specs, as provided in this review for example, indicate that my CPU's boost clocks work in a selective manner: it will reach its advertised 4.9GHz maximum on 1 core; 4.8GHz boost on 2 cores when required; 4.7GHz when boosting on four cores; and a maximum boost of 4.6GHz on 5 or more cores.
My i7 9700K is rated at 95W TDP, and this is an important spec. Thermal Design Power (TDP) is essentially the amount of heat output the CPU is designed to cope with, measured in Watts. The cooling system you purchase must be able to consistently dissipate that amount of heat in Watts for the CPU to operate at its rated base and boost speeds. The TDP rating is not a recommendation, it's a specific target: if my CPU exceeds 95W for more than a brief period at any time, it will automatically reduce its voltage so that it returns to around 95W TDP, reducing its speed in the process.
The be quiet Pure Rock heatsink and fan combo I bought to cool this CPU is a relatively inexpensive air cooler that claims to provide up to 150W of cooling, at very low noise levels - that last part was the key reason I bought it. Would it be good enough to allow the CPU to reach its advertised boost clock, much less allow for any overclocking?
There's one more critical safeguard to note, and it's been around for as long as I can remember: the CPU has a maximum temperature level (TJMax), in my case set at 100C (212F). This is a hard limit such that if the CPU reaches or exceeds 100C at any time, it will instantly throttle back or even immediately shut itself down in an attempt to prevent catastrophic damage.
When I first booted into the UEFI BIOS of this system, having just finished assembling it late one night in early January, I was impressed by the range of options that lay before me. However, I resisted the temptation to experiment, and left every overclocking and boost-related setting on default so I could concentrate on installing and configuring Windows 10. Once Windows 10 was up and running with my basic settings and the right drivers, I installed a fairly standard suite of free monitoring software to keep an eye on temperatures, speeds and voltages, and left them running in the background while I worked:
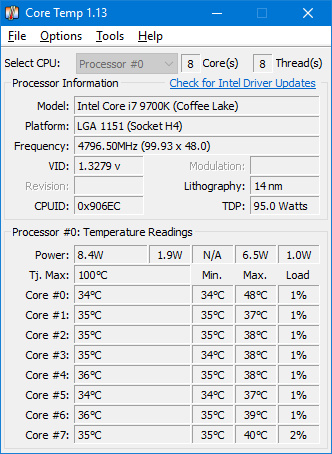
CoreTemp - provides a targeted summary of key CPU sensor results including the current, minimum and maximum temperatures across all cores, current clockspeed, voltage, and overall TDP.
CPU-Z - A summary of key CPU, motherboard and RAM data.
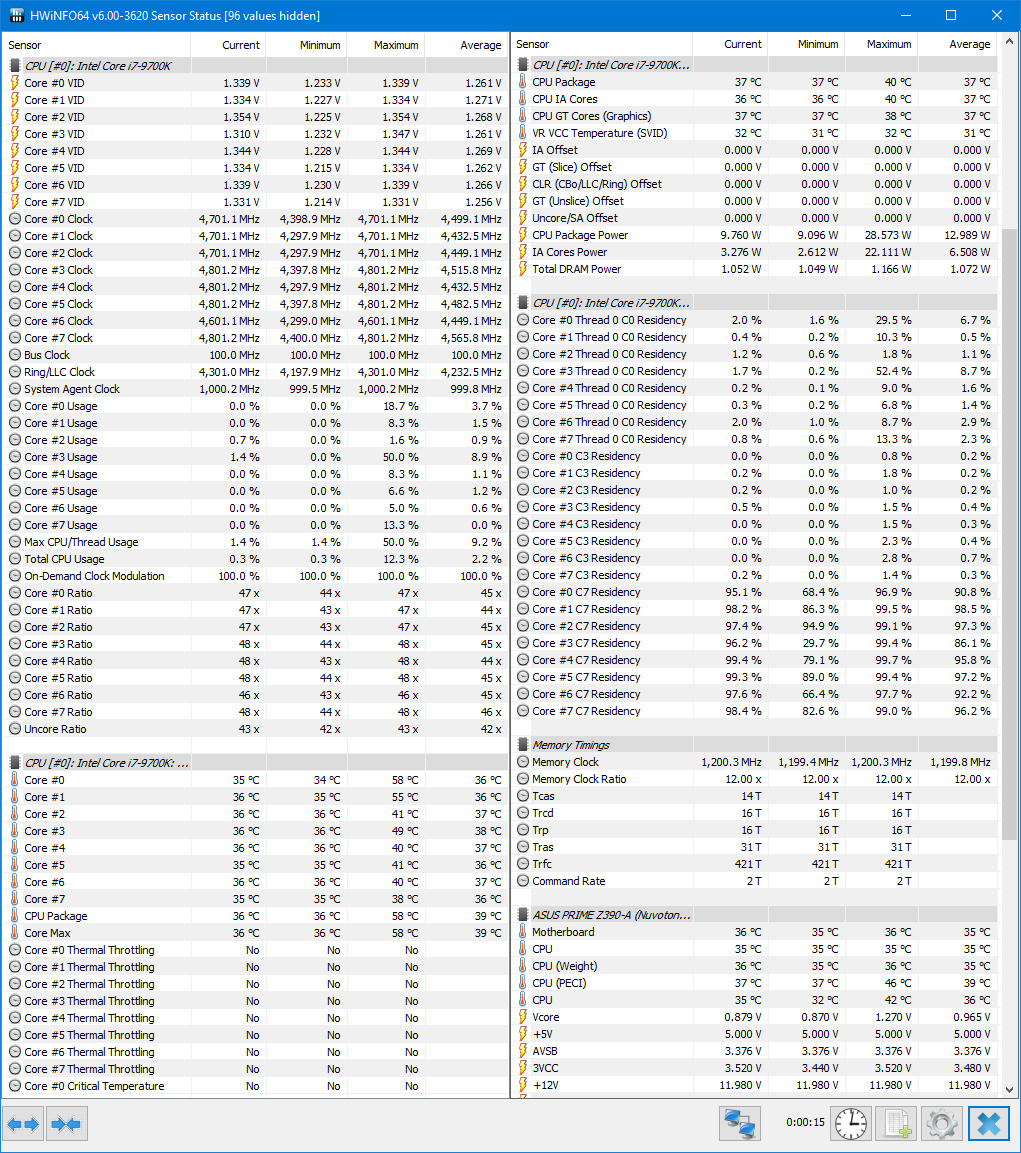
HWInfo - A detailed and configurable breakdown of a wide range of very useful information, drawn from every sensor on your system, including the current, minimum, maximum and average core speeds, temps, voltages, power usage and C-states across all cores, system fan speeds, drive temperatures, etc.
Windows Task Manager - I made use of the built-in Windows Task Manager (right-click on the Taskbar>Task Manager>Performance tab) as a cross-check against the tools above.
Here's where some confusion began to arise. While sitting relatively idle on the Windows desktop, I'd frequently see the CPU pegged at 4.9GHz on all 8 cores, typically changing both frequency and voltage up and down constantly within a 4.6-4.9GHz range and anywhere up to 1.4v. At the same time, total CPU power usage across all cores and including the other components of the CPU such as its caches, referred to as the CPU Package Power, would fluctuate from around 8W up to 30W or more while doing this.
Why did the CPU need to boost to its maximum frequency of 4.9GHz, or even to 4.6GHz, while sitting at idle when there was no appreciable load? Furthermore, why would it boost to these high levels across all 8 cores at the same time, when it was supposed to boost only one active core to 4.9GHz to start with? And if it was boosting all of the cores to these speeds, why was TDP still relatively low most of the time?
My first attempt at basic overclocking left me even more confused. I wanted to quickly see what my limits were on a system not designed for overclocking, so it was more of a joyride than a serious attempt at overclocking. By way of background, we've been experiencing a heat wave in Australia for most of January, with temperatures often around 37-41C (98-106F) here, and even with air conditioning on most of the day the computer room can still get up to 27C (80F) by midday, raising case temps to 36C(97F) and CPU idle temps to 40C(104F) or more. Also keep in mind that I'm using a fully enclosed case and low fan speeds to minimize noise.
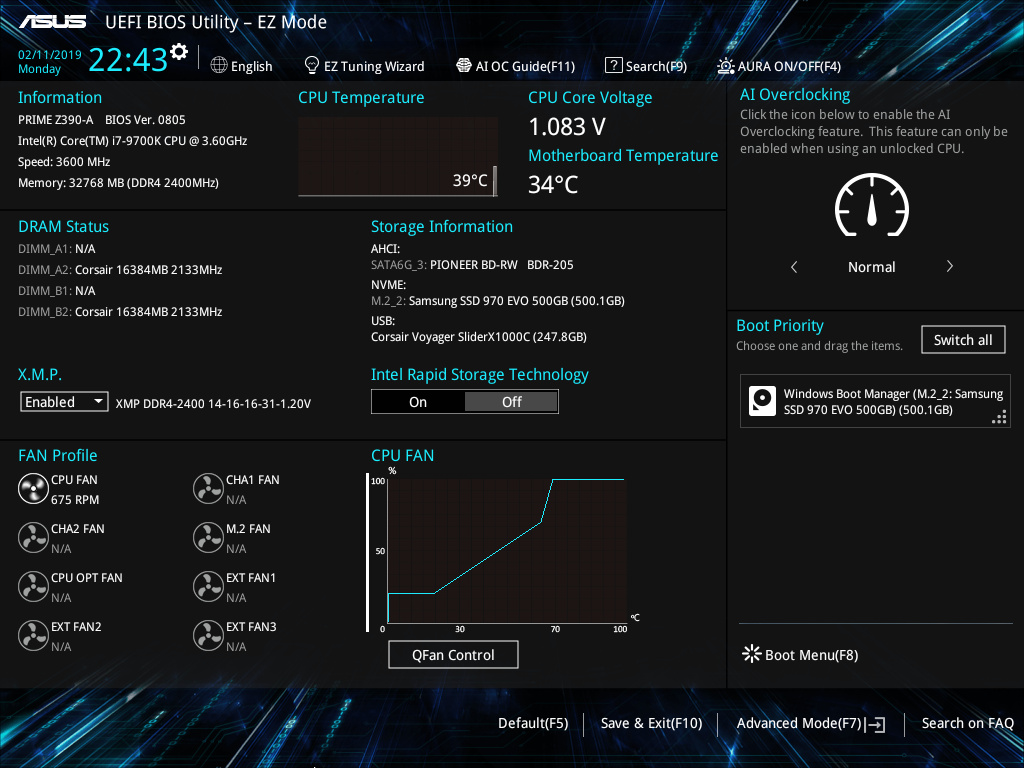
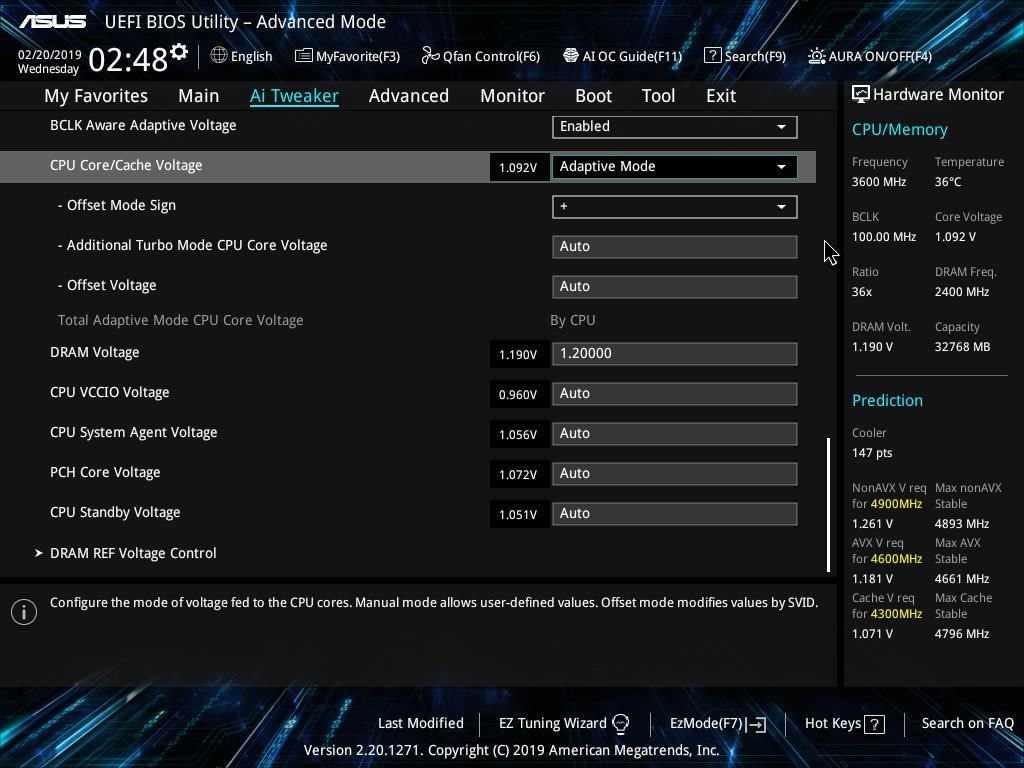
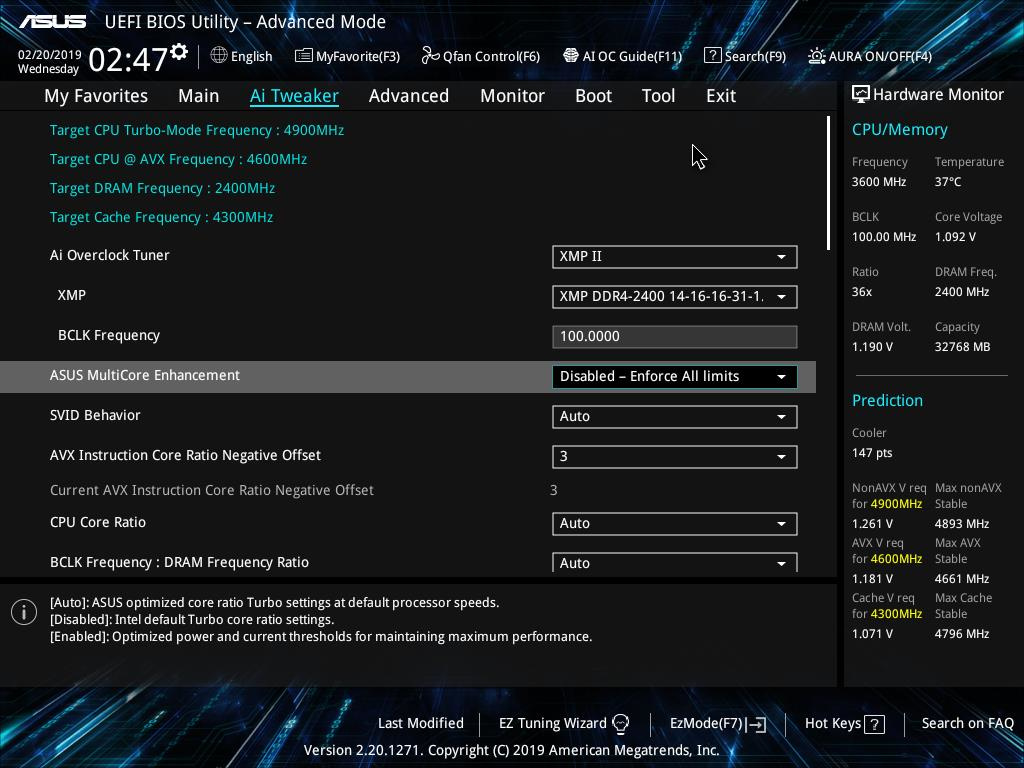
ASUS provides a user-friendly automated overclocking system on many of its boards called Ai Overclocking. There's a very simple EZ Mode interface that is on by default, which you can use to view and control the key system parameters, as shown on the left above. Or you can switch to a more advanced interface by pressing F7 at any time, as shown on the right above. On the Advanced page, ASUS Ai provides a prediction of the maximum overclocked speed, along with the voltage it calculates as being required to attain that speed with stability, based on its ongoing analysis of your energy usage and cooling efficiency. As a result of these calculations, it initially allocated a rating of 160 points to my cooler, and predicted that I could reach just over 5GHz with stability at a little over 1.2v.
Great! I set XMP to Level I to initiate a basic overclock of my RAM to its rated speed of 2400MHz (See further below) and I left the Bus Clock (BCLK) at 100, raised Core Clocks to 50, synchronized on all cores (100 BCLK x 50 Core Clock = 5,000MHz, or 5GHz, across all cores), and manually set the Core Voltage to 1.25v. To stress the CPU to a 100% constant load, I used the latest version of the free Prime95 utility on its default Blend setting.
Within seconds of launching Prime95 in Windows 10, one of the worker threads failed, meaning the overclock was not stable. As per standard overclocking logic, I would have to raise voltage slightly, retry Prime95, and repeat as necessary until the system could continue to run at full load without crashing or stopping any of the cores.
Here's where I started to pick up on some of the new methods of overclocking. For example, you can now control the level of Voltage Droop (VDroop), which is the drop-off in the voltage provided to your CPU as load increases. Say you select a Core Voltage of 1.25v for the CPU; as a characteristic of the way your system provides power to the CPU, the actual voltage it gets starts to dip below 1.25v as load increases, causing instability if 1.25v is the absolute minimum the CPU needs to maintain a stable overclock. This is where the CPU Load-Line Calibration (LLC) setting in the BIOS steps in, providing a range of percentages or levels (from Level 1 to Level 7 on my motherboard), with each higher value of LLC progressively reducing VDroop at the expense of higher voltage when not under load, thus the potential to overvolt the CPU, which can shorten its lifespan or even kill it in extreme circumstances. TL;DR: Numerically higher LLC Levels reduce VDroop and improve overclocking, at greater risk to your CPU.
I manually set my Load Line Calibration from Auto (Level 4 at the time) to Level 5, ensuring slightly less VDroop but hopefully no real chance of overvoltage, and raised my Core voltage to 1.30v. No dice, I still got a worker thread failure. I eventually raised voltage to as high as 1.36v and LLC to Level 6, at which point the 5GHz overclock seemed stable under Prime95. But something odd happened: the CPU hit 70-75C and 130W TDP before suddenly reducing speed, first to 4.8GHz, then further down to 4.4GHz, eventually dropping to as low as 3.9GHz across all cores after several minutes. Prime95 was "stable", but nowhere near my target frequency of 5GHz. Quitting Prime95 would instantly raise the cores back to 5GHz. Why was it throttling like this, was my cooling really that weak?
Nope, it was entirely rookie error. In only doing some quick reading on overclocking, I'd missed an important point: aside from switching on manual overclocking, and all of the rest of my adjustments to clock speeds and voltages in my UEFI BIOS, I had to remove the CPU's TDP limits in order for it to be able to maintain my target frequency. Otherwise, no matter what else I change, the CPU will simply hit its 95W TDP ceiling, temporarily going past it for a short while before being brought back into line as voltages, and thus speeds, are reduced, to get itself back to a 95W heat load.
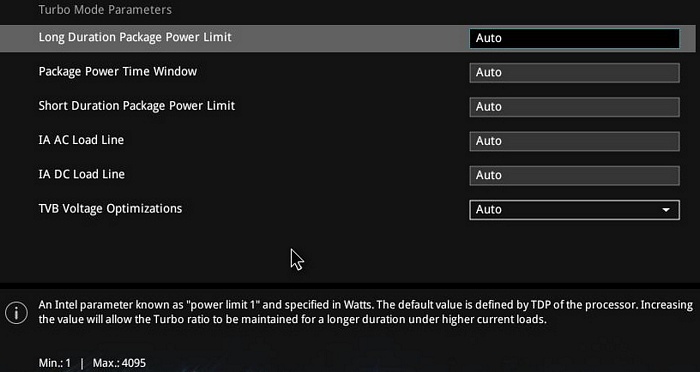
To prevent TDP throttling I had to go to the Internal CPU Power Management section of the Advanced UEFI BIOS settings, and alter Long Duration Package Power Limit, Package Power Time Window, and Short Duration Package Power Limit. These three settings respectively determine the CPU's TDP limit (in Watts) and how long the CPU is allowed to exceed the limit (in seconds) under different circumstances, before being returned to the limit. The quickest way to defeat the TDP limit is to set these three options to their maximums by entering a large number like 9999999 and pressing Enter.
I reran my overclock without the 95W TDP target, and this time the CPU maintained its frequency at the intended 5GHz. Great success, very nice! as Borat would say. Temperatures were rising to over 80C, yet still seemed safe. This all ended abruptly as I suddenly got a Blue Screen error in Windows after a minute or so of Prime95. Hmmm... this was starting to get frustrating.
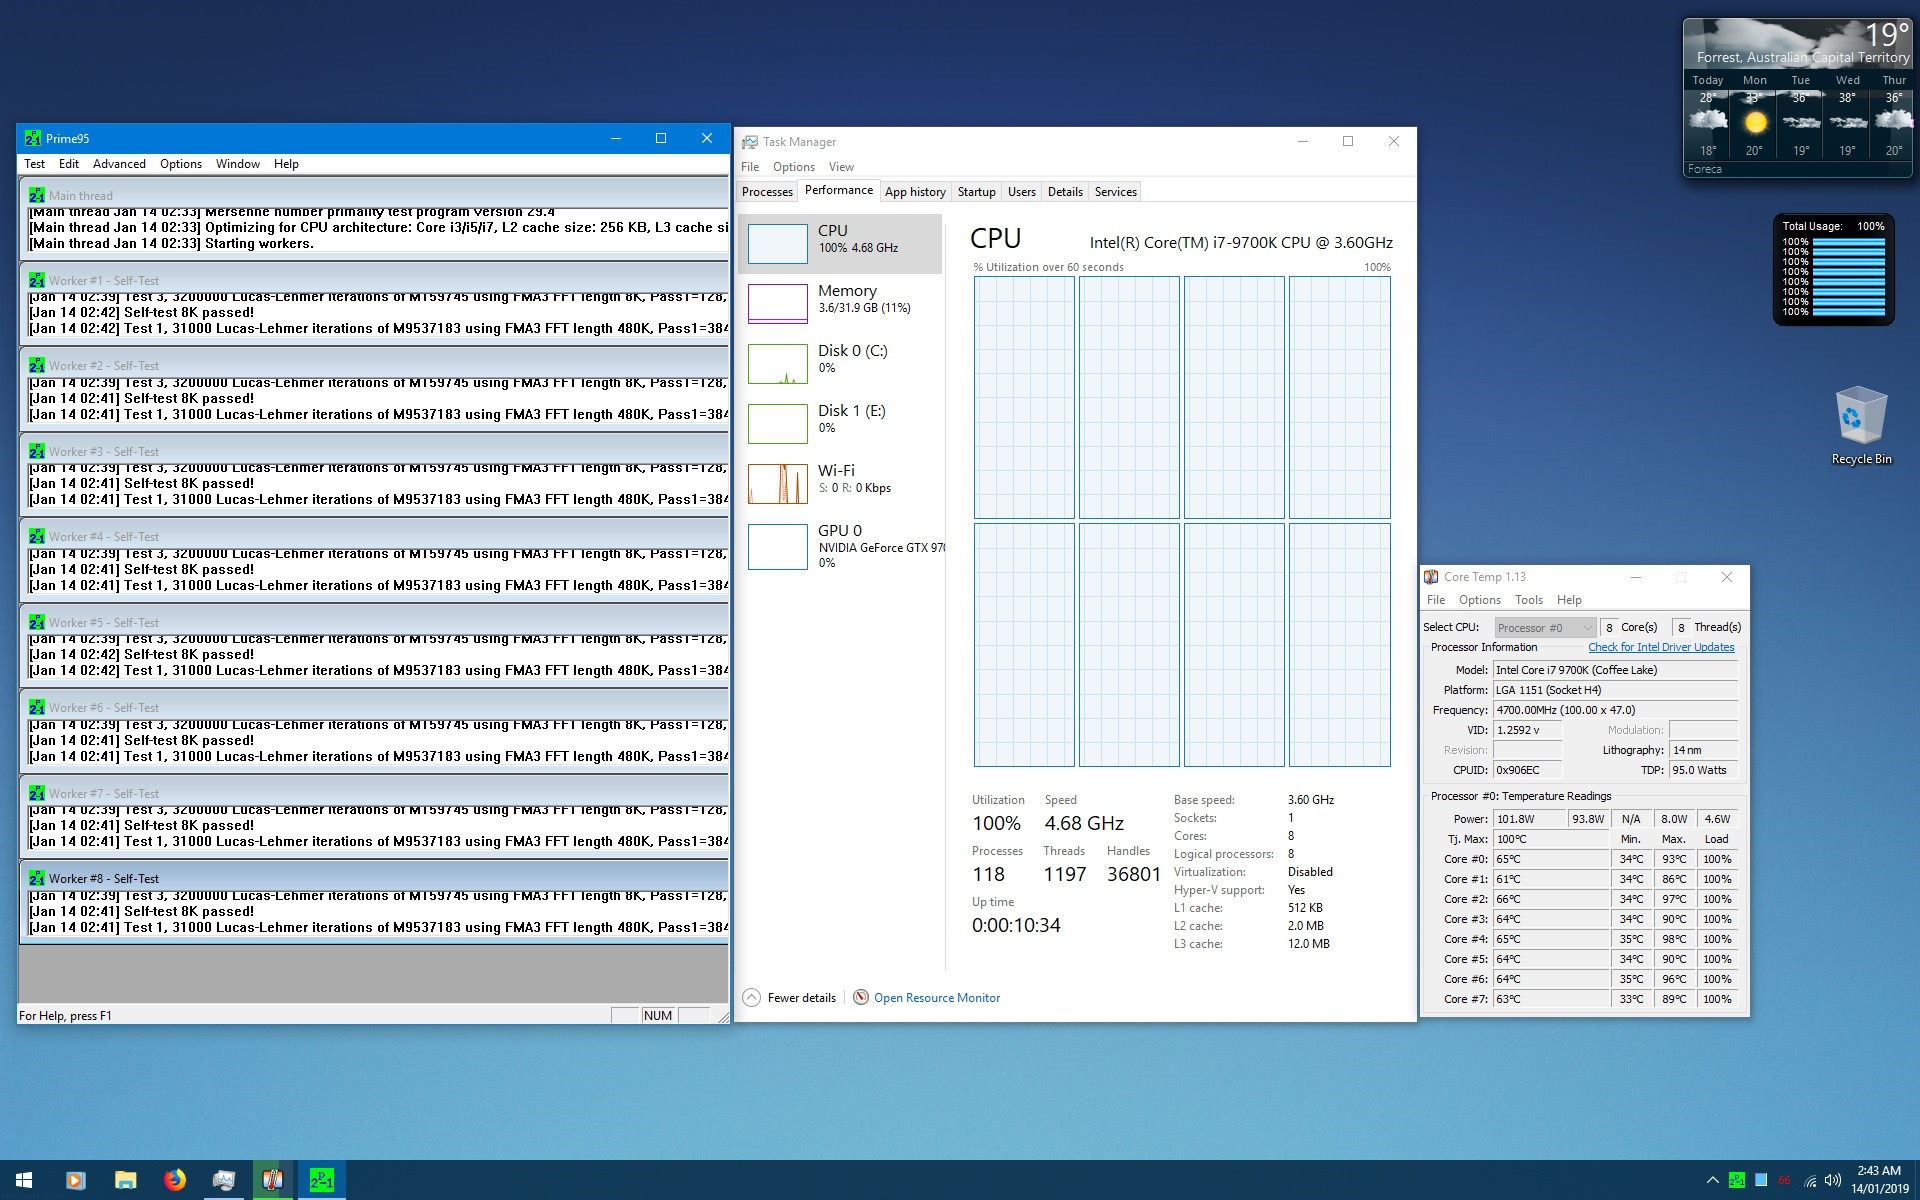

With more experimentation, I managed to get 4.7GHz stable (See screenshot on the left above). However, the system was using far too much voltage and LLC, so temperatures on some cores would spike close to 98C, which isn't safe in the long term. To cut a long story short, I did a few more overclocking runs, and finally, with the help of the good folks over at the Overclockers Australia Forums and overclocking tutorial videos such as this one, I got my CPU stable at 4.9GHz using a mix of automated and manual settings (See screenshot on the right above). My initial results were: 4.9GHz across all cores running Prime95, with the CPU briefly hitting around 90C and 1.385v at times, but averaging around 77-80C and 1.34v. I didn't crack the magic 5GHz mark, but I would discover some very interesting benefits that yet another rookie mistake of mine provided.
If these temps and voltages scare you, please keep in mind that this was testing done under extreme conditions in several respects: Prime95 is highly stressful and does not reflect real-world loads, as discussed later; the tests were run in the hottest part of summer, during a heat wave with interior temperatures up to 27C (80F) even with air con; and I was using a basic air cooling solution aimed at low noise not maximum cooling, in a completely closed case, with a standard fan profile to keep things quiet. Go to around the 18:30 mark in the video linked further above, and it shows that it's possible to have brief periods of even 100C temperatures on the CPU without damaging it, because it will simply throttle down. Obviously though, it's best to play it safe and not allow the CPU to get so close to TJMax if you want maximum longevity and stability.
Let's Not Forget the RAM
RAM choice is a fairly straightforward process now. The latest iterations of both Intel and AMD platforms use DDR4 RAM, which is more energy efficient than DDR3 and thus cooler as well as faster. In terms of speeds, DDR4 RAM starts at 1066MHz which, when multiplied by 2 given it's double data rate (DDR), results in the basic speed at which all DDR4 RAM modules are represented in system information utilities: 2133MHz.
The choice then typically comes down to higher speed capabilities when overclocked vs. greater storage. Faster RAM provides more memory bandwidth to the CPU when it requires a continuous flow of a very large amount of data. Greater amounts of storage in RAM help maintain high bandwidth and also reduce the load on your physical storage drives, from which the data is loaded into RAM. Both are desirable. However, be aware that just like many multi-core CPU benchmarks, synthetic RAM benchmarks can be misleading, because they can artificially saturate memory bandwidth and thus exaggerate the benefits of faster RAM, when in everyday usage this may rarely be a factor.
As a general rule, for high-end gaming and complex number-crunching tasks involving big datasets, there are real-world performance benefits to buying faster DDR4 RAM and more of it, as benchmarks in articles such as this one have shown. Conversely, if you don't game and just want a smoother, more responsive system, then focus on a greater quantity of RAM, rather than higher speeds. This advice applies to Intel Core systems, whereas AMD Ryzen-based systems apparently benefit much more from faster RAM.
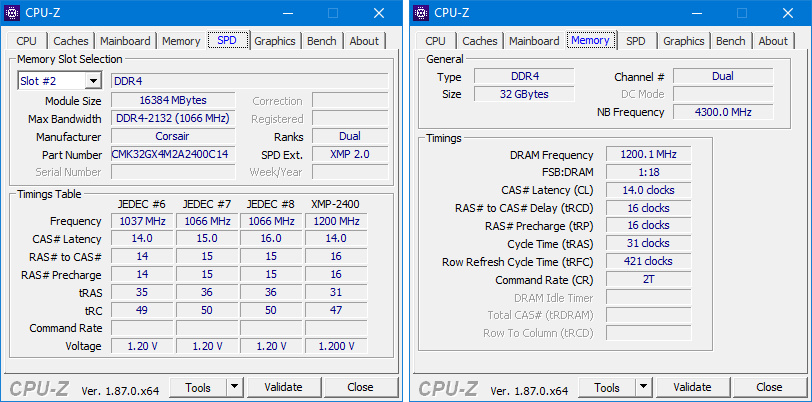
I had managed to get by reasonably well until recently using only 6GB of DDR3 RAM, so I knew my needs wouldn't be extravagant. I opted for the cheapest - but still high quality - and largest quantity of DDR4 RAM I could get. I wound up with the Corsair Vengeance LPX 2400MHz CAS 14 rated series in 2x16GB DIMMs for a total of 32GB. The 32GB of storage is quite future proof in my opinion, and while I could have paid a bit more to buy a 3000MHz set from Corsair, there was no need. As we'll see a bit later on, there's another component in this system that plays a far more prominent role in boosting overall responsiveness.
One interesting feature I learned about is that while default RAM timings are still provided by SPD, on Intel platforms, an extension of that called Extreme Memory Profile (XMP) allows the motherboard to safely overclock the RAM to a higher frequency and tighter timings without the user requiring any knowledge of overclocking, especially the often-tricky correct timings. In fact, the DDR4 RAM you now buy won't run at its fully rated speed unless you select an XMP profile in your BIOS. So to get my Corsair RAM just to rise from 2133MHz to its advertised 2400MHz CAS 14 speed and timing, I have to select the highest XMP profile in the Ai Overclock Tuner setting on my motherboard, which is XMP II. I'm told that on some high-end AMD motherboards, a similar community-derived feature, known as Stilt's Ram Timings, is available or you can download the Ryzen Timing Checker by The Stilt.
Once again, XMP II was a blessing for an overclocking noob like me. My system is completely stable using the XMP II rated speeds, both during normal usage and stress testing on the desktop, as well as running the lengthy built-in Windows Memory Hardware Diagnostic test (Start>Windows Memory Diagnostic). Make sure you test your RAM thoroughly before doing anything else, because faulty RAM, or RAM run at unstable frequencies/timings, can corrupt your data, sometimes in virtually undetectable ways until it's too late. In extreme cases, unstable RAM can cause sudden app crashes to desktop with no error details, or even a spontaneous reboot of the system at random times, resulting in data loss. Remember: stability is king, and your data is irreplaceable.
The next section covers the BIOS settings I eventually settled for as my stable, everyday configuration, as well as a performance-oriented variation of it.
|
|