
Firefox Tweak Guide
[Page 7] Features, Tips & Tricks (Pt.2)
Location Aware Browsing
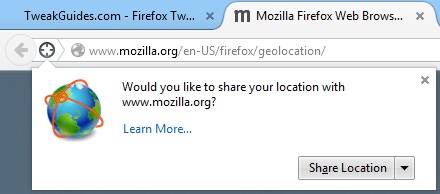
When visiting certain sites which are "location aware", the icon next to the site address in the Address Bar will change to a target, and you will be prompted as to whether you wish to let the site know your location. The available options you will be presented with are a main 'Share Location' button, and if you click the small arrow next to it, you can select further options: 'Always Share Location', 'Never Share Location' and 'Not Now'. If you click the 'Share Location' button, this will allow Firefox to use its Geolocation functionality to send information about your IP address, any nearby wireless access points, and a random client identifier to Google Location Services, which then shares it with the requesting website. The website can then provide more relevant information based on your location, such as refining search results to be more specific to your area (e.g. a search for 'Central Station' will show you your town's central station), or showing you businesses and services in your local area. To safely test out this functionality for yourself, click the link further above and select the 'Give it a Try' link at the top of that page - a Google world map will appear and you can click the 'Where am I?' button and if you wish, allow it to detect your location. The map should change to show your current location.
Keep in mind that unless you manually choose to share your information with a site by clicking the 'Share Location' button (or select 'Always Share Location') which appears in the prompt at the top of the screen, no Geolocation information will be shared with any site. There is no inherent danger to leaving this option enabled. If you are concerned, see the Google Location Service Privacy Policy for more details. If you have granted permission to a site to use Geolocation but want to revoke it at any time, or you want to make sure a specific site can never use Geolocation on your system, open that site, click on the target icon that appears in the Address Bar, and select 'Never Share Location' from the drop down box.
Alternatively, to check and alter Geolocation settings for any site at any time, visit the site, right-click on the page and select 'View Page Info', then under the Permissions tab, look for the 'Access Your Location' section and select the appropriate option.
If you want to disable the Geolocation functionality in Firefox altogether, you will have to change the geo.enabled preference to False - see the Advanced Tweaking section for more details.
Permissions Manager
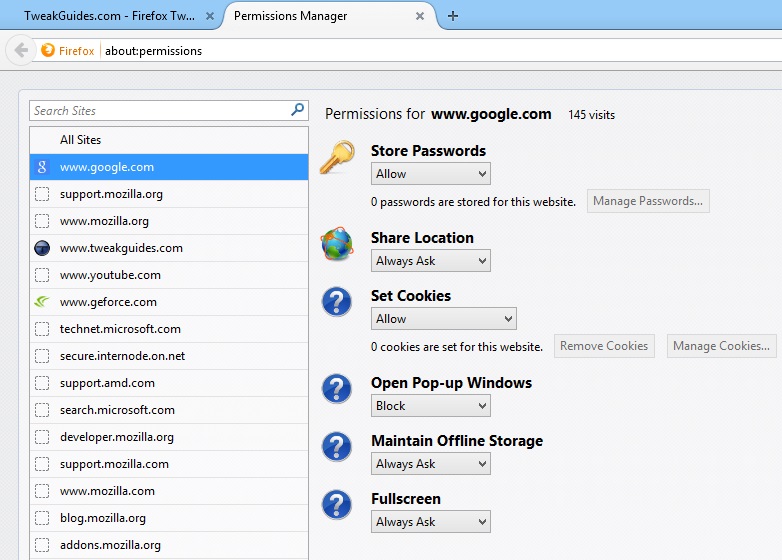
As noted above, you can edit the permissions for any site by first visiting it, right-clicking anywhere on the page and selecting 'View Page Info', then looking under the Permissions tab. However, there is a unified Permissions Manager interface in Firefox that allows you to examine and adjust permissions for a range of websites that you've visited more easily. To access the Permission Manager, type About:Permissions in the Address Bar and press Enter.
The interface which opens lists all the sites for which there is some stored data, typically in the form of a cookie. You can select any one of these sites and then change various settings on a per-site basis, such as password, location, cookie and pop-up preferences. You can also click the 'All Sites' item at the top of the list and set these options for all sites if you wish. The Permissions Manager doesn't add any new settings; its main purpose is to provide a central location for managing a range of permissions on either a per-site or global basis.
Session Restore
Firefox has a built-in Session Restore feature, which if enabled, allows you to close the browser at any time, then open it again in the future and continue viewing the same content you had open last time. To enable Session Restore, open the Firefox main menu, click on Options, and under the General section select the 'Show my windows and tabs from last time' setting from the 'When Firefox starts' drop-down box.
Session Restore also comes into effect if Firefox closes unexpectedly - when next you open it you will see a custom prompt screen asking you to specifically select which particular tabs or windows you wish to reopen. This way you can continue where you left off before the crash, but you can untick the tabs you believe may be problematic, thus preventing Firefox from crashing again as soon as it opens up. What's even nicer about this automatic Session Restore feature is that if you crash out of a page while you were typing some text - e.g. a forum reply - then when next Firefox opens up on that page it will also display any text you had entered.
Bookmarks
Your bookmarks are web pages whose URL addresses you have stored so that you can return to them quickly and easily. This is identical to the Favorites feature in Internet Explorer. You can access your bookmarks directly by clicking the bookmark icon at the top right of the Firefox window, next to the Star icon.
There are a range of features in Firefox designed to make using and managing your bookmarks easier. The main ones are covered below:
Bookmark Star: To add a new page to your Bookmarks, click the Star icon, shown on the main Firefox toolbar. The star will turn blue, indicating that the currently viewed page is now a bookmarked page. By default, pages bookmarked in this manner are automatically saved to the 'Unsorted Bookmarks' category of the Bookmarks menu, but you can create different folders and move bookmarked pages between them, as detailed further below. Aside from allowing you to quickly bookmark any page, the Bookmark Star acts as a visible indicator of whether a page is already among your bookmarks or not: while browsing, if the star turns blue, that means the current page is bookmarked; if the star is white, the page is not in your bookmarks.
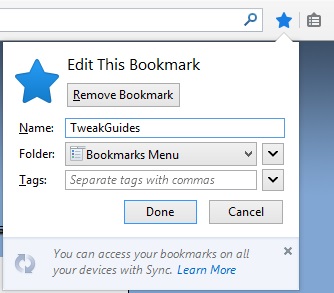
If you click once on the Bookmark star, it will bookmark the current page as described above. But if you click twice on the star, or click once on an already blue star, a small window will appear with more details about the bookmark, and additional options for managing it. Here you can edit how the bookmark's name appears in your Bookmarks menu, its target folder in your Bookmarks menu, and you can add tags to the bookmark, as covered further below. You can also click the 'Remove Bookmark' button if you want to remove that bookmark from your Bookmarks menu.
Tags: You can add a tag to a bookmark by entering text in the Tags field for that bookmark - visible when you click on a blue star. A tag is an additional property you add to a bookmark purely for organizational purposes. Tag any bookmarked site with a particular word, and you can then either search for all sites with a particular tag by entering that tag in the Address Bar, or by going to the Bookmarks menu, selecting 'Show all bookmarks', then selecting the Tags item in the left pane of the Library.
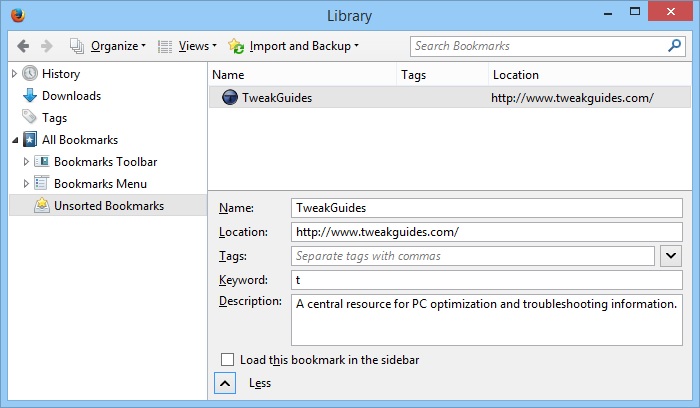
Managing Bookmarks: To manage your bookmarks, click the Bookmarks icon in the main Firefox toolbar and select the 'Show All Bookmarks' item at the bottom of the menu. This opens the Library window. Your bookmarks are held under the 'Bookmarks menu' folder in the left pane of the Library, and you can drag and drop bookmarks, and create or delete folders similar to Windows Explorer here. Remember that by default, any page that is bookmarked by using the Bookmark Star is automatically saved to the 'Unsorted Bookmarks' folder, so move any bookmarks there to relevant folders under the 'Bookmarks Menu' section as necessary.
To export or import bookmarks, click the 'Import and Backup' button at the top of the Library window. Firefox stores your bookmarks in a special database format as the file places.sqlite under your profile directory. Full details of how to correctly backup and restore bookmark files, and the main differences between the .JSON and .HTML bookmark file formats, are provided under the 'Bookmark Files' area at the start of the Advanced Tweaking section of this guide.
Sorting Bookmarks: To quickly sort the bookmarks in your Bookmarks menu, open the Bookmarks menu, then right-click on any folder, select 'Sort By Name', and the contents of that folder will be alphabetically sorted by the name of the bookmark, with folders first, and standalone bookmarks below them. To alphabetically sort all of your main bookmark files/folders, go to the Bookmarks menu, select 'Show All Bookmarks', then right-click on the 'Bookmarks Menu' category in the left pane of the Library window and select 'Sort by Name'.
Keywords: If you want to rapidly access your bookmarks, you can always use the Address Bar's search functionality as covered under the Address Bar section on the previous page. However there's an even faster way: open the Bookmarks menu, right-click on the relevant bookmark and select Properties. In the Properties box which opens, you can assign a shortcut to this bookmark in the Keyword box. For example, if you have TweakGuides.com bookmarked, enter "t" (without quotes) in the Keyword box, and click the Save button to save the change and close the box. The next time you want to quickly load up TweakGuides.com, go to the Address Bar and simply type the letter "t" (without quotes) and press Enter - TweakGuides.com will load up straight away. You can assign custom keywords - whether a single letter or an entire word - to each of your favorite bookmarks and use them in the Address Bar. If you assign a Keyword to a search engine search result, you can use it to speed up searches as well.
Bookmarking Multiple Tabs: If you want to bookmark several open tabbed pages at once, open all the tabs you want to bookmark, right-click on any one of the tabs and select 'Bookmark all tabs', then give the new folder a name. This folder will now be added to your bookmarks and contain all your open tabs. The next time you want to open all of the sites listed in that or any other folder all at once, open your Bookmarks menu, left-click on the folder and select 'Open all in tabs'.
Recently and Frequently Visited Bookmarks: Click the Bookmarks button and you will find the 'Recently Bookmarked' and 'Recent Tags' categories on the main Bookmarks menu, and a 'Most Visited' folder under the 'Bookmarks Toolbar' category. These allow you to see your ten most recently bookmarked pages, tags and visited sites respectively. You can move these folders to new locations, or right-click on and delete them at any time if you want to remove any or all of them.
Live Bookmarks: If you visit websites which have RSS feeds, you can bookmark them as 'live' bookmarks. Visit a site with an RSS feed and click the 'Subscribe to this page' link at the top of the Bookmarks menu. You will be presented with a prompt to select the type of RSS subscription. If you select 'Live Bookmarks', the bookmark will be added with a sub-folder which has all the latest articles from that site as a live feed. This feed can be found under the 'Bookmarks Toolbar' category of the Bookmarks menu.
Bookmarks Toolbar: If you wish to display your Bookmarks menu as a separate toolbar on the main Firefox interface, right-click on an empty area of the main Firefox toolbar and select 'Bookmarks Toolbar', or open the Firefox main menu, select Customize, then select 'Bookmarks Toolbar' from the 'Show / Hide Toolbars' box at the bottom of the customization interface. Any bookmarks or folders added to the 'Bookmarks Toolbar' category of the Bookmarks menu will now be displayed on the main Firefox interface, making it easier to access them. The 'Bookmarks Toolbar' folder can't be deleted.
If you want to do even more with Bookmarks, you can get various Bookmark Add-ons, and also see the Advanced Tweaking section for related tweaks.
Spell Checker
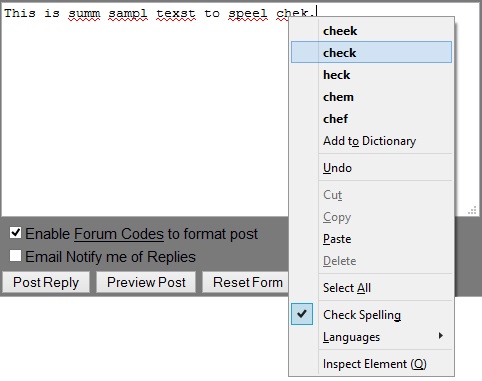
Firefox has an integrated spell checker designed to check the spelling of any text you enter in various text boxes. To enable this feature, tick the 'Check my spelling as I type' setting under the General tab of the Advanced section of the main Firefox Options. For example, if you're posting on a Forum, or entering text into an online form or search box, by enabling the spell checker any spelling mistakes you make will be underlined in red. Right-clicking on these underlined items will show you suggested alternative spellings which you can click on to use instead, or if you're sure that the word is correct, you can either ignore the spell checker or select 'Add to Dictionary' and it will be stored and not flagged as being misspelled in the future.
Some text entry boxes do not have spell checking enabled by default. To temporarily enable Firefox spell checking in any text entry box, right-click in the box and select 'Check Spelling'. To enable spell checking in all text boxes permanently, see the layout.spellcheckDefault preference in the Advanced Tweaking section. Furthermore, ideally you should have downloaded the correct language version of Firefox for your region as covered on page 3, as this affects the specific dictionary that Firefox uses by default. For example if you downloaded the English US version of Firefox and you live in Australia, it will falsely pick up some Australian spellings as incorrect (e.g. color vs. colour). Furthermore, dictionaries for certain regions are not automatically built into Firefox. To add new dictionaries to your existing version of Firefox, right-click in a spell-checked field and select Languages>Add Dictionaries. You can then install a new dictionary, and select which to use as the default under the Languages menu in the spell checker.
The spell checker generally does not affect performance, however on pages which have multiple editable text boxes and/or box(es) containing a very large amount of entered text, this may cause a noticeable slowdown as Firefox checks for errors. To reduce this problem see the extensions.spellcheck.inline.max-misspellings preference in the Advanced Tweaking section. In general though there should be no real reason to completely disable the spell checker.
Downloads Window

Whenever you initiate a file download within Firefox, the Download button, shown as a down arrow on the main Firefox toolbar, will flash green and change to a mini progress bar, with text indicating the amount of time left before the download is completed. If you click this button, a small Download window appears beneath it, with a larger progress bar and the ability to Pause/Resume the download if you right-click on it, or to cancel/redownload it by clicking the small button at the far right of the progress bar.
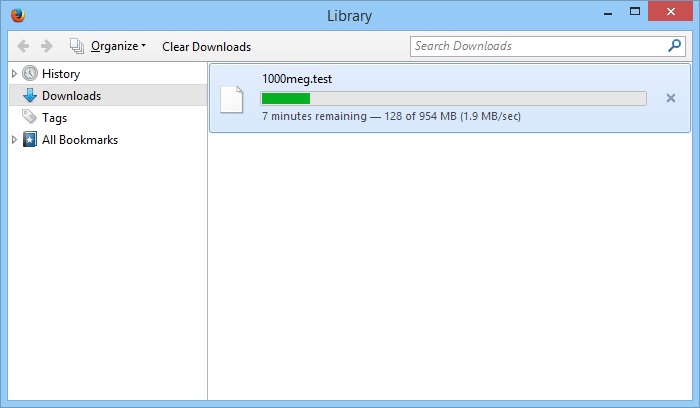
You can access a more detailed Download Manager window by: clicking the Firefox main menu button and selecting Downloads; by clicking the 'Show All Downloads' link in the small Downloads window; or by pressing CTRL+J at any time.
Most of the Downloads functionality in Firefox is intuitively clear, but some features are worth discussing further:
Download Progress: The progress bar which appears in the Downloads Manager provides an estimate of your current downloading speed, which is absent from the smaller Downloads window. Note that you can also view download progress in Windows 7 or 8 just by looking at the Firefox icon in the Windows Taskbar - it will have a fill effect corresponding to the download progress, even if the Downloads window or Downloads Manager is not open. The fill effect will be green if the download is proceeding normally, and yellow if it is paused.
Pause, Resume and Cancel Downloads: You can pause an active download by either double-clicking on it in the Downloads window, or by right-clicking on it and selecting Pause. You can similarly resume the download at any time. To cancel a download at any time, click the X icon at the far right of the progress bar. Closing Firefox during a download will also raise a prompt asking you to confirm whether you want to terminate the download, or keep Firefox open and hence continue the download.
Managing Downloaded Files: The default location to which a file is downloaded on your system is set in the 'Save files to' setting under the General tab of the main Firefox Options. Alternatively, you can select 'Always ask me where to save files' if you want Firefox to prompt you for a location at the start of every download. If you often find yourself wondering from where or when you downloaded a particular file, then make sure that the 'Remember my browsing and download history' option is ticked under the Privacy tab of the Firefox options. This will keep all the details of each download, including the filename, site it was downloaded from, and date of download, all shown in the Downloads Manager. This also allows you to use the Search functionality in the Downloads Manager. If you want to revisit the download page for a particular file, right-click on its filename in the Download Manager and select 'Go to Download Page'. You can clear any entry in your Download history by right-clicking on it and selecting 'Remove from History'; you can clear the entire list of downloads by right-clicking on any item in the list and selecting 'Clear Downloads'.
For alternatives to the built-in Downloads Manager in Firefox, see the Add-ons section on the next page.
Keyboard and Mouse Shortcuts
There are a range of keyboard and mouse shortcuts you can use to speed up browsing and to access special features in Firefox, some of which have already been mentioned. Whether you use them is up to you, however I personally use a handful of shorcuts quite frequently in Firefox to speed up access to various features. To see a complete list of various keyboard and mouse shortcuts you can use in Mozilla, see this Keyboard Shortcuts List and Mouse Shortcuts List.
That covers our look at some of the more prominent features in Firefox. However this is just the tip of the iceberg, as there are a large number of ways in which Firefox can be customized and tweaked, and these are covered in the next two sections, starting with add-ons on the next page.
|
|