
Firefox Tweak Guide
[Page 6] Features, Tips & Tricks
This section provides clear descriptions of the key features of the Firefox browser, along with a range of tips and tricks you can use to take better advantage of them. Beginner users should definitely not skip this section, but even Advanced users who may already be aware of many of these features might still find some new tip they haven't seen before.
Customize the Interface
Controversially, Firefox has had a substantial redesign of its interface, known as Australis, starting with version 29.0. The philosophy behind this simplified new design is explained by Mozilla here. Firefox allows a range of basic customization options for altering the interface.
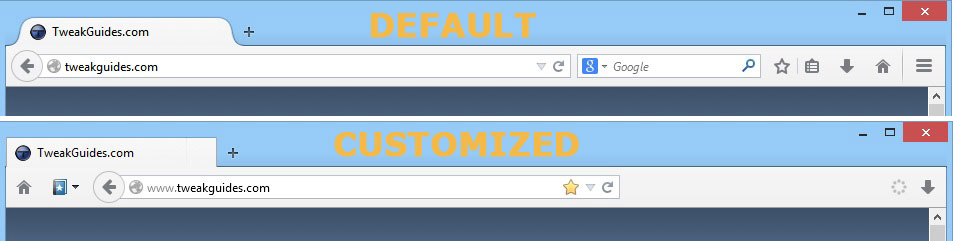
To access the basic Firefox interface customization options, click the Firefox main menu button at the top right, and select the 'Customize' option at the bottom of the menu. This will place Firefox into customization mode. The key interface elements are discussed below:
Buttons and Boxes: Aside from the Firefox main menu button at the top right, all of the buttons and boxes on the main part of the Firefox interface, called the Main Toolbar, can be rearranged, removed, or added to while in customization mode. Select an interface item and you can drag and drop it onto, or off of, the Toolbar. You can also add or remove any button, even while not in customization mode, by right-clicking on it in the Toolbar, or in the Firefox main menu, and selecting either 'Move to toolbar', or 'Remove from toolbar' as relevant.
Title Bar: The Title Bar is hidden by default in Firefox, and if enabled, consists of an extra space above the Tab Bar with the name of the current window in Firefox. It is generally unnecessary as it uses up vertical screen space for little benefit, but if you want to enable it, open Firefox customization mode, then click the 'Title Bar' button found at the bottom of the customization mode window.
Firefox Main Menu Button: Firefox consolidates all of the major settings and options into a single button with three horizontal lines, shown at the far right of the main Toolbar. In this guide, the button is referred to as the Firefox main menu button, but it is also known as the Hamburger button. By default this button cannot be moved, removed, or altered in appearance. If you want to completely remove the Firefox main menu button, then use the 'Remove the Firefox Main Menu (Hamburger) Button' UserChrome.css tweak as covered in the Advanced Tweaking section on page 12. If you want to replace the Hamburger button with a small orange Firefox logo, use this Iconic Firefox Menu add-on.
Bookmarks Menu & Star Button: By default, Firefox merges the Bookmarks menu with the Star feature into one button. If you want to separate these functions, you can use the Star Button in Urlbar add-on to move the Star bookmarking function back into the main Address Bar, and use the Classic Bookmarks Button add-on to add a separate Bookmarks Menu button to the main Toolbar.
Tab Bar: By default, the Tab Bar, which displays all open tabs, is always displayed at the very top of the Firefox screen, above the main Toolbar. To get it to display below the main Toolbar area, you can either use the 'Move Tab Bar to below Toolbar' UserChrome.css tweak as covered in the Advanced Tweaking section on page 12, or use this Tabs on Bottom add-on. If you also want square rather than curved edges on tabs, try this Firefox Tab Mod add-on.
Menu Bar: To enable the Menu Bar, which is an area at the top left of the screen listing all of Firefox's options and settings in a series of menus, while in customization mode click the 'Show / Hide Toolbars' button and select 'Menu Bar'. Keep in mind that you don't need to display the Menu Bar permanently; a cleaner solution is to temporarily bring it up any time you need it by pressing the ALT button while in Firefox.
Bookmarks Toolbar: To enable the Bookmarks Toolbar, which is a separate toolbar designed to show your bookmarks as buttons, while in customization mode click the 'Show / Hide Toolbars' button and select 'Bookmarks Toolbar'. Note that then for it to show any bookmarks, they need to be added to the 'Bookmarks Toolbar' menu under the main Bookmarks menu.
Add-on Bar: There is no longer any dedicated Add-on Bar in Firefox. Any buttons for controlling installed add-ons are now added directly to the main Firefox Toolbar and/or can be found as separate buttons under the Firefox main menu button. These can be added or removed from the main Toolbar just like any other button as covered further above. If you want to add back the Add-on Bar, you can use The Addon Bar Restored add-on.
Activity Indicator: The Activity Indicator, also known as the throbber, a rotating circle which indicates that Firefox is loading page content, now only appears at the far left of each open tab. To get back a general throbber independent of tabs, use the Throbber Restored add-on.
Returning to pre-Australis Look: If you just want to go back to the way Firefox looked prior to the introduction of Australis from Firefox 29.0 onwards, then rather than installing dozens of individual add-ons and making lots of tweaks, just install the Classic Theme Restorer add-on, or look at using one of the Firefox variants covered in the Conclusion section of this guide.
Tabbed Browsing
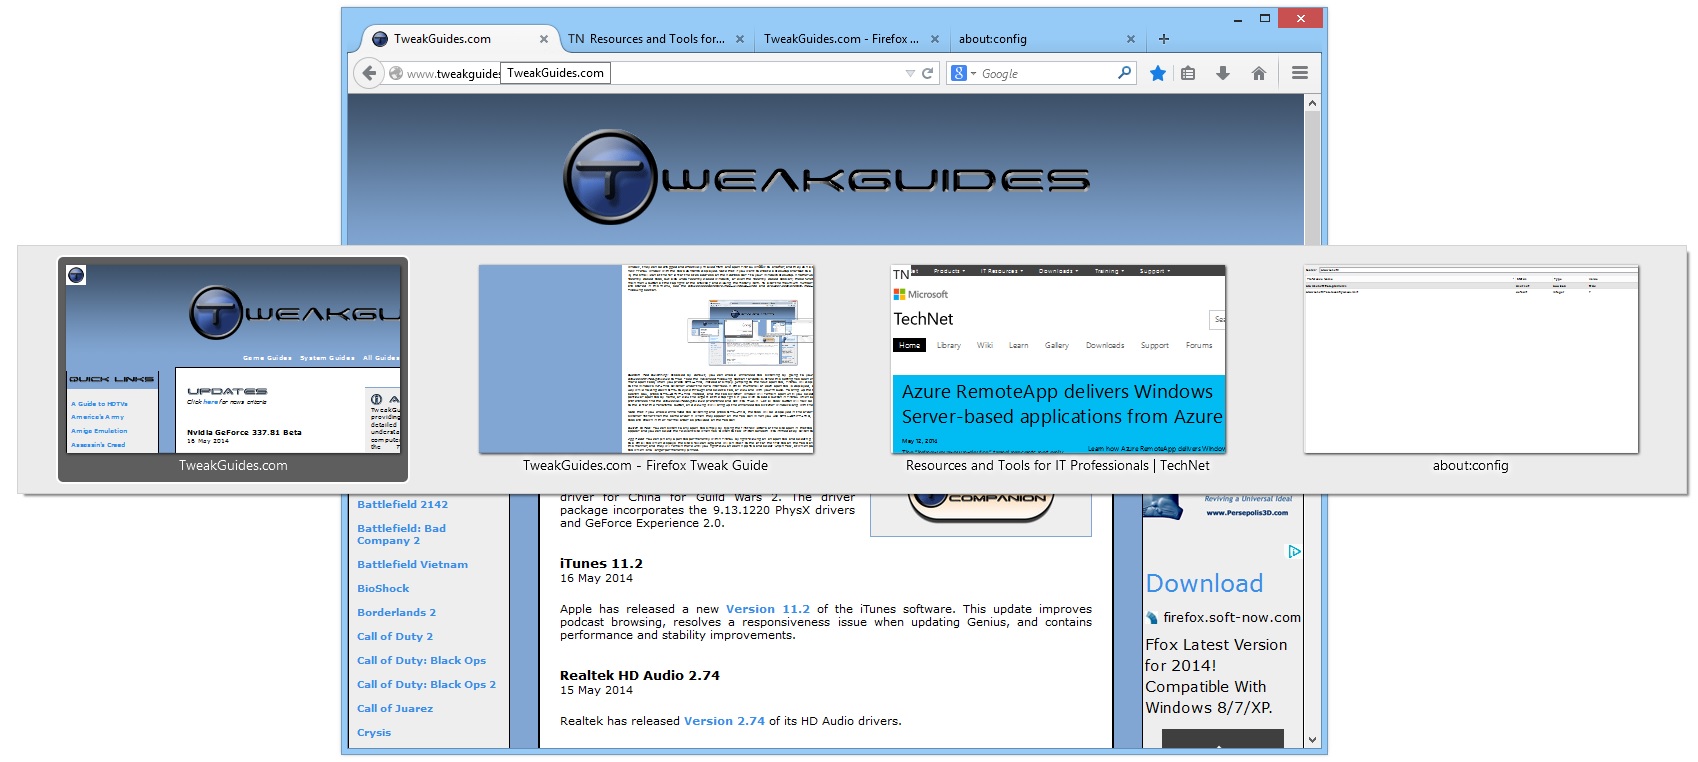
Tabbed browsing allows you to open up new web pages as tabs within the current Firefox window, rather than opening up an entirely new Firefox window for each page. The benefits of this are faster loadup times for pages opened as tabs, less overall system memory usage, the ability to load pages in the background while reading the current page, and the convenience of being able to switch back and forth between pages just by clicking their tab. The location where all of the tabs are shown at the top of the Firefox window is known as the Tab Bar. The Tab Bar is always shown by default, even with only one tab open in Firefox. There is also a small 'Open a new tab' (+) button to the right of the tabs on the Tab Bar, which opens a blank new tab when clicked, listing your frequently visited sites. This button can be removed as covered under the 'Customize the Interface' section further above, and the new tab page is covered under Frequently Visited Sites further below.
Below are a range of tips on how to make better use of tabs:
If you click your middle mouse button on a range of interface elements in Firefox, they will also typically open up in a new tab. For example, click the middle mouse button on the back or forward arrows to the left of the Address Bar and the previous or next pages you've visited will open in a new tab. Middle-click on an item in your History or your Bookmarks menu and it will open in a new tab. Middle-click on the Home button and your home page will open in a new tab.
As more and more tabs are opened, each tab starts to shrink in width on the Tab Bar. At a certain point no more additional tabs can be shown on the Tab Bar, though they will be opened in the background. Instead, arrows will appear at either side of the Tab Bar, allowing you to scroll through the full list of open tabs. A small dropdown button will also appear at the far right of the Tab Bar, which can be clicked to show a menu of all open tabs. To alter the minimum and maximum width of each tab, you can use this Custom Tab Width add-on.
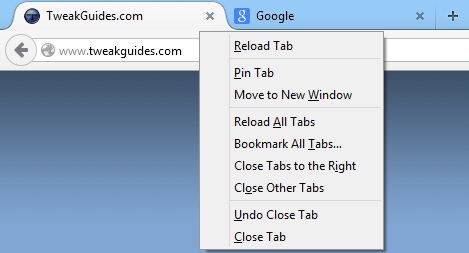
Firefox has 'tear-off' tabs. As covered in the list of tips above, tabs can be dragged not only from one location to another on the tab bar within a Firefox window, they can be dragged and effectively moved from one open Firefox window to another, and they can also be dragged onto the Desktop to open a new Firefox window with the tab's contents displayed. Another useful feature is the ability to not only undo recently closed tabs, but also undo recently closed windows, or even the recently closed session; these functions can be found by clicking the Firefox main menu button at the top right of the browser, then clicking the History item. To alter the maxmium number of recently closed tabs or windows which are stored in this menu, see the browser.sessionstore.max_windows_undo and browser.sessionstore.max_tabs_undo preferences in the Advanced Tweaking section.
Frequently Visited Sites: If you open a blank new tab, such as by clicking the '+' button on the Tab Bar, by default the new tab will display a thumbnail list (also called Tiles) of your frequently visited sites. This requires that you have the History feature enabled. You can click on the relevant thumbnail/tile to go to that site. To disable or customize this feature, click the small cog icon at the top right of a blank page and you can remove all tiles by choosing Blank; select Classic if you want normal thumbnails of sites you have frequently visited; or select Enhanced to see a site logo instead of a thumbnail snapshot for each tile. For more options see the browser.newtabpage-related preferences in the Advanced Tweaking section later in this guide.
Custom Tab Switching: Disabled by default, you can enable enhanced tab switching by going to your About:Config preferences and setting browser.ctrlTab.previews to True - see the Advanced Tweaking section for details. Once this setting has been changed, and as long as you have three or more open tabs, when you press CTRL+TAB, instead of simply jumping to the next open tab, Firefox will display a custom tab switcher window, similar to the Windows ALT+TAB task switcher. A small thumbnail of each open tab is displayed, and you can either keep pressing the TAB key while holding down CTRL to cycle through and select a tab, or click one with your mouse. To bring up the tab switching window along with a custom search box, press CTRL+SHIFT+TAB instead, and the tab switcher window will remain open until you select a tab or enter a search term to find a particular open tab by name, or click the large X at the top right.
Switch to Tab: You can switch to any open tab simply by typing the letter or two of the site open in that tab in the Address Bar. A drop-down box will appear and you can select the relevant site which has 'Switch to tab' written beneath it to immediately switch to that open tab.
Pinning Tabs: You can pin any open tab permanently within Firefox by right-clicking on an open tab and selecting 'Pin tab'. The open tab will convert to a small tab which displays only the site's favicon logo and will pin itself to the left of the first tab on the Tab Bar. You can add multiple pinned tabs in this manner, and they will remain there until you right-click on each tab and select 'Unpin Tab', at which point they will revert back to a normal open tab which is no longer permanently pinned.
For other ways of customizing tabs and tabbed browsing see the browser.tabs.-related preferences in the Advanced Tweaking section.
Full Page Zooming
You can zoom in and out of all elements of a web page, whether text or images, or both. This functionality can be accessed under the Firefox main menu by selecting either the '-' (minus sign) or '+' (plus sign) buttons, with the current level of zooming indicated as a percentage between these two buttons (100% is the default). A quicker way of accessing these functions on any page is to use the Control (CTRL) key in combination with the + (plus), - (minus) and 0 (zero) numerical keys. However the quickest way of all is:
This feature is particularly useful when viewing images in Firefox, as it lets you zoom in or out of an image within the browser so you can look at relevant details without having to launch a separate image viewing application. You can further customize Zoom in Firefox using the browser.zoom.siteSpecific, zoom.maxPercent, and zoom.minPercent preferences as covered in the Advanced Tweaking section.
Faster Searching

There are several ways you can speed up searching web pages and searching on the Internet using Firefox:
Keyboard Shortcuts: To quickly open the search box on any page, press F3 or CTRL+F. You can close the search box by pressing the ESC key at any time.
Search for text when I start typing: For even faster searching on a page, I recommend that you have the 'Search for text when I start typing' setting ticked - see the Advanced area of the previous page. That way you can initiate a word search on the currently viewed web page simply by starting to type the search string without having to first bring up the search box. The first instance of that word will automatically be highlighted in green on the page. To find more instances of the same word, keep pressing the F3 key. The last search string you entered in the current session is kept in memory, and simply pressing F3 on any other page initiates the same search again. For ways of customizing this feature, see the accessibility.typeaheadfind.-related preferences in the Advanced Tweaking section.
Selection Web Search: Highlight a portion of a web page by holding down the cursor over the start of your selection, then left-click and drag the cursor to the end of your selection and release the mouse button. Now right-click on this highlighted selection, and in the context menu select the 'Search Google for...' item. Firefox will automatically launch a web search using the default Google search plugin and provides the results in a new tab.
Open Link: You can highlight any text which corresponds to a website address, right-click on the highlighted text and select 'Open Link' to immediately launch that address in the current tab. If you prefer a separate new tab or window for the link, select 'Open Link in New Tab' or 'Open Link in New Window' as appropriate instead. You can try this out by first highlighting all of the following text and then right-clicking on it: https://www.google.com Firefox will check to see if the text has what appears to be a correct URL structure before providing the open link options in the right-click context menu, but this doesn't guarantee that the address is free from syntax errors such as too many slashes or dots.
Web Search Box: You can use the dedicated Web Search box in the main Firefox Toolbar to speed up searching for information on the Internet. Click on the small site icon on the left side of the Web Search box, and select the search engine you wish to use for web searches. Yahoo is the default web search engine in the US, with Google the default everywhere else. But you can switch to other engines such as Bing, or a site-specific search engine such as Amazon.com or Ebay.com. Enter the phrase(s) you wish to search for in this Search box and press Enter - the results will be displayed in the current tab. You can download additional search engine plugins by clicking on the icon in the Web Search box, selecting 'Manage Search Engines' and then clicking the Get more search engines link at the bottom. You can also create your own custom search. Since all the search engine coding is saved in your \Program Files (x86)\Mozilla Firefox\searchplugins\ directory as .xml files, you can create your own custom .xml search engine files. Full instructions are here.
Location Bar/Keyword Searches: The Web Search box is actually redundant, because one of the fastest ways to search is by using keywords within the Address Bar. The Address Bar, also known as the Location Bar or Awesome Bar, is covered in detail in its own section below.
The Address Bar
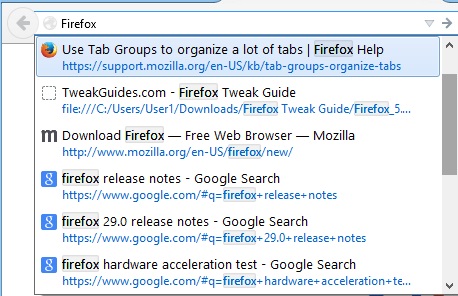
More than just a location for web addresses, the Location Bar in Firefox, also called the Address Bar, is nicknamed the 'Awesome Bar' due to its additional functionality. To start with, you can type in any words or phrases, even partial words, and the Awesome Bar will by default display any possible matches from your open tabs, browsing History and Bookmarks in a drop down box. The matched words/phrases can be in any part of the URL or page description, or any custom tags you've added to your bookmarks. The more letters or words you keep typing into the Awesome Bar, the more refined the search results become.
When viewing the search results in the Awesome Bar, you will see not only the title of the web page, but also the favicon next to it, which makes site identification easier, and you'll also see the site/page URL beneath the title as well, or 'Switch to tab' if the result relates to a page which is already an open tab in your browsing session. You will also see at a glance whether it is already part of your bookmarks: it will have a blue star at the right side of the listing if it is - see the Bookmarks section on the next page for more details.
The Awesome Bar also allows the ability to use custom search filters to refine search results. You can use the '*' and '#' characters to respectively restrict search results to bookmarks or tags. For example a search on "tweak *" (without quotes) will find any bookmarks you have with the word 'tweak'; a search on "tweak #" (without quotes) will find any items you've specifically tagged with the word 'tweak'.
You can also simply type a word and press Enter in the Awesome Bar without selecting a search result, and Firefox will usually launch a search using Google and show the results. If you want to add the Search functionality of any web page directly to the Awesome Bar, simply right-click in any search box on a web page and select 'Add a keyword for this search'. If you want to jump quickly to the Address Bar/Awesome Bar at any time, press CTRL+L - this moves the cursor to the Address Bar and highlights all existing text in there.
To allow you to further customize how the Awesome Bar functionality works, you can adjust whether it searches your History and Bookmarks, just your History, just your Bookmarks, or none of them at all (i.e. switching off this functionality altogether) by selecting the relevant item under the 'Location Bar' section of Firefox's Privacy options - see the previous page for more details. You can further customize the way the Location Bar/Address Bar/Awesome Bar behaves and which search engine it uses by adjusting the keyword.URL, browser.urlbar.maxRichResults, browser.fixup.alternate.enabled and places.frecency.-related preferences all covered in the Advanced Tweaking section.
Note that web addresses shown in the Address Bar usually hide the https:// portion of a URL; only https:// (secure) web pages will show that portion. However, if you highlight and copy the URL, the full address, including the https:// portion, will be included in the copied text. If you want the Address Bar to always show the full web address, see the browser.urlbar.trimURLs preference in the Advanced Tweaking section.
Another quirky aspect of the Address Bar is that the Forward arrow button will not be shown at the far left until you go back a page (i.e. until there is something to actually go forward to). Similarly, the Back arrow button at the far left will be grayed out until there is actually one or more pages to go back to within that tab's browsing session. When available, you can also right-click on the Forward or Back button to see a list of available pages.
Site Identification & Plugin Buttons
Though technically part of the Address Bar, the Site Identification button, and the Plugin button, are two elements which deserve special attention.
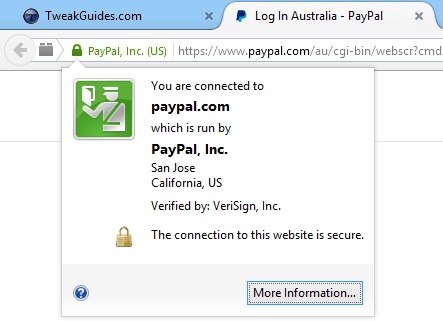
The Site Identification button appears whenever you visit any site. For most sites, it is shown as a globe icon at the far left of the web address - this indicates that the site is insecure for sensitive transactions. For some sites, a padlock icon will appear instead, indicating that a secure connection is being used. You can click on this icon/button to find out more about the security level of the site. The icon, as well as the Site Information box which opens when it's clicked, can also take on three possible colors indicating the exact level of security:
Gray - Indicates that the site has no or insufficient encryption. Most web pages will display this color, which is completely normal and fine as long as you're not entering any sensitive information such as credit card details for online purchases for example.
Blue - Indicates that you are using an encrypted connection to the site, and its identity has been verified as being a legitimate domain name. This should be secure enough for sensitive transactions, but you may need more information (See further below).
Green - Indicates that the site is as secure as it can possibly be, both in terms of verified ownership, and also being fully encrypted.
More Information: In all cases, if you have any doubts, click the Site Identification button, and in the box which opens, click the 'More Information' button. The dialog box which opens shows you a range of information which should help you better understand the level of encryption, the ownership details, and even useful facts such as how often you've visited this site in the past. Of additional use is the ability to also set the permissions for things such as popups, cookies, images and location awareness on a site-by-site basis under the Permissions tab. In short it makes it far easier for you to manage particular sites, and actually see how secure a site is compared to just a basic padlock icon which simply indicates that a site is using some level of encryption, however inadequate it may be.
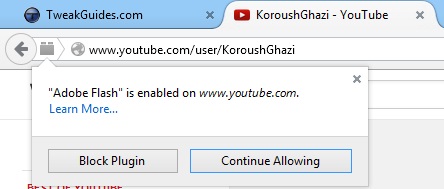
The Plugin button is another useful addition to the Address Bar. Found to the left of the Site Identification button/icon, the Lego-like Plugin button appears if a site is currently using one of your plugins. You will also see the Plugin button appear with a downward arrow inside the brick icon if a site requires a particular plugin, and you do not have it currently installed or enabled.
By clicking the Plugin button, you can see precisely which plugin is currently being used by the site, or is required to view content on the site. The Plugin button then allows you to either download and install the required plugin, or if one is currently in use, you can block its use on that site only by selecting 'Block Plugin'. Blocking a plugin means that each time you visit that site in the future, a prompt will appear at the top of the page asking you whether you want to allow the plugin, or continue blocking it. If you click the Allow button, you will be able to choose whether to simply it allow it for the current session, or select 'Allow and remember' to permanently unblock the plugin's use on that particular site. See the Add-Ons section later in this guide for more details on Plugins.
Private Browsing Mode
Private Browsing Mode is designed to allow you to browse the Internet without leaving any trace of your browsing history on the PC. While some jokingly refer to this as "Porn Mode", in reality there are many other reasons why this feature is useful, especially when browsing on a public PC, or at a friend's place.
The main methods for enabling Private Browsing mode are: clicking the Firefox main menu button and selecting 'New Private Window'; right-clicking on the Firefox icon in the Windows Taskbar and selecting 'New Private Window'; or pressing CTRL+SHIFT+P. You can launch Private Browsing mode at any time - a window that is running in Private Browsing mode will display a purple mask icon and the main tab will also have 'Private Browsing' shown as its title. A window will continue to be in Private Browsing mode until you close that particular Firefox window. Since Private Browsing mode opens in a window of its own, you can start up Private Browsing mode at any time during a normal session, and switch between a regular Firefox window and the Private Mode window as you wish.
When in Private Browsing mode Firefox will not save any aspect of your browsing history, including: visited pages; form and search bar entries; passwords; listings of downloaded files; cookies; or cached files of any kind. This means you essentially leave no trace of the browsing activity which occurred while Private Browsing mode was enabled. However, if you save any bookmarks, or download any files, these will not be deleted once you exit Private Browsing mode. Private Browsing mode will also not make you anonymous on the Internet, since you are still broadcasting your IP address, and your actions are also being logged by your ISP. If you want complete anonimity, you will need to consider something like the Tor Browser version of Firefox.
If you wish, you can force Firefox to always open in Private Browsing mode whenever it is launched by going to the Privacy section of the Firefox Options menu and either selecting 'Never remember history', or by selecting 'Use custom settings for history' in the drop down box and then ticking the 'Always use Private Browsing mode' box.
For the times when you haven't used Private Browsing mode, but want to remove traces of your browsing history, you can do so in several ways. To remove the stored history for individual sites rather than your entire browsing session, click the Firefox main menu button, click on the History item, select 'Show All History', then find the site in your history listing (use the 'Search History' box at the top right if necessary), right-click on it and select 'Forget About This Site'; this will remove all recorded history for that site immediately. Be aware however that Firefox treats subdomains of the same site as separate entities when using this feature: e.g. if you right-click on and select to forget www.mozilla.org, it won't also remove support.mozilla.org from your history. You can of course also delete other specific aspects of your history at any time using the 'Clear Recent History' option under the History item of the Firefox main menu button - this is covered under the Privacy settings section on the previous page.
The next page continues the Firefox features, tips and tricks.
|
|