
Firefox Tweak Guide
[Page 5] Firefox Settings (Pt.2)
Privacy
Tracking: Some sites track your browsing, done primarily by third party advertisers on the site. If ticked, the 'Request that sites not track you' option informs websites that you do not want your browsing behavior to be tracked while visiting them. Complying with your request not to be tracked is entirely voluntary, so selecting this option does not actually force websites or advertisers to stop tracking you if they wish to keep doing so. The 'Use Tracking Protection in Private Windows' option, if ticked, will use the Disconnect Tracking Protection List to identify and block trackers while in Private Browsing mode. To enable a more aggressive tracking protection list, click the 'Change Block List' button and select from the alternative(s) shown. You can also manage trackers on a per-site basis by clicking the shield icon which appears on the far left of the Address Bar when a tracker is detected on a site.
History: By default, Firefox will keep a history of your browsing habits, saving such details as which websites you've visited over the past 90 days, which files you've downloaded, any form data entered, search terms used, and any custom preferences for websites. This is not something to be concerned about in general, as none of it is reported back to anyone, and most of it is used to improve your browsing experience. However, if you don't wish Firefox to keep any such records on your drive, in the History drop down box you can select either 'Never remember history' which is the same as the Private Browsing Mode feature covered later in this guide, or you can select 'Use custom settings for history', which is recommended and covered in more detail below:
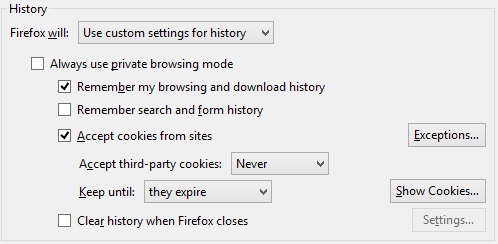
Always use Private Browsing mode: If ticked, this option will force Firefox to automatically start in Private Browsing Mode each time Firefox is launched. Private Browsing Mode is covered in full detail under its own area in the Features, Tips and Tricks section later in this guide.
Remember my browsing and download history: The addresses of the sites you visit in Firefox will be held for 90 days if this option is ticked. Every time you download a file using Firefox, a history of the file will also be kept in a list in the Downloads Manager, available by clicking the Downloads button and selecting 'Show All Downloads'. If you don't want your browsing and download history to be kept, untick this box. Alternatively, you can leave this box ticked, but use Private Browsing mode for the times when you don't wish certain sites you visit to be recorded in your browsing history. The reason you may want to keep a history of the pages you have visited is that aside from being of use when you want to revisit a recently viewed page you have not bookmarked, browsing history can also be utilized in other ways. For example, you can search your history and bookmarks dynamically just by typing in any letters or words in the Address Bar, and the results will be instantly displayed in a drop down box beneath it. This feature is covered in more detail under The Address Bar area of the Features, Tips and Tricks section.
Remember search and form history: If this box is ticked Firefox will save any details you enter in online forms as well as in the search bar. Unless you fill in such forms very often, for security and privacy purposes I recommend having this box unticked.
Note that neither of the history options above needs to be enabled in order to save your login and password details for sites - that feature is covered under the 'Remember passwords for sites' setting covered under the Security area further below.
Accept cookies from sites: Cookies are small files which are placed on your computer by various websites. These hold information which can be referred to by the website the next time you visit, such as any customizations you may have selected for that site, or your username for a forum, or which ads on a site you have already been shown. Cookies are mostly harmless, and often have legitimate uses, so blocking them altogether is not wise. Furthermore, some sites will not function correctly if their cookies are blocked.
The 'Accept third-party cookies' option can be safely unticked however, as this relates to cookies provided not by the site which you are viewing, but by third parties providing additional content on that site. Typically this means things like advertisements, videos or maps which aren't vital to the proper functioning of the main site.
If you run into problems, or if you have the time, you can click the Exceptions button and allow or block individual sites from placing a cookie on your machine. That way you can block all cookies for example, but allow them for specific trusted sites which would otherwise not function properly.
To get an idea of the types of cookies already on your machine, click the 'Show Cookies' button and you can individually remove any which look suspicious or useless.
Finally, the 'Keep until' option relates to how long cookies are retained on your drive. Since cookies can hold useful information, I recommend the 'they expire' setting be chosen, which will keep cookies for as long as they are needed. If you value privacy above all else and want cookies cleared every single time you close Firefox, then select the 'I close Firefox' option, but this will mean you will lose all customizations related to cookies each time you close Firefox. If you want to make the choice on a case-by-case basis (which is not recommended), select the 'ask me every time' option.
Clear history when Firefox closes: When this box is ticked, the Settings button to the right becomes available and you can click it to customize which particular aspects of your browsing history are cleared when Firefox closes. On a machine which is shared with a lot of other people, you should enable this option and tick all available items as added protection. On a personal machine which you don't share with others, or if you have your own separate password-protected Windows user account on a shared machine, I don't recommend clearing history each time Firefox closes, as it reduces browsing efficiency and convenience, and may also increase Firefox closing times.
To clear any elements of your history at any time, click the Firefox main menu button, click the History item, then select 'Clear Recent History' to open a new window. This allows you to select which period of time for which to clear your history, such as 'Last two hours' or 'Today', or select Everything to clear all history stored to date. To customize precisely what is cleared each time, click the Details item and select which component(s) to clear: 'Browsing and Download History' is generally fine to clear, as is 'Form & Search History' - removing these will have minimal impact on convenience in most cases. Clearing Cookies, 'Site Preferences' and 'Active Logins' will remove all site-specific customizations and log you out of any sites you were previously automatically logged into. Clearing the Cache may reduce browsing speed, especially if you aren't on a fast Internet connection, as Firefox will need to re-download all previously cached website elements when you next visit them - clear the cache less frequently if possible. When you've finished making your selections, click the 'Clear Now' button to immediately delete all selected elements of your history from your drive for the time period you specified.
Ultimately, if you're genuinely concerned about leaving any traces of your activity on a PC each time you use Firefox, use Private Browsing Mode at all times, or see the Portable Firefox tip at the Conclusion of this guide for more practical solutions.
Location Bar: The Location Bar is also known as the Address Bar or Awesome Bar - see The Address Bar area of the Features, Tips and Tricks section later in this guide for more details. Here you can select which aspect of your stored data is used for the search functionality of the Address Bar. By default if you enter any text in the Address Bar it will show the closest result(s) from your browsing history and bookmarks. If instead you wish the Address Bar to just search through your stored browsing history, select History; if you just want it to search through your saved bookmarks, select Bookmarks. If you want this Address Bar functionality disabled such that it conducts no searches and shows no results, select Nothing instead.
Security
Warn me when sites try to install add-ons: I strongly recommend you tick this option as it prevents websites from attempting to install add-ons without your full knowledge and consent. With this option ticked, before any site attempts to install an add-on, Firefox will block such attempts and give you prominent notification of what it is trying to install. If in doubt, cancel out of the installation and do some research to find out more. Most add-ons are unnecessary at best and can reduce performance, some are actually malicious or will spy on you browsing behavior. Click the 'Exceptions' button to view the sites which are allowed to install Firefox add-ons. By default the Mozilla-run sites addons.mozilla.org and marketplace.firefox.com will be listed here - if any untrusted or unknown sites are also listed, highlight and remove them.
The most commonly used add-on software you will need installed when viewing certain websites is Flash Player. Other potentially useful add-ons for Firefox are listed throughout this guide, and discussed in more detail in the Add-ons section of this guide.
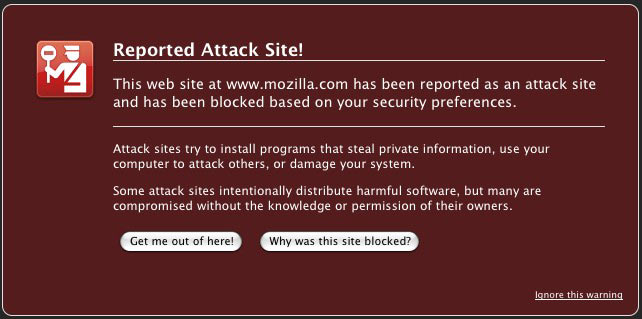
Block reported attack sites: This setting allows Firefox to warn you if the site you are about to visit could potentially be a known attack site; namely a site which attempts to use malicious techniques to harm your PC, or send sensitive personal information about you to other parties without your permission. If you try to visit such a site, Firefox will raise a prominent warning stating 'Reported Attack Site' which comes up before you can even view the site's contents, and before anything is loaded up, keeping you safe from exposure to any malware on the site. I strongly recommend that this option always remain ticked as it's a valuable layer of protection against being exposed to such sites, though it's not a completely foolproof mechanism for protecting you when online.
Block reported web forgeries: Similar to the option above, this setting is part of Firefox's Phishing Protection feature. It will raise a prominent warning stating 'Reported Web Forgery' before the page can be loaded or viewed. Once again I strongly recommend enabling this option, as it adds another layer of protection against having your important data, such as bank account or credit card details, stolen by being entered on a fraudulent site. As with the attack site protection, it is not foolproof, and should not be relied upon as the sole form of defense or a replacement for using common sense and vigilance.
Both these anti-malware protection and anti-phishing protection features in Firefox are automatically powered by the Google Safe Browsing Service, and there is no option here to change this behavior. This means that aside from maintaining a list of potentially harmful sites within Firefox itself and regularly updating it when online, when you visit a potentially harmful site, the browser may automatically connect to Google's servers to provide more detailed information about it. The link above gives specific details regarding its functionality in Firefox and may address any privacy concerns you have, but ultimately if you don't agree to this approach then your only recourse is either to completely disable the two options above. It is not recommended that you disable or alter these settings.
Passwords: If the 'Remember passwords for sites' box is ticked, whenever you enter a username and/or password on a web page, you will be given the option to save that username/password within Firefox. If you do so, the next time you go to the same site your password will be automatically filled in as a series of *****, along with any username, or selectable from a dropdown box. This speeds up logging into various sites, and means that you don't have to remember all of your username/password combos, however it is also a significant security risk if you share a computer with others. Untick this option if using a shared or unsecured machine. If this box is ticked, a 'Remember password' prompt appears as soon as you enter a username/password in a login area, and will remain until either you choose an option or navigate away from it. It won't block your login progress, which allows you to see if your username/password is actually correct before you choose to remember it. When presented with options for saving your username/password, you can click the main button to save the password, or click the arrow and select one of the following from the drop-down box: 'Never remember password for this site' means that not only will your username/password not be saved, you will also never again be prompted to save a username/password for this site; or 'Not now', which means that the username/password will not be saved this time, but you will be prompted again the next time you attempt to login here.
To view the currently stored usernames and passwords and the sites they relate to, click the 'Saved Passwords' button. This opens a window which shows every username you've saved on particular sites. To view the actual passwords for each site, click the 'Show Passwords' button at the bottom of the window, and this will reveal a new Passwords column. You can highlight specific entries and click Remove to delete any incorrect or unnecessary username/password combinations as required. If you want to protect yourself from others who may try to view your password list, tick the 'Use a master password' option under the main Passwords section of the options and then enter a master password - the longer and more complex the master password, the stronger it will be as indicated by the password quality meter at the bottom of the master password dialog box. Now whenever you click the 'Show Passwords' button you must first enter this master password to see all the passwords. There is also a search box in the Saved Passwords window, allowing you to find any site, password or username much more rapidly.
Sync
Firefox Sync is designed to let users synchronize their history, bookmarks, passwords and open tabs across a range of devices. That way, you will get a consistent and continuous experience regardless of where you are using Firefox. This is done by holding your details on Mozilla's servers, linked to a specific account which you create for this purpose, which is then read from or written to by your various PCs and devices when you use Firefox on them. Before you can use Sync, you will need to create a Firefox Account as detailed here. Details of how to manage Sync information is provided here, and to troubleshoot Sync-related issues, see here.
Advanced
General
Always use the cursor keys to navigate within pages: When ticked, a flashing cursor will be shown on the web page. You can then use the arrow keys on the keyboard to move the cursor around, and you can also use the SHIFT key along with the arrows to highlight portions of text. Set to suit your taste, however note that firstly you may have to click on a page to initiate the cursor, and secondly, if enabled, this option may force a flashing cursor to appear on some web pages even without being clicked on, which may be annoying. If you just want to use this mode at certain times, use the F7 key to toggle it on or off as desired.
Search for text when I start typing: If this option is ticked, as you start typing, a search box automatically appears at the bottom of the browser and initiates a search of the current page based on your input. If unticked, you will have to press the Find shortcut key (F3 or CTRL+F) to open the search box. I suggest you tick this option to begin with, and if you find it annoying then untick it. See the Faster Searching area of the Features, Tips and Tricks section for more details of ways to speed up searching and how to customize this function.
Warn me when web sites try to redirect or reload the page: This option is designed to prevent sites from automatically redirecting or reloading the page without your permission. If that happens, a prompt will appear at the top of the screen asking you whether you wish to allow this behavior or not. Tick this option if you want to maintain strict control over your browsing, but in practice enabling this feature may get annoying as it also comes up quite often on legitimate sites which need to reload or redirect as part of their normal functionality.
Use autoscrolling: If ticked, this option enables Autoscroll, letting you scroll the page quickly by first clicking the middle mouse button once, and then simply moving your mouse up or down. Untick it if you don't want this feature.
Use smooth scrolling: If this option is ticked, when a page is scrolled up or down, either by using the Page Up or Page Down keys, or via the mouse scroll wheel, it scrolls more slowly and smoothly, allowing your eyes to better track your existing position to its new spot on the screen. This can make reading long passages of text easier, however it may also make some pages seem slightly 'laggy' when scrolling them.
Use hardware acceleration when available: If this option is ticked, Firefox will use Hardware Acceleration wherever possible to improve the speed with which pages are displayed. This means Firefox will utilize your GPU (graphics card), if you have one, instead of your CPU, to speed up page rendering. Windows Vista/7/8 benefits more fully from hardware acceleration than Windows XP, as under Vista/7/8 both Direct2D and Direct3D acceleration are enabled. Note that altering this setting requires a full restart of Firefox before the change is implemented.
To check the status of hardware acceleration in Firefox at any time, type About:Support into the Address Bar and press Enter. Then check the 'gfx.direct2d.disabled' field, and the 'DirectWrite Enabled' field - these will say True if hardware acceleration is enabled, and False if it is not. The 'GPU Accelerated Windows' field will show '1/1 Direct3D 10' or '1/1 Direct3D 9' depending on the level of Direct3D support when hardware acceleration is enabled, or '0/1 Basic' if Direct3D acceleration is disabled. To test and compare your actual hardware acceleration performance after making any changes, first exit and restart Firefox, then run this test to see how many Frames Per Second (FPS) you get with and without hardware acceleration.
An unfortunate side-effect of enabling hardware acceleration in Firefox is that the text rendering method changes to one which some users may find displeasing. Fonts may appear blurry, overly thin, oddly spaced or inconsistently rendered across various sites. The easiest way to fix this issue is to disable hardware acceleration and restart Firefox - text rendering will now revert back to its original and familiar look. A slightly better method of fixing this issue is to keep the hardware acceleration option ticked, but set the gfx.direct2d.disabled preference to True - see the Advanced Tweaking section for details. This disables Direct2D acceleration while keeping Direct3D acceleration enabled. Another alternative is to keep the hardware acceleration option ticked, and install the Anti-Aliasing Tuner add-on, which allows customization of font appearance, while keeping the full advantages of hardware acceleration. Open the Options for this add-on (under Firefox menu button>Add-ons>Extensions), and try this suggested configuration: set Anti-Aliasing mode to ClearType and Rendering Mode to 'Natural Symmetric' for both text sizes, then tick all the 'ClearType Level' and 'Enhanced Contrast' boxes and set them to 100%. This will not be ideal, but you can experiment further to see if you can further customize text appearance to suit your taste.
Another aspect to consider regarding hardware acceleration is that disabling it may actually provide the best overall performance and stability in Firefox. With hardware acceleration enabled, the GPU will continually cycle between 2D and 3D clock speeds, and there may be periodic stuttering/pauses on certain pages, such as those with Flash video or heavy scripting. This is neither good for the GPU, nor good for smoothness. Enabling hardware acceleration can also result in Firefox crashes. Therefore I recommend experimenting with disabling hardware acceleration to see if it improves your browsing experience.
Check my spelling as I type: If this option is ticked, the built-in Firefox spell checker will automatically check the spelling of any text entered in standard text input boxes on a page and underline in red any words which it believes are misspelled. You can then right-click on the word to see suggested spellings and select one, or you can add the word to the current dictionary used. I recommend that you enable this option, and remember that the default dictionary used by this feature depends on the language version of Firefox you've installed. See the Features, Tips & Tricks section for more details of this feature.
Always check to see if Firefox is the default browser on startup: If this option is ticked, Firefox will check to see whether it is the default browser each time it starts. You should untick this option for fastest startup. Text provided below this option will indicate whether Firefox is currently your default browser, and if you want to be certain that Firefox always remains your default browser, in Windows Vista/7/8 go to Windows Control Panel>Default Programs>Set Default Programs and select 'Set this program as the default' for Firefox. In Windows XP go to your Windows Control Panel>Add/Remove Programs. On the left hand side of the 'Add or Remove Programs' box, click the 'Set Program Access and Defaults' icon, select the Custom option, and under the 'Choose a default web browser' section select 'Mozilla Firefox'. Also go to Windows Control Panel>Internet Options, and under the Programs tab untick any option related to checking for or making Internet Explorer the default web browser. Do the same for any other browser(s) you have installed.
Data Choices
Enable Telemetry: If this option is ticked, anonymous data regarding your Firefox configuration and system will be sent to Mozilla, allowing them to improve Firefox's performance in the future. If you don't wish this data to be sent, untick this option.
Enable Firefox Health Report: The Firefox Health Report (FHR), if enabled, collects and sends a range of Firefox performance information to Mozilla. Importantly, it can also assist you in resolving problems by examining the information in the FHR Dashboard. To access the FHR Dashboard, type About:Healthreport into the Address Bar and press Enter. The Dashboard provides statistics and tips which can give you an insight into what may be causing problems in Firefox, and how to improve its performance on your system. Firefox Health Report is discussed in more detail later in this guide.
Enable Crash Reporter: If this option is ticked, any time Firefox crashes, the Mozilla Crash Reporter will open, and you can choose to submit a summary report on the crash to Mozilla. The Crash Reporter provides options allowing you to determine which potentially sensitive details you may wish to include/omit from the report, such as the address of the site you were browsing when Firefox crashed. This can help Mozilla to better detect and resolve genuine bugs in Firefox.
If you have privacy concerns about your data being shared with Mozilla by any of the above features, click the 'Learn More' link in this section to read their privacy policy.
Network
Configure how Firefox connects to the Internet: This setting is very important, and if you need help configuring it correctly contact your Internet Service Provider (ISP). If configured incorrectly you will have problems accessing the Internet through Firefox or you may have relatively slow loading of pages. Click the Settings button, and for most people the 'No Proxy' option is appropriate, as the average home PC user does not go through a Proxy. If you have any doubts about whether you are behind a proxy or not, or you are on a networked machine, then select the 'Auto-detect proxy settings for this network'. If you are certain that you are behind a proxy, it is recommended that you select 'Manual proxy configuration' and specify your proxy settings for optimal performance, but you will require specific information from your ISP or Network Administrator to do this.
To potentially optimize your network connection usage and speed in Firefox regardless of your connection type, see the network.-related preferences in the Advanced Tweaking section.
Cached Web Content: The browser cache is a form of offline storage on your drive where Firefox holds website elements such as images, text, videos, ads etc. This speeds up browsing, because whenever you revisit a site, the stored version of the unchanged elements from that site are loaded from your drive as opposed to having to be redownloaded over the Internet. By default Firefox automatically handles the amount of drive space allocated to the cache, up to a maximum of 1GB. You can see the current amount of drive space used by the cache in this section, and if you tick the 'Override automatic cache management' box, you can manually specify the maximum amount of drive space allowed for the cache. A cache which is too small or set to 0 will increase page loading times, but similarly, a cache that gets too large may also reduce browsing speed, especially if you have a fast Internet connection but a relatively slow drive for example. In practice, you should allow Firefox to automatically manage the cache, but if you're running low on drive space, or find that browsing appears to slow down over time, click the 'Clear Now' button to clear the existing cache contents, then manually set a lower limit for the cache, such as 250MB.
See the browser.cache.-related preferences in the Advanced Tweaking section for more ways to customize how Firefox handles the cache. Also see the 'Cached Files' area at the start of the Advanced Tweaking section for details of how to view the actual contents of your cache.
Tell me when a website asks to store data for offline use: You can specify whether to be prompted when a website explicitly wants to store data on your drive for offline use. This is not the same as the regular offline storage (cache) covered above - this is a feature which allows web applications to be specifically written so that they can be used when Firefox is not connected to the Internet. You should tick this option so that you are aware of when an application may wish to use this feature. You can see a list of the sites which have stored such data in the box below this option, and you can opt to remove any which you are not familiar with. You can also add specific exceptions if you know certain sites should always be allowed to use this functionality without requiring a prompt. Finally, you can adjust how much storage space Firefox allocates for offline files by changing the browser.cache.offline.capacity preference, or disable the feature using the browser.cache.offline.enable preference, as covered in the Advanced Tweaking section.
Update
Firefox installs updates to itself automatically and silently in the background by default. This is made possible if the optional Mozilla Maintenance Service is enabled during installation of Firefox. The service is set to Manual in Windows by default and hence normally consumes no resources, but it can be completely removed by going to Program and Features in the Windows Control Panel and uninstalling the 'Mozilla Maintenance Service' item.
Automatically install updates: If this box is ticked, Firefox will regularly check for updates and if the Mozilla Maintenance Service is installed and set to Manual, will automatically install any newer version of itself when detected. If you also tick the 'Warn me if this will disable any of my add-ons' box, Firefox will prompt you if an update is incompatible with your current add-ons. The automatic option is recommended for average users as it maintains maximum security by automatically keeping Firefox up-to-date at all times.
Check for updates, but let me choose whether to install them: If this option is ticked, you will be prompted when an update is detected; it will not be automatically installed in the background. This is recommended for medium to advanced users who wish to retain more control over the updating process. For example, you may want to delay the installation of certain updates whether due to issues with your current add-ons, or other known or potential problems with an update.
Never check for updates: If this option is ticked, Firefox will not check for updates, nor will it install any updates in the background. This is not recommended as it means running the risk of having an outdated and hence insecure version of Firefox.
Use a background service to install updates: If you enabled the Mozilla Maintenance Service during installation of Firefox, and this box is ticked, then Firefox will automatically install any detected updates to itself silently in the background. If you don't want this silent update functionality, untick this box. You can go even further by removing the Mozilla Maintenance Service altogether as noted further above. If the Mozilla Maintenance Service is not installed, this option won't be shown at all.
Manually check for updates: You can view which version of Firefox you are currently running, and manually check for updates to Firefox at any time, by opening the Firefox main menu, clicking the '?' (Help) button at the bottom, then selecting 'About Firefox'. A small window will open, noting your current version number under the main Firefox heading. It will then briefly run a check to see if any newer version of Firefox is available for download. If there is, you can choose to install it (which is recommended), otherwise the message 'Firefox is up to date' will be shown. If you want to manually download and install any version of Firefox, see page 3 of this guide for more details.
Certificates
When a server requests my personal certificate: This setting determines how Firefox reacts to a request by a website to present a Certificate. Certificates are used to verify identity and/or provide authorization for secure transmissions. You can choose 'Select one automatically' to allow Firefox to determine the appropriate Certificate to present, but this can potentially compromise your privacy. Select the 'Ask me every time' so that you are prompted to manually select a Certificate, and if in doubt, do further research before accepting a certificate request on a particular site.
View Certificates: Clicking this button brings up a box which allows you to add or remove various types of Certificates - those which are yours, those of others, those of web sites you visit, and those of authorities which verify certificates. In general you shouldn't need to change these settings unless you know what you're doing. This option is best used as part of researching the validity of a certificate.
Validation: OCSP is the Online Certificate Status Protocol, an online method to determine the validity of a Certificate. By default you should have the 'Use the Online Certifcate Status Protocol (OCSP ) to confirm the current validity of certificates' box ticked. If you want even more advanced security also tick the 'When an OCSP server connection fails, treat the certificate as invalid' option, however this can cause many problems, so is best left unticked unless you are familiar with certificate validation.
Security Devices: Clicking this button allows you to manage the tools which facilitate secure access in Firefox. There are two which are built into Firefox, but you can manage or use others which are installed on your system. Once again there is no need to change these settings unless you know exactly what you're doing and have specific needs.
Once you're done with all of the Firefox settings, click OK to exit the Options, and I also recommend closing all instances of Firefox and restarting the browser to ensure that all settings are applied properly.
The next section provides a range of details and tips on all of the major features of Firefox.
|
|