
Call of Duty 2 Tweak Guide
[Page 5] In-Game Settings
This section contains full descriptions and recommendations for Call of Duty 2's in-game settings. Read these carefully to get a good balance between image quality and performance. I can't tell you what you should set these to, as that depends on your particular hardware combination, and more importantly your personal taste for the trade-off between performance and image quality. For more details of the precise performance impact of the game, see this article and this article.
To access Call of Duty 2's in-game settings, start the game and under the main menu click the Options setting. Note that you must configure the settings for Singleplayer and Multiplayer separately - the settings for one don't impact on the settings for the other. Each of the settings are covered in detail below:
Controls
Look
These options affect the way you control your character's viewpoint in the game. You can bind various keys/buttons to these options, and none have any impact on performance. Particular settings of importance are covered below:
Invert Mouse: This controls whether moving the mouse forward will make your character look down (Yes) or up (No).
Center View: This command instantly centers your view parallel to the ground. This can be handy if you often become disorientated during heavy combat for example.
Smooth Mouse: This setting if set to Yes attempts to reduce the jerkiness of mouse movements. If you find that in fact it makes your mouse seem laggier or less snappy, set this to No.
Mouse Sensitivity: This setting is very important, and depending on how far right you move the slider, the greater the responsiveness of your character's view to your mouse movements. Note that if you're experiencing a lot of mouse "lag", it is usually due to low framerates - especially when in heavy combat or smoky scenes, or large complex outdoor scenes. Raising the mouse sensitivity value can't fix that - you'll have to reduce/alter other settings to increase your average framerate.
Move
These settings control your character's movement, and should be assigned according to your tastes. None have any impact on performance. Pay attention to the following setting in particular:
Multiple Crouch and Prone options: You may notice there are several Crouch and Prone-related settings on this screen. This is not a mistake by the developers, and can be confusing since really you only need to bind one key to crouch, and one to prone. However the various options are here designed to suit different play styles, depending on how you to like to use crouch (kneeling down) and prone (lying down). The 'Toggle Crouch' and 'Toggle Prone' settings do just that - pressing the relevant key once will make you go straight into crouch or prone stance, and pressing the same key again will take you out of that stance. The 'Go to Crouch' and 'Go to Prone' commands don't work that way - pressing the key only makes you go down to crouch/prone; you must then press the Jump key (or 'Stance Up' key) to get back up again. The basic 'Crouch' and 'Prone' commands are different again - pressing these keys will make you go to prone or crouch mode and stay there only for as long as you keep holding the relevant key down; if you let go you stand back up again. Choose one which suits your needs. You might want to mix and match, selecting one type for the Crouch command, and another for Prone.
Shoot
These settings control the weapons in Call of Duty 2. None have any impact on performance, so set to suit your tastes. Check the following settings in particular as they are very important:
Throw Grenade: There are two options here for grenades, the 'Throw Frag Grenade' and 'Throw Smoke Grenade' keys. I strongly recommend that you don't forget to bind these to keys which you can access easily as they are used often in the game.
Aim Down the Sight: This setting is also commonly known as the 'Zoom' command, since it allows you to look down your weapon's sights and zoom further in for harder shots. There are two types of this setting here: the 'Toggle Down the Sight' command does exactly that - when activated you look down your sights, and to come out of sighted/zoom mode you need to press the same key again. The 'Aim Down the Sight' command is slightly different - it only stays zoomed for as long as you hold down the relevant key/button. Once again, your choice depends on your style of play.
Melee Attack and Steady Sniper Rifle: A Melee Attack is useful for hitting enemies who are extremely close, or for when you run out of ammo. The 'Steady Sniper Rifle' option allows you to hold your breath for a short period while zoomed in using the sniper rifle, and thus steadies your aim further. For the most part you can use the 'Melee/Steady Sniper Rifle' command to bind a single key to, as these commands rarely if ever conflict with each other. However if necessary, you can instead bind separate keys to these functions using the 'Melee Attack' and 'Steady Sniper Rifle' options here.
Interact
These settings control interactions, like opening/closing doors and triggering objectives. No impact on performance so set to suit your tastes. Note that the Screenshot button is shown here, so if you want to capture in-game screenshots press the appropriate key (F12 by default). Any screenshots taken are placed in your \Program Files\Activision\Call of Duty 2\Main\screenshots directory as .jpg files.
Set Default Controls
Clicking this option allows you to reset all your control commands back to their default settings. This is not something you should usually do unless you're experiencing problems with controls.
See the Advanced Tweaking section for more details of how to use the bind command to create your own custom control bindings.
Graphics
Video Mode: This setting determines the resolution of the game. The numbers shown are pixel width x pixel height. The greater the resolution, the more of a strain on your system to render the in-game scenes, and hence the lower your framerate. Also, the higher your resolution, the more chance there is that Call of Duty 2 will automatically reduce other settings to try to improve your performance.
Screen Refresh Rate: Refresh Rate, measured in frequency per second (Hz), is basically the number of times per second a screen redraws images. All reasonable monitors can do a 60Hz refresh rate at most resolutions, however many monitors can achieve higher refresh rates at various resolutions. By default Call of Duty 2 uses a 60Hz refresh rate, when in fact if your monitor supports a higher refresh rate at your chosen resolution, it will provide better image quality (less eye strain) if you can set it to that higher rate. Furthermore, if you have enabled the 'Sync Every Frame' option (See below), your refresh rate is also the highest FPS your system can achieve. Choose the highest possible refresh rate for your system - see the r_displayrefresh setting in the Advanced Tweaking section if you know your display device is capable of a refresh rate higher than 60Hz at your chosen resolution. For more details see my Gamer's Graphics & Display Settings Guide.
Aspect Ratio: The Aspect Ratio is the ratio of width to height of your in-game image. The options here are Auto, Standard, Wide (16:10) and Wide (16:9). Selecting the Auto option should provide the correct aspect ratio for your monitor. However if you see an oddly stretched image, or black bars on the sides of the image, manually set this option. Keep in mind that the normal aspect ratio for most computer monitors is 4:3, so select Standard (which is 4:3) or Auto for such displays. For widescreen monitors or HDTVs, try 16:9 to start with and if the image still appears incorrect, try 16:10, or set back to Auto. Also keep in mind that a resolution (Video Mode - see above) which corresponds closest to this aspect ratio will provide optimal image quality with minimal stretching/scaling.
Texture Filter: The options here are Bilinear, Trilinear and Anisotropic. These are filtering modes which affect the way textures (the 2D surfaces of all 3D objects) appear in the game - especially how crisp surface textures look as they fade into the distance. Read my Gamer's Graphics & Display Settings Guide for more details and graphical examples. Basically Bilinear is the simplest method of texture filtering, and provides the best performance. Trilinear improves image quality but is slightly slower. Anisotropic will have a noticeable impact on performance, but provides the best texture image quality. Note that if you select Anisotropic here, the actual level of Anisotropic Filtering (AF) is automatically set to 8x AF by the game, so it can give a noticeable performance hit, especially on lower end graphics cards. To manually adjust the level of Anisotropic Filtering, see the r_anisotropy command in the Advanced Tweaking section.
Anti-aliasing: The options here are Off, 2x and 4x. Antialiasing (AA) basically makes jagged lines appear smoother, with the higher the sample rate of AA, the smoother jagged lines become in return for slower performance. Again, see my Gamer's Graphics & Display Settings Guide for more details and examples. Enabling Antialiasing, particularly on machines with older or lower-end graphics cards, can have a significant negative impact on performance in COD2.
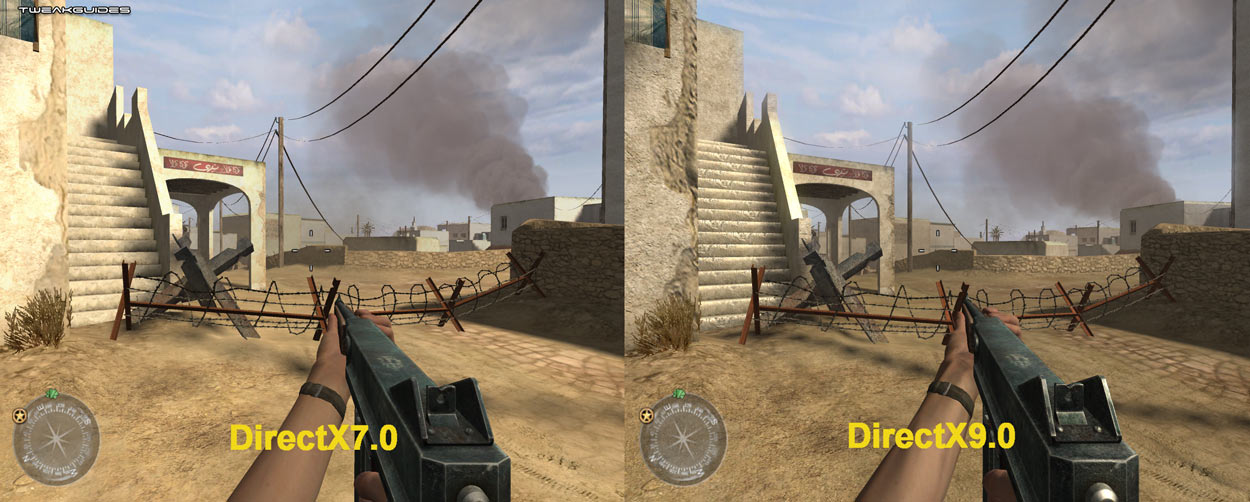
Render Method Preference: This option allows you to choose between DirectX9.0 and DirectX7.0 rendering methods in Call of Duty 2, or allow COD 2 to automatically choose one for you. For more details of DirectX see the bottom of this page of my Nvidia/ATI Tweak Guides (the information is identical in both guides). Basically selecting DirectX9.0 (DX9) gives you the highest quality images and special effects in Call of Duty 2, while selecting DirectX7.0 (DX7) reduces the quality of some of the effects in the game in return for a significant boost in performance on most systems. The effects which are altered by this setting include the glow of the sun, the overall light bloom effect, bump mapping (which gives textures depth), heat haze effects, reflections and so forth. The screenshot comparison above shows some of the differences between the two modes - note the differences in the wall to the left of screen, the stairs, and the walls of the building in the background. There are other differences based on which map you are in, but basically DX7 mode has far less of the 'atmospheric' features of DX9 mode, but still looks fine nonetheless, particularly given the performance boost it provides.
The ATI Radeon 9x00 series and above, or the GeForce 6x00 series and above should provide good hardware-level support for DirectX9.0 and hence are better suited to run in DirectX9.0 rendering mode. Older graphics cards may still support DirectX9.0 (if this option is available), however since they are not optimized to run DX9 effects, they will suffer from relatively poor performance. The GeForce FX series for example is known to be a poor performer in DX9. This is not a "flaw" in the Call of Duty 2 engine (which is actually quite a good engine), rather it is simply the richness, high quality and sheer multitude of DX9 effects which the game uses - specifically advanced particle and smoke effects for weather, smoke grenades and explosions, advanced shader effects for that "hazy" and realistic lighting look, dynamic lighting and complex shadows, high polygon objects and of course high level texture detailing. You can disable some of these effects individually by checking the Advanced Tweaking section of this guide (e.g. the r_glow setting) and by looking at the Texture Settings section below. However if after all your tweaking using this and my other guides you can't get your FPS to consistently stay above 30FPS in DX9 mode, I recommend enabling DirectX7.0 mode (or just select Auto), and then raise other settings to compensate.
Brightness: This slider controls the brightness of the in-game image. Set it to suit your tastes, it has no impact on performance.
Sync Every Frame: This option is also commonly referred to in other games as Vertical Synchronization or VSync. Vertical Synchronization is the synchronization of your monitor and graphics card's abilities to draw a certain number of frames per second (or FPS) on the screen. This is referred to as the Refresh Rate (See the Screen Refresh Rate setting above), and is measured in frequency per second (Hz). If this option is enabled (i.e. set to Yes), your maximum FPS cannot exceed your current refresh rate at your chosen resolution, and more importantly your overall FPS will be reduced. For this reason it is strongly recommended that you set this option to No. The only down side is that if VSync is disabled, you may notice some image 'tearing'. This causes no damage to your monitor, but if it really annoys you enable this option but note that your actual FPS will be reduced overall and not just capped.
Optimize for SLI: This option should be set to Yes if you have an SLI (Scalable Link Interface) system with two physical graphics cards connected and SLI enabled in your Nvidia Forceware control panel (See my Nvidia Forceware Tweak Guide for more details). In such cases the game will attempt to take advantage of both your graphics cards to improve performance by as much as an extra 50%. Some interesting things to note about this setting - originally this option was called 'Optimize for Dual Cards' (not just SLI) in the COD 2 Demo and as such this leads me to believe that this should also improve performance on Crossfire setups, although I would appreciate Crossfire users letting me know if it does indeed work for them. Furthermore, various single graphics card users have said that this option improves performance on their systems. This is likely because of an issue discovered on the NVNews Forums (See Conclusion section of this guide for discussion and links). Enable it to see if it improves your performance, however it will be set back to No on non-SLI machines after each restart. Instead I recommend you that you go to the Advanced Tweaking section and read about the r_multigpu and r_gpusync commands, as configuring those correctly provides the best framerate.
Shadows: If set to Yes, characters and some objects will cast complex shadows in the game. The performance impact of shadows can be quite significant, especially in areas with multiple character and/or multiple lights. If set to No, such shadows are removed, boosting FPS at the cost of some realism. Note that some shadows in the game - such as static shadows of buildings - are not affected by this setting and will be drawn regardless. This setting is not available in DX7 mode.
Number of Dynamic Lights: Dynamic Lights are lighting effects which interact with surrounding objects. For example, the way the muzzle flash from guns light up surrounding areas, the way in which explosions shed light, etc. The options here are Off, Low, Normal and High. In general the higher the setting, the more objects cast dynamic lights. However even at Low the most obvious dynamic lighting (muzzle flash for example) is visible, and higher settings will have a noticeable negative performance impact in areas with multiple light sources/weapons - so if you need the FPS set this to Low for a good balance of image quality and performance. This setting will also further impact on performance if Shadows is enabled (See above). This setting is not available in DX7 mode.

Soften Smoke Edges: This setting determines whether the 'ZFeather' smoke effect is used in Call of Duty 2. The options here are Off, World Only and Everything. Note that some graphics cards cannot use Zfeather effects due to lack of hardware support. Off should disables zfeather smoke, resulting in the edges of the smoke being more clearly defined ("clipped") against all surrounding objects, and hence much less realistic - this may provide better performance in smoky situations. 'World Only' should only allow smooth the edges of smoke against the surround terrain and buildings, but not against enemies. At the 'Everything' setting, smoke should blend smoothly with all surrounding objects seamlessly ("feathered"), which is highly realistic. This may reduce performance. A screenshot comparison is provided above - note that at Off, you can clearly see the smoke has defined edges (against the ground for example). At the 'World Only' setting, the smoke edges are smooth against the ground, but notice the defined edges of the smoke against the enemy character's arms and legs. At 'Everything', all edges are smooth and the smoke appears more realistic. If your system is slowing down when smoke is visible, set this to Off to increase performance, otherwise set it to Everything.
Number of Corpses: The options here are Tiny, Small, Medium, Large and Insane, and clearly this option relates to the number of dead bodies visible on the battlefield at any one time. The number of corpses visible at any one time are 3 for Tiny, 5 for Small, 10 for Medium, 20 for Large and 64 for Insane. You can manually specify a number between 1 and 64 for this setting by using the ai_corpsecount command (See the Advanced Tweaking section). Since characters are quite complex objects, the more corpses which are visible at any one time, the slower your performance will be.
The next page continues with the in-game settings and provides more screenshot comparisons.
|
|