
ATI Catalyst Tweak Guide
[Page 8] Catalyst Control Center (Pt.3)
All Settings: If you find that changing settings with the Preview screen visible is annoying you, or if you simply want to see all the settings in one summary interface, then you might want to adjust your 3D settings using this option. Just click this option and in place of the Preview screen will appear all the setting sliders and tick boxes for you to adjust as discussed on the previous page. Importantly, there is a significant additional option under the All Settings section which is not available elsewhere in the Control Center:
Wait for Vertical Refresh: This option controls Vertical Synchronization (VSync) in games. VSync is the synchronization of your graphics card and monitor's abilities to redraw the screen a number of times each second (measured in FPS or Hz), and is explained in greater detail on this page of the Gamer's Graphics & Display Settings Guide. There are four choices here:
Always Off - Vertical Sync will always be set to Off, regardless of the setting in the game or 3D application. This provides fastest performance but may result in image 'tearing' which can be annoying to some.
Off, Unless Application Specifies - Vertical Sync will be off by default, however if you choose to enable it in a game or 3D application, it will be enabled for that game/app. This is the recommended mode.
On, Unless Application Specifies - Same as above, except Vertical Sync will be on by default unless otherwise disabled in a particular game or 3D application.
Always On - Vertical Sync will always remain on, regardless of the setting in the game or 3D application. This is not recommended, as it may reduce performance however it guarantees that there will never be any screen "tearing".
It is recommended you select the 'Off, Unless Application Specifies' option for the best performance, and this also allows you to set VSync Off/On in each individual game using the game's own settings if required. Generally speaking, VSync should be disabled for the best performance.
More Settings: Even though the Catalyst Control Center doesn't distinguish between OpenGL and Direct3D in the bulk of the 3D settings, there are still some settings which are unique to OpenGL and Direct3D respectively, and they are covered here:
Direct3D Settings
Enable geometry instancing - Geometry instancing basically optimizes the rendering of objects which appear multiple times in a 3D scene by uploading one instance of the object and then replicating that as many times as needed. For example, with geometry instancing enabled, outdoor scenes with 3D objects like leaves, bushes and grass should be rendered faster, since the geometry for only one instance of a blade of grass is calculated and then reproduced over and over to create a field of grass. You should enable this option to improve performance in such cases, and only disable it if you notice graphical anomalies with multiple objects of the same type.
Support DXT texture formats - DXT is DirectX Texture Compression, which compresses textures into smaller sizes, making them easier to load into Video Memory and hence speeding up graphics performance with minimal loss in the quality of textures. It is strongly recommended that you make sure this option is enabled (ticked) to support DXT texture formats for maximum performance.
Alternate Pixel Center - This setting changes where the center of each pixel originates, and that can resolve problems such as texture or text anomalies in games. You should leave this Disabled unless you experience precisely those sort of problems.
OpenGL Settings
Triple Buffering - This setting is described in more detail on this page of my Gamer's Graphics & Display Settings Guide. Set this option to Enabled to improve overall performance in OpenGL games if VSync is enabled. However using Triple Buffering may cause problems for graphics cards with lower Video RAM, so disable this option if youre experiencing problems such as mouse or input lag, or if you don't enable VSync in OpenGL games. See the guide above as well as the Advanced Tweaking section for more details of how to enable Triple Buffering in Direct3D games.
Force 24-bit Z-Buffer depth- The Z-Buffer controls the rendering of depth in 3D games, such as which objects are hidden behind others when viewed at a distance. Greater precision for the Z-Buffer means less chance of visual errors, which often appear in the form of objects showing through each other, or having missing or flashing bits. This option allows you to force 24-bit Z-Buffer precision, however I don't recommend ticking this option, as the Z-Buffer precision should normally be left to be determined by each game. If you do see a lot of errors and glitches in distant objects in games, you can try forcing a higher Z-Buffer depth, but this typically reduces performance.
Color
If you believe you don't have appropriate color and brightness on your monitor when displaying the Windows desktop, or in particular games, you should firstly make sure you have the correct Color Profile for your monitor installed (See Color Management section). If this doesn't resolve the problem, you can manually change the color and brightness/contrast/gamma settings for your Desktop and/or 3D games in this section. The first choice you have to make is whether you want to adjust these settings for your Windows Desktop (Select the 'Desktop' option), or for 3D Applications (Select the 'Full Screen 3D' option).
Next, you can select whether you want to change the Gamma, Brightness and Contrast properties of the Red, Green and Blue colors individually (Select the Red, Green, or Blue option) or for all of them at once (Select 'All Channels'). For each color, or for all colors, you can then move the Gamma, Brightness and Contrast sliders to the left or right to adjust the properties as appropriate. If you want to reset your choice for a particular slider, click the Reset button next to it. If you want to reset all your changes back to the 'normal' values, click the Defaults button. For most people I recommend using the default values here and adjusting your monitor's controls to achieve optimal color and brightness/contrast.
(Avivo) Video
This section allows you to change the display properties of any video media which you may play through your PC. There is a video preview of a waving ATI flag which allows you to see the effects of your settings. There are three sub-sections to the Video Settings section, and each is covered below:
Video Basics: You can select a preset video playback configuration from here. The presets include Home, Office, and Theater. If you're not happy with one of the presets, use the Custom preset and adjust the relevant settings below.
Video Color: Basic: If you untick the 'Use application settings' box, the options in this section of the Control Center will determine the brightness, contrast, saturation, hue and gamma settings for any image which displays through a video overlay, such as DVD playback. Changing these sliders will adjust the properties of the image and you can immediately see the impact of these on the right side video preview. Set to suit your tastes, but if you don't like your changes, select the Discard button at the bottom and tick the 'Use application settings' box again to allow individual video playback applications use their own settings for video playback.
Theater Mode: These settings work if you have an ATI graphics card which is capable of supporting a Primary and Secondary display, and the secondary display is connected. You can see a preview of the impact of your choices on the Video Preview panel, so select a combination which suits your needs. If you select 'Theater Mode' from the list, you can select the aspect ratio of the video playback here. Aspect Ratio is the width of the image versus the height of the image. 4:3 ratio is standard TV/monitor size, while 16:9 is the standard Widescreen TV format, such as that used in most DVD movies and HDTVs. If you select 'Match the source video', then if the source is 4:3 aspect ratio, so too will the playback be in 4:3. Alternatively, if you want to change the video's aspect ratio to match to your display's aspect ratio, select the 'Scale to full screen' option, however note that this may cause skewing/distortion of the image.
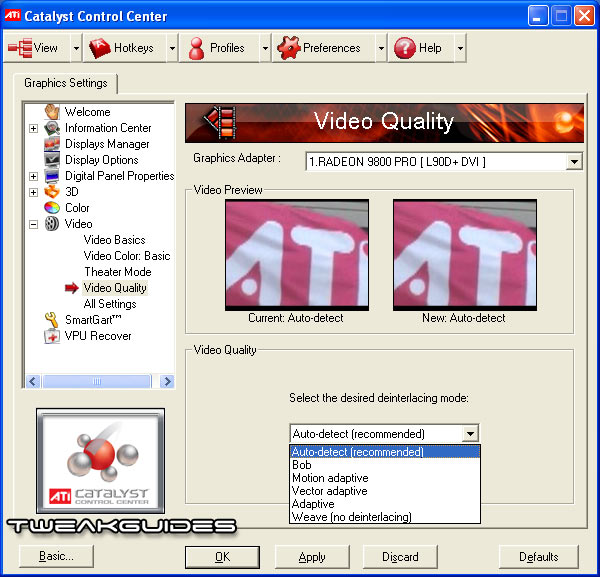
Video Quality: The Catalysts come with software Deinterlacing which can help improve the image quality of videos depending on the method you choose. The options available are Auto-Detect, Bob, Motion Adaptive, Vector Adaptive, Adaptive and Weave (No deinterlacing). You will have to experiment to select the right type for your particular video source, but look at the preview display to see an indication of the various impacts. If in doubt, select 'Auto Detect'.
All Settings: This section is similar to that under the 3D section of the Control Panel - it allows you to view and change all the Video settings in one place, without a video preview. However it also contains an additional option 'Windows Media Video Acceleration'. If this option is ticked, it uses your graphics hardware to improve WMV-encoded video playback - which is recommended.
SmartGart
The settings here have a significant impact on your system stability, and to some degree on your performance, if you run an AGP graphics card.
Set AGP Speed: This setting only applies to AGP graphics cards, not PCI-E cards. AGP Speed is detailed under the Essential Optimization section of the guide. Your current AGP speed is shown here, and you can manually change it by using the slider. Note that certain AGP Speeds may be greyed out, either because they offer significantly lower performance, or because your motherboard and/or graphics card do not support those speeds. It is recommended that you set the highest available AGP Speed here for optimal performance. If at any time you begin experiencing lots of crashes, freezes and other problems, you can reduce the AGP Speed here in an attempt to increase system stability. Also make sure the AGP speed set here matches the one you set in your BIOS.
Fast Write: This setting is detailed under the BIOS section above, and is essentially the same as the BIOS setting of the same name. Your current Fast Write setting (On or Off) is shown here. As mentioned earlier, Fast Write is a major source of instability on most systems and provides little to no performance benefit, so it is strongly recommended that you select Off here to disable Fast Writes.
AGP Read, AGP Write, PCI Read, PCI Write: These settings are covered in detail under the Catalyst Installation section of the guide. For optimal performance you should ensure they are all set to On.
Retest: If you click this option next to any of these settings, or the 'Retest All' button, the SmartGart system will retest the setting(s) in an attempt to find the "best" settings. Of course this means it will revert the setting(s) to exactly the same as it was when you first opened the SmartGart tab, so there should be no reason for you to use this option unless you want to return to the default settings.
Importantly, if you have changed any of these settings, clicking the Apply button may require that you reboot your system to implement the changes. Once you reboot, come back into the ATI Control Center and check these settings under the SmartGart section. If they haven't changed, it is highly likely you will need to re-enable the ATI Smart service, install the latest motherboard AGP driver and alter other important settings such as those in your BIOS.
VPU Recover
Enable VPU Recover: VPU Recover attempts to stop any sort of graphics-related crashes or freezes from completely locking up or resetting your machine. While this is a valiant idea, in practice VPU Recover has been known to increase the probability of crashes and problems when enabled, and more importantly needing VPU Recover to kick in regularly is a sign that something is wrong with your system and you need to find the source of the problem. I recommend that you untick (disable) VPU Recover to increase system stability, and then seek out and remedy the source of any problems by using the tips in the rest of this guide and the tips in the TweakGuides Tweaking Companion. A stable system will never trigger VPU Recover. Note that this option doesn't exist in Windows Vista, since Vista's new driver model means that a form of VPU Recover is permanently in effect for all graphics cards.
Prepare an Error Report: If VPU Recover is enabled, this option will be available to be ticked. If ticked, it means that every time your system has an error which VPU Recover helps recover from, an email will be generated which you can send to ATI disclosing the details of the problem. While this may help ATI in determining the cause of certain issues, more often than not it is completely unnecessary and I recommend unticking this option, even if you do use VPU Recover.
ATI OverDrive
If you have a Radeon XT, X1X00 series or newer graphics card, you will find an ATI OverDrive item in the Control Center. The OverDrive panel provides information about the current temperature of your graphics card's Graphics Processing Unit (the GPU or Core) which is only possible due to the presence of a temperature sensor on your graphics cards. This is the reason why older cards do not have Overdrive, because it requires the physical presence of this temperature diode onboard the card itself.
If you tick the 'Enable ATI Overdrive' box, the OverDrive software will actively monitor your graphics card's temperature and allow you to manually overclock your video card's GPU (Graphics Processing Unit) core/engine speed as well as the memory, if it is safe to do so. This is a nice method of achieving some extra performance safely, since OverDrive will not allow your graphics card to fry by accidentally overclocking it to insane speeds. If you want to overclock your system see the Overclocking section for more details.
A common question asked by users is "What is a safe temperature for my graphics card?" This varies depending on the particular graphics card series you have, since each is based on a particular architecture and hence has different heat output and tolerances. Typically, under most circumstances the 50-60 degree (Celcius) range is considered quite normal at idle, increasing into the high 70s under load. These temperatures will rise when overclocking or when your system is not properly cooled, and can result in crashes and freezes when under load. See the Overclocking section for more information on cooling.
Finally, note that some ATI graphics cards don't come with OverDrive capability. If you believe you should be seeing the OverDrive tab in the Control Center but it's not there, remember that the ATI Hotkey Poller service needs to be set to Automatic (See Tidying Up section), and if necessary contact ATI Technical Support for more help.
Crossfire
If you have two ATI graphics cards, with at least one being a Crossfire Edition graphics card, and they are installed in an appropriate Crossfire-supported motherboard (with both PCI-E Slots enabled in the BIOS), and you're using the correct connecting cable between the two cards, you should be able to see the Crossfire tab in the Catalyst Control Center. You can then tick the 'Enable Crossfire' box to enable Crossfire usage - it should be disabled for any games in which you notice performance problems or glitches. It is recommended that you then make sure Catalyst AI is enabled (See further above) so that the Catalyst drivers can automatically set the correct Crossfire mode for each game. Note that with Crossfire enabled, you will be able to access additional Crossfire Antialiasing modes under the Antialiasing section of the 3D options in the CCC - up to 14x Antialiasing.
Once you're done changing all the Catalyst Control Center settings to suit your preferences, make sure you click the Apply button at the bottom of the Control Center box to apply them. In fact get used to pressing the Apply button after almost every change so you can see the impacts of it more quickly. Now is also a good time to click the Profiles button and create a new profile called Default (or similar), to keep all your preferred original settings from being lost.
The next section starts our look at Advanced Tweaking with ATI Tray Tools.
|
|