
ATI Catalyst Tweak Guide
[Page 9] Advanced Tweaking
This section delves into the types of things you can do outside the normal ATI Control Center settings, both to improve your graphics performance and/or to alter image quality to suit your tastes and perhaps resolve specific graphics problems. Please note that if you are not confident in undertaking these tweaks - and certainly none of them is necessary for you to enjoy games - then do not perform them. There is a certain level of risk involved in changing some of these settings, so backup your system first before going further.
ATI Tray Tools
The main tool we will focus on in this section is ATI Tray Tools, and in effect the following two pages are about how to use this great free utility. It is a comprehensive utility which not only allows you to change all the normal ATI Catalyst settings (especially if you don't wish to use the Catalyst Control Center), but also provides a huge range of additional features which are covered below. Of course I can't do a complete rundown of every single one of ATI Tray Tool's many features in two pages of this guide, but I detail all of the most important and useful features here and provide recommendations.
Installation & General Options
To start with, when installing ATI Tray Tools (hereby referred to as ATT), it is generally recommended that you choose the Full installation, which includes a range of components such as Smart Shader files, 3D profiles and Plugins. Note however that if you don't wish to have ATT put itself into your right-click context menus, untick the 'Windows Shell Integration' item. You can also remove the 'Autostart with Windows' option if you don't use ATT's overclocking or game profile options often for example - you can always reenable this option later if necessary anyway. On the next page of the Installation Configuration Options, you should leave all the options unticked (for maximum functionality) except the 'Enable old I2C control system', and if you also know you won't be overclocking at any point, you can choose to tick the 'Disable Overclocking' option. From there, finalize the installation as normal. Note that the version of ATT which comes with the Omega Drivers may be slightly different to the details provided here; this guide mainly refers to the proper standalone version of ATT.
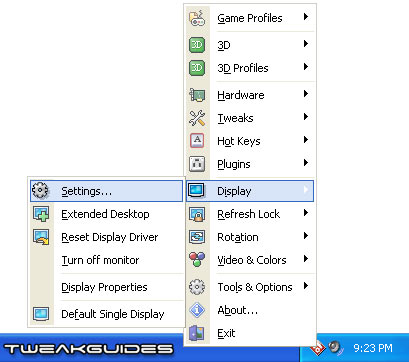
Once ATT is installed, it will appear in your System Tray icon area - the lower right corner of your Windows Desktop, next to the clock. It is shown as red diamond icon, and right-clicking on it will bring up a range of menu options. Most of these are covered below, but first to undertake some basic configuration of ATT, go to the 'Tools & Options' menu and select the 'General Options' item. A new dialog box will open with four tabs:
General: Here I suggest ticking the 'Use new Apply 3D Settings mode' and 'Aggressive 3D detection'. The remaining options are up to you as they mainly rely on your preferences. For example, if you want to open the main ATI Tray Tools menu using a left-click instead of a right-click of the mouse, tick the 'Swap mouse buttons for tray menu' item. Importantly, as mentioned you can tick whether ATT loads up with Windows or not at the top of this box. In general if you only use ATT to adjust various Catalyst settings and make a few one-off Registry tweaks, it's not necessary for it to load up at startup - you can launch it manually whenever you want to use it. ATT doesn't have to be running in the background for the basic 3D graphics options to work, like the 'Flip Queue Size', as these are changes recorded in the registry and don't require the active presence of ATT in memory to work. However if you use particular functions like an Overclocking Profile or Game Profile then it's best to simply let ATT loadup at Windows startup, and the Registry method shown in the drop box is fine.
Advanced: I recommend ticking the 'Enable ATT Shared Memory' feature, as it is required for functions like the FlashOSD option (see Onscreen Display on the next page). If you're overclocking using ATT, you can enable the overclocking limits to prevent from severely overclocking or underclocking the card and hence causing damage or poor performance. If you only want your new clock rates to work while ATT is running, tick the 'Reset clocks on exit' to go back to default speeds once ATT is closed; similarly if you want your overclock to be removed before going into Suspend mode, tick the 'Reset clocks before suspend mode'. Finally, at the bottom of this box I recommend ticking the 'Always select maximum refresh rate' so that you get the optimal refresh rate at any new resolution you switch to. You can also disable the ATI Hotkey Poller Service whenever ATI Tray Tools is launched, however this is best done by following the instructions on the Tidying Up section of this guide.
Audio Recorder: This functionality is obviously not directly relevant to your graphics card, and is one of the added features of ATT which you can experiment with. You can choose a variety of sources to record audio from, including Videos, and you can save these recording to a particular folder in the format you prefer (e.g. MP3).
Screenshots: Again, not directly related to driver functionality, this is an additional - but useful - function of ATT: the ability to take screenshots during games by using a specified Hotkey. I personally use FRAPS to take screenshots in games, however ATT doesn't have the same limitations as the free version of FRAPS does in terms of image formats, so you may prefer it, especially as it allows things like setting the quality vs. size of captured screenshots.
The sections below cover the basic functionality of ATT which I consider the most commonly used and/or the most important:
Game Profiles
One major benefit of ATI Tray Tools is that you can create custom game profiles; that is you can create profiles for each game you run specifying different 3D settings for that game. This is a feature available in the Nvidia Forceware Control Panel, but ATI has neglected to include it in the official ATI CCC. While the Catalyst Control Center can provide game profiles, you need to create custom icons for them to work. The difference is that so long as ATI Tray Tools is loaded in the background, whenever you launch a game, the game executable is detected and the relevant profile is applied automatically. You don't have to create a custom icon for the game, but of course ATT also allows this method if it's what you prefer. To create a game profile, select the 'Game Profile' item in the ATT main menu and select 'Manage Profiles'. This will open a new dialog box. The basic procedure to create a custom game profile is covered below:
1. In the Executable box, click the folder icon and browse to the executable file for the game you wish to create the profile for. Remember that some games have an executable which is actually just a launcher, and the game executable itself is named different. We need the actual game executable, not the .exe file which opens a config utility or menu prior to launching the game. Once you've chosen what you think is the correct executable, click the 3D icon on the same line as the Executable box - you should see the game API type (e.g. DirectX8.0) shown, indicating it is indeed the right .exe file to use.
2. In the Parameters box, enter any additional command line parameters you may be using or which may be needed as the game is launched. To find if you're using any of these, go to the game's normal launch icon, right-click on it, select Proprties and check the Target box for any additional text after the last " mark. For example, in Quake4 you might want to use the command line parameters +set com_allowconsole 1 +disconnect - add any such command line parameters in this box.
3. Tick the 'Set 3D to' box, then in the box next to it, select either a preset profile, or if you want to create a brand new one, select Custom and click the Edit button. In the 3D proprties box which opens, set up all the parameters you want for this particular game, then click the OK button. These settings will only be used for this particular game.
4. Tick the 'Restore previous settings after game end' to make sure that after the game has been closed, your regular Catalyst preferences are restored again.
5. Back at the top of this dialog box, enter a name in the 'Profile Name' box. Typically the name of the game is appropriate. At the bottom of the dialog box, click the Save (disk icon) button and profile will be saved.
Now whenever you launch that particular game through its normal game icon, as long as ATT is running in the background (i.e. you can see its icon in the system tray), then it will automatically detect the game executable and apply your custom game profile settings to the game. Alternatively, if you don't want to keep ATT running in the background, click the 'Create Desktop Shortcut' button in the Game Profile dialog box and a new icon will be created on your desktop for this game profile. Whenever you launch the icon, ATT and the relevant game with its profile will be automatically started - you won't need to have ATT load at startup or be resident in memory before launching the game through this icon.
Note that you can further customize game profiles by checking under the Hardware, Additional and Direct3D Tweaks tabs of the Game Profiles dialog box. The more important of these are covered below:
Exit from ATT after finish: If you want ATT to be closed and removed from memory after you have exited the game, tick the 'Exit from ATT after finish'. This is particularly handy if you're using the Desktop icon method, which means you don't have to have ATT staying in the background either before or after using a particular game profile - it only loads itself up when you launch that game profile icon, and it automatically closes itself after you have exited the game.
Disable OSD Support: If you want to disable the On Screen Display (OSD) that ATT shows during a 3D game, such as the FPS counter, tick the 'Disable OSD support' box under the Additional tab and it will be removed for this game. See the On Screen Display section on the next page for more details.
Change Adapter Identification: If you want to try to trick a Direct3D 9.0 game into thinking you have another graphics card, you can tick the Enable box under this option under the 'Direct3D Tweaks' tab, then enter the device name, or if you know the particular DeviceID in Hex form, enter it here. Clearly this may not always work, and even if it does, if your graphics card doesn't have hardware support for particular features in a game it will either crash, or experience severe glitching.
Force to use Triple Buffers: Triple Buffering is important if you use VSync in any games. Whenever you enable VSync in a game, you will get better image quality due to the removal of 'tearing', however if you enable VSync your average FPS also drops sometimes by up to 50%, because of the way your graphics card waits for data to be synchronized before displaying it on your monitor. The only way to enable VSync and be rid of tearing, yet at the same time not have to worry about reduced framerates in Direct3D games is to enable this Triple Buffering option (the main Catalyst Control Center Triple Buffering option only works for OpenGL games). However if you enable Triple Buffering on a graphics card with less Video RAM, you may experience mouse lag, so if you use VSync enable this option first, then disable it (and preferably disable VSync too) if you experience mouse lag.
Remember again that any time you change the game profile options to click the Save button to save changes to the Profile.
3D
To start with - and this is one of the reasons why ATI Tray Tools is so popular - you can access all of the major features available in the regular Catalyst Control Center within the 3D section of ATT. This means that you can simply install the basic ATI graphics drivers without installing the Catalyst Control Center as well, and then use ATT to quickly and easily change the required Catalyst settings, without the added background resource usage of the CCC and .NET.
Since the settings in this section are identical to those of the same name in the Catalyst Control Center section, I recommend that you refer to that section of this guide for more details. Note that if you don't wish to use the ATT menu items to access these settings, go to the 3D section of ATT and select the Settings item. This opens up a separate '3D Settings' dialog box to access all of the 3D settings more easily. Note further that there are a few additions to the 3D settings which are not included in the regular CCC, and these are covered below:
Flip Queue Size: This setting is similar to the 'Max Frames to Render Ahead' Nvidia setting which has been made famous by Oblivion - see this page of my Oblivion Tweak Guide. It works in much the same way, controlling the number of frames which are calculated in advance of being displayed. The default is 3, or Undefined, however by lowering this setting you may be able to resolve mouse lag problems, and even prevent graphics freezes in certain games. Experiment by setting this value to 2 first, and then if necessary try an extreme value like 0. For most people however I recommend either 3, 2 or 1 at the lowest as setting a value of 0 can disable the performance benefits of dual core CPUs for example, and in general lowering this setting will reduce overall FPS the lower the setting. You can try raising it if you want to see if you can gain performance, however again you may experience mouse lag or input lag.
Anisotropic/Trilinear Filtering Optimizations: If you want the fastest performance when using Anisotropic or Trilinear texture filtering in a game, you should enable both these options. This may result in a slight drop in image quality, however for most games this should not be noticeable, and in return you should gain some extra FPS.
Finally, if you want to use custom 3D setting profiles, you can select one under the '3D Profiles' menu. For example the 'Max Speed' profile automatically configures the various 3D settings to give you maximum possible speed at the cost of image quality. Generally not recommended; best if you work out which setting does what with the help of guides like this and set them according to your personal preference for eye-candy vs performance. You can of course save your own custom profile by using the Profile box at the bottom of the 3D Settings menu.
Hardware
This section of the ATT main menu accesses a range of overclocking and hardware monitoring functions.
Overclocking Settings: This option opens up the Overclocking dialog box, which allows you to view and alter your graphics card's Core and Memory clock speeds. For more detail of clock speeds and overclocking see the Overclocking section of this guide. Note that ATT comes with two basic tools for testing whether your overclock is stable - a separate 3D Renderer screen with a spinning 3D image which can be used to show artifacts (visual glitches), and also to run benchmarks on. Just because you don't get any artifacts when running this screen, does not in any way mean that your overclock is stable. Refer to the Benching & Stress Testing section of this guide for the correct way to benchmark and stress test your graphics card - overclocked or not - to check for performance and stability changes. The Timings tab of the Overclocking dialog box is much more dangerous, and should not be altered unless you know what you're doing; lowering graphics card memory timings can improve performance but it can also severely destabilize/corrupt your graphics so is best left untouched. The Fan tab allows you to control Fan speeds, but only on graphics cards which are built to allow variable fan speeds.
Auto Overclocking: This feature allows you to control when your overclocked settings are applied. By selecting which events can trigger your overclocked speeds to be implemented or removed, you can for example run normal speeds during 2D applications, then implement a higher clock speed when running a 3D application like a game. After all, there is no point running an overclocked GPU for 2D usage, as this increases heat output for no discernable performance impact. Go through the Auto Overclocking dialog box and select the profiles you want to use for particular events.
General Settings: Selecting this option opens up a dialog box which allows you to specify whether you want the settings you have chosen in the Hardware section to be implemented each time you start Windows. Tick this only if you're certain that the changes you have made are stable.
PCI Latency: This is a reasonaly important but misunderstood option available under the Hardware>General Settings dialog box, and hence deserves its own explanation. While changing PCI Latency can be useful in smoothing out your overall performance, preventing stuttering in games for example, it is not a performance maximizing tool as such. For example, if your AGP graphics card has a high PCI Latency of 248 clocks, lowering its latency may actually reduce your overall framerate slightly but can improve smoothness. This is because PCI Latency is the amount of time which a particular AGP/PCI device has exclusive access to the main system information pathway (or 'Bus'). Some devices need higher clocks because they are transferring larger amounts of information. Graphics cards are a good example, and in most recent games the graphics card would require longer bus access than say the sound card. In general I recommend that you allow graphics cards to at least have a latency of 128. You can experiment with other values of course, but write down your original latencies first. Note that you must tick the 'Apply Hardware Settings at Startup' both to access this setting, and to make it work the next time you reboot. Finally, note that PCI latency doesn't apply to newer PCI-Express devices.
The SmartGart and System Information items are the same as those of regular CCC, so they aren't covered again here. The Motherboard Monitor tool, and the Monitoring Graphs function are yet another useful feature of ATI Tray Tools. These allow you to view information about your system such as fan speeds, CPU and motherboard temperatures, and a range of voltages. You can then graph a variety of system diagnostics over time to see how they change, for example how your CPU or GPU temps change while you're playing a game.
The next page continues the description of ATI Tray Tools functionality.
|
|