
ATI Catalyst Tweak Guide
[Page 7] Catalyst Control Center (Pt.2)
Welcome
This section only contains a range of ATI links. You can click on the links shown at the bottom right of the main panel to check for updates, contact ATI Customer Care, Send Feedback and so forth. None of these affect the performance or functionality of the ATI Catalysts on your system.
Information Center
The Information Center section contains details about your graphics card hardware and software. This is very handy for quickly finding out more details about your system, such as the core and memory clock speeds. Note that the information is not comprehensive, and on some systems may show up incorrectly. See the Overclocking section of this guide, as well as the System Specifications chapter of the TweakGuides Tweaking Companion for a range of better tools for finding out much more about your ATI graphics card and your entire system.
Displays Manager
This section shows all the displays connected to your system and currently recognized by the drivers. A picture of the primary display will be under the Main box, and if another is connected, under the Secondary box. If you right-click on the picture of the display, you will see the options to Rotate the image from that display, or to Swap Display Mapping - which means to exchange the displays mapped to your primary and secondary displays (i.e. make Display 1 become Display 2 and vice versa), and if you have two displays, the option to Disable one of the displays. If you cannot see a recently connected display device listed, click the 'Detect Displays' button and it should appear in the list. If it doesn't check the cabling and if possible use another type of connection (e.g. swap DVI for D-SUB or vice versa).
The currently selected (typically Main) display will be shown under the Selected Displays section of this screen, with details of the display's model name and connection type (e.g. DVI). You can select how big the Desktop Area will be by choosing a resolution for it. The Color Quality can also be changed, all the way from 32-bit, to 16-bit down to 8-bit. The lower the color quality, the less colors used to display the screen image, and 32-bit is recommended for all users. An important setting is the Refresh Rate box which shows the currently used refresh rate, and allows you to adjust it manually. See the Tidying Up section for more details on the refresh rate, and what you should and shouldn't do with it. If in doubt do not alter it.
Rotation provides the option to rotate the display through 4 preset angles, with 0 degrees being a normal image, 180 degrees being an upside down image, and either flipping the image 90 degrees to the left (ccw - counter-clockwise) or right (cw - clockwise). There is no reason to do this unless you have special requirements, such as correctly displaying an image on a display which is on its side.
The Force button contains a range of sub-options which allow you to manually force a wider range of settings to the Desktop Resolution, Color Quality, Refresh Rate, Rotation and HDTV properties. There is an inherent danger in doing this, as for example you may assign a refresh rate which exceeds your display's capabilities and thus get no image and perhaps even damage your display device. The main reason you would use these options would be to select a setting which you know works on your system or display but is not being correctly detected, especially if you want to force a specific HDTV resolution such as 1920x1080. Exercise caution, and don't mess with this setting unless you know what you're doing.
Display Options
The 3D Refresh Rate Override option when enabled allows you to force a game's refresh rate to exceed the default 60Hz. You can do this by selecting 'Same as Desktop', if your Desktop refresh rate is above 60Hz. You can find out much more Refresh Rates on page 4 of this guide. Do not alter this setting without first understanding what Refresh Rates do, as forcing a non-default refresh rate can result in some games not starting up at all.
The Display Detection Option simply determines at what point the Catalysts will attempt to detect all your display device(s). If you select 'Detect whenever Catalyst Control Center is opened' then it will do exactly that - go through a detection process for any attached displays whenever you open the Control Center. Unless you regularly connect and disconnect displays to your system, I recommend you select the second option 'Use manual detection only (I must click the Detect Displays button)' for quicker CCC startup.
The Display Management Options section here also allows for forced detection of any connected televisions (if 'Force TV detection' is ticked). If you display has limited resolution capabilities - that is, if it can only display in certain resolutions - then the default 'List only those modes supported by all displays' is the safest as it ensures you cannot select a display mode which is incompatible with one or more of the displays.
Monitor/Digital Panel Properties
Depending on whether you have a traditional CRT monitor or a Digital flat panel display (e.g. LCD) attached, the settings in this section may be different. See the relevant section below:
Monitor Properties
Attributes: The main area of the Monitor Properties section shows you the details of the particular CRT display(s) you have connected to your machine, including resolution and refresh rate limits. You can select whether you want to tick 'Use Extended Display Identification Data (EDID)', which is recommended if available. This allows your display device to accurately inform the Catalysts about its capabilities, reducing the change of any damage to the monitor from inappropriate resolutions and/or refresh rates. If your monitor doesn't support EDID (which is rare) or you are certain it is incorrectly identifying your monitor's capabilities, untick the box and manually set the maximum resolution and refresh rate.
Adjustments: You can use the arrows on this screen to adjust the screen position and size if the picture on your display is not reaching the edges of the monitor. I recommend resizing and repositioning the image on your screen to ensure that the image evenly touches the four edges of your monitor screen. However ideally you should use the controls on your monitor to resize, reshape and reposition the image to perfectly match the monitor screen. You may have to do this several times, at various resolutions and refresh rates. If then you reach some sort of limitation with the monitor controls, you can use these software controls for further adjustments.
The Horizontal and Vertical synchronization of your monitor are controlled by the settings here. You will typically see a '+' or a '-' sign against the Horizontal and Vertical settings. I strongly advise you not to alter these unless you are directed to by a technical support person, or you know precisely what you are doing. Clicking on the buttons can result in loss of video signal (black screen) and even potential damage to your monitor. In particular, the Composite Sync option combines the vertical and horizontal synchronization signals into one, and is only for composite monitors. Do not click on the blue Composite button unless you are certain you are using a composite monitor.
Troubleshoot: If you know your display device is capable of display modes such as 720p (720 horizontal lines progressive scan) and/or 1080i (1080 horizontal lines interlaced) then you can tick the relevant boxes here to add these modes to the Force button under the Displays Manager section. Do not select these modes if your display device is not capable of such resolutions (as most CRTs aren't), since attempting to use these resolutions may cause damage to your display device if not supported.
Digital Panel Properties
Attributes: This section shows the details of your digital panel's capabilities, including the panel name and connection type, and maximum supported resolution (usually called the 'native' resolution) and refresh rate.
Image Scaling: This section allows you to choose whether to have the images on the screen 'Scale to full panel size', or 'Use centered timings'. For most displays the 'Scale image to full panel size' is the best option, however the further away your current resolution is from your display's 'native' resolution, the blurrier the onscreen image will be. Note, you can use the free Microsoft ClearType utility to make text in non-native resolutions much clearer. If you want to force all resolutions to display at your monitor's native resolution - hence providing the sharpest image quality - select the 'Use Centered Timings' option, however note that any resolutions below your native resolution will appear as a centered box on the screen with black borders.
DVI Settings: If your flat panel is connected via DVI cable, you can select the 'Reduce DVI frequency on high-resolution displays' and 'Alternate DVI operational mode' settings to reduce/remove any potential graphical anomalies if running your panel at resolutions above 1280x1024. For most panels however this is not necessary, and both these options should be unticked.
Avivo Color
This section is only available for ATI graphics cards which support per-display color settings, namely the X1000 series or newer. Here you can alter the Hue and Saturation for each display connected to your system. Hue refers to the gradation over the color range, while Saturation refers to the richness/vibrance of a particular color. To put this in simple terms, changing the Hue value changes the actual colors shown - and hence is best not altered. However Saturation is useful to change, as it operates similar to the 'Digital Vibrance' option for Nvidia Forceware drivers - it alters the vibrance of a color. Raising this slightly can greatly improve color reproduction on many displays.
HDTV Support
This section allows you to add 720p, 1080i or 1080p modes to the Displays Manager section. If you are certain your monitor/digital panel supports these modes and they are not being detected properly, tick the relevant box(es) here and they will be added as available options under the Force button of the Display Options section of the CCC (See further above). If you then get display anomalies when running these higher resolution HDTV modes, you can use the utility at the bottom of this section to adjust the image size/resolution until it fits properly on your display. Remember, if you have any doubts don't enable these options as setting a resolution which exceeds your display's capabilities can damage it.
3D
Unlike the old ATI Control Panel, the Control Center doesn't distinguish between OpenGL and Direct3D for the majority of 3D-related settings. They are combined into one area called '3D', and whatever you select here will apply equally to all games and 3D applications - whether they be OpenGL or Direct3D - except for the API specific 'More Settings' section (see further below). The most interesting feature of the 3D section is that there is a 3D preview in the main panel, showing a typical game scene, with the scene shown differing based on the setting you are viewing. The graphics used for this preview will adjust in real time to reflect the changes you are making in the 3D settings. Pay particular attention to this 3D preview image to see changes in subtle details, like the way the tiles on the ground and textures on the walls become crisper into the distance as more Anisotropic Filtering is used, or the way the jagged lines become smoother with increasing Antialiasing.
There are several main settings under the 3D section, and each is covered below:
Standard Settings: If you are awfully lazy, and just don't have the time or patience to change a whole bunch of settings you can simply use this universal slider to adjust your graphics card's settings between either Performance or Quality modes. I don't recommend this method whatsoever - take the time to adjust all the settings individually for optimal performance and image quality: tick the 'Use custom settings box' and follow the advice below.
Anti-Aliasing: Antialiasing (AA) determines how jagged the outlines of objects appear to be. For a full description and screenshot comparisons, see this page of my Gamer's Graphics & Display Settings Guide. It is recommended that you tick the 'Use application settings' box, so that the level of Antialiasing can be set within particular games and won't conflict with your Control Center settings. However if you really want to force a particular level of AA in all 3D games, disable any in-game AA then untick the box here and use the slider here to force a particular level of Antialiasing. From 2x to 4x to 6x sample rate (or higher depending on your graphics card), the higher the level of Antialiasing, the less jagged the lines in games and 3D applications will appear, however the lower your performance will be. Note that Crossfire users will see more options here if Crossfire mode is enabled.
Temporal Antialiasing: This setting is described in more detail here. Essentially it is a driver trick designed to give the effect of a higher level of Antialiasing, but with a lower performance hit. For example, if you select 2x on the Antialiasing sample slider and also tick the Temporal Antialiasing box, during a game given the right conditions (high framerates) it will look almost exactly like 4x Antialiasing, but with the performance impact of only 2x Antialiasing. Since the image quality of Temporal Antialiasing cannot be captured properly in a screenshot, the only way to determine if you like it or not is to try it yourself.
Remember, if you want to disable Antialiasing (for fastest performance), or if you simply want to determine the level of Antialiasing using the settings in a particular game, you should tick the 'Use application settings' box, and the ATI Control Center will not force any Antialiasing on any game or 3D app. This is the recommended option since most games now have separate Antialiasing settings, and often if you try to force Antialiasing on them using the Control Center it will cause conflicts and slowdowns. Furthermore some games simply cannot have Antialiasing forced on them due to the rendering method they use, such as HDR or Deferred Shading (e.g. games like Ghost Recon: Advanced Warfighter or S.T.A.L.K.E.R.).
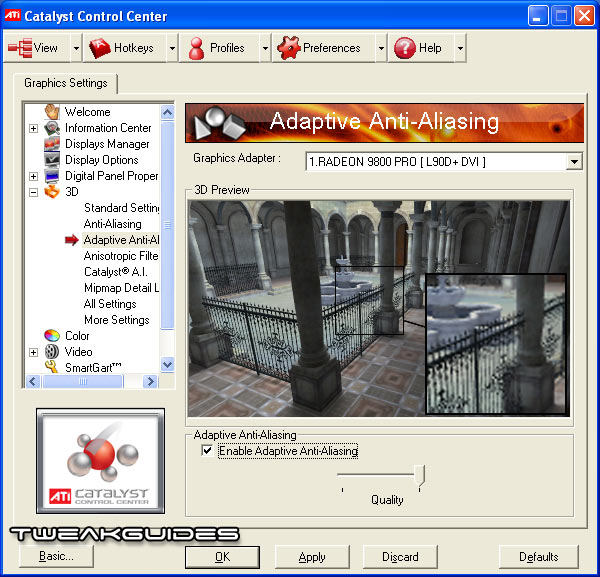
Adaptive Anti-Aliasing: This is an Antialiasing technique which improves the appearance of scenes which contain transparent textures. Enabling it will result in varying image quality and performance impacts depending on whether you choose the 'Quality' or 'Performance' mode. Some details and screenshots can be found here and here. The 3D preview provided also shows the impact quite clearly. In general the performance impact should not be significant over normal Antialiasing, but it still does reduce FPS when enabled, so untick it if you need the additional framerate.
Anisotropic Filtering: This graphics method sharpens textures as they fade into the distance. Once again, you can find a full, easy-to-understand description of it at the bottom of this page of my Gamer's Graphics & Display Settings Guide. Note that you can select the 'High Quality AF' mode which enables Trilinear Filtering, or disable it which enables Bilinear Filtering - the difference between them is negligible in terms of image quality, so if you need the extra FPS untick the High Quality AF box. If you wish to disable Anisotropic Filtering, or more importantly allow individual game settings to determine it, tick the 'Use application settings' box, which is recommended. Most recent games have some sort of 'Texture Filtering' or Anisotropic Filtering-related option which should be used instead of this setting to prevent conflicts or problems. If instead you wish to force a specific level of AF in every game, untick the box and select the sample rate to use, with higher rates provided clearer distant textures at the cost of some FPS.
Catalyst A.I: Catalyst A.I. allows users to determine the level of 'optimizations' the drivers enable in graphics applications. These optimizations are graphics 'short cuts' which the Catalyst A.I. calculates to attempt to improve the performance of 3D games without any noticeable reduction in image quality. In the past there has been a great deal of controversy about 'hidden optimizations', where both Nvidia and ATI were accused of cutting corners, reducing image quality in subtle ways by reducing image precision for example, simply to get higher scores in synthetic benchmarks like 3DMark. In response to this, both ATI and Nvidia have made the process transparent to a great extent. You can select whether you want to enable or disable Catalyst A.I. for a further potential performance boost in return for possibly a slight reduction in image quality in some cases. If Catalyst AI is enabled, you can also choose the aggressiveness of such optimizations, either Standard or Advanced on the slider. The Advanced setting ensures maximum performance, and usually results in no problems or any noticeable image quality reduction. If on the other hand you want to always ensure the highest possible image quality at all costs, disable Catalyst A.I. (tick the 'Disable Catalyst A.I.' box). I recommend leaving Catalyst A.I enabled unless you experience problems. ATI have made it clear that many application-specific optimizations for recent games such as Oblivion are dependent on Catalyst AI being enabled.
Note: As of the 6.7 Catalysts, Crossfire users should set Catalyst A.I. to Advanced to force Alternate Frame Rendering (AFR) mode in all Direct3D games for optimal performance. Once again, Catalyst A.I. should only be disabled for troubleshooting purposes, such as if you notice image corruption in particular games.
Mipmap Detail Level: This slider helps determine how good textures generally look, when combined with your game's own texture settings. By moving the slider to the right, textures should appear sharper and more detailed, but performance is reduced, and some added aliasing/shimmering may be noticeable. By lowering this slider you may see texture anomalies in particular games, so increase the slider if that is the case. I recommend leaving this slider at the midpoint to start with, and adjusting mipmap/texture filtering/texture quality levels in individual games to minimize graphical anomalies. Then if necessary adjust the slider to further balance performance or image quality as required.
The next page continues the descriptions for the Catalyst Control Center.
|
|