
VLC Tweak Guide
Author: Koroush Ghazi
Last Modified: July 2019
Introduction
Who hasn't heard of the VLC Media Player by now? It's been around for almost 20 years, steadily gaining new features until it's become pretty much the Swiss Army Knife of multimedia players. Don't let its plain-jane looks fool you; it can play virtually anything you throw at it, smoothly and with excellent quality, without the need to install any dodgy codec packs. Plus it has a huge number of options to allow you to customize it to suit your tastes. If you haven't tried VLC in a while, or never looked beyond the bland beige exterior, now's your chance to be impressed by the free open source media player that lives to give.

VLC is available for virtually every platorm, but this guide is specifically aimed at using the VLC player on PC hardware. I've been running VLC as my video player for several years, and having built a new PC in January 2019 (as documented in my Hardware Confusion 2019 article), I recently decided to let VLC handle all audio and video playback chores on my system.
First thing's first though, download and install the latest version of VLC from the VideoLAN Website. Clicking the big orange download button should give you the right installer for your system, but you can also click on the arrow to the right of the button and manually select a package. VLC doesn't incorporate any hidden unwanted/irrelevant/advertising software in its installer, and won't leave a mess on your system should you wish to uninstall it, so install with confidence. During installation, I recommend selecting only the 'Desktop shortcut' and 'Discs Playback' options. It's best not to associate VLC with any audio/video formats until you know for sure that you want to use VLC for any/all of them. There's also a VLC Portable Version you can download and install onto a USB flash drive for example if you want to run VLC on a system where you can't, or don't want to, install it locally.
Got VLC? Good, let's get busy.
Skinning The Interface
I'm going to hazard a guess that one of the main reasons why a lot of people give VLC a miss is because the first impression it makes is dominated by its Windows 98-ish native interface. Relax, VLC is readily skinnable. Skins are files that alter the overall appearance of VLC, from mild to wild. Skinning VLC is free and easy:
1. Look through a gallery of VLC skins, such as the Official VLC Skins Gallery, or the DeviantArt VLC Skins Gallery.
2. Select a skin you like the looks of and click 'download'. Most VLC skins are totally free, but keep in mind that because VLC has been around for years, some of the skins are actually quite old, and may not function correctly on the latest version of VLC. Read any notes or comments carefully for more details.
3. Extract the small .vlt VLC skin file, and move it to your \Program Files\VideoLAN\VLC\skins directory.
4. Launch VLC, or if it's already open, go to the Tools menu and select Preferences (or press CTRL+P), click the Interface icon at the top, under 'Look and feel' select the 'Use custom skin' option, click Choose and browse to and select the file you imported in step 3.
5. Click the Save button at the bottom of the Preferences, then close VLC (ALT+F4 or click the 'X' at the top right), and upon relaunching VLC, the new skin should be in effect. Note, a quicker way of changing skins is to right-click on VLC then select Interface>Select Skin>skin filename.vlt.
What do you think? Aside from how it looks, give the skin a test drive feature-wise, as some of the buttons and functions may have shifted around or changed to your disliking, and while some of them can be removed or adjusted using the standard VLC options (see further below), some are hard-coded that way in the skin. Also, keep an eye out for skin bugs/glitches as noted earlier. Skins are largely a matter of taste, but aside from the Default silver skin built into VLC, here are a few relatively sleek, minimalist and flat, and seemingly properly-functioning (given my basic testing), free skins you can try:


From left to right, top to bottom, we have: Skyfire, Steamed, Orion, VLC Media Player 4 Black Edition, and the YouTube inspired YT. But my personal favorite is this one:

The MetroX VLC Skin by Maverick07x. Clean, sleek, and a great match for Windows 10. It's also been updated as recently as last year, and is much more customizable than most skins, including a choice of 10 highlight colors. Give it a try, it breathes new visual life into VLC.
Skin away to your heart's content, and if at any time you want to turn off skins and return to the stock VLC look, go back to Tools>Preferences>Interface, select 'Use native style', click Save and restart VLC. If you're feeling creative, you can even make your own custom VLC skin using the free VLC Skin Editor.
Interface & Feature Customization
While the native VLC interface may be bland, it does have one advantage: it's much more customizable, whereas most skins are more restrictive in order to maintain the creator's intended look. I can't cover every VLC customization option here, so instead, I'll quickly run through the way I've set up my own VLC in native mode. Even if it doesn't suit you, it should give you plenty of ideas as to where to look and the kind of options available to tailor VLC to fit your own tastes and hardware.
VLC has two main modes: Windowed and Fullscreen. Each one has its uses - Windowed mode presents VLC in a free-floating resizable window for when you want to multi-task; Fullscreen mode makes VLC take up the entire screen without any visible borders, primarily for movie/TV viewing when you don't want any Windows elements intruding.
To access the relevant interface customization features, launch VLC, then select 'Customize Interface' from the Tools menu. Again, note that these option are not available in Skin Mode - it is up to the skin's creator to provide you with any customization options. A Toolbars Editor appears, and the current toolbar layout is shown at the top. You can drag and drop new toolbar elements from those shown in the list below it, you can remove or rearrange new or existing elements on the two lines, and you can use the check boxes to further tune the appearance of the elements and the toolbar(s), such as deciding whether the playback controls appear at the bottom or top of the VLC playback window.
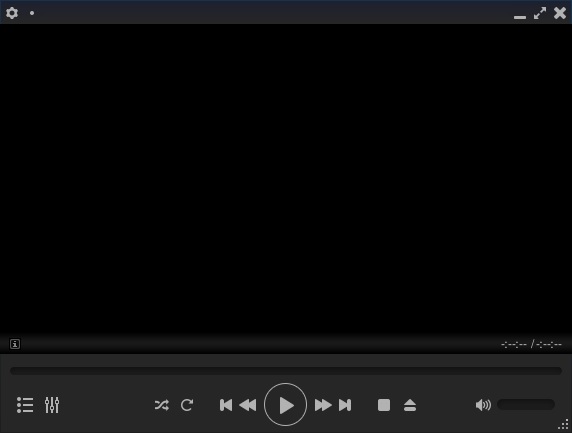
Main Toolbar

We'll start by customizing the all-important Main Toolbar layout which provides the playback controls when VLC is in Windowed mode. The default layout is serviceable, but I prefer a minimalist look. Refer to the image above which shows my customized Main Toolbar layout. I achieved this by:
1. Though not absolutely necessary, as VLC normally only shows the elements on Line 2, I remove every element from Line 1 of the Main Toolbar tab, dragging and dropping each one into the Toolbar Elements box.
2. Switching for a moment to the Time Toolbar tab, I remove all the elements from here as well.
3. Back under the Main Toolbar tab, I go to the elements list and grab the 'Time Slider' element, which is basically the location slider typically used to "scrub" (fast forward or reverse) through audio or video when seeking out a particular location. Yes, it's the same one I deleted in Step 2, because I don't want it taking up a separate line of its own, I want to put it on the far left of Line 2 of the Main Toolbar.
4. I add the 'Time' element immediately to the right of the slider, to display the elapsed/total time (e.g. 12:34/30:00, meaning you're at 12 minutes 34 seconds out of a 30 minute playback time). You can instead use the separate 'Elapsed Time' and/or 'Total/Remaining Time' elements if you wish.
5. I finish things off by adding standard Stop and Play/Pause buttons on the right, though frankly, they're not really needed as I usually just press the Spacebar to play/pause as necessary (see the Keyboard Shortcuts section further below).
6. Last of all, I remove the standard triangular horizontal Volume element at the far right, and replace it with the 'Small Volume' element which has a Vertical slider, to save space. Again, thanks to a built-in shortcut linking the mouse scroll wheel to volume level, I rarely if ever use the actual volume slider on the toolbar anyway.

There you have it, a clean but functional playback toolbar which is also slimmer than the old one.
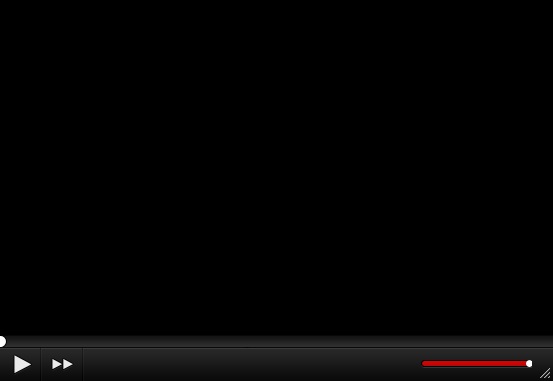
Fullscreen Controller
The Fullscreen Controller tab determines what the playback controls will look like when VLC is in Fullscreen mode, which is typically the best mode to use when you want to exclusively watch video content such as a movie or TV show. Switching to/from fullscreen mode can be done at any time by pressing the F (not F11) key, or simply double-clicking on the centre of the VLC playback window. A nice touch in VLC is that you can have a completely different set of playback controls in Fullscreen mode versus Windowed mode; they're independent of each other. Note that pressing the F11 key, or selecting the Fullscreen Interface option under the View menu, doesn't enter the proper Fullscreen mode as described here, it enters a maximized Windowed mode, where the Windowed mode playback controls are still showing as well as the menu bar.
As shown below, I decided to use the exact same layout as the Main Toolbar utilised in Windowed mode in Fullscreen mode because I once again wanted a minimalist, unobtrusive set of playback controls.

In earlier versions of VLC, the playback controls were hidden by default in Fullscreen mode, as VLC assumed that you didn't want them distractingly visible. Presumably, it was thought that a user would quickly adapt to using context menus and keyboard shortcuts to control playback in this mode. This, unfortunately, confused and frustrated many new users, including me. The solution was simple: go to Tools>Preferences in VLC, click the Interface icon, and tick the 'show controls in full screen mode' box. It seems VLC now turns this option on by default when installed. Of course, you can turn it off if you want. Better yet, VLC now auto-hides the playback controls in Fullscreen mode by default, and they're semi-transparent to make them even less intrusive. Whenever you move your mouse or press a key the playback controls appear, and disappear a second after user input has ceased. You can move the controls around to sit wherever is convenient and VLC will remember its position.
Advanced Settings
Which brings me to the far more detailed Advanced preferences section of VLC. So far we've been working with the default Simple preferences, which are sufficient for most people. To access the full list of preferences and customization options in VLC, go to Tools>Preferences and select the 'All' option at the bottom left - it instantly switches to a detailed tree listing of all available VLC preferences.
For example, to change how see-through the fullscreen playback controls are, in the full preferences screen go down to the Interface category, expand it, then expand the 'Main Interfaces' item and select QT. On the right a set of options will appear, with the one relevant to our example being: Fullscreen controller opacity between 0.1 and 1, which determines how translucent (see-through) the playback controls are when they appear. Lower values make the controls increasingly transparent, higher values the opposite.
Some of the preferences listed here are already accessible in the simple preferences, many of them are not. Keep in mind that they are hidden by default because they can cause major headaches if you don't know what you're doing, so always do some research first before changing anything you're not sure about. Note: VLC stores all of its preferences in the \Users\[username]\AppData\Roaming\vlc directory by default. I don't recommend manually altering these files, but you can backup and restore them for use on another install of VLC, or delete them altogether if you want to return VLC to default settings.
Key Settings & Features
Now that you're familiar with the fundamentals of VLC, let's look into some of what I consider the more important settings and features in the player. Tip: When you're in the Advanced settings screen, type the first few letters of the setting name, or the type of setting you're after in the text box at the top to quickly see only the relevant setting categories and items. Note: make sure to click Save after changing any setting, and in most cases, you then need to exit and restart VLC to correctly see the impact of any change.
Disable Filename Text Display on Startup
Whenever you open a multimedia file in VLC, by default its filename will be displayed in large white text on the screen for a few seconds. This can be annoying, but is easily turned off by unticking the show media title on video start setting under the Subtitles/OSD section of the preferences. To disable all text that appears on the screen in VLC, such as notifications of volume level % each time you change it, untick the Enable On Screen Display (OSD) box, but note that this will also disable the ability to show any subtitles.
Continue Playback
To get VLC to resume your video content from where you were when you last viewed it, go to the Interface section of the simple preferences and change the Continue playback setting to Ask or Always. If set to Ask, a prompt will appear next time you open the same video file asking whether you want to resume from where you left off; selecting Always means VLC will automatically resume any video you've previously watched from your last known location. Importantly, you need to also tick the save recently played items setting under the Interface section for the Continue Playback feature to work. Note: the list of video filenames and the location times when last played are recorded under the [RecentsMRL] section of the vlc-qt-interface.ini file in your \Users\[username]\AppData\Roaming\vlc directory. You can delete the text in this section if you want to reset/remove your saved playback locations.
Default VLC Mode When Launched
You can determine whether VLC automatically launches in Windowed or Fullscreen mode each time, and if in Windowed mode, the size and number of window(s), in the simple preferences. The main settings involved are Integrate video in interface, Resize interface to video size, Allow only one instance, and Enqueue items into playlist in one instance mode settings under the Interface section of the preferences, along with the Fullscreen and Window decorations settings under the Video section. I recommend ticking the Integrate video in interface setting, as well as the Allow only one instance, and Enqueue items into playlist in one instance mode settings. Ticking these three prevents VLC from opening multiple instances of itself and/or spawning separate new window(s) for each video. Instead, only one video will play at any time, on only a single instance of VLC, shown within VLC's display area, and this provides the smoothest playback. The Window decorations setting is best unticked to remove any superfluous captions, borders, etc. that VLC may normally add around the video playback area, giving it a cleaner look. Ticking Resize interface to video size will force VLC to resize itself to the resolution of each video source, which can result in the VLC window being larger than your monitor's display area in some skins, causing problems. Lastly, if you just want VLC to automatically launch in Fullscreen mode whenever you start a video, then tick the Fullscreen setting.
Correct Audio/Video Playback
If you're having issues with audio and/or video glitches, or just want to ensure that you're getting the best quality output, go to the Audio and Video tabs in the VLC preferences. Each one of these categories has both Output and Device settings. Output determines the software method VLC uses to decode and play back the media; Device determines which particular hardware device on your system is used to play back the resulting video and/or audio. These are extremely important, and by default they're all set to automatic, which means VLC determines what it believes to be the correct output mode and playback hardware to use on your system. In many cases, this works best, allowing you to switch from speakers to headphones for example, and, say, from DVD to MKV to MP3, without having to constantly reconfigure VLC so it knows which resources to use. However, sometimes you may need to manually specify some or all of these for VLC to work properly. E.g., on my current system I have to specify 'DirectX audio output' in order to hear any audio in VLC, regardless of source; on my previous system, I could hear audio at default settings, but I still had to select DirectX audio output otherwise audio in certain formats such as DTS-HD/DTS-HD MA would be crackly and distorted. So if you're not getting correct audio or video output, these are the settings to look at first, combined with some research, and then if necessary, dive into the detailed Audio, Video and Input/Codecs categories in the advanced preferences.
Audio Synchronization
Synchronization issues between audio and video is a common playback problem, whether caused by improperly encoded media, or when using certain hardware configurations (e.g., with Bluetooth speakers). It's easy to rectify this in VLC. Go to the Tools menu, select Effects and Filters (or press CTRL+E), then select the Synchronization tab. You can enter a value in milliseconds (where 1,000ms = 1 second) to adjust the audio synch - progressively higher positive values increase the delay between when the video is seen, and when audio is then heard, while greater negative values make the audio play increasingly sooner than the video. A quick way of getting close to the correct value for this delay is to use the J and K keyboard shortcuts to adjust the audio delay on the fly while the video is playing. Pressing K will increase the delay (raise the value), pressing J will decrease the delay (lower the value) in increments of 50ms; if you have the OSD enabled (see further above), a prompt will show you the current value of the audio delay in ms, e.g. -250ms or 450ms. However, this method of adjusting the audio delay is temporary, and the audio delay is automatically reset to 0 whenever the video is changed or VLC is exited. Once you've determined the optimal value, if you want to keep that delay permanently for all video playback (best used only when compensating for a fixed hardware configuration issue), then go to the advanced preferences, select the Audio category, and enter your delay in ms in the Audio Desynchronization Compensation setting, and click Save. This delay will now apply to all media playback in VLC.
Equalizer
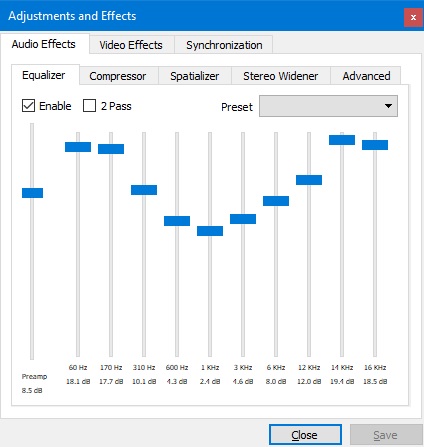
Found under the Tools>Effects and Filters section, under the Audio Effects tab, is a ten band graphic equalizer, as well as a preamp slider. Enabling and adjusting the graphic equalizer is a must if you want to get the most out of your audio hardware. If in doubt, select from one of the preset equalizer configurations listed in the top right dropdown box. Enabling the equalizer means it remains in effect until you disable it here again, regardless of whether VLC is restarted or another source is played.
Video Effects
A range of settings that can alter the quality, shape, orientation and position of the video can be found under Tools>Effects and Filters>Video Effects. While you can experiment with these, keep in mind that these sorts of artificial enhancements will typically reduce image quality for high quality sources. One very useful effect which is often necessary is found under the Geometry tab. By enabling the Transform or Rotate setting here, you can now rotate video playback by set values in increments of 90 degrees, or use the dial provided to rotate video to a specific angle. This is particularly handy when viewing video from a phone that was held at the wrong angle when recording. Click the Save button to apply these settings to all video playback, but note that these settings do not affect the original file. If you want to permanently alter a particular video file, then you will need to re-encode it with the changes, as covered below.
Altering Media Files
For most of the changes you make to audio and video playback in VLC, you can, if you wish, make them permanent by producing a newly encoded copy of the media file. To do this, apply any effects or changes you wish as above in the preferences, then click save to save those settings. Now go to the Media menu, select Convert/Save, add the media file you want to alter, and click the convert/save button. You can choose from one of the presets shown in the Profile area, or click the small wrench icon to let you choose specific audio and video codecs, along with encapsulation and even subtitle options. Select a destination path and filename by clicking the Browse button at the bottom, and when you click Start, re-encoding will begin, creating a new copy of the media file inclusive of your changes. Depending on your hardware and chosen options, this may take quite some time, and there may also be a loss in quality.
Subtitles
One of VLC's quirks is that subtitles may be displayed on some sources, even if you haven't chosen to show them, as long as the Enable subtitles setting under the Subtitles/OSD section of the preferences is enabled. If you untick this setting, it removes this annoyance, but it also completely disables the subtitles functionality. The solution is to go to the Preferred subtitle language field and enter None, then click Save and restart. Now you can leave subtitles enabled, and manually specify a subtitle track at any time by right-clicking on the VLC display area while a video is playing and selecting Subtitle>Sub Track>trackname, but subtitles will otherwise not appear. If you do want to automatically show a particular subtitle track by default for every video, specify the preferred subtitle language instead of none, e.g., enter English if you want English subtitles to automatically be shown whenever you launch a video. Unfortunately, some media files are encoded incorrectly or deliberately stripped of some/all subtitles to save space, so VLC's subtitle-related settings may not work as desired. If no relevant subtitles exist then you can search for and download them from the Internet by going to the View menu and selecting VLSub, or by going directly to a subtitle website like Opensubtitles.org. Once you have the appropriate subtitle file, VLC will automatically detect and play it if: it's in the correct .srt, .ssf, .ssa/.ass, or .sub file format; the subtitle file has the exact same name as the video file; and it is placed in the same directory as the video file. So for example, if your video is called Video File 1.mkv, the subtitle file needs to named Video File 1.srt and placed in the same directory as Video File 1.mkv. Note: If you're experiencing subtitles that are displayed out of synch, see the Audio Synchronization section further above, as a similar method applies in conjunction with the Subtitle track synchronization setting.
DVD & Blu-ray Disc Playback
As physical discs steadily die off in popularity, and given both DVD and Blu-ray disc playback requires proprietary codecs that need to be licensed, Microsoft made the decision to drop native support for DVD movie playback as of Windows 10, and it never supported Blu-ray movie playback in any version of Windows by default. That's where VLC comes in, giving you hassle-free DVD playback for free. Insert a DVD movie in your drive, and if VLC isn't automatically started by Windows Autoplay, select Media>Open Disc, choose DVD and click Play. Blu-ray movie playback is a bit more tricky, but still possible for free on VLC. Go to this site, download the KEYDB.cfg and libaacs.dll files, create a new directory under your \Windows\ProgramData directory, and call it aacs (i.e., it should look like this: \Windows\ProgramData\aacs\) then put the KEYDB.cfg file into that new directory. Put the libaacs.dll into your base VLC directory, typically \Program Files\VideoLAN\VLC - it's the same directory that contains vlc.exe. Now restart VLC, insert a Blu-ray disc into your PC's Blu-ray drive. If it gives an error via Autoplay, then manually go to Media>Open Disc in VLC, select Blu-ray, and importantly, tick the No disc menus option, then click the Play button. I've managed to play the majority of my commercial Blu-rays on VLC in this way, so it does work.
Keyboard Shortcuts
VLC's graphical user interface is easy to use for controlling media playback, but VLC really shines if you learn to use several important keyboard shortcuts for the most frequently-utilised features. Go to Tools>Preferences and under the Hotkeys section, you can view, and alter, the various actions assigned to the keyboard and mouse. Start practicising using these. For example, as noted earlier, you can quickly adjust the audio delay using the J and K keys. You can use the mouse wheel to adjust the volume - by default the vertical (scroll) axis is assigned to this; alternatively, you can reassign this option if you constantly find yourself accidentally adjusting volume whenever you use your mouse. The F (not F11) key is great for quickly switching between Fullscreen and Windowed modes, as is simply double-clicking on the centre of the video display area. The Spacebar toggles between Play and Pause by default. And the V key quickly cycles through subtitle tracks, or use SHIFT+V to toggle subtitles on/off, as needed.
Streaming Video
VLC is a great lightweight solution to flawlessly playing media streamed from networked drives. I have a very basic network-attached storage configuration which I refer to as a "Ghetto NAS" (external USB drives connected to a router - see here for details). Having mapped the network drives in Windows 10, VLC sees them just like any other drive, and plays back the video files, mainly high-bitrate MKV DVD & Blu-ray rips I've made, without a hitch. Give it a try, and if you do have any playback difficulties, adjust the Default caching policy setting under Tools>Preferences>Input/Codecs. Use a High or Higher latency setting to compensate for low or unstable throughput between your router and your PC.
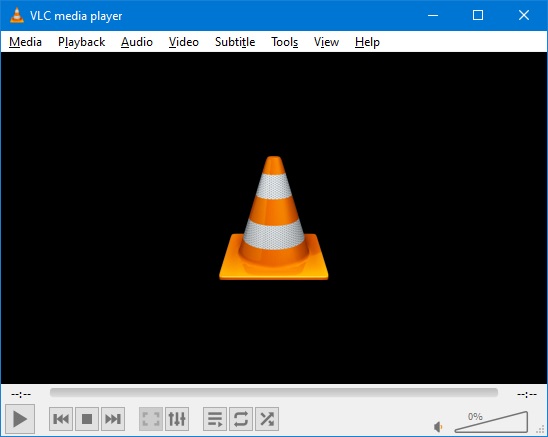
Bonus Tip: I love the unique orange VLC traffic cone logo, but (sorry VideoLAN) I don't really want it staring at me from the middle of the VLC player each time I launch it. If you want to disable it, go to the advanced preferences in VLC, and under the Interface category expand the 'Main interfaces' item and select Qt. On the right, untick the Display background cone or art setting, save and restart VLC.

Conclusion
While the cool kids are busy hyping the latest fad player, VLC keeps rolling right along, getting better and better under that unassuming exterior. After everything I've written so far, I've only managed to scratch the surface of VLC's capabilities and customization options. I didn't even get to write about extensions, playlists, capturing screenshots and videos, or... well you get the picture. Learn to use VLC's wealth of features well and you won't need anything else for your PC multimedia playback needs.
I genuinely hope you found this brief guide useful. If you didn't because you already knew all of it, then spare a moment to pass the link along to someone you know who isn't as knowledgeable as you, or is hesitant to use VLC, or tried it once years ago and didn't like it. If you find any factual inaccuracies in this guide, please Let me know, but also keep in mind that I can't provide tech support, so if you're having problems with VLC, the place to go is the Official VLC Support Page, where you can find links to documentation, support resources, and a bug reporting facility.
Until next time, take care!
![]()