
Unreal Tournament 3 Tweak Guide
[Page 5] In-Game Settings
This section contains full descriptions and recommendations for UT3's in-game settings. You can use these to get a good balance between image quality and performance on your machine, however I can't give you specific instructions on what to turn on or off, nor can I provide precise performance impacts. It all depends on your particular hardware combination, and more importantly your personal taste for the trade-off between performance and image quality.
To access the in-game settings, click the Settings link in the main menu, then refer to the relevant sections below. Make sure to click the Apply button each time you change any settings, and note that some settings require a restart of the game to be applied properly.
Video
Screen Resolution: This setting allows you to select the resolution of the game image, measured in pixels wide by pixels high. The higher the resolution, the more detailed the image on screen, and also the less jagged lines there will be (See Antaliasing further below), but the lower your performance. For more details see the Resolution section of my Gamer's Graphics & Display Settings Guide. The number of resolutions available is limited by what both your graphics card and monitor can handle. Resolution has a noticeable impact on UT3 performance, so if nothing else works to improve your FPS, lower your resolution, or check the Screen Percentage setting further below for an alternative.
Note: UT3 does not have 'proper' widescreen support at the moment, see here for more details, and also check out the 'Player's FOV' setting further below.
Screen Mode: This option can be set to Windowed or Fullscreen. If set to Windowed, the game will run in a window rather than in full screen mode. In general for stability and performance I always recommend full screen mode, as there can be memory and resource management issues when a game is run in windowed mode.
Brightness: This slider controls the overall brightness of the game, and has no performance impact.
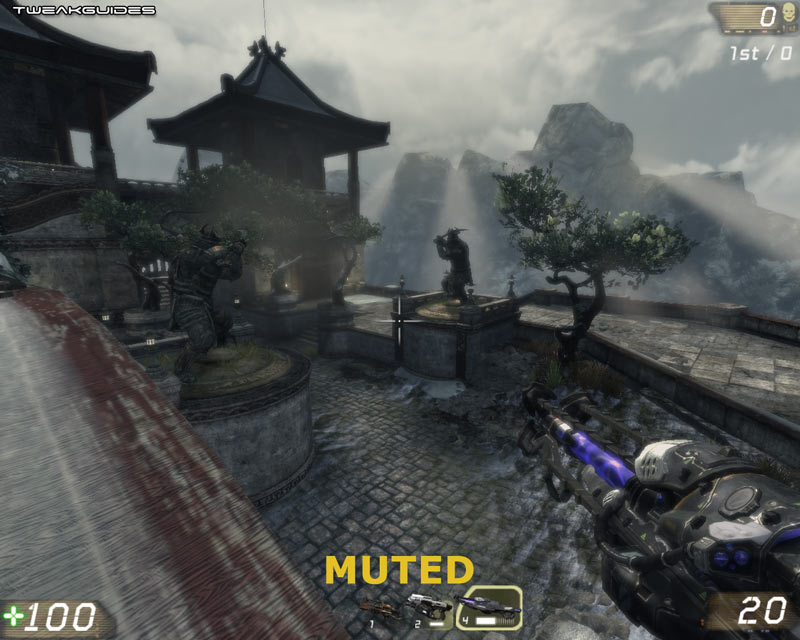
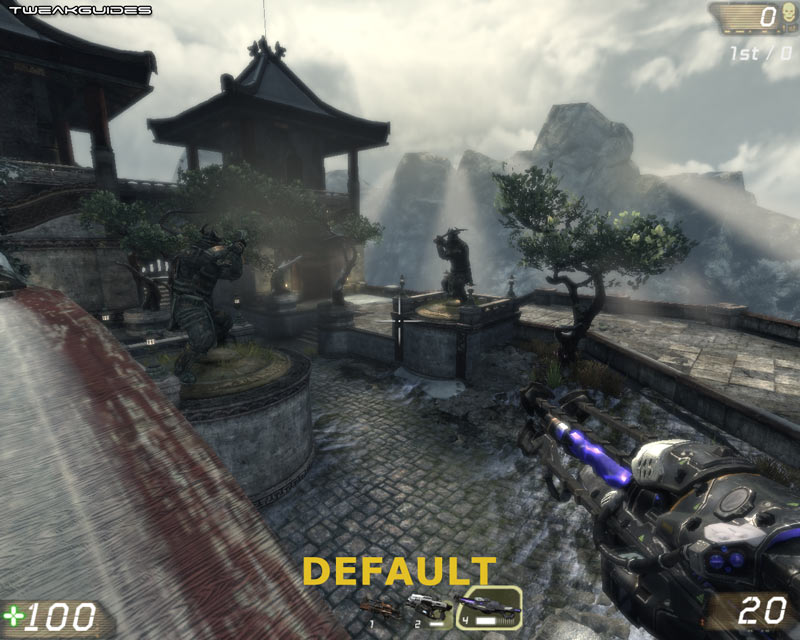
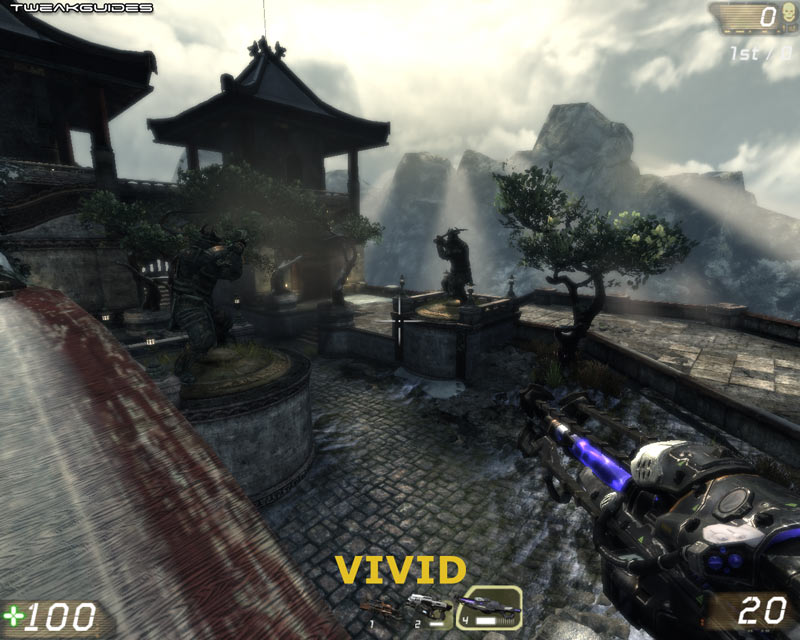
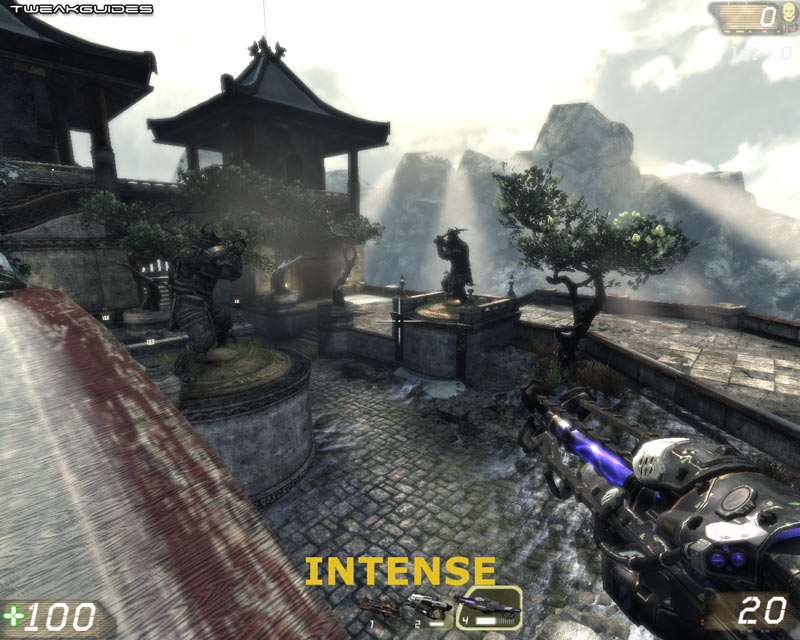
Post Processing: This setting is quite important for overall image quality. The available options are Muted, Default, Vivid and Intense. A screenshot comparison of the same scene using these four settings is provided above. Each effect is slightly different in the amount of bloom and light contrast it contains, but in terms of framerate, it appears they all perform much the same, at least on more recent graphics cards. Note that if you see a great deal of blurring, make sure your Screen Percentage slider is set to 100 - see further below for details. Also note that the various post processing options all effect the amount of aliasing (jaggedness) shown. There are a range of advanced variables, including DepthOfField and FloatingPointRenderTargets which can further customize the post processing used in the game - see the Advanced Tweaking section for details.
Antialiasing Support: UT3 uses a technique called Deferred Lighting, which doesn't allow for the use of normal Anti-Aliasing, at least in DX9 mode. Epic has stated that when running in DX10 mode in Vista, the game will allow the use of AA in the future. For the moment there are two ways to force Anti-Aliasing in the game:
A better alternative to either of the above is simply to adjust your Post Processing setting to something like Vivid, which helps cover up aliasing extremely well at a minimal cost in performance.
Reduced Gore: If ticked, this option disables much of the gore in the game, removing the large blood splatters when you shoot the enemy for example. While disabling gore may improve FPS slightly, you should set this to suit your taste.
Subtitles: This option enables text subtitles for dialog, but appears to be for the singleplayer campaign mode only.
Hardware Physics: If ticked, this option takes advantage of an Ageia PhysX card to enhance physics effects. More details and a demonstration can be found here, as well as at the bottom of the previous page. If you have a PhysX card, you can tick this option, though it may reduce your FPS. If you don't have a PhysX card, leave the option unticked as there is no benefit to ticking it. Note that regardless of whether or not you have a PhysX card, the PhysX drivers will be installed with the game as these are needed for the normal software physics in the game.
Update: All GeForce 8, 9 and 200 series (and newer) owners can now access the enhanced effects of PhysX courtesy of GPU-based PhysX. See the previous page for the details of the UT3 PhysX Mod Pack, and for full details of how to enable and configure GPU-based PhysX see this page of the Nvidia Forceware Tweak Guide.
Advanced
Screen Percentage: This slider controls the amount of screen space to render the game world in, and the lower the screen percentage, the smaller the game image will be on the screen. However, what actually happens is that the game takes this smaller image and by default upscales it to fill your screen (if UpscaleScreenPercentage=true in your UTEngine.ini file - see the Advanced Tweaking section). The result is that the in-game image becomes noticeably more blurry the lower the screen percentage setting is taken, and in return you gain more performance. In practice this is very similar to running the game at a specified proportion of your current resolution. For example a 50% screen percentage on a 1280x1024 resolution gives the visual equivalent of running at half the resolution. The difference is that your main menus and in-game HUD elements (graphics and text) will not be reduced in resolution, which helps legibility, particularly for people using LCD screens at native resolution, and the setting can also help those already running a low resolution, or those who want to only slightly decrease their resolution. To observe the difference for yourself, you can see an animated screenshot comparison by clicking this link: UT3_ScreenPerfect.gif (553KB). If you want the best image quality don't reduce screen percentage below 100, unless you're truly struggling for FPS. If you want to decrease this setting below 50%, use the ScreenPercentage setting in the Advanced Tweaking section.
Texture Detail: This setting controls the appearance of textures, which are the surfaces of all objects in the game world. The further to the right the slider, the clearer and crisper textures will be, but you may experience reduced performance and possibly increased stuttering. The setting not only controls texture resolution, it also controls the level of Anisotropic Filtering applied to textures to make them clearer as they recede into the distance. At level 5 on the slider, 16x AF is automatically applied; at Levels 4 and 3, 4x AF is applied; and at Levels 2 and 1 on the slider, no AF is applied. To see an animated screenshot comparison click this link: UT3_Textures.gif (1.2MB). As you can see, particularly at Level 3 and below, textures become noticeably blurry. Note that you can manually adjust the level of Anisotropic Filtering regardless of the texture setting, by altering the MaxAnisotropy variable, as well as the base type of filtering used with the Trilinear variable - see the Advanced Tweaking section.
Update: As of the 2.0 Patch (See Page 4), the Advanced section of the in-game menu has a range of options rather than the simple 'World Detail' slider covered below. All of the new advanced settings are covered either in this section, or in the Advanced Tweaking section under their relevant names.
World Detail: This setting controls the world geometry, but in reality it also controls a wide range of special effects in the game - more than 14 .ini variables can change based on where this slider is set. As such it can have a significant impact on performance. So aside from geometry, the following are the main impacts at each level:
You can see an animated screenshot comparison by clicking this link: UT3_WorldDetail.gif (1.3MB). As can be seen, by Level 1 virtually all post processing and special effects have been removed, however obviously no screenshot comparison can show the full impact of all the effects which are removed. It is generally recommended that you set World Detail to 5 to start with, and then manually go into your .ini file and selectively enable or disable the various effects to get a better balance of performance and image quality. See the Advanced Tweaking section.
Enable V-Sync: Vertical Synchronization (VSync) is the synchronization of your graphics card and monitor's abilities to redraw an image on the screen a number of times each second, measured in Hz. It is explained clearly on this page of my Gamer's Graphics & Display Settings Guide. When VSync is enabled your maximum FPS will be capped at your monitor's maximum refresh rate at your chosen resolution, and more importantly in some areas your FPS may drop by as much as 50% or more if the graphics card has to wait to display a whole frame. Thus setting VSync to On can have a major negative performance impact, though you can counter the performance drop by enabling Triple Buffering - see this page for details of how to enable it properly. Note that the game also has two other FPS caps regardless of what you set VSync to - see below for details.
Update: The following settings were added as of the 1.1 Patch:
Framerate Smoothing: When this option is enabled, the game engine is capped to a maximum framerate, as determined by the value of the MaxSmoothedFrameRate variable (see Advanced Tweaking), which is 62FPS by default. This is done by the developers to prevent FPS spikes and thus provide smoother performance. However, by disabling this option you can completely remove this FPS cap. Keep in mind though that if you then find your framerate varying a great deal and causing jerkiness, this option is best enabled again. Also note that uncapping your FPS doesn't increase overall performance as such, i.e. if you got 35 FPS in certain areas with the cap, you'll still do so without the cap. Finally, the game is capped to a maximum of 90FPS online, and that cannot be altered using this or any other setting - it is a hard cap.
FOV: This slider controls the Field of View (FOV) for the game, which is essentially how many degrees your character can see of the game world at once. The default is 90 degrees, and raising the value means your character sees more; conversely lowering the FOV slider will show less of the game world. The main purpose of this slider is for subtle adjustments to the FOV, as some users prefer a slightly different Field of View, such as 85 degrees. Note that changing FOV may impact on performance as well.
Update: The following setting was added as of the 1.3 Patch:
Motion Blur: Ticking this box enables Motion Blur, a form of effect most noticeable when you change your view rapidly; the resulting slight blur in the image may improve visual quality and realism for some people, while others may find it distracting. For the most part the performance impact of motion blur should be minimal, but if you find it annoying or need the extra FPS, leave this option unticked. Note that the Screen Percentage setting needs to be at 100% for this option to work properly.
The next page continues the In-Game setting descriptions.
|
|