
Elder Scrolls IV: Oblivion Tweak Guide
[Page 7] In-Game Settings (Pt.3)
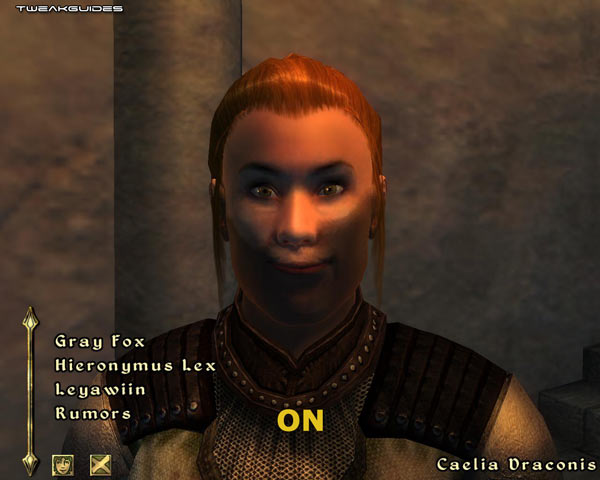
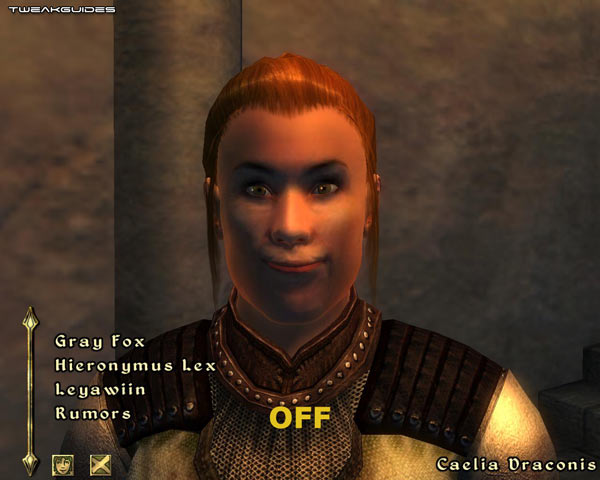
Self Shadows: If set to On, this option allows characters to cast shadows on themselves. That is, depending on the position of the local lighting relative to their body, characters will cast accurate shadows on themselves based on the contour of their body, faces, clothing and worn items in relation to the strongest light source. Importantly, this setting does not affect whether characters cast shadows on the ground, only on themselves. See the screenshot comparison above, and note that with Self Shadows enabled (left image), the character's head casts a shadow on the body, and her face has additional shadows. With it set to Off, the character still has some shadows on her face. The quality of the shadows cast depends on the Shadow Filtering setting (see below), however even at High quality, the shadows may be unrealistic and have funny edges to them - at times. There is also a noticeable performance impact, so on balance I recommend disabling Self Shadows both to boost performance and also to remove potential visual glitches.
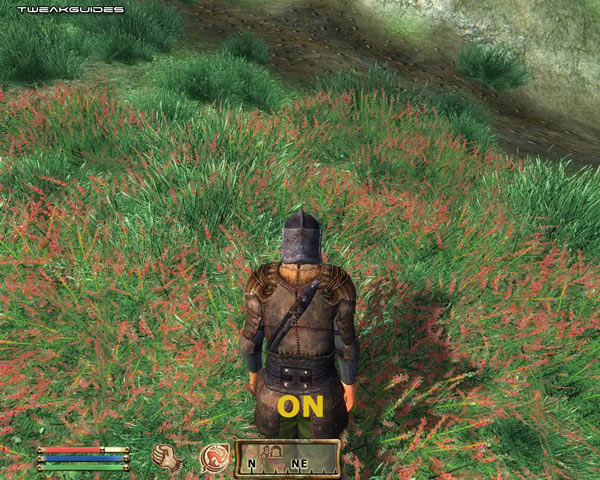
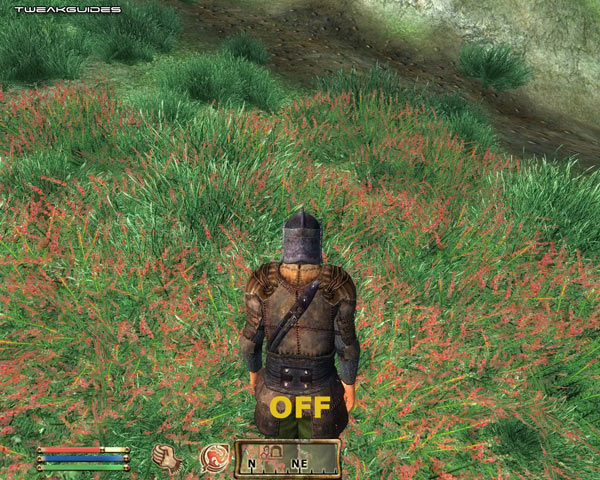
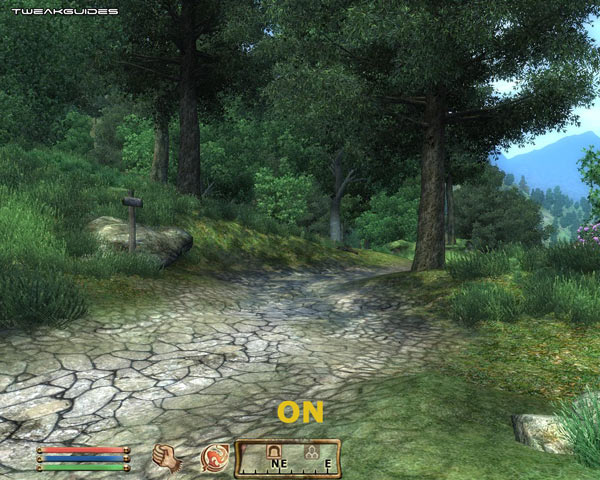
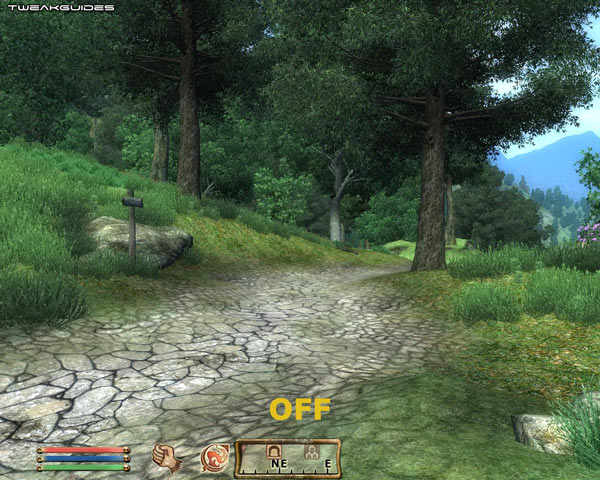
Shadows on Grass: When set to On, characters will cast shadows onto grass (if the Grass Distance slider also allows the display of grass). This setting only affects shadows cast by characters, not trees for example. See the screenshot comparison above, and note that the shadows cast by your own character on grass can only be seen while you are in 3rd person mode (as in the screenshot above), not when you are in 1st person mode. In general I strongly recommend disabling this option as it can noticeably reduce performance when walking or fighting in grassy areas. Note of course that the precise performance impact and visual quality of the shadows is affected by the Shadow Filtering option (see below).
Tree Canopy Shadows: This setting controls whether trees cast realistic shadows on the surrounding objects/ground around them. The screenshot comparison above demonstrates the difference. While adding to the richness of atmosphere in forested areas, it can also noticeably reduce performance outdoors. As always, the quality and hence the performance impact of the shadows cast depend on the Shadow Filtering option below.
Shadow Filtering: This is a very important setting if you have enabled any of the shadow-related options above. See an animated screenshot comparison by clicking this link: Obl_ShadowFilter.gif (556KB) - pay close attention to the outlines of the horse's shadow at each setting. Essentially this option controls how smooth the edges of shadows are, and thus how realistic and visually pleasing they appear. However this setting can take quite a bit of graphics processing power if enabled and hence can have a significant performance impact. Shadow Filtering affects all shadows cast as a result of the Int Shadows, Ext Shadows, Self Shadows, Shadows on Grass and Tree Canopy Shadows settings (all covered further above). Its most noticeable impact is on Self Shadows, whereby if set to Off, the shadows cast by characters on their own faces will appear very jagged and unpleasant. In most other instances, the difference between the High and Low settings is difficult to distinguish, and thus Low is recommended for most people who have any shadows enabled. If you have no shadows enabled, or if you really need the additional performance, setting this option to Off is recommended. Also check the iShadowMapResolution and iCanopyShadowScale variables in the Advanced Tweaking section for more ways of adjusting general shadow quality to gain performance.
Specular Dist: This slider controls the distance at which Specular effects are visible - namely the shininess/reflectivity of the surface of appropriate objects, like metal swords, shields, armor, glazed bricks, etc. See an animated screenshot comparison by clicking this link: Obl_Specular.gif (668KB). As the slider is moved to the right, objects further away start to show more reflective characteristics (especially noticeable in HDR mode). Pay close attention to the shields and armor of the characters in the animated comparison for example. Specular effects can have a noticeable performance impact on many graphics cards, and thus moving this slider to far left to disable specular can help increase FPS in most areas, as well as in combat. Note that if you operate in 3rd person view, removing the specular effects on your own armor/weaponry (i.e. moving the slider to the far left) can also give a noticeable performance boost. Also see the bDoSpecularPass variable in the Advanced Tweaking section.
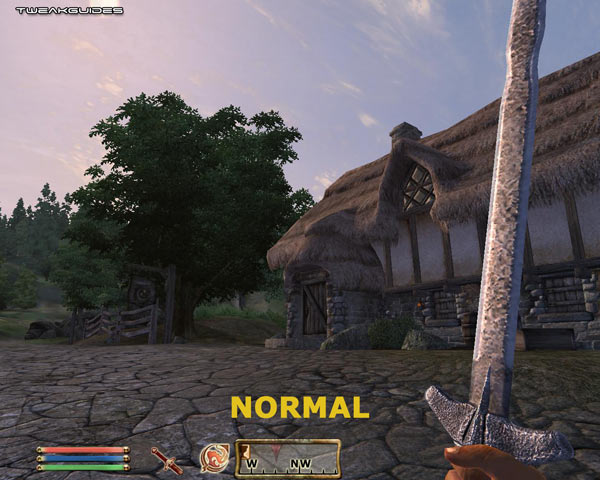

HDR Lighting: High Dynamic Range (HDR) lighting is a form of lighting effect which dynamically alters based on the way it interacts with various objects and surfaces, as well as the environment in which the light source is portrayed. Look at the screenshots above for a comparison of the same scene using the default Oblivion lighting, then with Bloom only, then finally with HDR only. It is difficult to capture the true impact of these lighting effects in a compressed JPG screenshot as by definition HDR is dynamic, has a wide color range and is constantly altering. However essentially you can see that the HDR-enabled scene exhibits greater illumination of certain surfaces/light sources, and can be a (arguably) more realistic portrayal of how the human eye interprets light in certain situations (e.g. the added glare of light at the end of a dark tunnel, or when staring at the sun). While being more atmospheric, HDR lighting is more graphics card intensive, and furthermore can only be enabled on the GeForce 6600 series or above, or the ATI X1000 series or newer. HDR is also mutually exclusive with Bloom - one cannot be enabled at the same time as the other. Finally, you also can't enable HDR and Antialiasing at the same time unless you have an ATI X1000 series card or a GeForce 8 series card or newer, and recent Catalyst or Forceware drivers - in both cases you must first enable HDR in the game, and then force enable Antialiasing in your graphics card's control panel for it to work. See the Advanced Tweaking section for ways in which you can alter the visual parameters of HDR to alter its appearance.
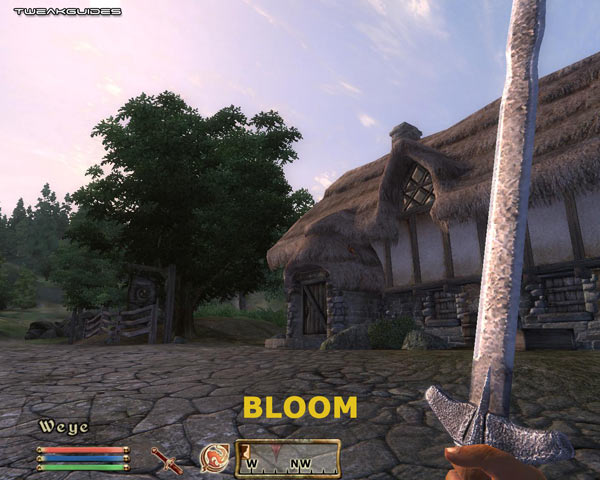
Bloom Lighting: Bloom is a lighting effect which, similar to HDR, alters the appearance of lighting in an attempt to make it seem more realistic. However unlike HDR, bloom is less dynamic and some would say less realistic. Again, refer to the screenshot comparison further above. Bloom is a lot less graphically intensive than HDR lighting, and is also supported on a wider range of graphics cards, thus it is preferred by many people as a performance-enhancing substitute to HDR. Furthermore, unlike HDR, Bloom can be enabled along with Antialiasing on almost any card thus making it preferable for those who wish to use Antialiasing (see further below). See the Advanced Tweaking section for ways in which you can alter the visual parameters of Bloom, including ways of making it more 'HDR-like'.
Water Detail: If set to High, this option allows the water's surface to appear slightly more realistic. The difference is very difficult to see in screenshots - at Normal the reflections are slightly less detailed and more blocky than High due to the lower surface resolution of the water. The performance impact is not significant by itself, however neither is the visual impact, so if you're struggling for FPS in outdoor areas with water, set this to Normal. Note that the blockiness of distant reflections on water can't be resolved with this setting - see the uGridsToLoad variable in the Advanced Tweaking section.
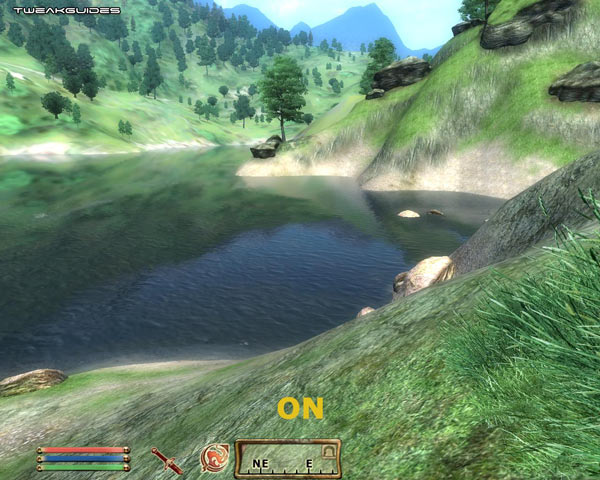
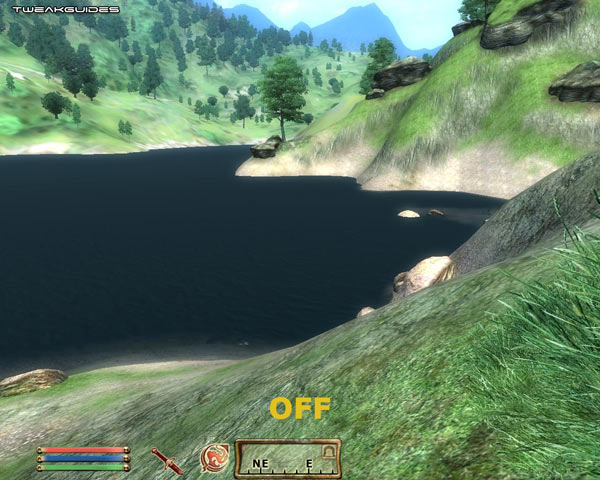
Water Reflections: This setting enables or disables reflections on the surface of water. The screenshot comparisons above show the obvious impact: when set to Off, water appears much less realistic because it appears as a solid block of color. The performance difference should not be significant enough to warrant turning this option Off, however if you experience a lot of mouse lag/low FPS around water, turning this Off will help. Note that you can use several bUseWaterReflections variables to add more objects which can be reflected in the water - see the Advanced Tweaking section.
Water Ripples: This setting controls the appearance of ripples on the surface of water when objects interact with it. It has no impact on the general ripples displayed on the water's surface, only the ripples initiated by characters (including your own) when swimming/wading through water. Once again the performance impact of this options should not be significant on most systems, however if you find that swimming or wading - particularly in 3rd person view - is giving you lower FPS, then disable this option.
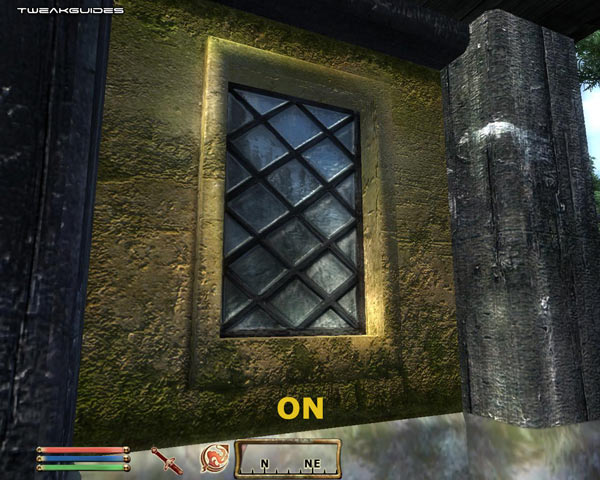
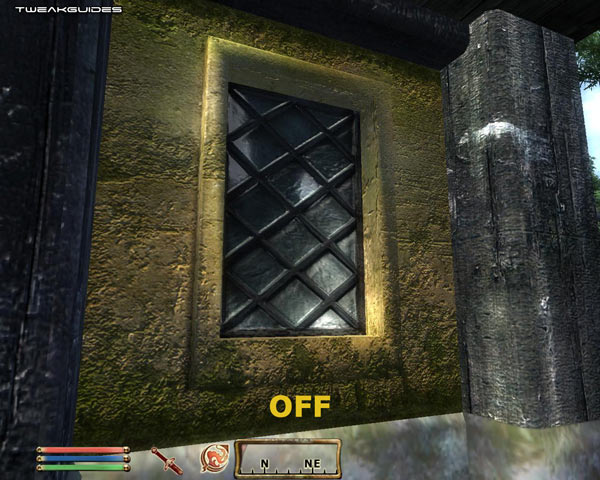
Window Reflections: When set to On, glass windows on buildings will show rough active reflections of their surrounding environment. Screenshot comparisons are shown above, and while most systems would not find this effect particularly stressful, in areas where several windows are visible and/or in combination with other effects (e.g. Specular lighting), this can contribute to reduced FPS, so disable it if you want a small performance boost in such areas without a noticeable visual quality difference.
Blood Decals: Blood splatters (or 'decals') are displayed on the ground, on characters/creatures and on weaponry during combat, and depending on this setting, more or less will be displayed. By default up to 10 separate decals can be displayed at the same time, each lasting 10 seconds. At High, decals can stick to characters; at Low they only appear on landscape; and at Off no blood marks will be displayed at all. Setting this option to Low or Off can help improve FPS during heavy combat scenes at the cost of some realism. Conversely, if you want even more blood you can raise the maximum possible decal value and the time it stays visible - see the fDecalLifetime and iMaxDecalsPerFrame variables under the Advanced Tweaking section.
Antialiasing: Antialiasing is described in more detail on this page of my Gamer's Graphics & Display Settings Guide. The higher the sample rate (i.e. 2x, 4x), the smoother jagged lines will appear, however the greater the performance impact, which can be significant. Note that you should either set the level of Antialiasing here, or in your graphics card's control panel, but not in both. I recommend using your graphics card's control panel to set the level of Antialiasing, and set it to Off here for the least potential conflicts/problems. Furthermore, Antialiasing is not compatible with HDR lighting unless you're using an ATI X1X00 series or higher graphics card or GeForce 8X00 cards or newer - however most recent graphics cards can support HDR and AA together in Oblivion. The use of Antialiasing in Oblivion can make the graphics appear much more realistic, so it is recommended that you experiment with this setting in your graphics card control panel to see how it impacts on Oblivion in terms of both image quality and performance.
Audio
Volume Sliders: There are four separate volume sliders here for controlling the level of Voices, Sound Effects, Footsteps, and Music. The Master Volume slider controls the overall volume level. Set these to suit your tastes, as they have no impact on game performance. To adjust the main menu music volume independently, you can use the fMainMenuMusicVolume variable in the Advanced Tweaking section. Note that setting the sliders to the far left does not provide a performance boost, because it does not actually disable music/sounds.
If you are experiencing audio-related glitches or problems, firstly make sure you have installed the latest audio drivers for your sound card. Details of these are in the Driver Installation/Windows Drivers chapter of the TweakGuides Tweaking Companion, along with further instructions in that chapter for correct driver installation and general driver tips. Disable all additional audio effects or enhancements. For example, if you run a Creative sound card, go into the Audio HQ/Audio Console and in the EAX Control Panel click the 'All Effects Off' option or select 'No Effects' for all the presets. You should also consider disabling CMSS 3D, and indeed any other audio effect options which may be conflicting with Oblivion's sound. You should also consider uninstalling any 'codec packs' you may have installed, as these are known to cause audio problems in a range of games. Contrary to popular belief, most sound cards and even recent onboard audio solutions do not have a conflict with Oblivion, so typically the problem is with the audio settings and/or other audio codecs installed on the system.
If you are still having lots of stuttering, audio glitches and crashes, you can undertake certain tweaks to disable Sound Hardware Acceleration or disable the background music in Oblivion - see the bDSoundHWAcceleration and bMusicEnabled variables in particular under the Advanced Tweaking section. The reason for this is that the background music is dynamic, and responds to your location and situation. While it is indeed very beautiful music, it is constantly loading in the background, changing whenever combat is initiated for example, so it can use up additional RAM and accesses hard drive resources adding to stuttering on many systems.
Controls
Mouse Sensitivity: This slider controls how sensitive the mouse is in the game. The further right the slider, the more sensitive your mouse will be to movements while playing. Note however that mouse lag - that is, the slowing down and general 'lagginess' of you mouse or crosshair while playing the game is not affected by this setting. Mouse lag is usually caused by low FPS in certain areas, so you should consider reducing some of your settings to increase your framerate. There is also a specific fix for mouse/control lag - see the 'Max Frames to Render Ahead' tweak at the end of this guide which has helped a lot of people reduce it.
Invert Y: If set to Off, moving your mouse back makes your character look down, moving your mouse forward makes him look up. If set to On, the opposite happens. Has no impact on performance, so set to suit your taste.
Stick Controls: If you use a joystick or stick-type controllers, these options control the way they behave. Set to suit your taste. If you use a regular mouse and keyboard combination, these options are unavailable, and you should see the bUseJoystick variable in the Advanced Tweaking section for a potential performance tweak based on this.
Controls: Clicking this button takes you to a screen where you can assign keys and buttons to various functions in the game. These should be set to suit your taste as they have no performance impact, but note that to select the control input to alter (e.g. to select Keyboard or Mouse), use the left/right arrows at the top of this box, and make sure to assign a key/mouse button to all the important functions.
The next section goes into the Advanced Tweaking possible in Oblivion, of which there is plenty.
|
|