
The Linux Experiment
[Page 2] The Experiment
Installing Linux
I was impressed with the look and feel of Linux Mint just from my few minutes of playing around in the LiveCD environment. I felt confident in proceeding to install Linux. Of course, I'd already made a full system backup onto an external USB hard drive. If anything went wrong, and it's quite possible on something as precarious as a dual boot with Windows being controlled by the Linux bootloader, I didn't want to lose any data, and equally, I didn't want to spend hours trying to troubleshoot, or reinstalling Windows and configuring everything all over again. A Windows System Image backup is recommended because, if used on the same drive, it will recreate a Windows installation right down to the exact same partition(s) and offsets used when the backup was captured. I've used the built-in System Image utility in Windows for years, both to backup and restore images, as well as mounting these VHDX images as a drive and extracting individual files when needed. A full system image of some kind is the quickest way to get your PC back to the way it was with minimal effort. Use a third party software package instead if you prefer, but I strongly recommend that you do not proceed with your own Linux Experiment unless you have at least one full backup of all of your important data on a drive other than the one to which you're going to install Linux.
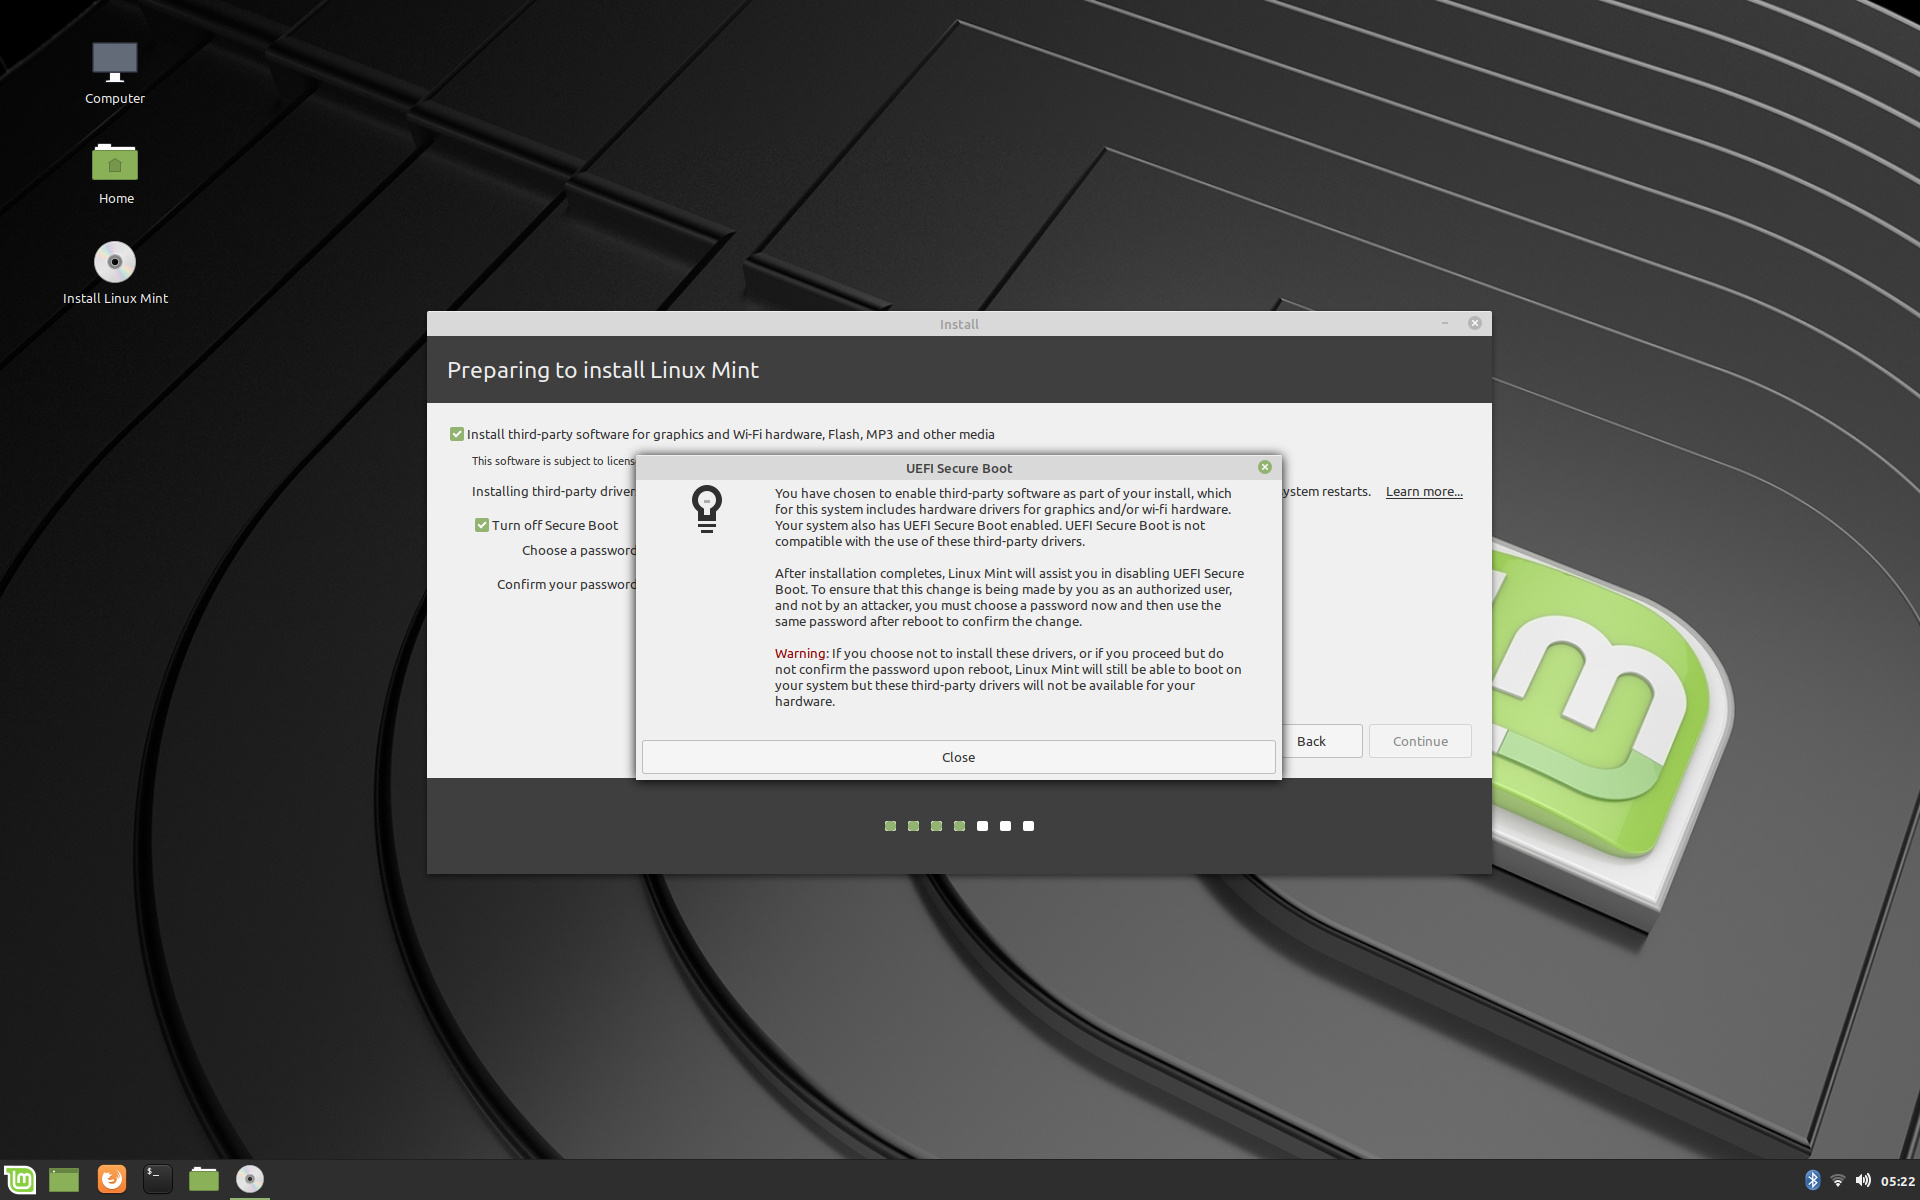
All systems were go. I launched the Install Linux Mint utility, and trusted Linux to be my guide. That is, as part of the experiment, I deliberately let Linux Mint do its thing, following its suggestions as much as possible. This includes an important step, which is turning off Secure Boot on UEFI systems. In the case of Linux Mint Cinnamon, while the OS itself may be trusted by the Secure Boot process, as covered here, if you tick the 'install third party software...' option, which is the default and recommended way to ensure greatest functionality and compatibility, this can create a conflict with Secure Boot. Linux Mint told me it could handle all of this for me, as shown in the screenshot above, and I believed it.
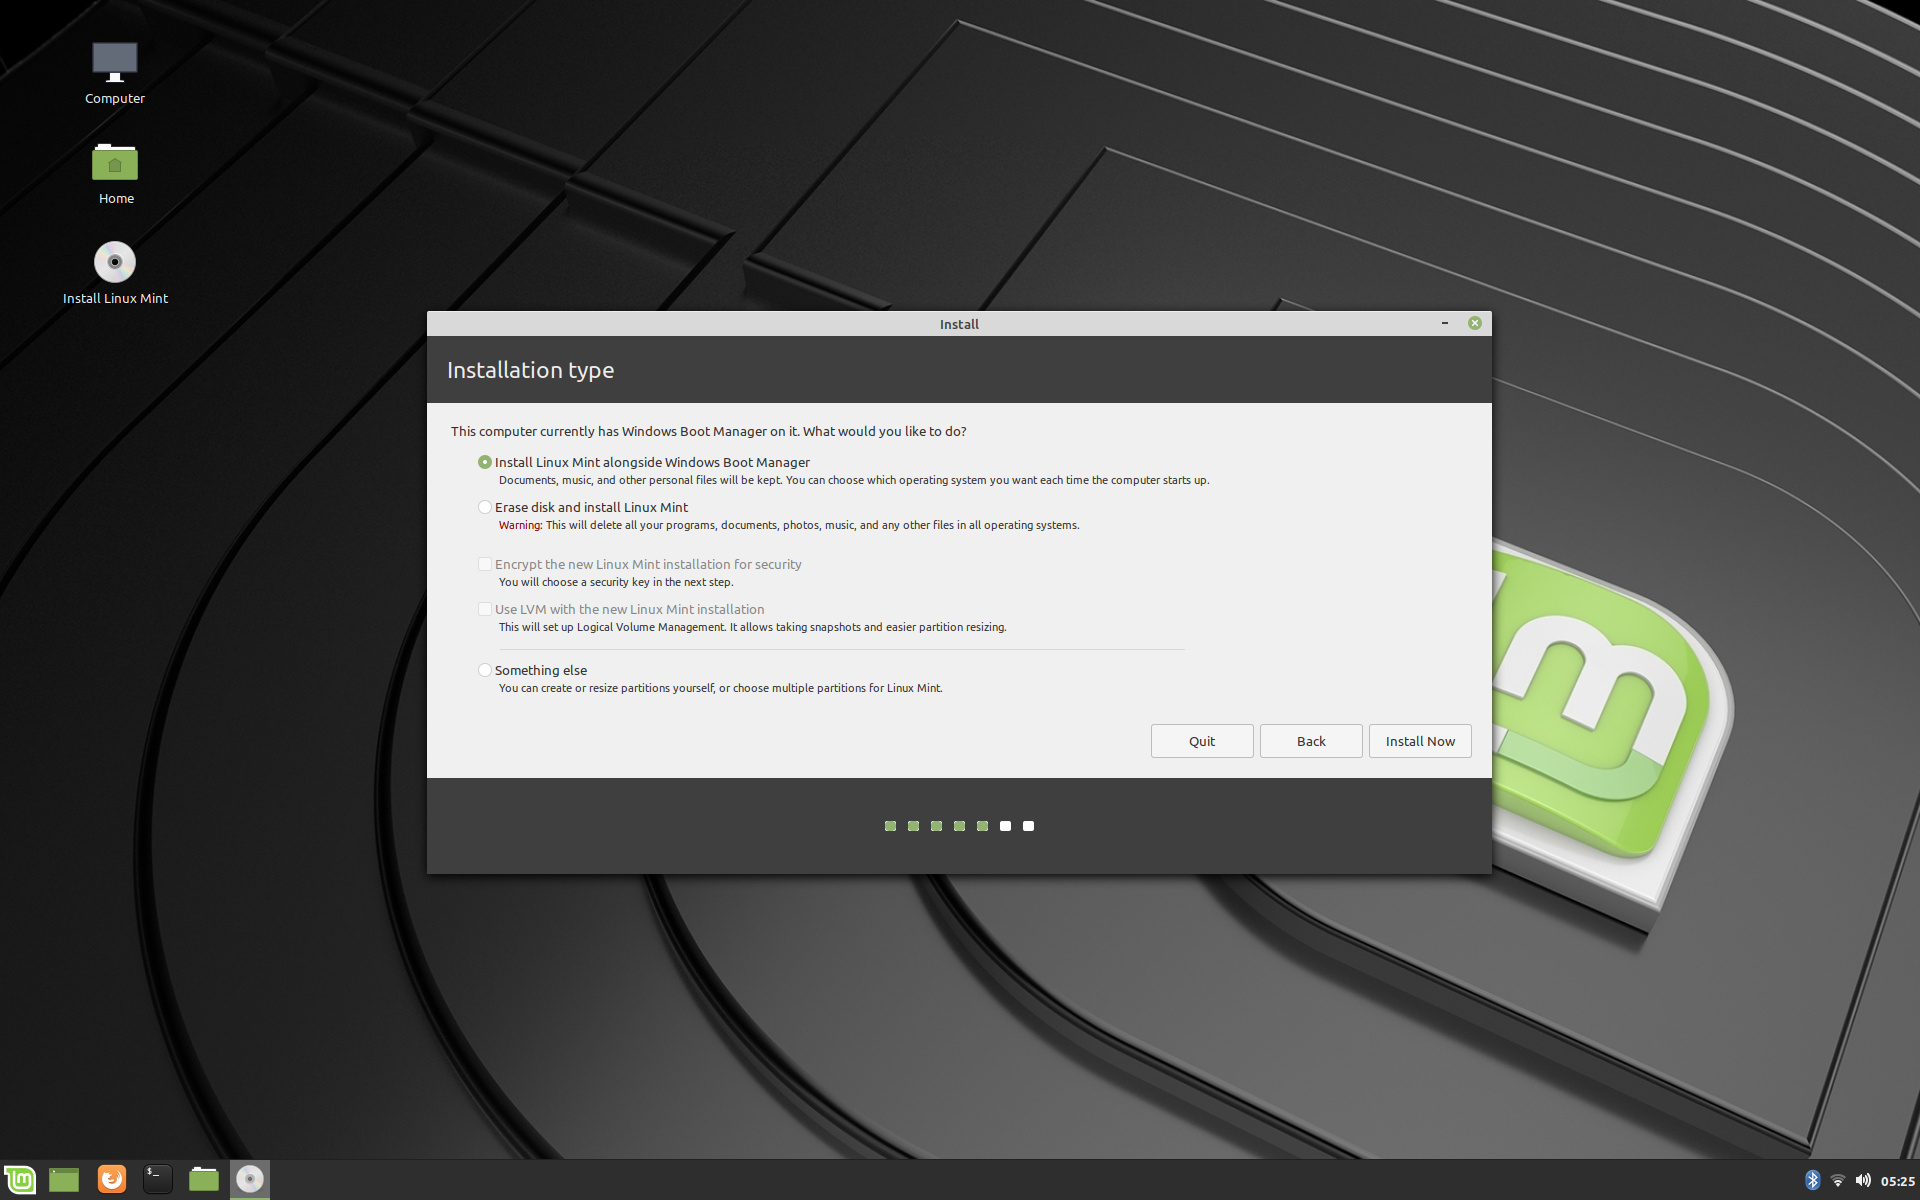

I continued to follow the installation prompts, selecting the default options as advised by Mint. This included installing Linux Mint alongside Windows on the same drive, letting Linux format the unallocated space that I'd created earlier. If you wish to manually (re)partition and format your drive(s), select the 'Something else' option here instead. The final steps were very similar to the tail end of a Windows installation: setting the time zone, system name, username, and importantly, the password for this default Administrator account, as shown above.
The Experiment Begins in Earnest

Once installation was complete and Linux rebooted, I was back in the interface I'd first seen when I'd booted from the LiveCD. This time however, a Welcome box came up, with a very useful set of First Steps that neatly highlight the key features of Linux Mint:
Note: If you accidentally close the Welcome box, you can access it again at any time by entering Welcome in Start>Search
These utilities demonstrated that Linux Mint had cleverly taken familiar aspects of Windows, and not just mimicked them, but actually improved on them in several respects. Software Manager for example is very similar to the Microsoft Store in Windows 10. Except it doesn't contain defeatured, mobile-centric apps that are foisted on you solely for Microsoft's benefit; the Linux version lists a large number of free, full-featured, open source programs which many people already use in Windows. Programs such as Firefox, GIMP, and GParted. Better yet, Mint comes with arguably the best of these already installed. So if, like me, you've been steadily transitioning to free open source alternatives (as covered on this page of the Hardware Confusion 2019 article) as your default programs in Windows, then once again, you'll feel at home.
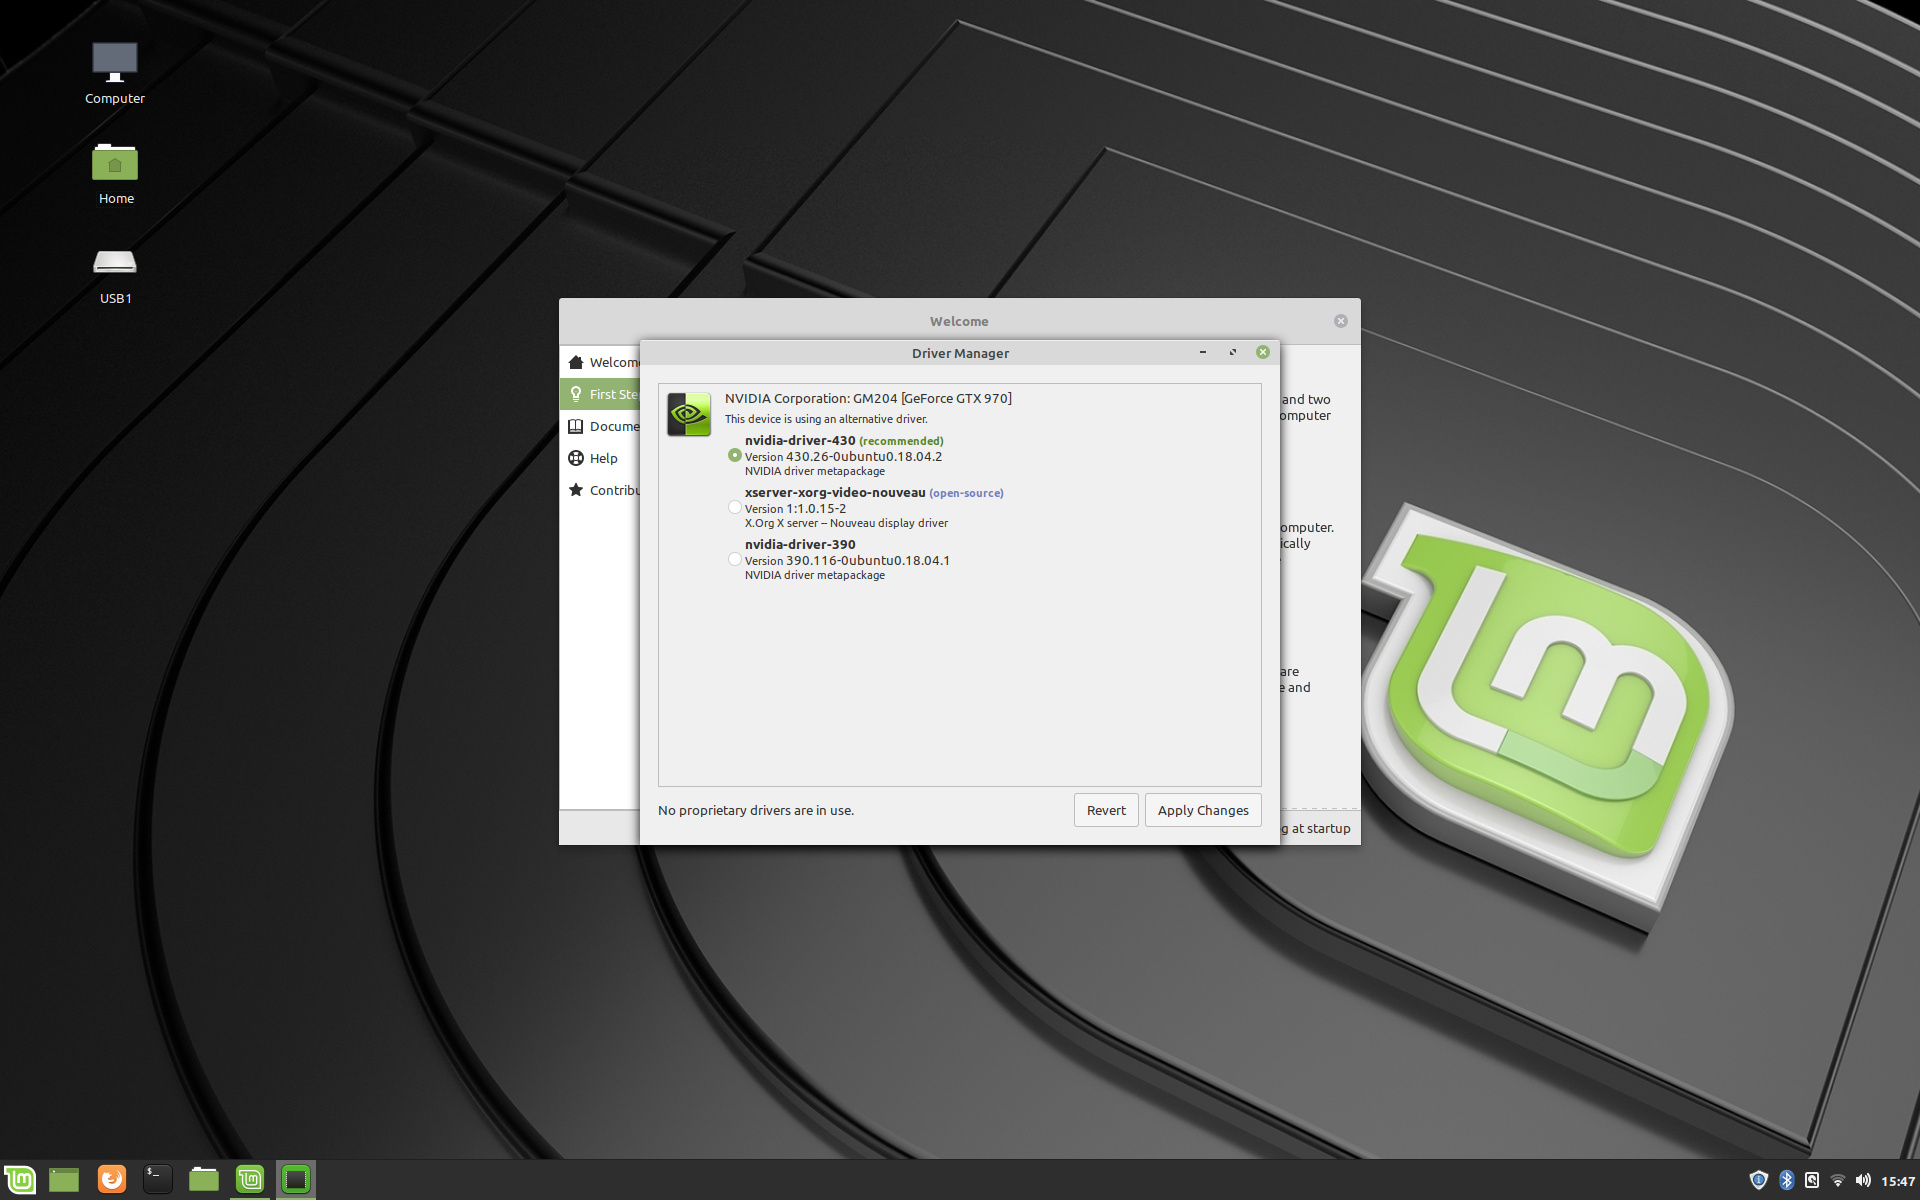
The very first thing I did was to run Driver Manager, whereupon the only proprietary driver Linux told me I needed was a graphics driver for my old Nvidia GeForce GTX 970 GPU. Feeling confident, I installed the recommended option, which is the 'Nvidia-Driver-430' option, as shown above, and rebooted as prompted. Upon rebooting, my desktop's appearance was clearly distorted, indicating that I wasn't at my native resolution. I start hunting around to see how I could change it, not an easy task when you're on a new OS. A search for Nvidia in the Start Menu brought up something called Nvidia X Server Settings, which I assumed was the Linux version of the Nvidia Control Panel. Except I could only see two two settings, and neither of them were relevant.
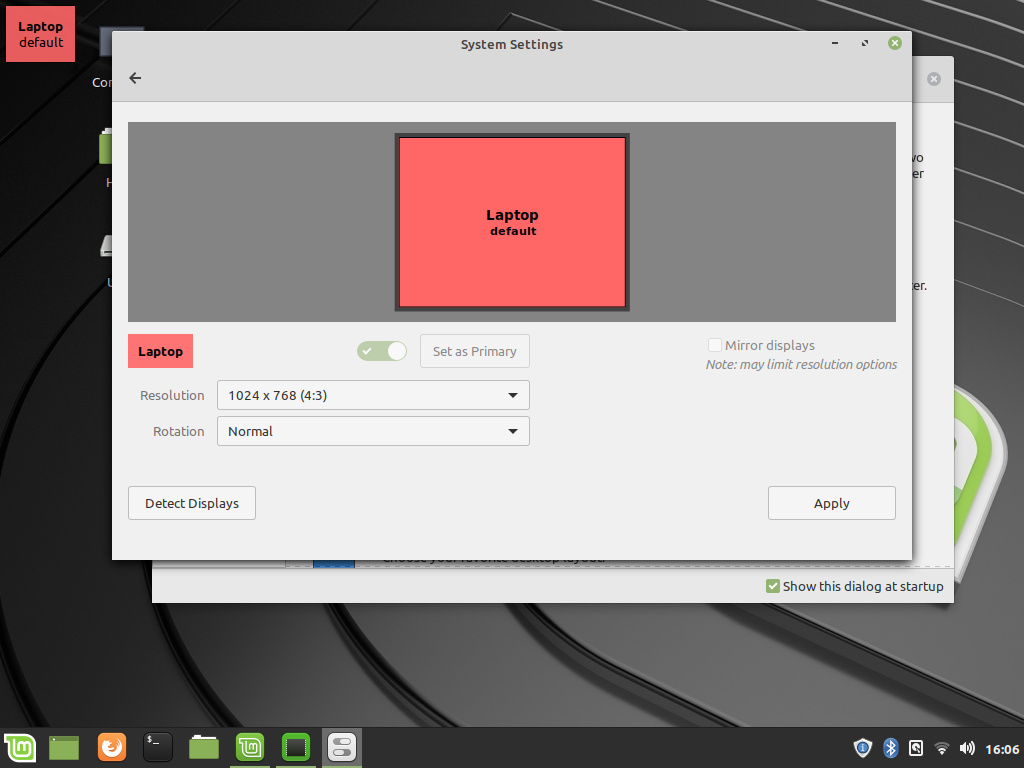
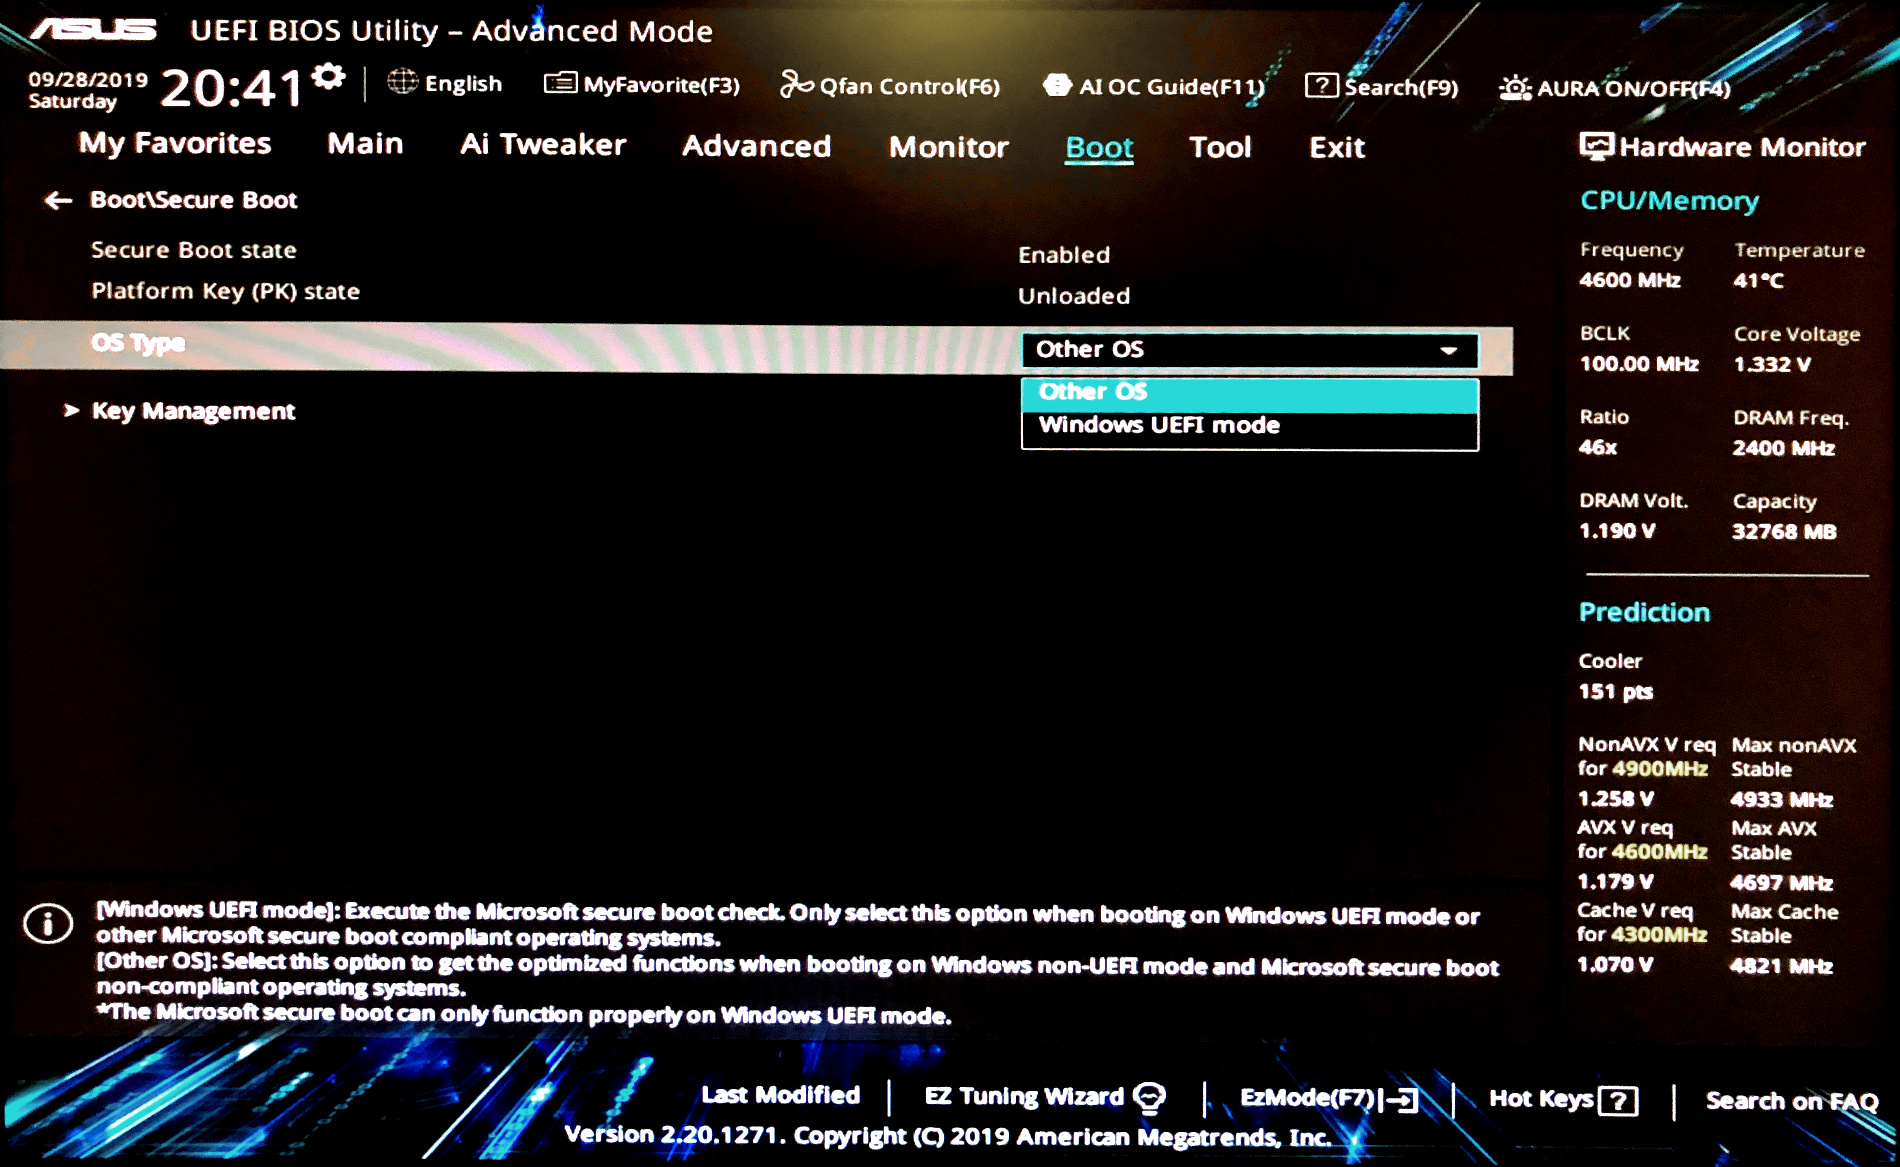
I searched for a general system setting that would allow me to manually alter my resolution. The only one I could find (see screenshot above) incorrectly identified my desktop PC as a laptop, and as I'd suspected, inaccurately showed my maximum (native) resolution as 1024x768 when it's actually 1920x1200. I couldn't change any of these settings. So I then tried installing the other two graphics drivers in Driver Manager, but that didn't change anything. The only error message Linux would periodically give me was a prompt saying "Check your video drivers. Your system is currently running without video hardware acceleration. You may experience poor performance and high CPU usage. Launch Driver Manager." I'd already done that, so this wasn't helpful advice. Lots of Googling ensued, and I found out that GPU driver problems are common Linux, and that the Nvidia X Server Settings utility should show a lot more options than I had in mine.
Of much greater significance is that just from this first hour or so of troubleshooting an initial problem, I immediately began to notice several common annoyances:
The dot points above may seem petty, and no doubt Linux users will point out that Windows has its quirks and annoyances too. But there are major differences, particularly with regards to the reliance on terminal commands, which I'll discuss further on the next page.
I'll move on to clarifying how I resolved this Nvidia driver issue: I'm quite familiar with basic PC troubleshooting methodology, one step of which is to try to completely uninstall and reinstall the faulty software. I had no idea at this stage how to cleanly uninstall a driver in Linux, so while trying to reinstall everything related to the Nvidia driver, I went into Software Manager and searched for the Nvidia Settings utility.
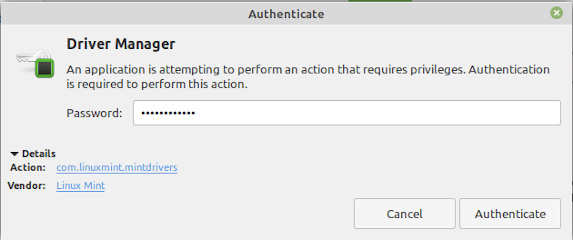
By a stroke of luck, on the main page for the Nvidia Settings utility, the first among numerous less-than-helpful user comments happened to be one that mentioned going into the BIOS and "disable EUFI", as shown above.

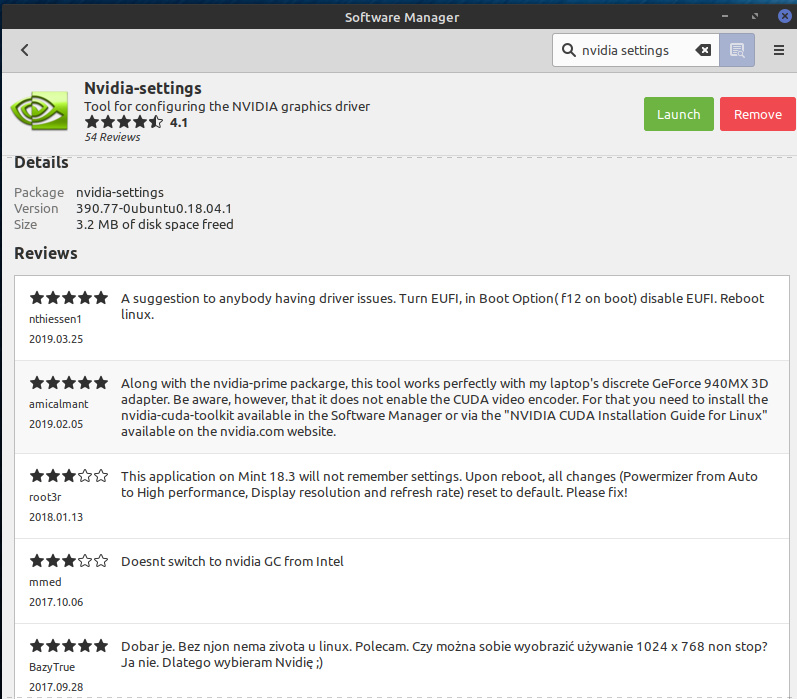
I booted into my UEFI BIOS, and immediately saw the likely culprit under the Boot>Boot\Secure Boot section of my ASUS Prime Z390-A motherboard BIOS (screenshot on the left above). I knew straight away that this had to be changed from 'Windows UEFI Mode' to 'Other OS' to correctly disable Secure Boot. I did so, rebooted, and sure enough, the graphics driver had loaded up properly, my GPU's capabilities were correctly detected, the resolution was automatically changed to my native 1920x1200, and the Nvidia Settings utility now showed the full range of options (screenshot on the right above). This begged the question - why hadn't Mint done this correctly when it specifically told me it was going to handle the disabling of Secure Boot? Once again, I imagine Linux users will suggest that you can't expect an OS to do everything perfectly, or that I did something wrong. But I don't think those sorts of excuses cut it; it's a major problem when an OS says it will auto-manage an incredibly important aspect like disabling Secure Boot, then doesn't do it properly, especially when a less-experienced or less patient user may not track a symptom like non-native desktop resolution back to Secure Boot as the source of the problem in a reasonable length of time, and just gives up. At this point I'd wasted almost two hours on just this one issue.

After a bit of looking around and trying out a few things, I ran the Update Manager, allowing it to download and install a long list of various packages in my Linux Mint installation. No problem here, the Update Manager handled everything for me, and I, knowing nothing about Linux, updated all packages just to be safe. This reminded me to do something I'd noticed a little while before, which was to update the Firefox browser. I normally do this within Firefox in Windows by going to the Firefox Main Menu>Help>About. This didn't work in the Linux version of Firefox, which seemed weird. I tried doing it via the Software Manager and still no joy, again weird. So I went to the Mozilla website, downloaded the latest full Firefox for Linux package, launched it and it detected and updated Firefox.
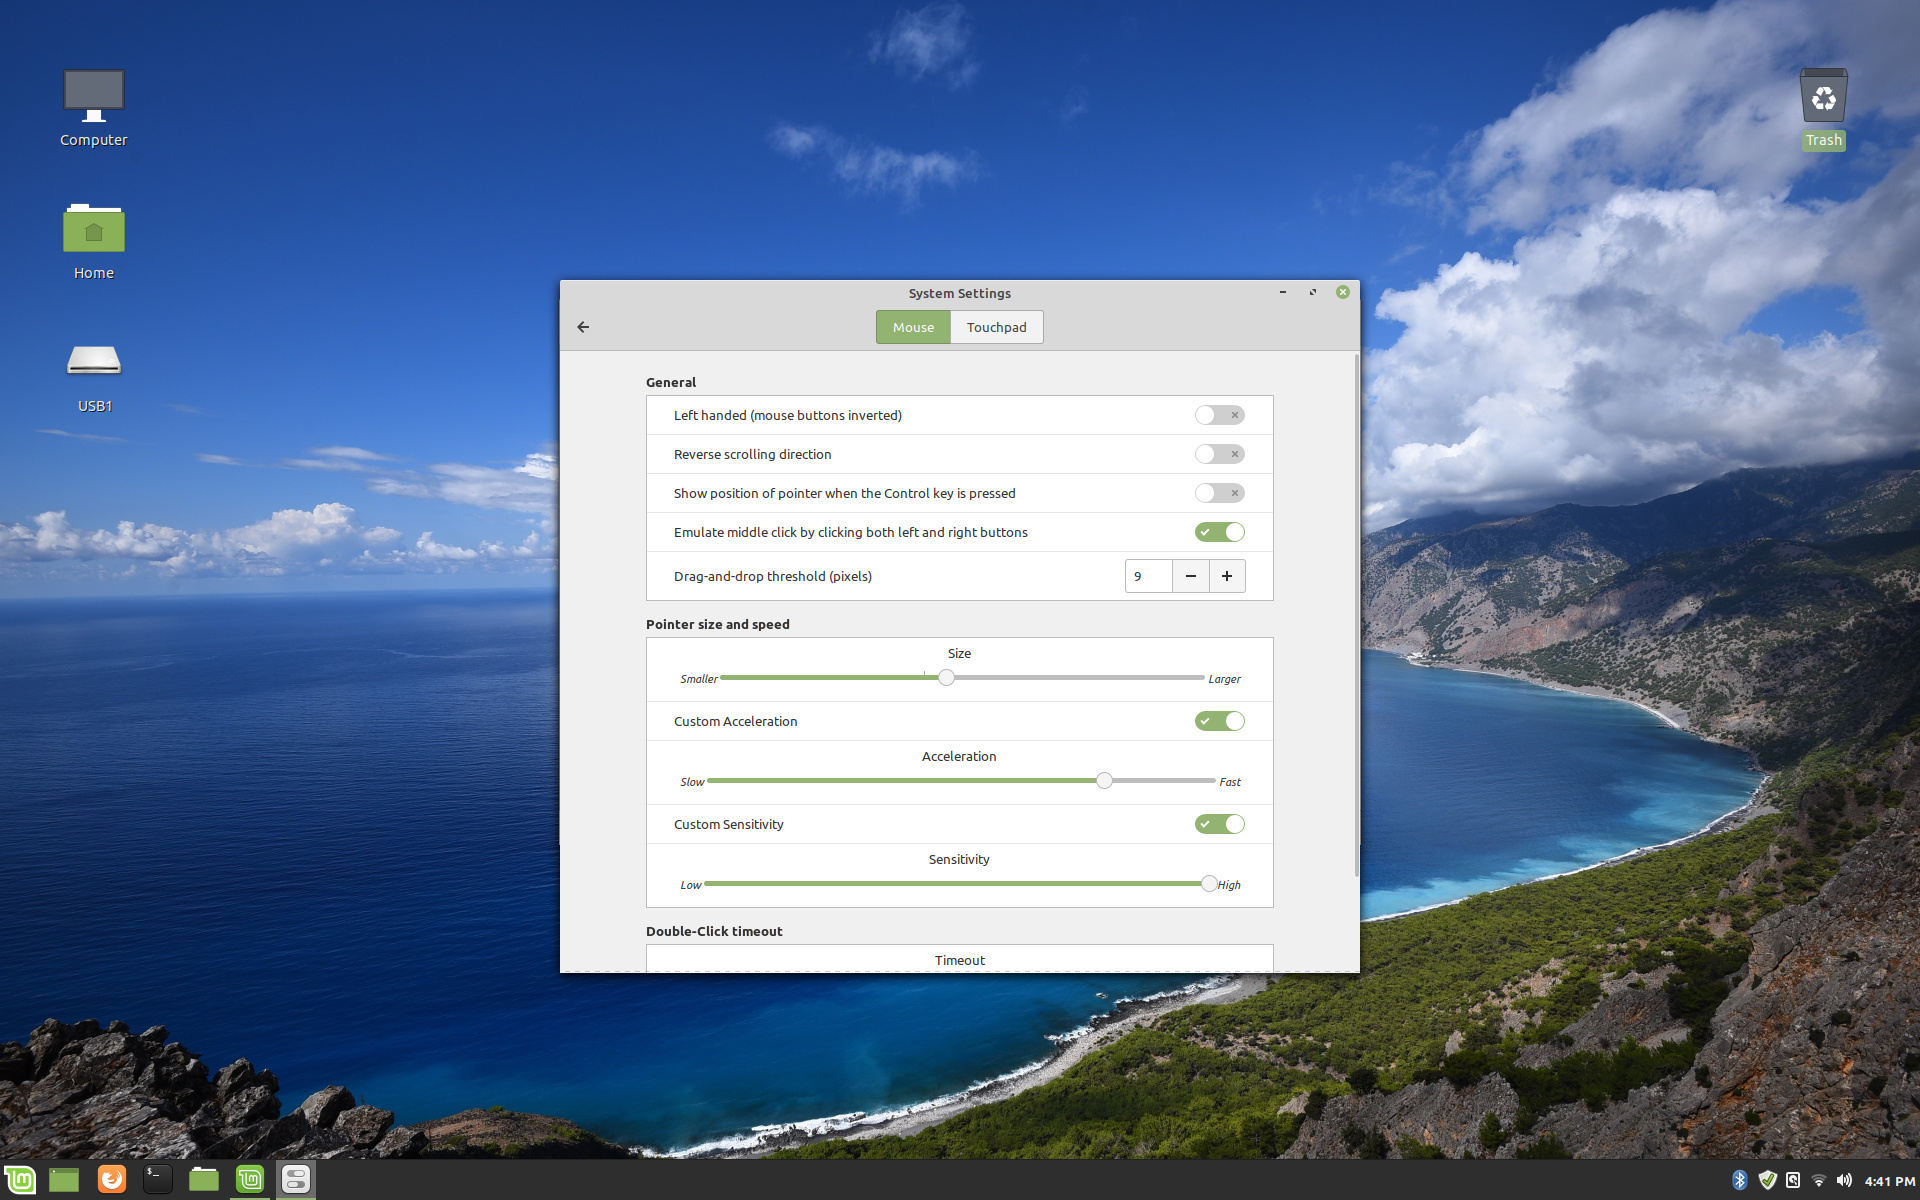
The System Settings in Linux Mint seemed fairly comprehensive, and I changed basic options such as mouse sensitivity, desktop icon spacing, the desktop wallpaper, which icons would show up on the desktop by default, and so on. One of the settings I really wanted to change was the speed of the scroll wheel on my mouse. Every time I scrolled the wheel even a tiny amount, it would scroll up or down too far on the screen. I couldn't find such a setting, and I suspected that I may need to install the third party drivers for my Microsoft Wireless 5000 mouse, which I'd leave till later.

It was during the changing of my background wallpaper to the one I use in Windows 10 that I got the fairly obvious idea to try and make Linux Mint look as much like my customized Windows 10 desktop as possible. To be honest, I didn't feel this was necessary, because the default Mint environment actually looks quite good in my opinion. But it seemed like an interesting test of how customizable the Linux Mint interface is, how long it takes to get it looking a certain way, and how closely it could resemble Windows, to aid Windows users in adapting to Mint even more quickly. A search in the Themes component of Linux Mint for 'Windows' showed two Windows 10 themes readily available (see screenshot above), so I began by downloading and installing the 'Windows 10 Basic' theme. No joy, it didn't appear to change much at all. I tried the other Windows theme listed, which was 'Windows 10 Light Theme', and again no luck.
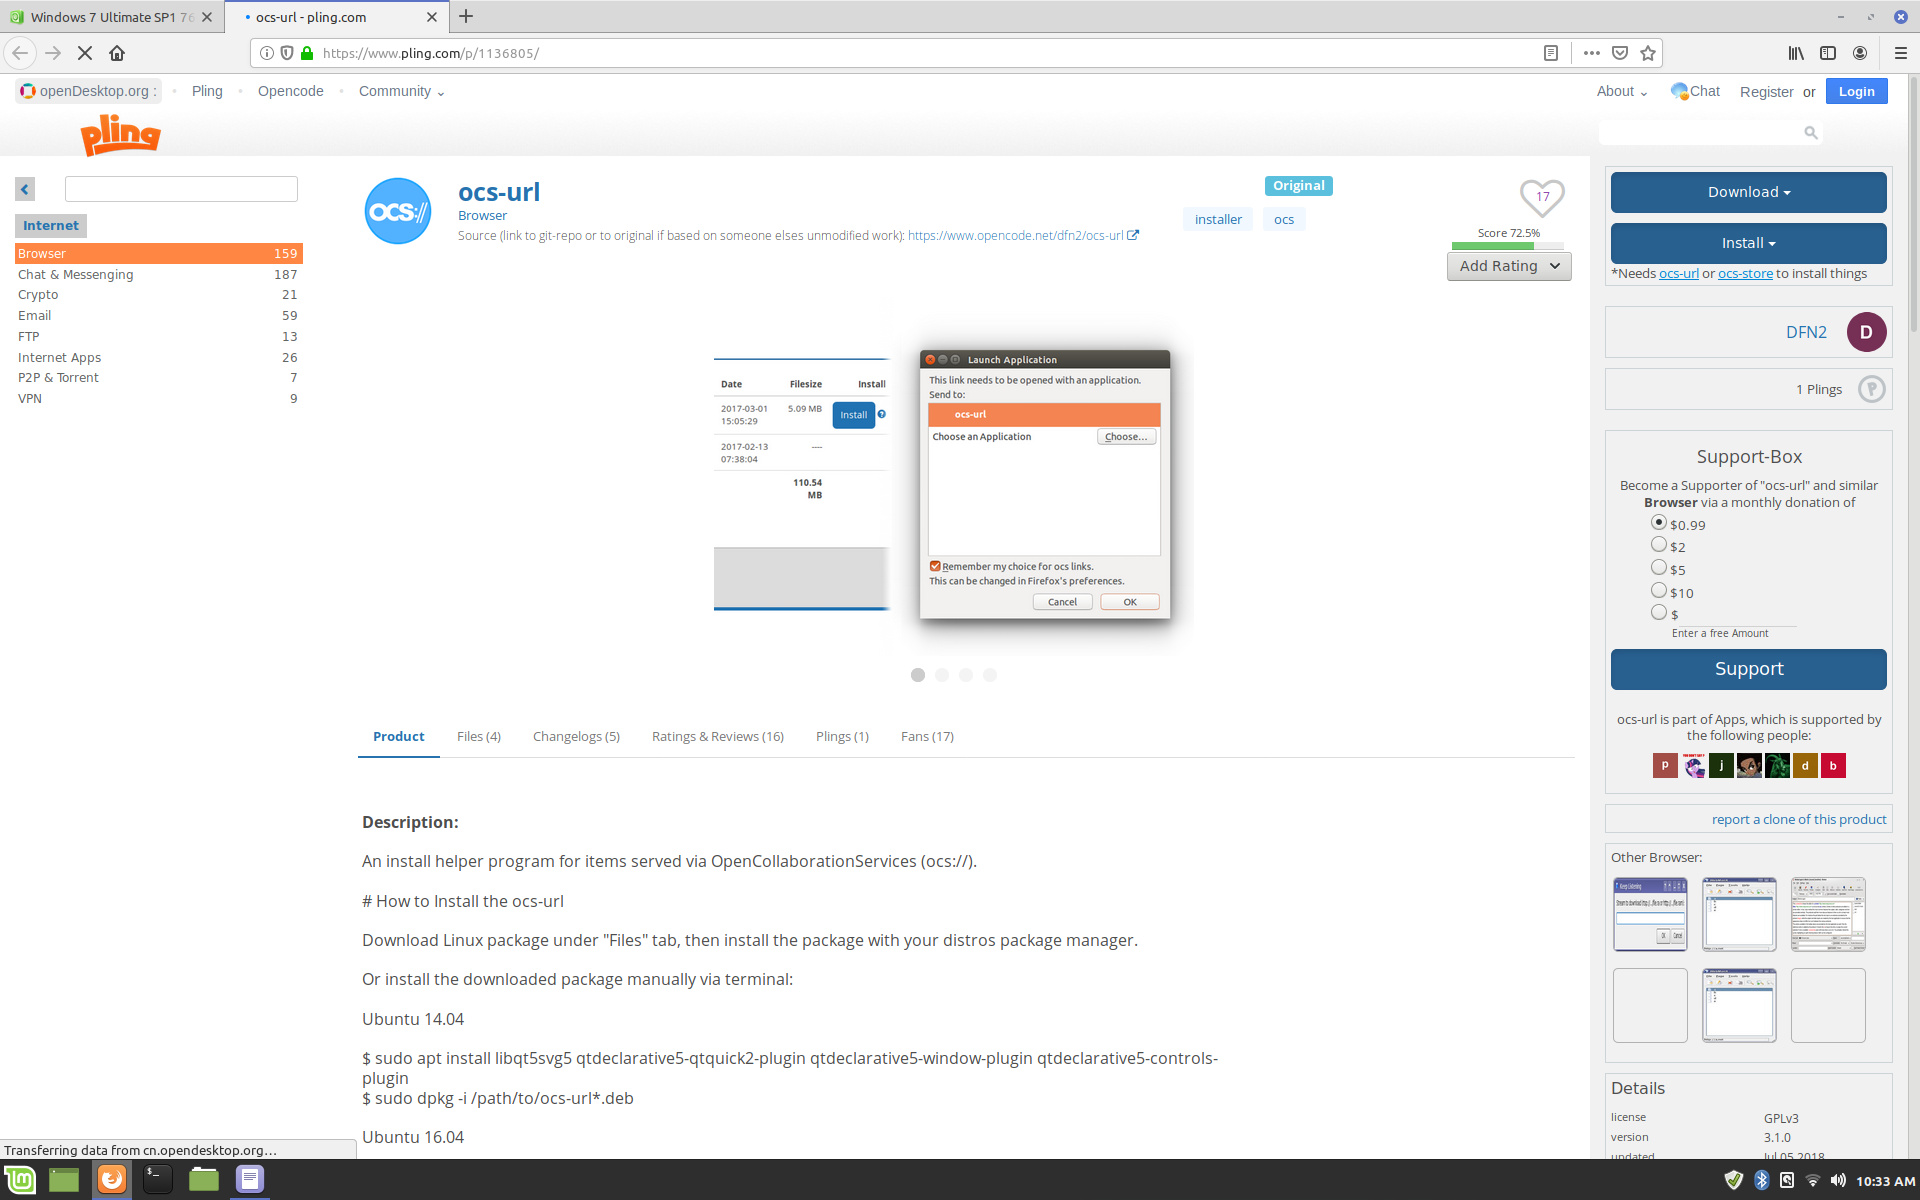
Since themes aren't something you change every day, I was fine with manually downloading and installing a theme if that's what it took to get it working properly. I searched Google for specific instructions on how to manually install themes in Linux Mint Cinnamon. I found several Windows themes for Cinnamon on the this site, and tried to install them using the convenient Install button on each theme's page. I was prompted to first get something called ocs-url or ocs-store to install these. So I searched for ocs-url, and finding it, I instinctively clicked the install button on its page - only to get the message that I need ocs-url to install ocs-url. Fine. To be fair, under the description on the ocs-url page, it does mention that you need to download the ocs-url package from the Files tab, rather than clicking the Download or Install buttons. As I continued to read the instructions, it said that I could install the package with my distro's package manager, or I could use terminal commands.
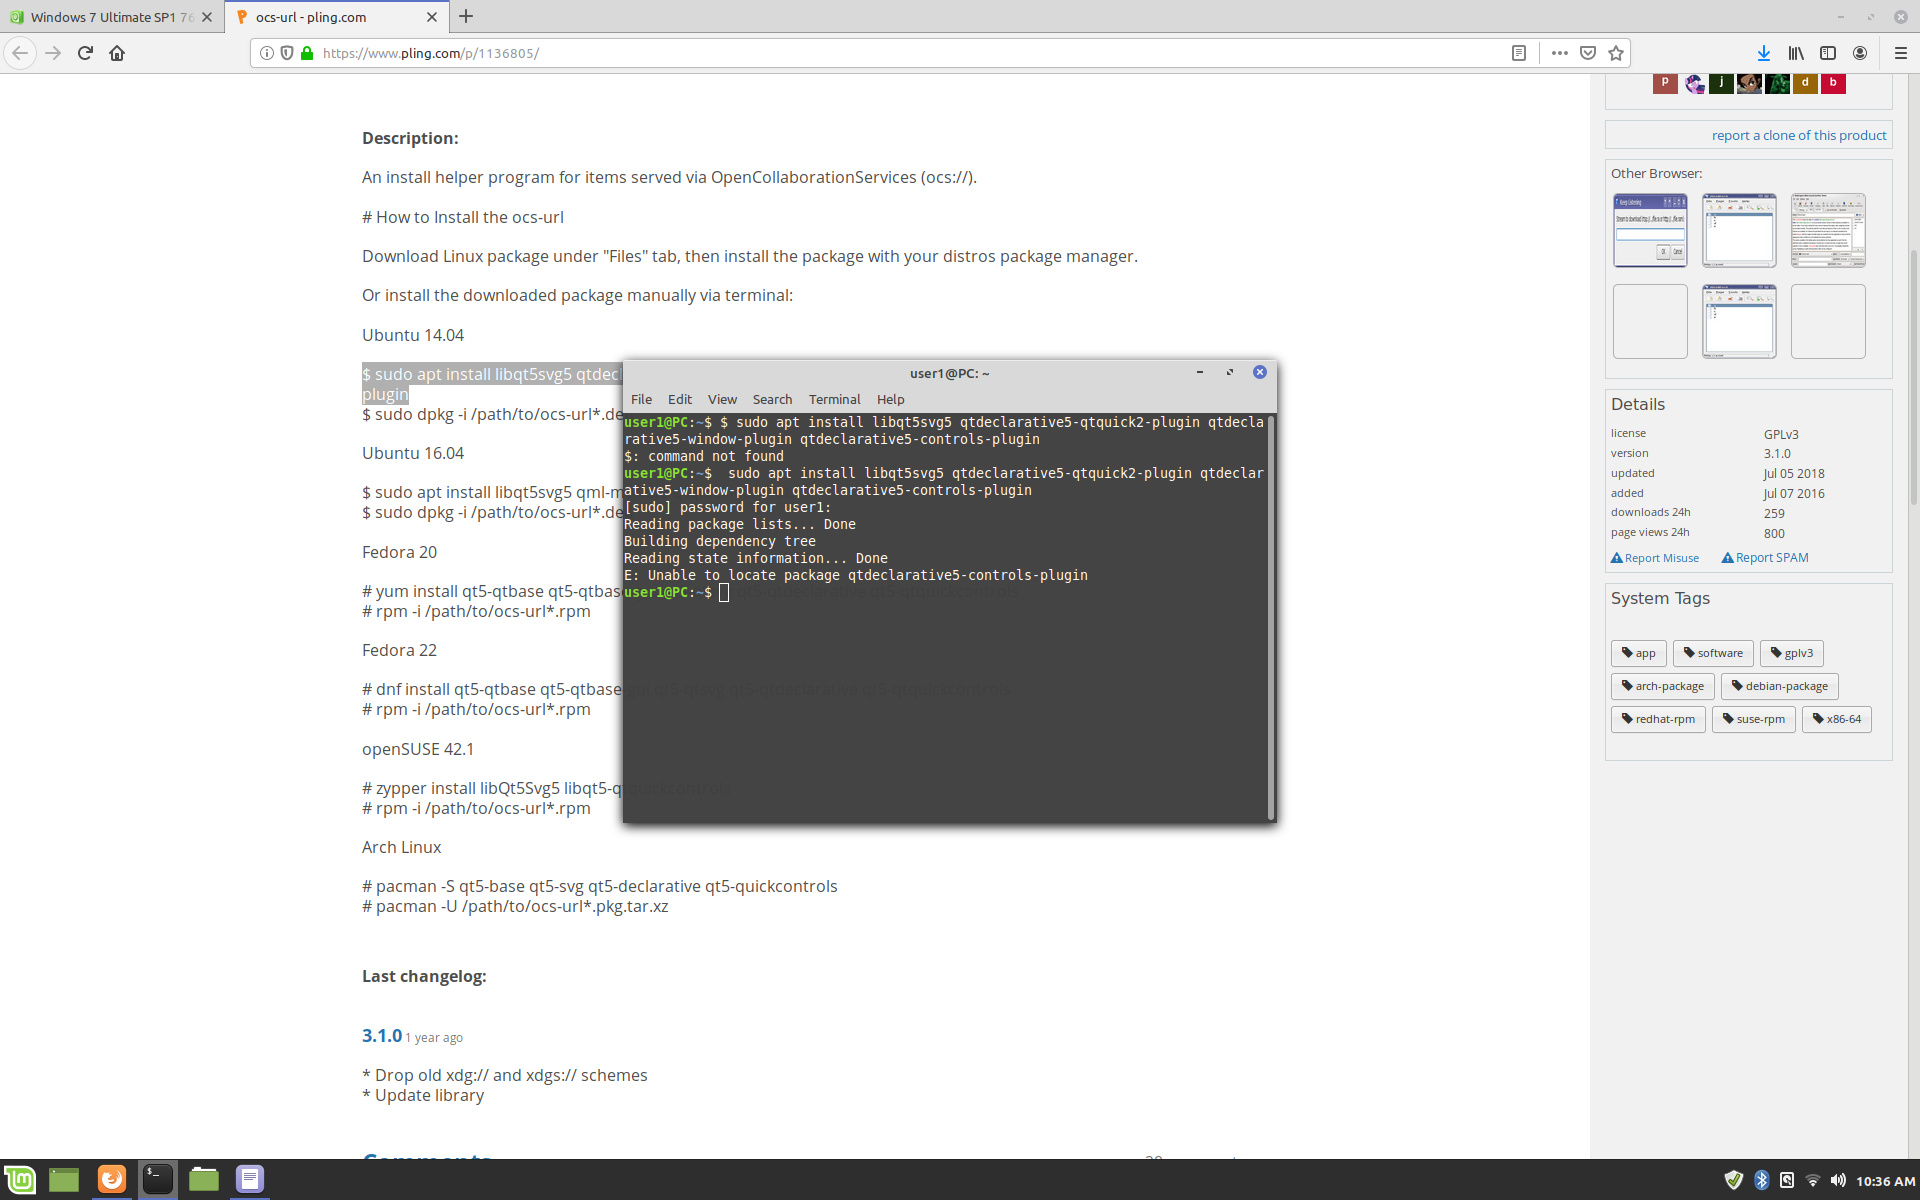
This should be easy - just highlight the text listed under the Ubuntu 14.04 section (see screenshot on the left above), which is the code base for Linux Mint Cinnamon, right? (Wrong, it's 18.04 as I noted earlier, I didn't remember it correctly) open the Terminal, which is conveniently pinned to the Linux Mint Taskbar, paste, and press Enter. This seemed to work. Except, the last line of the output (see screenshot on the right above), indicated that a package I needed called qtdeclarative5-controls-plugin, was missing. Ok, so I tried the Package Manager method, Start button>Package Manager in Search box, Enter, then copy and paste the package name above into it. It showed a full list of other packages it needed to install this package, which itself was needed to install ocs-url, which was a package I needed just so I could use the Install button to install a theme package. Linux was making me work now for its affections. Onwards.
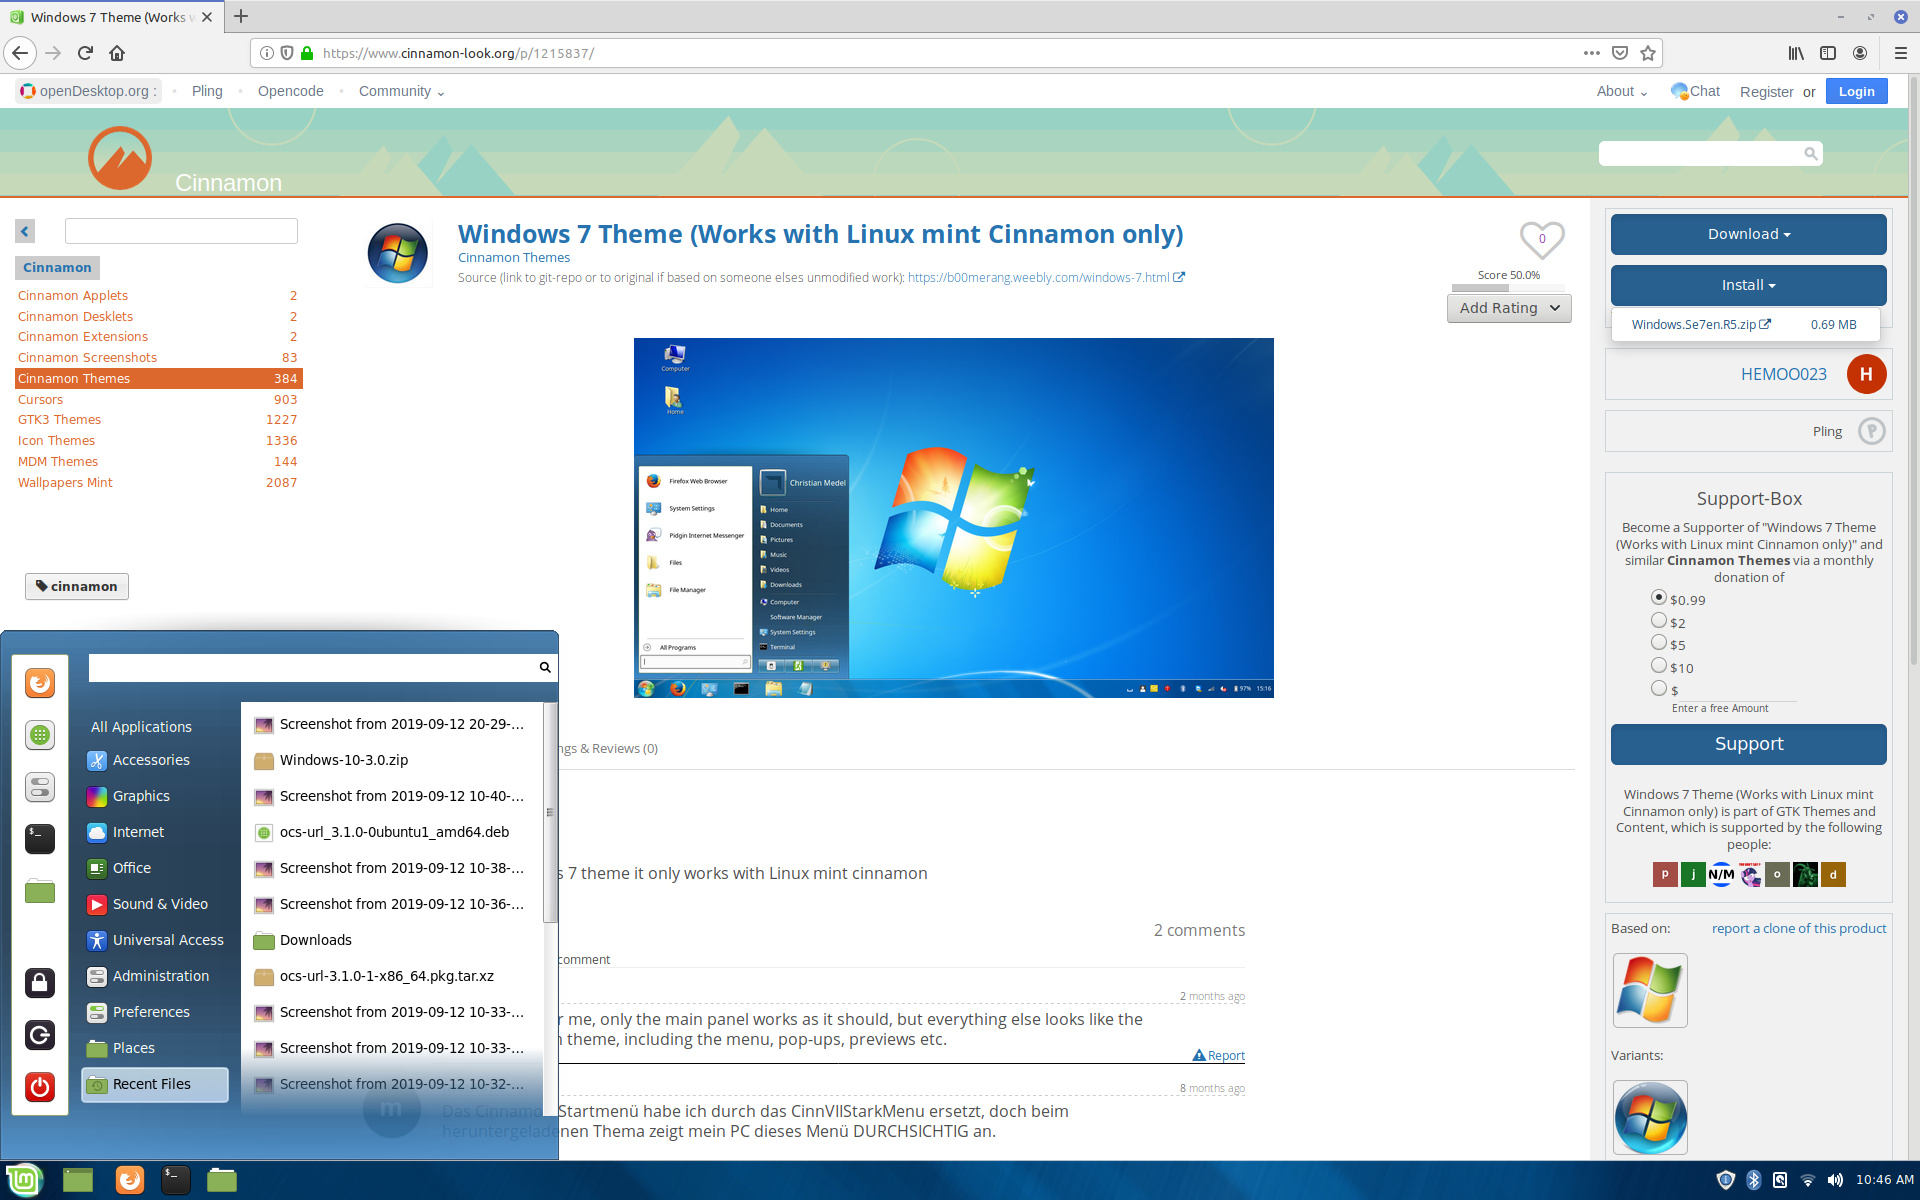
Newly empowered with the ability to make the Install button work, I confidently went to the theme I wanted, enticingly entitled Windows 7 Theme (Works with Linux mint Cinnamon only), and clicked Install. Voila! My theme finally changed to something that mildly resembed Windows 7, as shown above. Except, upon closer examination, I noticed that the icons in the Start Menu, the Start Button itself, and a range of other details, hadn't changed. I installed several other Windows themes, but again no luck. I rebooted each time to be sure that the themes were installing properly, and still, lots of missing effects - especially the Windows-like Start Menu illustrated in the screenshots for the themes I was installing. Long story short, nothing seemed to work 100% correctly in these themes, no matter how I tried to install them. Part of the problem was that some themes would refer me to some other package to get the theme to look the way it was illustrated. It seemed odd to me that given Linux is open source, why didn't each theme not contain all required packages bundled together in one place? There must be a logical reason, but whatever it was, I began to not care. This was becoming tedious. After a few more attempts, I stopped bothering to chase up packages for packages that would make such-and-such theme work as intended.
The best I could manage after a reasonable amount of effort (Linux Experiment rules, remember) is shown above. Aside from installing the theme and whatever components I could get to work, importantly, it required changing some of the Linux Mint settings, which in turn seemed to trigger certain aspects of the theme to work, at the expense of other aspects. For example, I could get a transparent Trash icon to appear on my Mint Desktop in place of the solid one if I selected a 'Humanity' folder type under settings, but that also resulted in bright orange folder icons, which didn't match the rest of my Windows 7 theme. Similarly, I had to enable the 'Use a custom icon and label' setting under the Menu>Panel settings, manually delete the 'Menu' text already there, and click the Icon button to make the Mint icon on the Start Menu change to the correct Windows 7 Orb icon for the theme. And so on.
Ultimately, I couldn't make Linux Mint look exactly the way I wanted. It was close enough, but obviously I would have to invest a fair bit of time to get everything to look as advertised, if indeed that was even possible, because at the time of writing, Mint Cinnamon 19.2 is quite new, and it may well be that the available themes haven't been updated for this version. Still, it looked pleasant enough if I could ignore the bright orange folders, and the Start Menu was quite functional and well-organised. Maybe not as good as the Windows 7 Start Menu, but certainly better than the atrocity that Windows 10 laughingly calls a Start Menu.

As I explored further, I found another software package of great interest to me, something that many people have recommended to me as a replacement for the Microsoft Office Suite: LibreOffice. I instantly thought of a great way to test it too; I would download the full TweakGuides Tweaking Companion Word Source Document, which I had recently made freely available under a CC BY 4.0 License. This is a huge DOCX Word document that I created from scratch in Microsoft Word 2010 years ago, with a fair bit of custom formatting. The file weighs in at 51MB and spans 687 pages, containing over 285,000 words. To its credit, LibreOffice Writer, the open source equivalent of Word for Windows, did a valiant job in trying to recreate it accurately (see screenshot above), but there were a range of mostly minor glitches. For example, the tab on the right side of the page reading Security should have the text rotated 90 degrees clockwise, running down the tab. All up, not too bad given the document hadn't been saved in Compatibility Mode, and I'd incorporated a lot more features into it than most standard Word docs. LibreOffice's interfaces seem fairly similar to their Microsoft cousins, at least enough that it wouldn't take long to get used to them. So LibreOffice is a winner in my opinion, based on my brief testing, at least for basic home use. In a professional environment and/or for highly specialised needs, you'll have to find out for yourself whether it can replace the Office Suite.
Periodically in my wanderings through the world of Linux Mint, some tool or another would randomly capture my attention just long enough for me to want to explore it further. For example, the Notes tool, which is the Linux built-in text editing tool (think Windows Notepad crossed with Windows Wordpad) works just fine, and seems at least as capable and intuitive for Windows users as the Windows equivalents. Not as versatile as the free open source Notepad++ mind you, but certainly more user friendly.
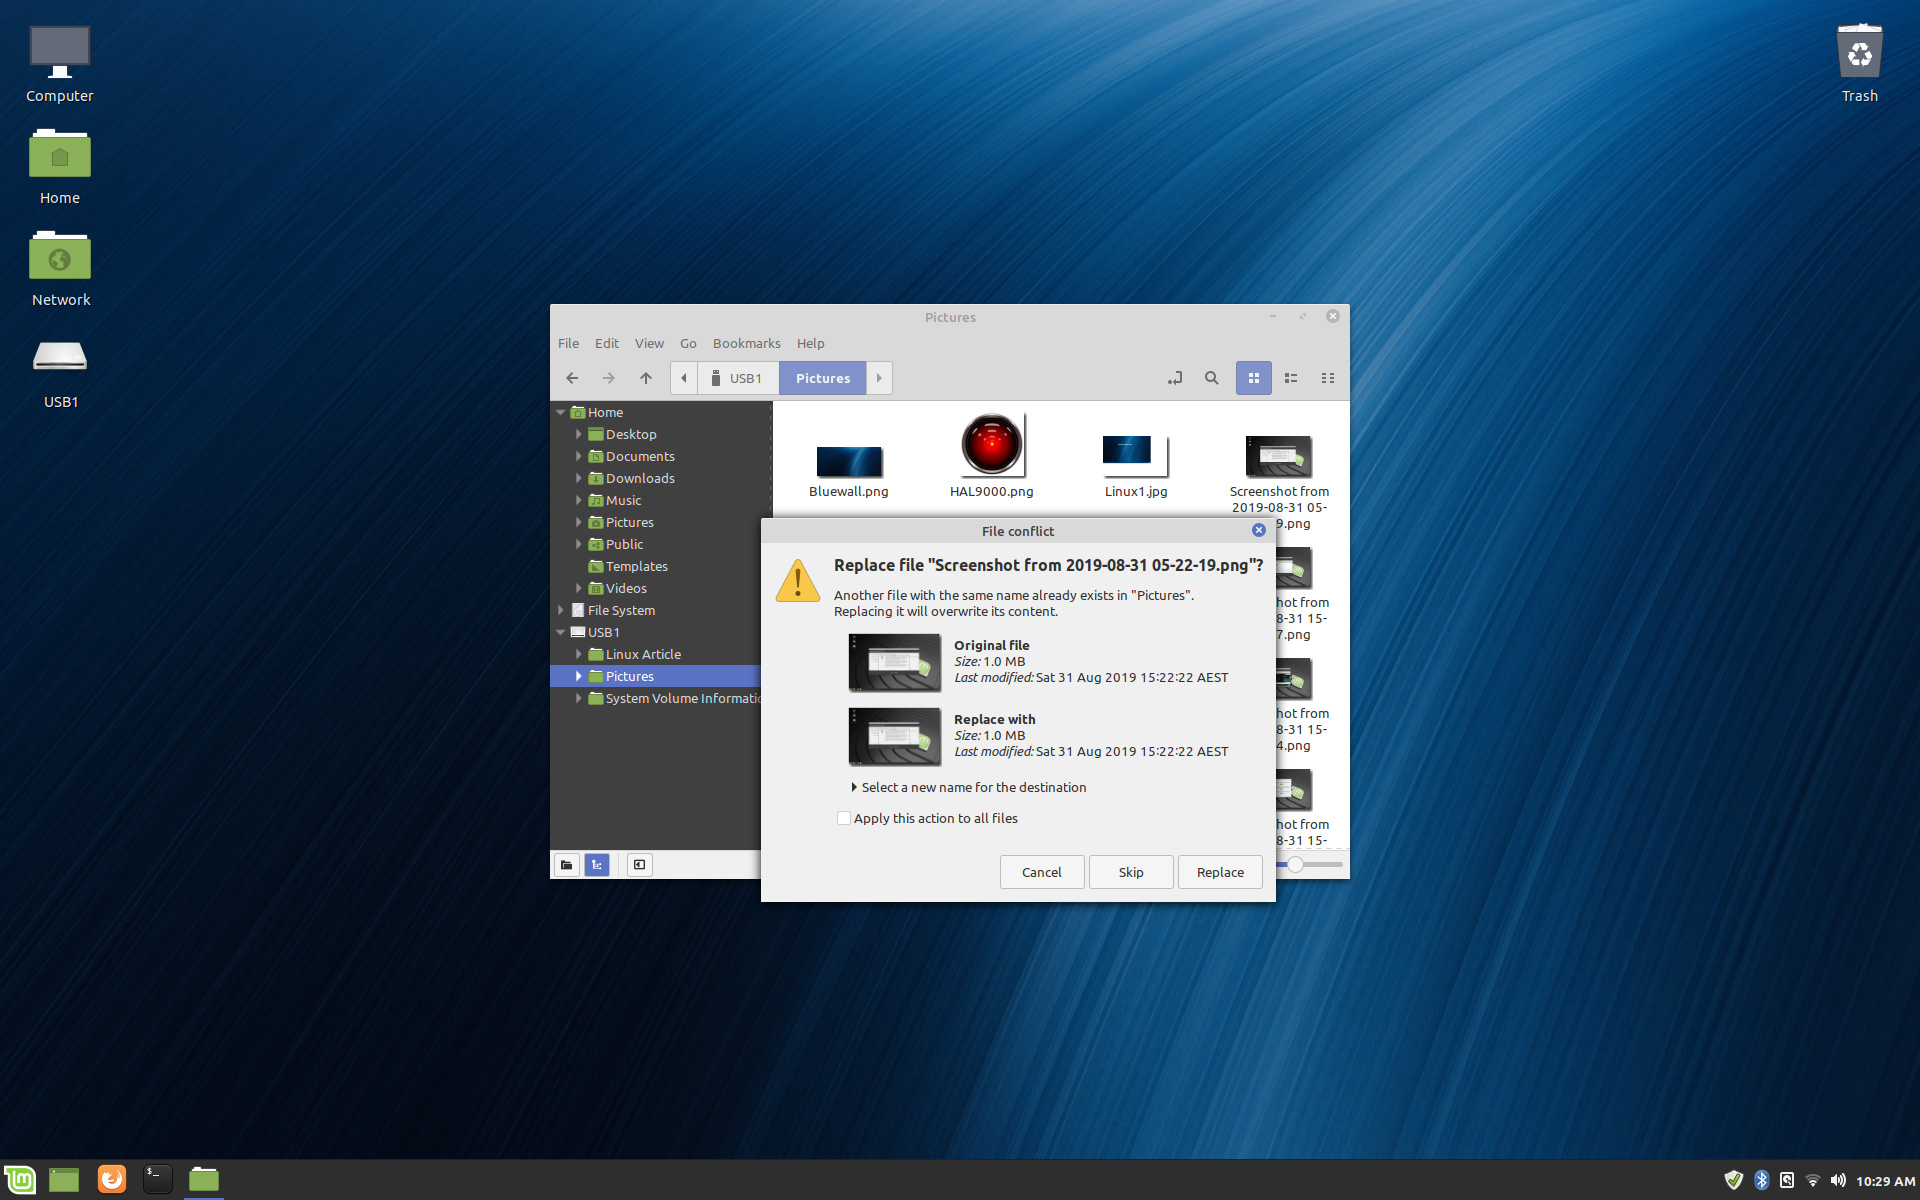
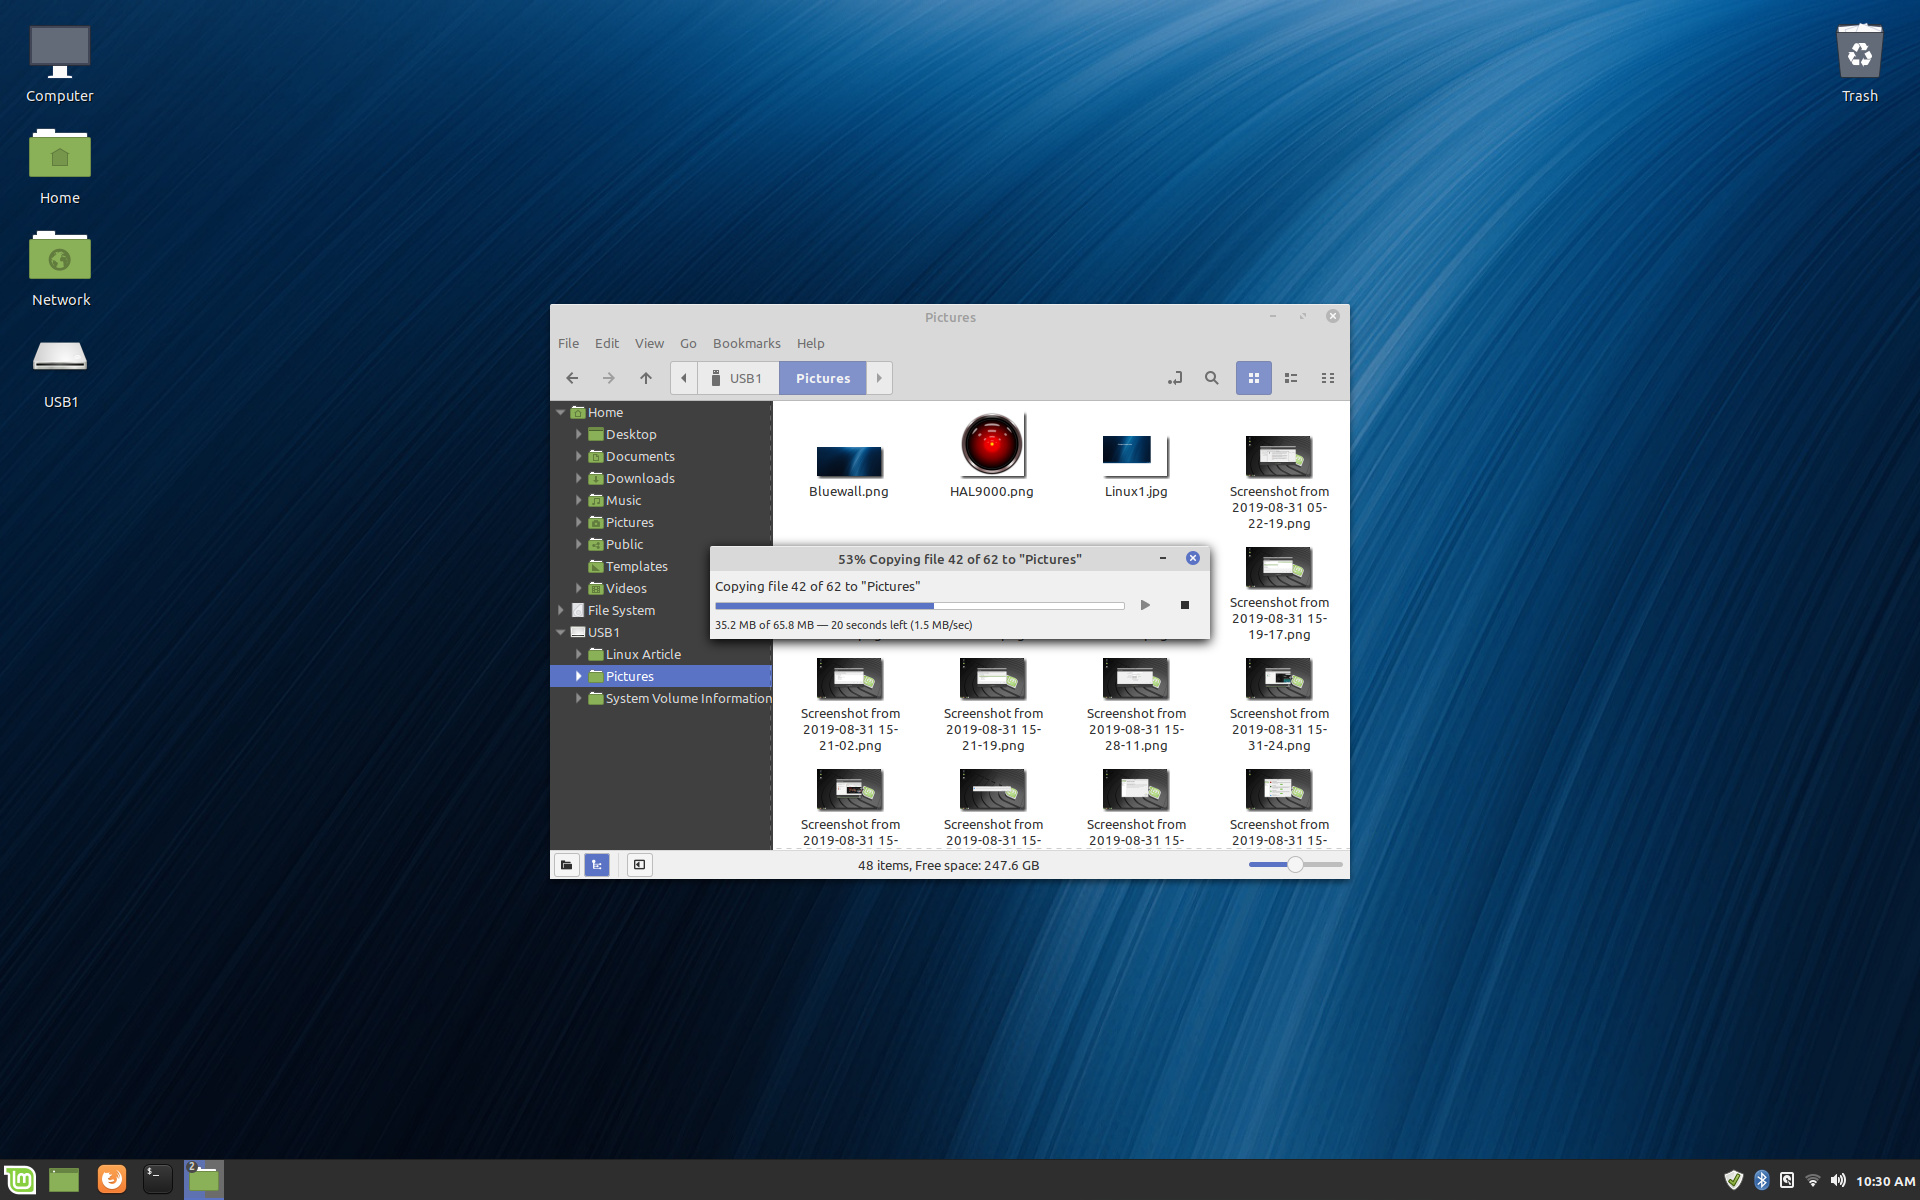
Another aspect I noticed was that the user interfaces relating to file manipulation were very similar to Windows, and thus very easy for a Windows user like me to understand. The File Conflict dialog box for example (see screenshot on the left above), gives you the familiar options to replace one file with another of the same name, or rename it, and a check box at the bottom letting you make your choice the default for all of the other files as part of this action. The subsequent file transfer dialog box (see screenshot on the right above) is again, easy to understand, showing details much like Windows would, albeit perhaps a bit more streamlined.
You may have noticed that the transfer speed shown above seems relatively slow (1.5MB/sec), even for a file copy action on a USB thumb drive (it's a Corsair X1 Slider USB 3.0 stick I've had for years). I too noticed this, and subsequently paid closer attention to the various speeds when copying to/from my 970 Evo SSD, as well as a WD My Passport 2GB USB hard drive, and of course the Corsair USB stick. In almost every case, speeds quickly reached expected values, so I don't believe there was any reduction in drive capabilities under Linux Mint. You'll need to find relevant hardware reviews that show the precise performance difference as I didn't have the time to conduct detailed performance tests, nor was it a part of the plan for The Linux Experiment to begin with. That said, I did run one quick objective benchmark (Google Speedtest) to confirm that my Internet speeds were the same (they were), as also confirmed by watching the Steam client download some game files from a local mirror. Overall, I never felt as though Linux Mint was slower than my optimized Windows 10 install.
And now, for my final trick, I shall try to make a Windows game run on Linux. I don't game much these days for a range of reasons, but I'm well are of the fact that many Windows users are also gamers, and they're worried that any transition to Linux will see them face a greatly reduced range of games they can play. The usual answer to these concerns from Linux fans is that virtually any Windows game can now be run in Linux, if necessary by using the free Wine utility. Wine stands for Wine Is Not an Emulator - a nightmare of an illogical looping statement if ever I saw one. The point is that an emulator or virtual machine results in significant performance penalities because it has to simulate in software the hardware-accelerated features native to Windows. Wine instead translates the relevant data into a form that Linux can utilize efficiently on the fly.
Unfortunately I'm ill-equipped for this aspect of the Linux Experiment. The latest games I have were purchased four years ago: Fallout 4 and GTA V, and my GPU consists of a GeForce GTX 970 from that time period. But there's a very good reason why I progressed with this portion of the experiment, and then decided to report on it here regardless: it demonstrates the type of research and effort you will need to put into getting even an older game to run on Linux.
I didn't plan for this particularly well though. The GTA V game files are over 92GB in total on my Windows install, but I'd only set aside 70GB of free space for the Linux partition. Remembering the old adage "When life gives you lemons, turn them into lemonade", I used this as an opportunity to see how a critical disk management task like file partitioning works under Linux, and also how it impacts on my dual boot. I booted up into Windows, and shrunk my primary Windows partition by another 70GB, then booted back into Linux. Next, I used GParted, which is a terrific open source tool I've used before; complex partition management is its specialty. I found that you can't increase the main Linux partition while using it. So, I figured that just like booting into Safe Mode in Windows allows greater freedom to alter system-related aspects, I would boot into LiveCD mode in Linux, and thus should have greater freedom to alter the main Linux system partition.
I was right, GParted could now add my free unallocated space to the existing Linux partition, although it kicked up a warning that this was dangerous, and upon rebooting, I saw a screen full of error text in incomprehensible Linux-ese (something about Squashfs and GRUB not getting along). The good news is that Linux managed to fix this all by itself, and I booted successfully, with no apparent data loss or other issues, back into my newly enlarged Linux partition. Here's where the fun really began. Reading some online guides about getting GTA V to work on Linux, I saw that the Steam client would be useful, so I downloaded the Linux version of Steam, installed it without a problem, confirmed my Steam account on what it saw as a new PC, and logged in successfully. Unfortunately I'd forgotten that my copy of GTA V was purchased directly from Rockstar, which means it uses the Rockstar Social Club, and cannot be directly installed in Steam; I had to add it as a non-Steam game. This caused all sorts of problems. I'd copied the GTA V directory from my Windows install to a USB drive (I didn't want to redownload 92GB of files again in Linux), but Steam couldn't see it. The Rockstar Social Club utility for Linux wouldn't launch properly. I tried various instructions, which inevitably involve Bash commands that I couldn't really understand, and likely applied to other versions or distros of Linux, and none worked. Bottom line: almost two hours wasted so far, and no dice.

Undeterred, I knew I'd have to Wine it. This should be simple enough I thought, I would launch the Software Manager, type in Wine, and - oh dear, Software Manager showed me several packages, none of which I could clearly identify as the latest version of Wine for running games (see screenshot above - note the visual glitch in the screenshot is a bug discussed on the next page). I assumed that the Playonlinux package listed at the top would be a good start, especially as it's described as "A Front-end for Wine", I installed it, then launched it. It provided a convenient install menu where I could search for particular games. Entering "Grand Theft Auto" revealed everything but GTA V, so I clicked the 'Install non-listed program' link.

A sad face appeared, with an error message that wasn't particularly helpful "Error in POL_Wine, Wine seems to have crashed, if the program is running, just ignore this message", as shown above. I persisted, thinking that I could invest a bit more time and still be considered to be asserting a "reasonable" amount of effort as part of the Linux Experiment paramters. I would have to manually download and install Wine, so I headed to the most likely Google search result: WineHQ.org's Ubuntu page. Fortunately, it had a link entitled Ubuntu 18.04 Linux Mint 19.x, which made it clear that it was the version for me. I clicked the link and instead of downloading anything, it sent me to a folder listing (parent directory, dists/ and pool/). I clicked dists. Another folder directory, shown here, with distro names, and no other details. Thankfully, I remembered from the Wikipedia page that Ubuntu 18.04 has the absurd name Bionic Beaver, so I chose Bionic. From there, things descended further into farce, as I, a new Linux user, came face to face with a seemingly endless choice of folders to click, only to arrive at yet another directory.

I had reached the 5th level of this directory (/wine-builds/ubuntu/dists/bionic/main/binary-amd64/) when I was confronted with a list of Wine builds. Even when I got to the specific package I thought I needed to install and clicked it, Linux was one step ahead (see screenshot above), referring me to something called a software channel. I could have Googled this and continued, but at this point, I gave up trying to get GTA V to run under Linux. Fair's fair, there's no way that this could be considered a reasonable amount of effort that an average Windows user and Linux noob would invest just to get a very popular four year old game to run in Linux. If you disagree, fair enough, but the combination of a lack of clear descriptions and the constant research needed at every step just to work out the conventions of what should be a simple procedure - installing a single software package called Wine - is just ridiculous in my opinion. In Windows it would be: 1. Go to Wine website. 2. Download Setup.exe 3. Run Setup.exe. Simple.
I moved on to what I believed would be a much easier proposition: getting the Steam-purchased Fallout 4 to run. Valve makes a point of supporting Linux, so Steam on Linux recently added a feature called Proton which is specifically designed to make running games under Linux a one-click proposition, as long as you use the Steam client. This looked promising, so I went into my Games list, clicked Fallout 4 to begin installation, and received the brief but succinct message that Fallout 4 wasn't supported on Linux (even with Proton). And that was it for me. Despite its age, despite being on a Linux-friendly platform like Steam, Fallout 4 wouldn't launch. Some research shows that you can get it to work in Linux, if you use methods such as those detailed in this guide, but as with pretty much everything else in Linux, it involves installing a dozen different packages and of course plenty of terminal commands. I couldn't be bothered, and that's the long and the short of it.
If you're detecting frustration in my writing by now, you're dead right. Keep in mind two very important points: Firstly, the above is a condensed summary of hours of Linux Mint Cinnamon usage; and secondly, I have written many, many tweak guides, spent countless hours delving into various game engines, configuration files, console commands, and the various quirks and bugs of PC games, and Windows, over the past 30 years. I'm not a genius, but I'm not a moron either, and I don't give up at the first sign of a bit of hard work, or the need to do some research, or even repetitive procedures, if they end up working to achieve what I want to do. So why was this frustrating me?
I suppose the best way to put it is that installing something in Linux seems a lot like buying IKEA furniture. It looks good at first, but you get it home, open the box and find dozens of fiddly pieces that have to be put together just right. Often some part is missing or broken and you have to go back to the store to get a replacement. Joy quickly turns into tedium. By the time you're done, you're just glad it's over rather than being eager to use it.
On the next page, we get down to the nitty-gritty. I talk in detail about my learnings from this brief experiment.

|

|