
Hardware Confusion 2019
[Page 13] Windows 10 Optimization & Conclusion
Windows Update
Microsoft refers to Windows 10 as Windows as a Service. This means that it's in constant development (some might say, unkindly, that it's in constant Beta), and as part of that strategy, in Windows 10, updates are strictly enforced so that no user falls too far behind. If you're on the Semi-Annual Channel (which I recommend) you will have the greatest flexibility in controlling updates. Security-related updates, known as Quality Updates in Windows 10, can only be delayed by a maximum of 30 days. Feature Updates, which is what Windows 10 calls non-critical updates similar to the old Service Packs, and which are usually released twice a year, can be delayed for a maximum of 365 days. You can also pause all updates at any time for up to 35 days. Eventually, however, you will need to update or Microsoft will quite literally force the update onto your system, downloading it in the background, and then prompting you relentlessly to install it - unless you take more stringent measures as provided in this article.
Quality Updates: I don't recommend blocking security updates for any more than a week at the most. These should be installed on all systems as soon as possible, the only reason to wait a few days would be to ensure that a security patch doesn't also create any major issues. On my system the O&O Shutup10 settings I use as covered earlier, combined with a 5 day delay on Quality Updates, are sufficient to keep me up-to-date without forcing me to be an unpaid beta tester for Microsoft. These settings can be found under Settings>Update & Security>Advanced Options. Note: if your O&O settings are so strict that they prevent the drop-down box(es) working here open Group Policy editor, go to Computer Configuration>Administrative Templates>All Settings, and open 'Select when Quality Updates are received', then set it to Enabled and enter your desired delay (in days) in the first box on the bottom left.
Features Updates: These are less desirable, particularly given the last one - the October Update - caused many issues. They arguably contain few major improvements. So you can install these whenever you wish, but make sure you do a full backup first, and I also recommend doing a clean install of Windows 10 periodically, as multiple in-place upgrades (i.e., where Windows essentially does a reinstallation on top of itself) will steadily reduce system integrity.
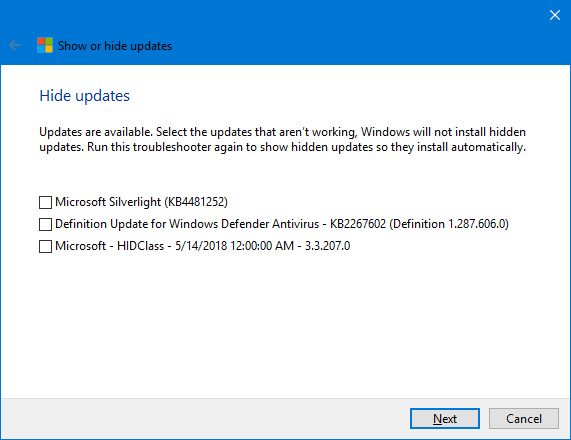
Removing or Hiding Unwanted Patches or Drivers: If you find certain driver(s) or update(s) that you don't wish to install continually reinstalling on your system after you remove them, then use the Show or Hide Updates Troubleshooter from Microsoft. Despite its age, it still works. Uninstall the relevant driver or update - for installed Windows updates, go to Control Panel>Programs & Features and click 'View installed updates' in the left pane. Then run the troubleshooter, and make sure to click the Advanced link on the first page and untick the 'Apply repairs automatically' box at the bottom before proceeding, then click Next, and tick those updates you don't wish to see again, or those you want to unhide. Note: Microsoft periodically releases new versions of certain updates which are then considered to be a new update, bypassing this block, so you may need to run tool again.
Lastly, be aware that Microsoft recently decided that anyone who manually clicks the 'Check for Updates' button can be considered to be "seeking" updates, and so will receive updates more quickly. More details are provided in this article. If your system is configured as above to receive Security patches relatively quickly, and feature updates a year after release, you can pretty much set and forget unless a specific problem is flagged in the tech news.
Windows Store Apps & Updates
Each newer version of Windows 10 attempts to hasten the transition from traditional Win32 desktop programs as they're known to Universal apps, also known as Modern, Windows Store, and originally Metro apps. These apps are based on the Universal Windows Platform (UWP), which is ostensibly a cross-platform and secure way of creating programs. It also allows Microsoft to earn revenue from app sales, because these UWP apps are usually restricted to only being available through the Windows Store, and Microsoft takes a cut of the sales there, like Apple's app store or Google 's Play store.
In reality, Universal apps frequently have fewer features, and have sparse device-centric interfaces with large amounts of white space. Quite a few of these UWP apps are pre-installed on Windows 10, including several that are of little use to most people. Therefore, many people, including me, remove as many of these as possible. Some can be uninstalled in Windows simply by going to Settings>Apps, selecting the app and clicking the Uninstall button that appears. Several cannot be uninstalled this way, so the next method you can try is to use the free O&O AppBuster utility, or the free CCleaner utility - click the Tools icon, select Uninstall, and then highlight and uninstall the relevant app(s). There will still be some uninstallable apps left: Connect, Cortana, and Microsoft Edge. Don't mangle Windows in an attempt to uninstall these.
Microsoft Store: Also known as the Windows Store, should not be uninstalled. It is necessary, e.g, for updates to apps, as shown further below, and also as Microsoft increasingly moves towards Universal apps in Windows. Removing it may require a reinstall of Windows to get it back.
Cortana: This is the name of the Windows 10 digital assistant who lives in the search box, and cannot be uninstalled or disabled; any methods you read about in the past do not work now due to changes Microsoft recently made to Windows 10. Cortana is a fundamental part of Windows Search for now, even if you never use it. However, Microsoft has indicated that it's planning to de-couple the two soon. For now, the best thing to do if you don't use Cortana, like me, is to hide it and thus minimize its impact. To remove the Cortana-based Search box from the Taskbar at the bottom of the screen, right-click on the Taskbar, then select Hidden under the Search menu item. This is especially useful if you're using a Start Menu replacement utility, as I am, because it has its own Search box.
Using the Store with a Local Account: The free Universal apps covered further below can all be installed from the Microsoft Store without a Microsoft Account; I've only ever used a Local Account in Windows 10, and they are listed in my library, as shown further below, despite not displaying a logged in account. However, some apps do require that you sign in with a Microsoft Account, and as I understand it, the previous trick of only signing into the Microsoft Store with Microsoft Account credentials, while using a Local Account in Windows proper, doesn't work anymore, and may even convert your Local Account to a Microsoft Account automatically now, so be careful.
Useful Apps: There are several free apps that you may wish to install, as they can add desirable core functionality:
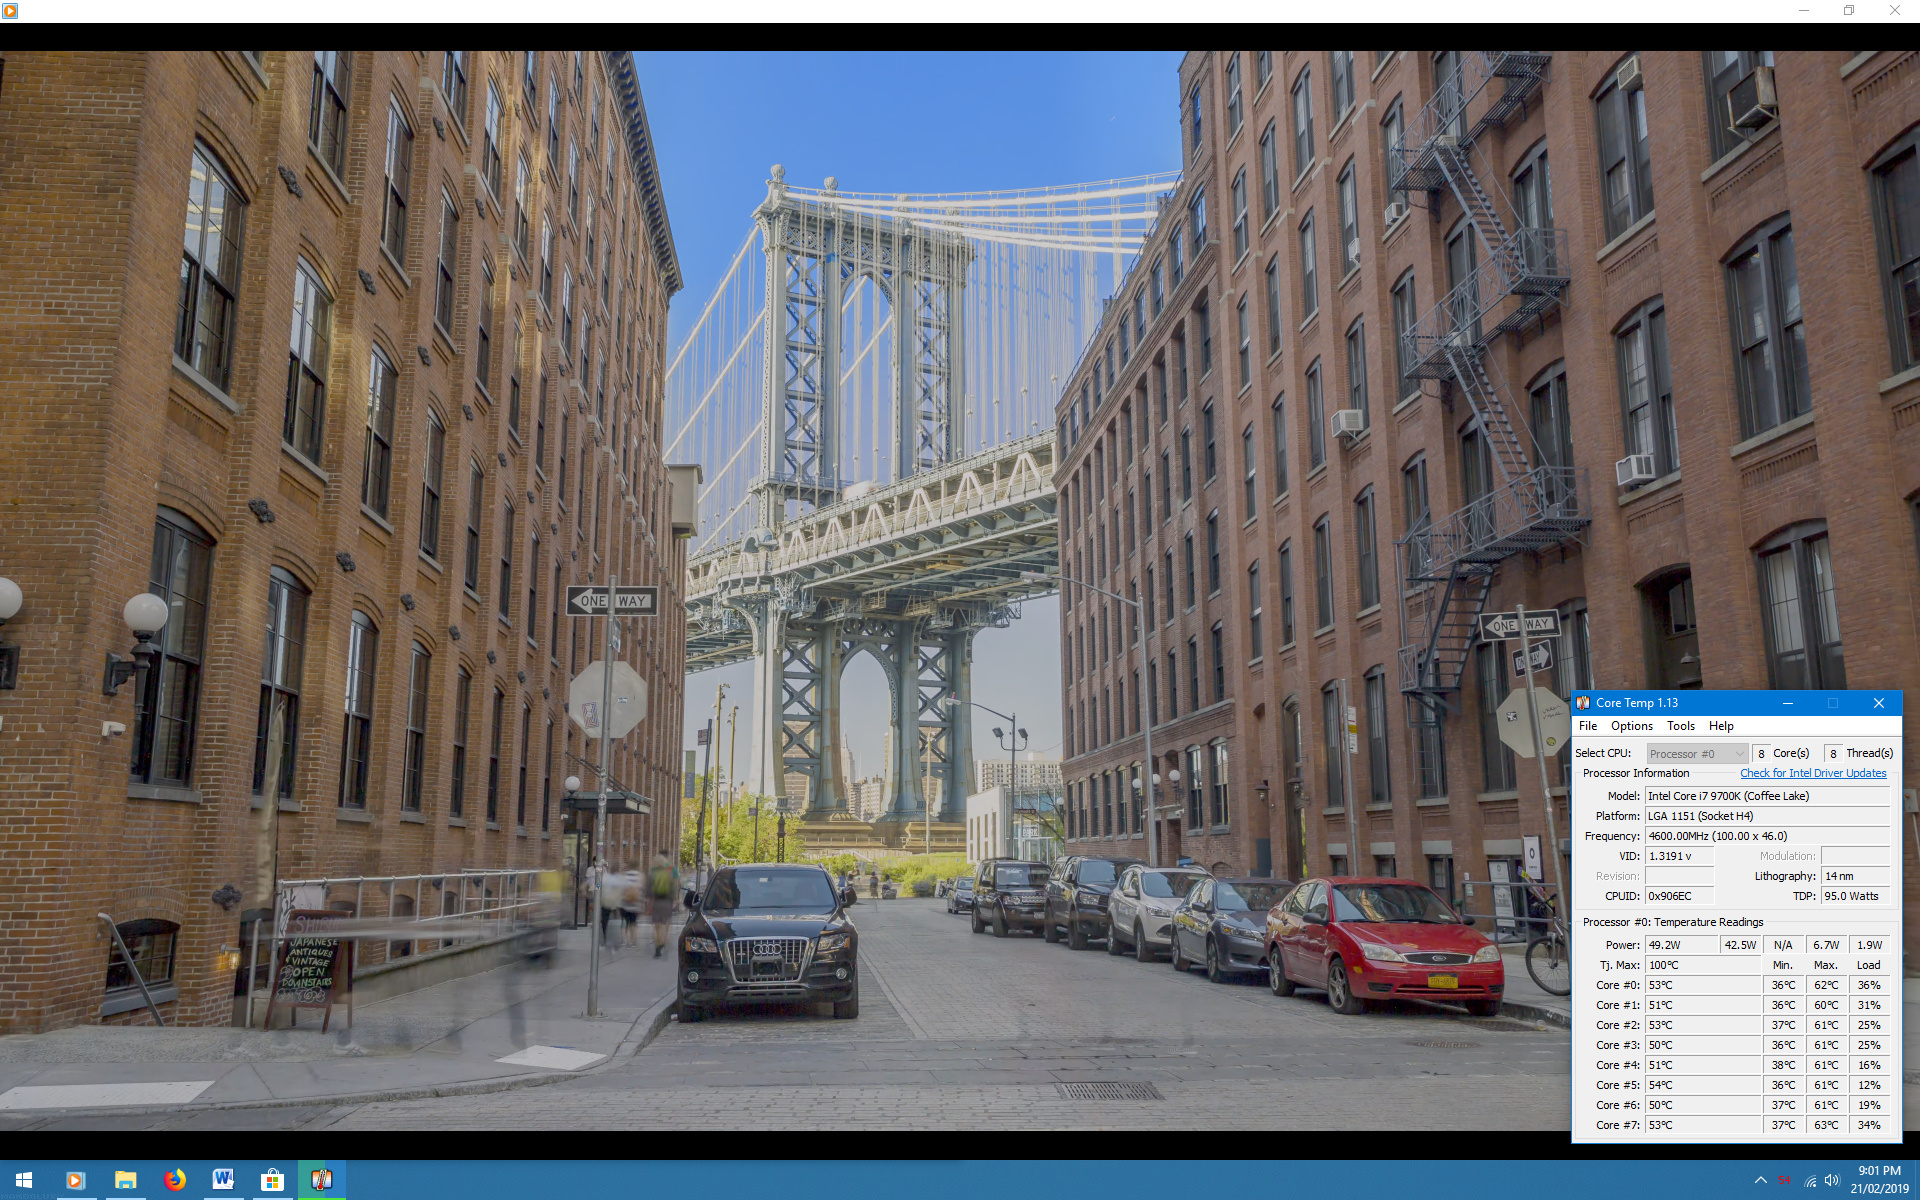

HEVC Video Extensions from Device Manufacturer - This app installs the High Efficiency Video Codec (HEVC), allowing native playback of HEVC (x265) content on Windows 10. Note, there's a paid version of the HEVC Video Extensions on the Store which has replaced this, but this version is free and still available. However, if you use a native Windows player like Windows Media Player, HDR content will not be displayed properly, and CPU usage is high. I recommend using the free VLC player, as covered earlier in this article. It plays HEVC content correctly, and uses less resources. See the screenshot comparison above. Note: The 4K HDR demo video being played in the screenshots is the free New York HDR Demo, which is extremely impressive when viewed on a proper 4K HDR TV or monitor. There are a range of other 4K demos you can download for free from that site.
CopyTrans HEIC for Windows - Although not available in the Microsoft Store, I've included this download here as it goes well with the HEVC video support above. This enables native Windows 10 support for the new High Efficiency Image Format (HEIF), including Apple's proprietary HEIC version. It allows you to view, edit and convert photos taken in this new format, such as those from newer iPhones.
Realtek Audio Console - Covered in the Input, Audio & Optical Drive section, this utility should be installed along with the UWD Realtek driver package, but you can download it separately here.
Ubuntu - Windows 10 provides support for Linux. Open the Control Panel, go to Programs & Features, click 'Turn Windows features on or off', then tick the 'Windows subsystem for Linux' to enable it. You will need to install a Linux distribution; Ubuntu is linked above, but you can choose from others.

Updating Apps: The apps you download, as well as the built-in apps in Windows 10, can be updated via the Microsoft Store. Open the Store at any time, click on the '...' at the top right, and select 'Downloads and updates'. Apps for which an update is available will be listed.
Startup Programs & Services
The single most important aspect of optimizing Windows in my experience is removing unnecessary startup programs and services. It bears repeating over and over again: please take the time to read the Startup Programs and Services chapters of the TweakGuides Tweaking Companion, or for a quicker look, try this page of the Stable Gaming Guide I wrote many years ago on GeForce.com. It's advice that's been echoed in a range of places, such as in this Ubisoft Support FAQs and this Microsoft Article.
The upshot of it is this - removing startup programs and disabling (third party) services is not about saving RAM, or even improving Windows bootup time. It does both of these, but most people have plenty of RAM these days such that a few more MB is not going to matter, and Windows bootup time is extremely fast already. The key reason to remove these programs is to prevent software conflicts. Another good reason is that it can reduce stuttering, even poor network performance. The more you have running in the background on your system, the more variables Windows has to juggle to remain fast and stable.
I can't give you a detailed list of things to remove, as that varies from system to system - see the chapters of the TGTC referred to above for detailed instructions. What I can do is give you some examples from my system, and a quick run through of the general method I use. The free tools you need are Autoruns, MSConfig, and Task Manager.
Autoruns is my favorite system utility. As sad as that sounds, the reason is that it provides a detailed look at all of the programs, services, drivers and scheduled tasks set to launch at startup on your system. At any point in time, such as after installing a new program, I can run Autoruns and quickly see if any new startup programs, or sneaky scheduled tasks, or unnecessary services and drivers, have been installed. Download Autoruns, launch Autoruns64.exe by right-clicking on it and selecting ' Run as Administrator'. To set it up correctly such that it narrows down the list to only those entries which may be truly unnecessary, open the Options menu and make sure all four of the first entries are ticked. Then select the Everything tab and press F5 to refresh the list.
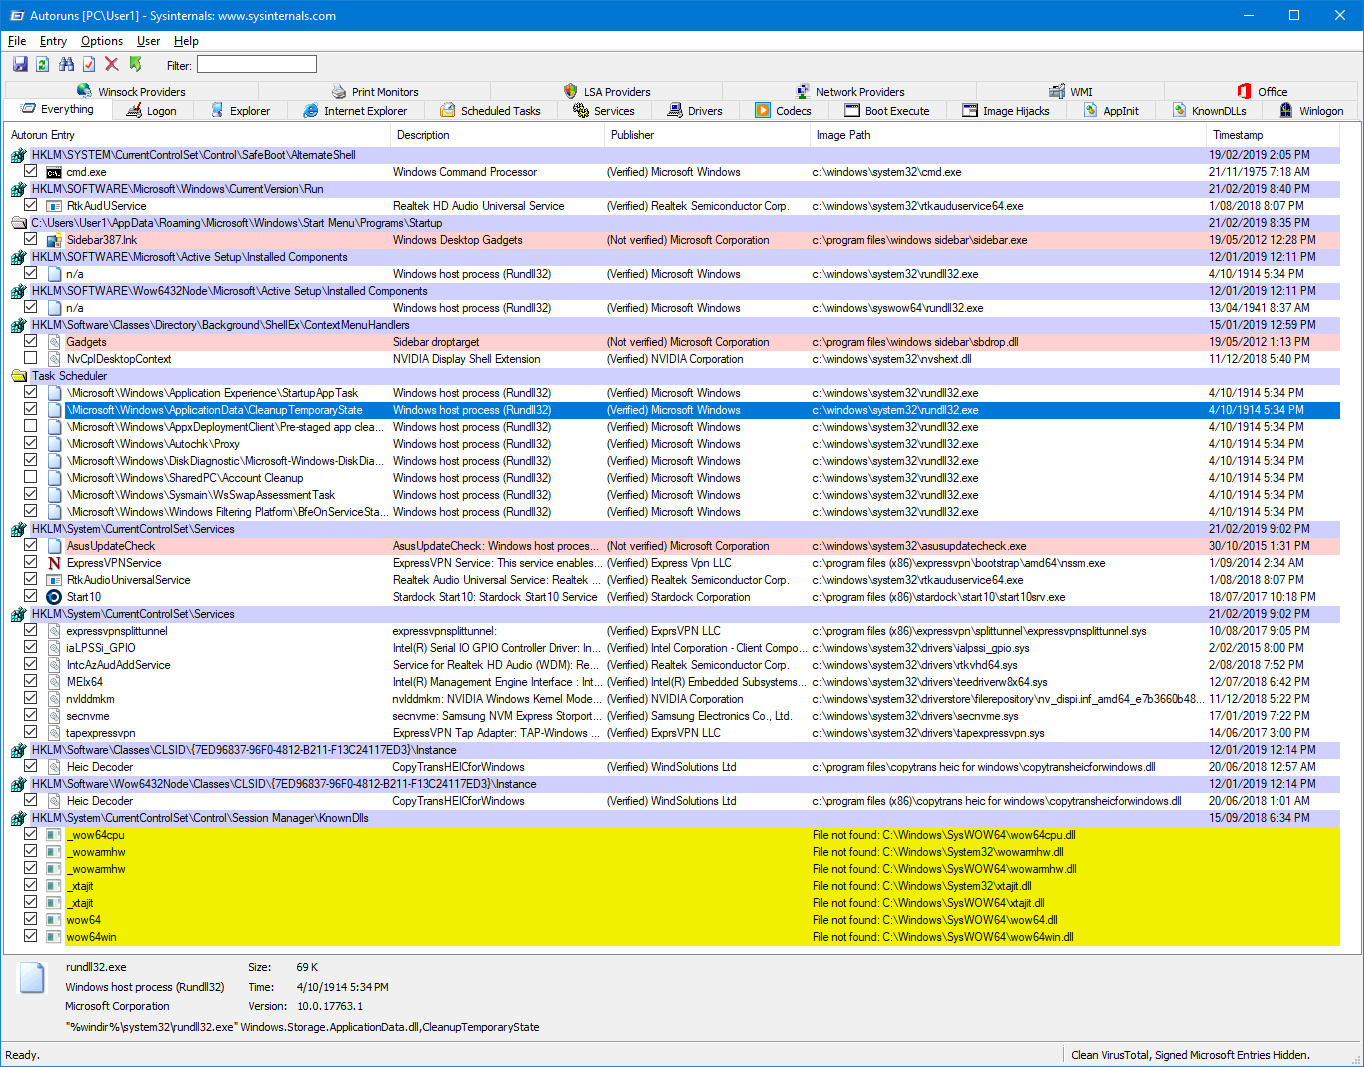
Above is my startup list after optimization. A few tips and quick observations: anything in yellow is generally not a worry as it means the file is missing. Unverified entries require some investigation - right-click on one and select 'Search Online' and do some research; in my case all three of the files shown in pink above are from Microsoft originally, but have been repurposed, hence the pink flag. The two Gadget-related flagged entries are using legitimate Microsoft files, they're just not meant to be used anywhere else but in Windows 7; AsusUpdateCheck has been discussed earlier, it's an MS run32.dll dummy file that's been renamed.
Take the time to reduce this list as much as possible to the bare minimum you need. The rewards will be a much more stable, generally faster and more responsive system.
General Customization

This section provides the main customizations I undertook to get Windows 10 looking and acting the way I want - a cross between the minimalist look of Windows 10, and the richer graphics of Windows 7. Please keep in mind that I applied a range of other minor tweaks and improvements, which are covered in the TGTC. For additional tweaks, tips and troubleshooting advice, I also recommend Tenforums and WinAero, as I've found their material to be quite useful and accurate.
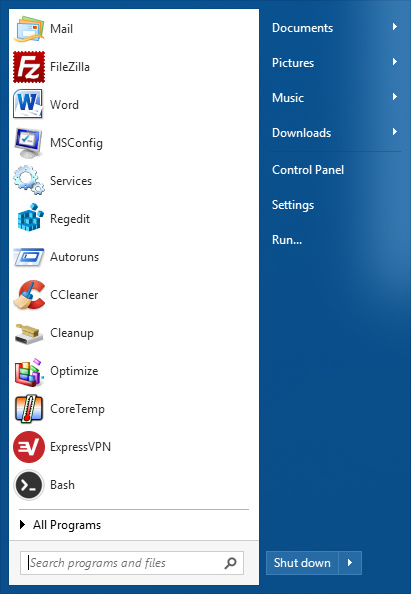
Start Menu Replacement: Windows 10 doesn't provide much in the way of interface customization options. The Start Menu, which appears when you left-click the Windows button or press the WINDOWS key, is also a source of much controversy. After numerous changes, its relative lack of customization options and general appearance remain sufficiently hated that there is a large market for Start Menu replacement utilities. The two most popular ones are the free Classic Shell, and Start10, which is my choice, for only a few dollars. Both are great, but I prefer Start10 as it's much easier get it to look and act the way you wish. Classic Shell is more powerful, but also requires more work.
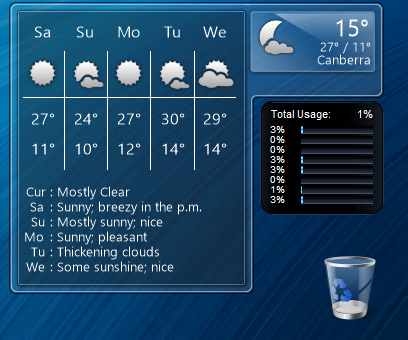
Gadgets: Microsoft killed Windows Gadget support in Windows 8, citing a security issue. Interestingly, this seemed to occur at the same time as they introduced the Gadget-like Live Tiles feature on their own Metro apps. I like Gadgets too much to give them up, and I've long suspected the security issue to be a smokescreen. I currently use two key gadgets: the Weather gadget that comes with the free 8GadgetPack, and the Intel Core Series Gadget (Previously, I used the iStat CPU Gadget) that displays the load on each of my CPU's 8 physical cores.
Transparency effects: I don't miss the Aero Glass transparent interface from Windows 7 all that much. But I did want a touch of transparency on my desktop. Microsoft has already progressively reintroduced more and more transparency into recent builds of Windows 10: the Calculator, the Settings app, and the Taskbar are semi-transparent for example. To that I added a semi-transparent Start Menu courtesy of Start10, the utility also allowing me to increase the Taskbar transparency (60%), and to cap it all off, I switched back to the transparent Recycle Bin of Windows 7 - see below:
Customize the Recycle Bin: The Windows Recycle Bin is the only icon I have on my Desktop. I was getting tired of looking at the clunky Windows 95-inspired default Windows 10 Recycle Bin. There's an easy way to change it:
1. Download custom images for empty and full Recycle Bin that you wish to use - the default Windows 7 ones are available here: Empty Bin, Full Bin. You can use other image(s) if you wish.
2. Extract the PNG files and convert them to ICO format, using the free ICO Convert website. We'll call them BinFull.ico and BinEmpty.ico.
3. Move these ICO files to your \Windows\System32 directory.
4. Go to Settings>Personalization>Themes and click the 'Desktop Icon Settings' link. Highlight the Bin (full) icon, click the 'Change Icon' button, then browse to \Windows\System32 and select BinFull.ico, then do the same for the Bin (empty) icon.
5. One last step: this customization won't work properly in switching the Recycle Bin icon between full and empty. To fix this, open Registry Editor and go to \HKEY_CURRENT_USER\Software\Microsoft\Windows\CurrentVersion\Explorer\CLSID\{645FF040-5081-101B-9F08-00AA002F954E}\DefaultIcon and double-click on the empty and full items in the right pane, and add ,0 to the end of each path. E.g., if it says %SystemRoot%\System32\Binempty.ico then change it to %SystemRoot%\System32\Binempty.ico,0 and press Enter.
Reboot, and the new Recycle Bin should work properly and look much nicer.
Useful New Tips
There are a couple of changes to Windows 10 that now allow for some useful tricks I haven't included in any previous guides:
Registry Editor Address Bar: You can access the Windows Registry Editor by typing Start>Regedit or WIN+R Regedit.exe. Microsoft has added an Address Bar, similar to the one in File Explorer. This means you can now copy and paste complex Registry paths, such as the ones provided further above, into that bar in Registry Editor, and press Enter to jump to the relevant key.
Boot Directly to UEFI BIOS: Because Windows 10 Fast Boot results in an extremely fast bootup time, it's difficult to press the right key in time to enter the UEFI BIOS. The normal way you can access the BIOS is to go to Settings>Update & Security>Recovery and click the 'Restart Now' button, then select Troubleshoot>Advanced Options>UEFI Firmware Settings and restart. If you access the UEFI BIOS often, as I have been this past month to overclock and fine tune my settings, this can be tedious. You can instead create an icon that restarts Windows and boots straight to the UEFI BIOS:
1. Right-click on the Desktop and select New>Shortcut.
2. In the Location box, type shutdown.exe /r /f /fw /t 0
3. Click Next and give the shortcut a descriptive name, e.g., Boot to BIOS.
4. Whenever you click this icon, Windows will immediately restart, and boot you into the UEFI BIOS environment.
You can substitute another value in place of the 0 if you want to have more time before the system restarts, e.g. /t 5 for a 5 second countdown before restart occurs.
Clean Up File Explorer
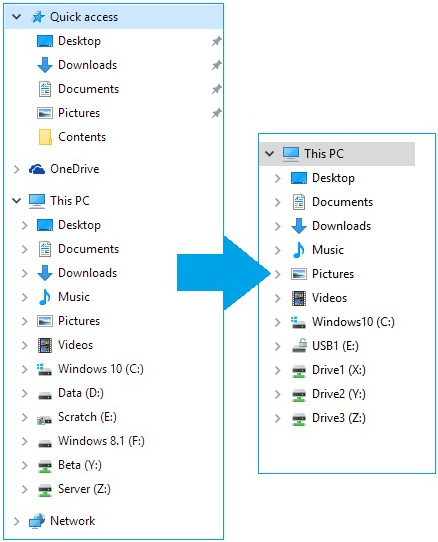
Windows 10 took a big leap forward in cleaning up the File Explorer interface when it introduced the This PC view a while back. Unfortunately, a range of superfluous items have quickly been added to the Navigation Pane on the left hand side, making it look more cluttered. Here's how I configure my File Explorer window for an easy-to-use, cleaner look:
1. In Control Panel, open File Explorer Options and change the 'Open File Explorer' setting to 'This PC'.
2. Right-click in an empty area of the navigation pane and untick 'Show libraries' and 'Show all folders'.
3. If you have any Network drives, such as the ones we added for our Ghetto NAS, as covered in the Network section earlier, make sure they're all mapped and displaying correctly under This PC. We can then remove the Network category in the navigation pane by opening Registry Editor, going to HKEY_CLASSES_ROOT\CLSID\{F02C1A0D-BE21-4350-88B0-7367FC96EF3C}\ShellFolder then double-clicking on the Attributes item and in Hexadecimal view, entering the data: b0940064 in place of what is there. Note, in Windows 10 64-bit, you need to repeat the steps above, this time going to HKEY_CLASSES_ROOT\Wow6432Node\CLSID\{F02C1A0D-BE21-4350-88B0-7367FC96EF3C}\ShellFolder double-clicking on the Attributes item and in Hexadecimal view, entering the data: b0940064.
4. To remove the Quick Access item, open Registry Editor and go to HKEY_LOCAL_MACHINE\SOFTWARE\Microsoft\Windows\CurrentVersion\Explorer then create a new DWORD (32 bit) and call it HubMode, then assign a value of 1 to it.
5. To remove the OneDrive item, see earlier in this section.
6. To remove the HomeGroup item, upgrade to a newer version of Windows 10, as Microsoft removed this feature in Version 1803.
7. To remove the 3D Objects folder, open Registry Editor, go to HKEY_LOCAL_MACHINE\SOFTWARE\Microsoft\Windows\CurrentVersion\Explorer\MyComputer\NameSpace, and right-click on and delete the {0DB7E03F-FC29-4DC6-9020-FF41B59E513A} key; on Windows 10 64-bit, you also need to go to HKEY_LOCAL_MACHINE\SOFTWARE\Wow6432Node\Microsoft\Windows\CurrentVersion\Explorer\MyComputer\NameSpace and right-click on and delete the same {0DB7E03F-FC29-4DC6-9020-FF41B59E513A} key again.
8. The duplicate drive bug is one that seems to constantly reappear in Windows 10. If some of your drives, such as USB drives, are listed twice, you can resolve this by opening Registry Editor, going to HKEY_LOCAL_MACHINE\SOFTWARE\Microsoft\Windows\CurrentVersion\Explorer\Desktop\NameSpace\DelegateFolders and deleting the {F5FB2C77-0E2F-4A16-A381-3E560C68BC83} key by right-clicking on it and selecting Delete. Note, in Windows 10 64-bit, you will also need to also go to HKEY_LOCAL_MACHINE\SOFTWARE\Wow6432Node\Microsoft\Windows\CurrentVersion\Explorer\Desktop\NameSpace\DelegateFolders and delete the {F5FB2C77-0E2F-4A16-A381-3E560C68BC83} key there.
Reboot and your File Explorer should now look a lot cleaner.
Last Minute Tips
Before I sign off, let me cram a few more last-minute tips into the article, because they just came to mind.
Reduce Startup Delay: I'm glad I remembered to mention this one, because it's so simple, but noticeably improves Desktop responsiveness straight after bootup. As of Windows 8 Microsoft added a short delay between when Windows reaches the Desktop, and when it loads programs. This is most noticeable if you have Gadgets installed (see above) - they will appear on the Desktop around 3 seconds after it loads. You can remove this delay with no negative impact. Open Registry Editor and go to: HKEY_CURRENT_USER\Software\Microsoft\Windows\CurrentVersion\Explorer, then right-click on the Explorer key and select New>Key, then call it Serialize. Right-click in the right pane and select New>DWORD (32 bit) and call it StartupDelayInMSec, then give it a value of 0. Reboot Windows, and the Desktop will now load any programs more quickly.
PageFile: This one relates to the age-old argument regarding the size of the Windows PageFile. I dealt with this comprehensively in the Memory Optimization chapter of the TGTC. I just want to add that despite now having 32GB of RAM, I still recommend that you do not attempt to "disable" the Page File, and haven't done so myself. I'm running a fixed 2GB PageFile for simplicity's sake (technically the TGTC recommends a 1MB - 2GB PageFile for my circumstances). You cannot force Windows to use your RAM; think of the PageFile as similar to a framebuffer on a GPU in some ways - it needs to be there as an accesible location Windows can use while managing your memory.
Restoring System Health: After all of the testing and overclocking and various odds and ends I have installed and uninstalled this past month or so, it's taken me the best part of an hour to tidy up my system and get it just right. If you want to give your system a quick health check after some heavy overclocking or other shenanigans, then run a system file check and repair any that may be corrupted or missing as per this Microsoft Article:
1. Right-click on the Start button (or press WIN+X) and select Command Prompt (Admin).
2. Type the following and press Enter: DISM.exe /Online /Cleanup-image /Restorehealth
3. When that's complete, type the following and press Enter: SFC /Scannow
Note that virtually every time I've run this, it's found corrupt files, but checking the logs reveals nothing. I suspect it considers some changes, such as disabling certain Microsoft services, or some Registry Edits, to be a sign of corruption.
You can also open a Command Prompt and enter chkdsk /f to run a full disk scan at next bootup, again to try to find and automatically repair any corruption.
Free Software I Use
There's no need to buy commercial software when your needs can be served by quality free software. There are also several built-in Windows tools that I use which, despite their poor reputation, actually do a great job. Here's a short but eclectic list of free software I have installed right now:
7-Zip - Archival utility
FileZilla - FTP manager
Firefox - Browser & PDF Viewer
VLC - Media player
GIMP - Image editor
Audacity - Audio editor
HandBrake - Video encoding & basic video editor
IrfanView - Image viewer
eM Client - Email client free for up to two email accounts
BitLocker - Drive encryption
Windows Disc Image Burner - Disc burning
Windows Defender - Anti-malware package
Windows Backup - System Image backup tool
The only commercial software I use is Start10 and Microsoft Office 2010, which I've been using for almost ten years and have no plans to replace.
Update: I bit the bullet and finally removed Windows Media Player (which I'd been using just for music), Windows Live Mail and Windows Live Photo Gallery. I liked the way they intergrated neatly into Windows, but they're all considered unsupported "legacy" products by Microsoft now, and it shows. I tried to get the Thunderbird email client to look and act the way I wanted it to, but in the end I decided upon eM Client, a sleeker and easier-to-configure free alternative (I only have 2 email accounts). I also switched to IrfanView, but it took quite a bit of time to configure it to my liking. Lastly, given VLC is now my all-purpose media player, not just for movies, I invested more time and effort into getting it look a bit more sleek, e.g. removing the VLC cone icon, getting a pop-up translucent minimalist set of player controls when in fullscreen mode, etc. Too many changes to detail here (Edit: Now covered in more detail in the VLC Tweak Guide), but the upshot of it is that thankfully, the developers of these free tools are supporting their software and providing customization options for users, not to mention continually adding more functionality.
Update 2: In late 2019, I've continued to pare down the third party software I use. The list above has been edited to reflect this, but briefly, the changes are that I've dropped the use of any dedicated PDF Reader software and use the Firefox browser for my PDF viewing needs (as covered in my Site Update of 14 July on this page); and I've uninstalled ImgBurn because I've found the built-in Windows Disc Image Burner utility, accessed by right-clicking on any ISO file and selecting 'Burn disc image', is more than enough for my basic burning needs.
Conclusion
This article took far, far longer to put together than I had imagined. What was going to be a quick week or two writing a glowing report about my new system, has ended up being a lengthy learning experience on virtually every aspect of my new PC and its capabilities and quirks. I've experimented, researched, read and consulted on a lot of information, and in the process, I am now quite confident that I'm getting the most out of my system. Part of the reason it's taken me so long to write this article is that I've also tried to ensure that this learning is passed on in a form that can be of benefit to you. So I sincerely hope that you've found some part of this material useful.
When I first announced that I was going to buy a new system, I mentioned that this would likely be the last desktop PC I will ever build. I wasn't teasing or trying to be sensationalistic. Having gone through the process recently - and despite being happy with the results - I have to say that it's only confirmed in my mind that building a PC is an anachronism. I don't say this with any joy, it's just the way things are headed.
For better or worse, I have no doubt that most people will come to view custom-built PCs the way we would view mid-century custom-made cars: wonderful time capsules and a credit to the dedication of their builders, but who has the time, money, or patience to do that now? I firmly believe we're rapidly heading towards an era where a single small computing device we can carry with us, will wirelessly connect to dumb screens, keyboards, tablets, appliances, vehicles etc. and handle our computing. Much more efficient than having one computer system in a PC case, another computer system in your TV, another one in your tablet, phone, car, etc. Microsoft had the same basic idea in the form of what it dubbed Continuum. Of course, Microsoft managed to screw it up. But the idea is sound. That's what I see as the (near) future.
Is the death of the PC as we know it such a bad thing? I think there's an important point that we need to remember as PC enthusiasts: it's not hardware that separates the so-called "PC Master Race" from the "console peasants", it never was - it's the concept behind what makes someone a PC guy and what makes someone else a console guy. PC guy is someone who is willing to learn, to put some effort into getting more out of what they have, and appreciating the finer things; console guy is someone who just uses the easiest available solution, with little thought or knowledge, and doesn't care too much about quality.
So if you take away only one thing from the discussion, it's this: you can always be a PC guy, even when PCs die off.
Until next time, take care!
|
|