
Hardware Confusion 2019
[Page 8] The PSU & Case
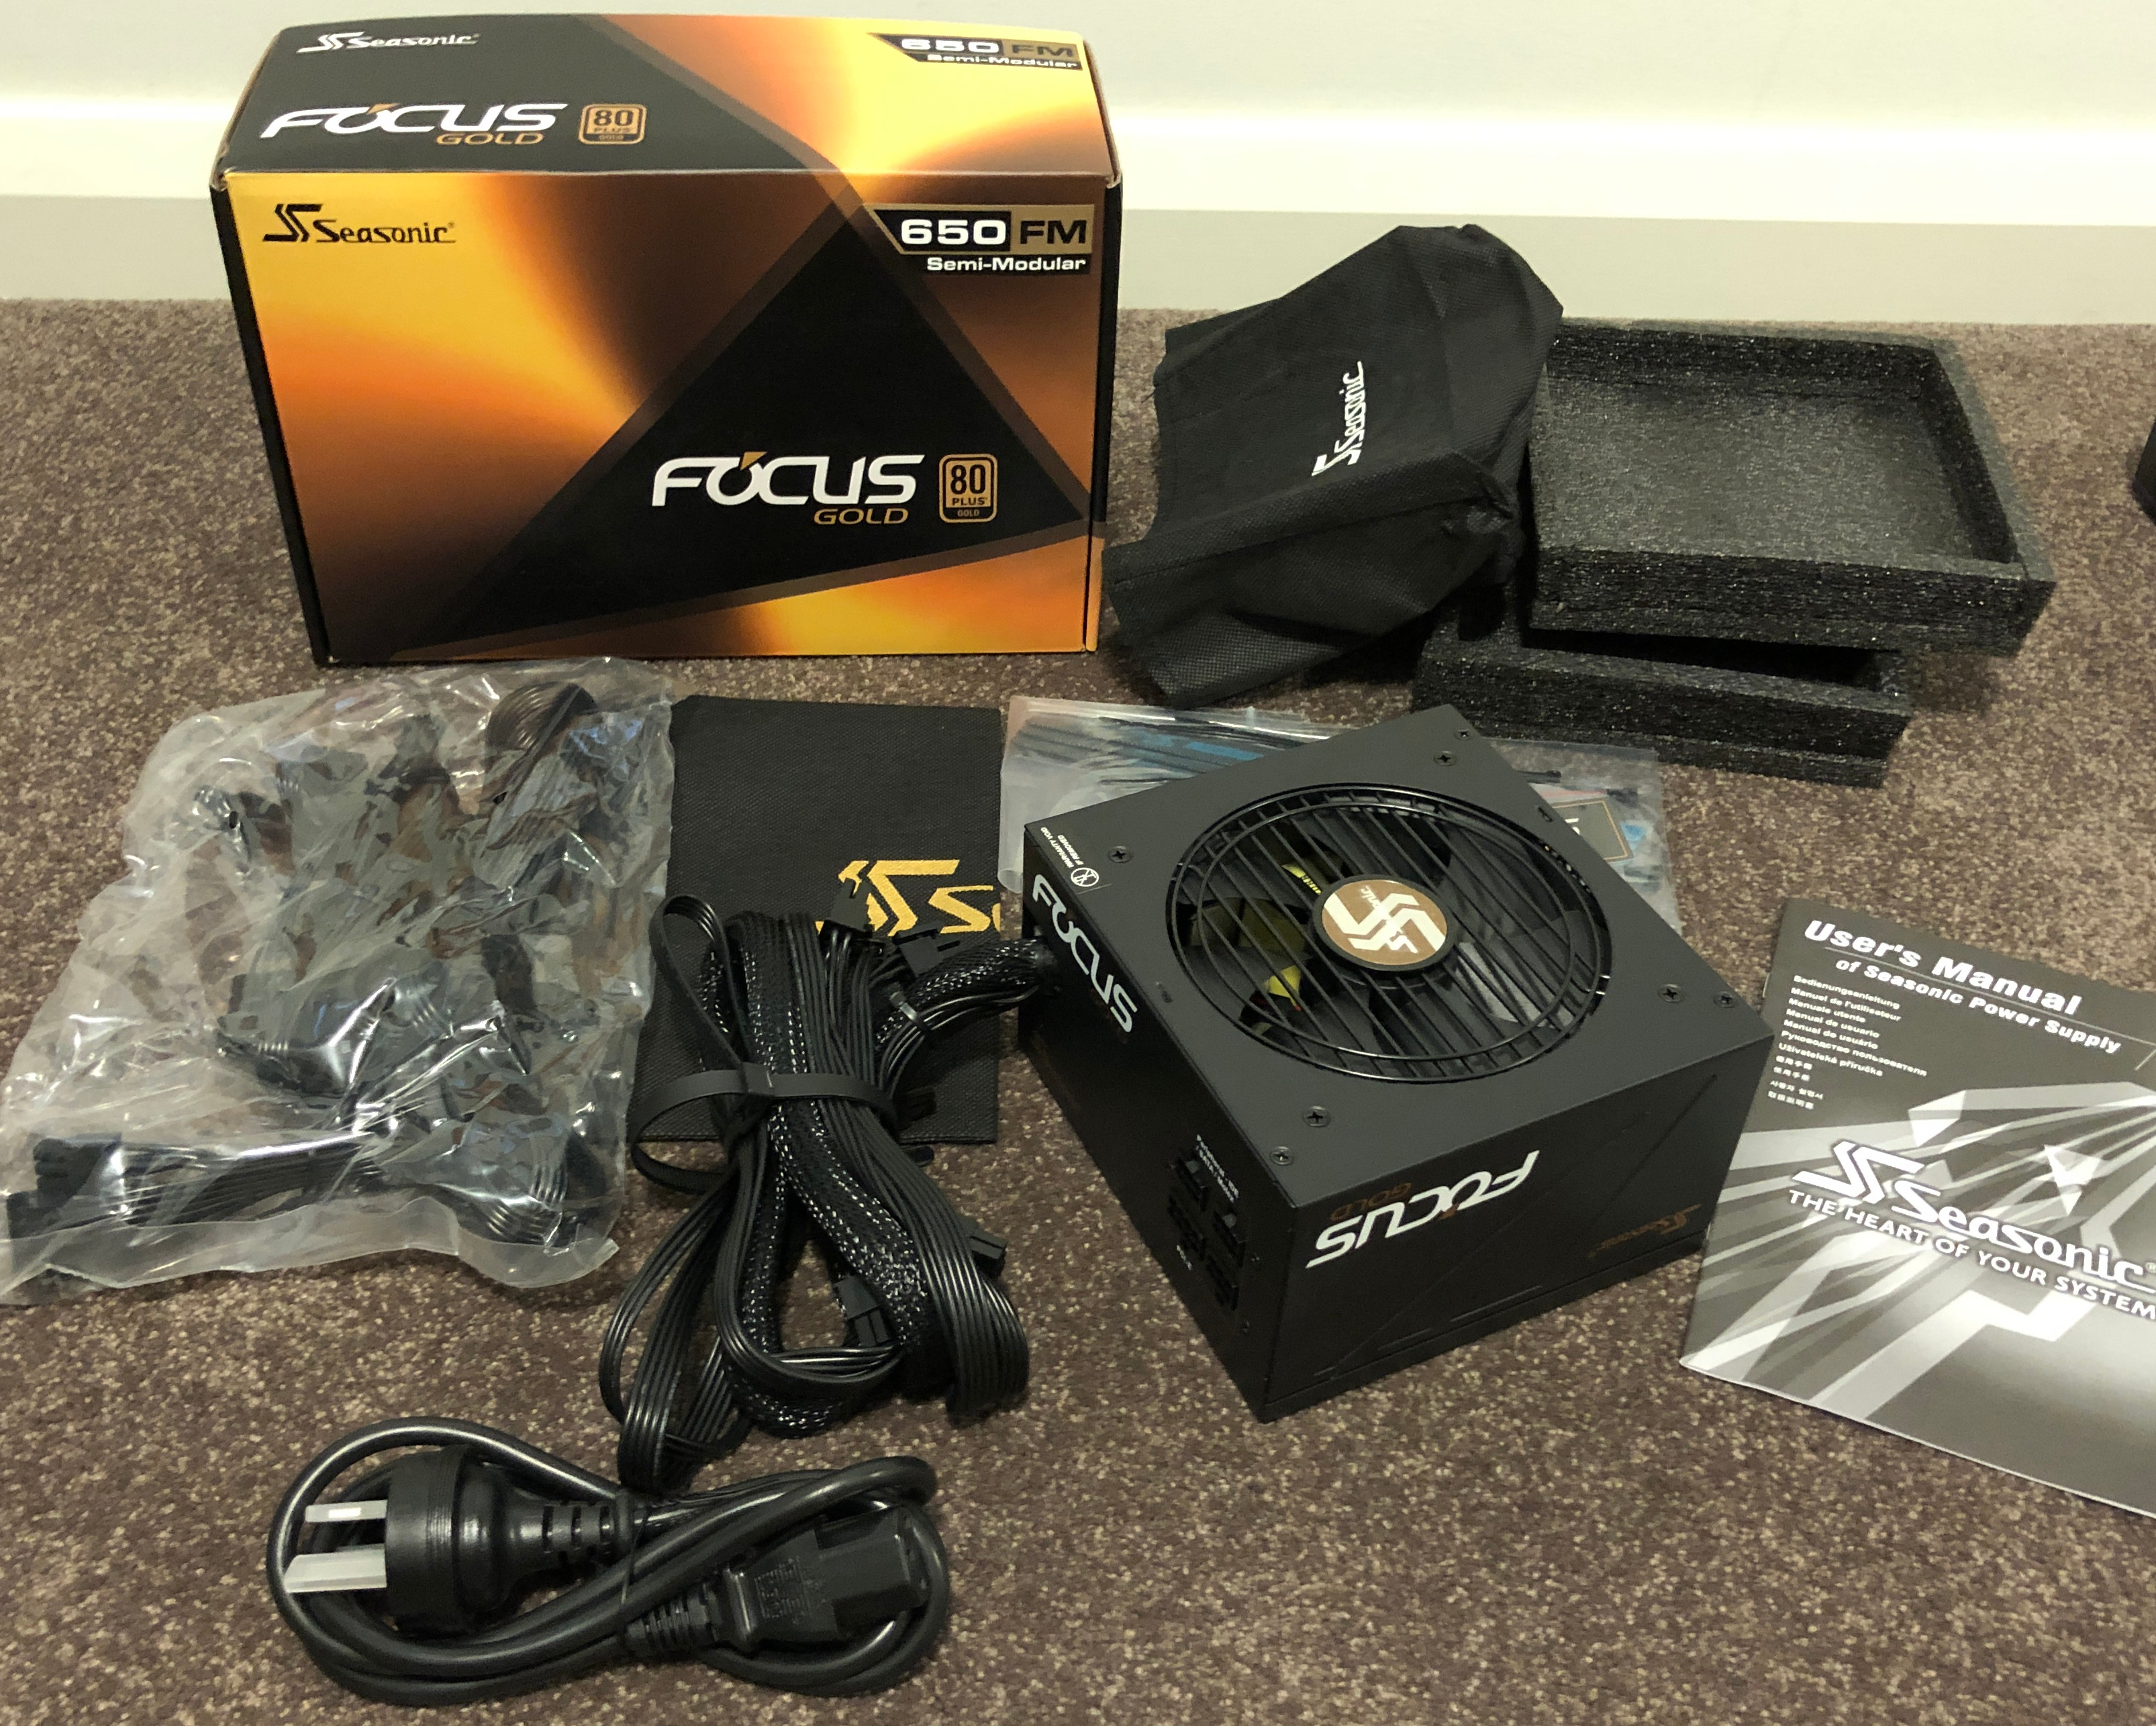
The PSU: Seasonic Focus Gold 650W
I made a point of stressing the importance of the Power Supply Unit (PSU) in the previous Hardware Confusion article, and things are still the same: the PSU plays a critical role in maintaining system stability, especially when components are overclocked. The main difference between 2009 and now is that most people seem to be aware of the need to get a good PSU. After the Seasonic 700W PSU in my old system survived ten sometimes very stressful years without so much as developing even the smallest quirk or annoying noise, I was happy to stay with Seasonic this time around - especially, as noted earlier, they've decided to increase most of their warranties to 10, even 12 years. This is a clear indication that there are many other Seasonic users like me who have proven the longevity of their PSUs, and they feel comfortable in formally backing them for even longer.
I briefly considered purchasing an 850W Seasonic PSU for this new system, thinking that if I hold onto this system for another ten years, the PSU should have plenty of headroom. PSUs lose efficiency over time, as components like capacitors age, so while providing the same wattage to your components, they'll be drawing progressively more power from the wall socket. But as before, the best method to work out how much power you really need is to use a Power Supply Calculator rather than just guess. It told me that even accounting for higher than normal average clock speeds and voltages (4.7GHz at 1.3v), and 90% TDP, the most power my entire system was likely to need with every single component at close to full load would be 448W, which the PSU calculator bumped up to 498W as its recommended PSU wattage.
The 850W unit was clearly overkill, so I saved quite a bit by knocking the PSU down to a 650W Seasonic unit. Even then, 650W still provides plenty of headroom above the recommended 500W. I have no plans to add anything to this PC that will draw significantly more power, so I'm all set.
Similar to my previous Seasonic PSU, this 650W unit is semi-modular, meaning only a few key cables are fixed, and the rest are provided separately, so you can plug in only the cables you need, greatly reducing cable clutter in the case. Installation was quite easy, the case provides a dedicated enclosure at the bottom for the PSU. The only real consideration is whether the main PSU fan should face up or down. There's no definitive answer; it depends on your case and environment. The fan is a sucking fan, meaning it sucks air into the PSU to cool the circuitry, then vents the hot air out of the smaller fan opening that should point outwards from the rear of the case. Your main goal should be to ensure that the large PSU fan is facing in a direction with the greatest potential source of cool air. In my case, I decided to face the PSU downwards, drawing in the cooler air from the small space underneath the case. If it faced upward, it would typically draw in the hotter air being expelled by the CPU, GPU, motherboard and RAM into the case.
Only one small hitch appeared before I could finalize my purchasing decision for this unit: there were reports that this particular Seasonic 650W PSU was causing problems on some GTX 970 and RX Vega GPUs, and I have a GTX 970. But a little research shows that this is a problem unique to the GTX 970 Strix, as it has a high voltage ripple (a replacement PCI-e cable can resolve this issue), and the Vega because it has very high voltage spikes that can trigger the safety mechanism on the PSU; newer units should be built with more tolerance for this. In any case, neither issue affects me.
All up, this was the easiest purchasing decision I made when building this system. Use a PSU calculator to determine your wattage, then buy the best quality you can find. I recommend Seasonic, but whichever brand you prefer, just be sure to read a reputable review of it, preferably by the recognized leader in PSU reviews Jonnyguru.
The Case
Case: Fractal Design Define R6 Black
For my first couple of self-built PCs starting back in 1999, I used fairly generic beige box cases, such as the stunningly bland AOpen H600A, which, while adequate and not hideous, was not particularly well-designed, either from an aesthetic or functional point of view. As I learned more about PCs, the importance of a good case became more apparent to me. For example, no amount of internal cooling helps if the case itself doesn't allow sufficient intake of cool air and/or doesn't expel the hot air properly. I also tried to steadily improve the overall aesthetic of my systems, but it was never a major point of concern for me. I'm typically far more fascinated by what I see on my computer screen than in my plain, minimalist surroundings.
Given this is likely the last desktop PC I'll be building, I wanted it to go out on a high note. I wanted to get as close as possible to my ideal case, hitting the "Goldilocks Zone" in all areas: a sleek, black, mature, elegant case, relatively compact but providing plenty of airflow, but with minimal noise. As I mentioned earlier, I turned to the good people on the Overclockers Australia forums, where I'd been a regular and even a forum Admin at one point, since 1999, for suggestions. As we compared what I wanted with what was available, options that were floated included:
The Cooler Master MC500M
The Phanteks P300 Tempered Glass
The Cooler Master Masterbox Lite
I even briefly thought about going down to ITX size with the Fractal Design Node 202.
In reality, none of these cases really met my needs. I didn't want glass side panels, I didn't want plasticky or overly-elaborate designs, and I didn't want to go ITX as it would be too restrictive in terms of airflow. To add to my worries, I wanted a case that could fit my Blu-ray drive, narrowing down choices even more. Then one member recommended the Fractal Design R6 Black, and I instantly knew it was what I was after: a 2001-esque 'black monolith' appearance; sophisticated, mature exterior aesthetics; minimal lighting and tastefully restrained front panel; completely sealed and lined with sound-deadening material; compact yet spacious due to a well-designed modular interior; and yes, it even had a single 5.25" drive bay that would fit my Blu-ray drive and allow easy access to it. I was sold; this was going to be my next case.
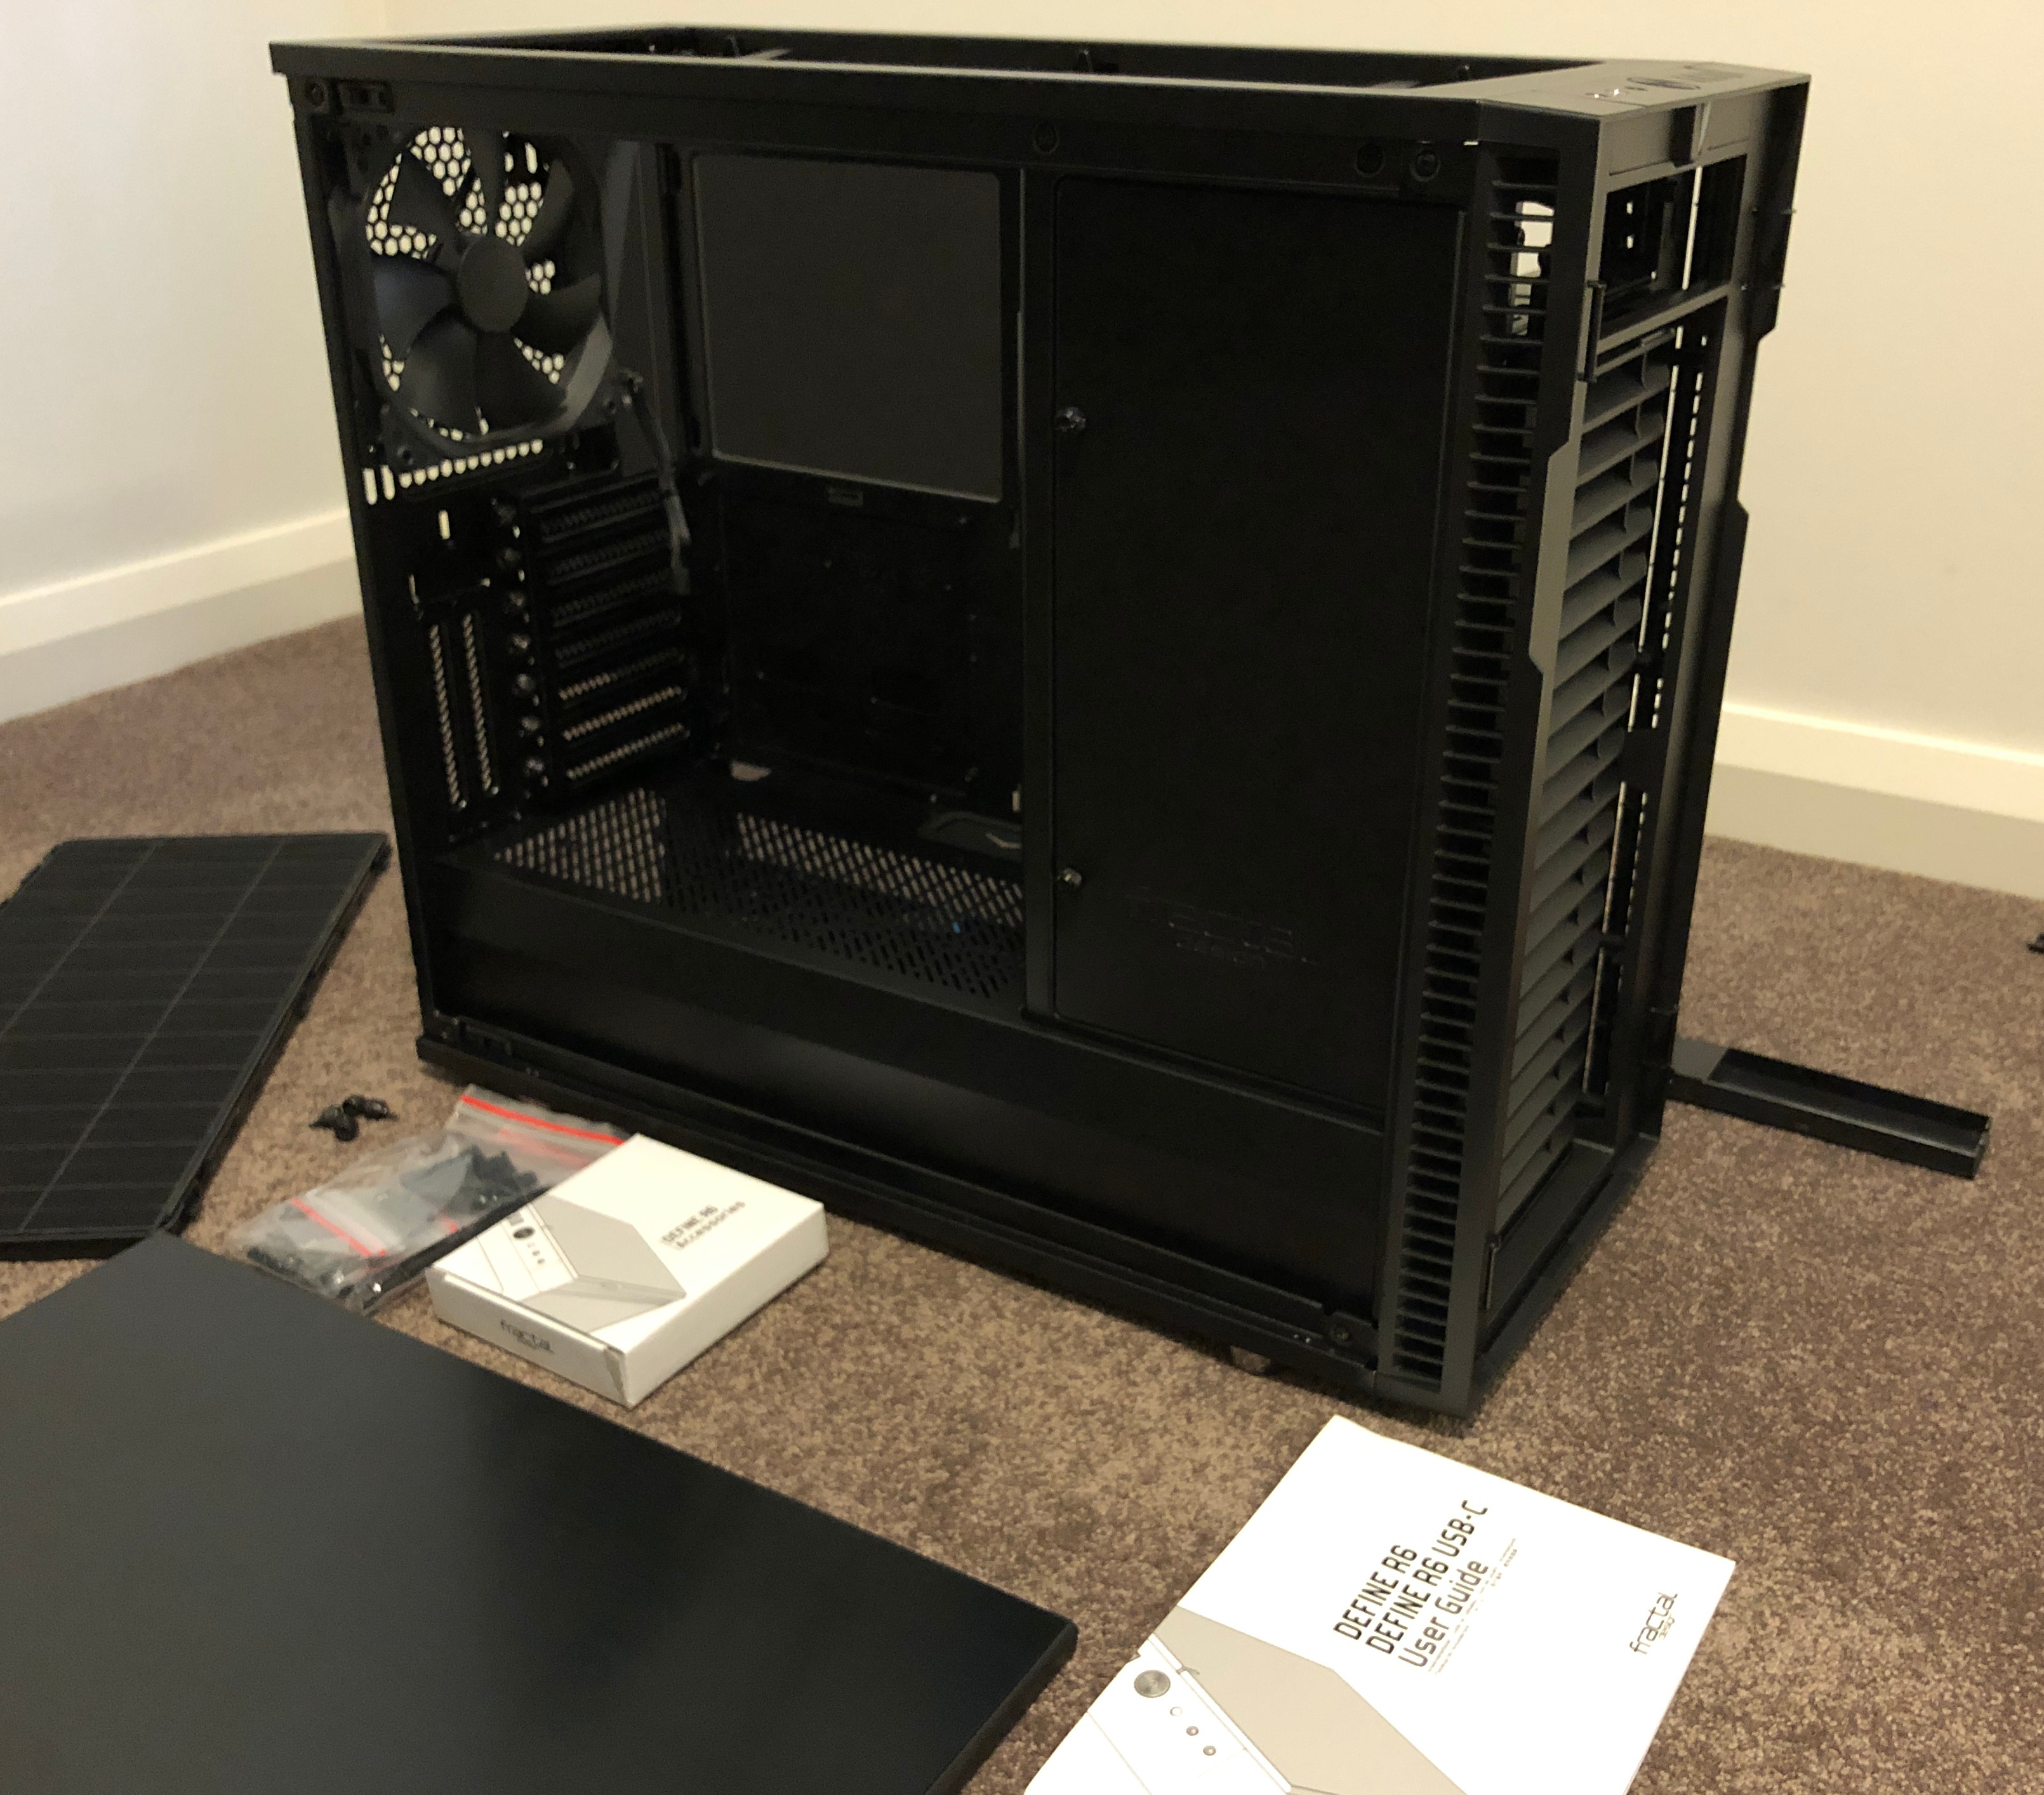
In assembling my system, this case has been a joy to use. The instructions that come with it are clear, no important screws or internal pieces were missing, everything is extremely well thought out. The modular nature of the interior means that you can remove almost everything you don't need, leaving a lot of room for airflow. This is particularly true if you use an M.2 SSD as your only system drive, like I do, which means that you can strip out all of the drive bays at the front of the case. The Blu-ray drive I installed goes into a dedicated 5.25" enclosure at the very top of the front area, above the front intake fans, so it doesn't interfere with airflow whatsoever. Equally, for watercooling aficionados, and people with different cooling and lighting needs, the case allows a wide range of configurations so you can use the space optimally.
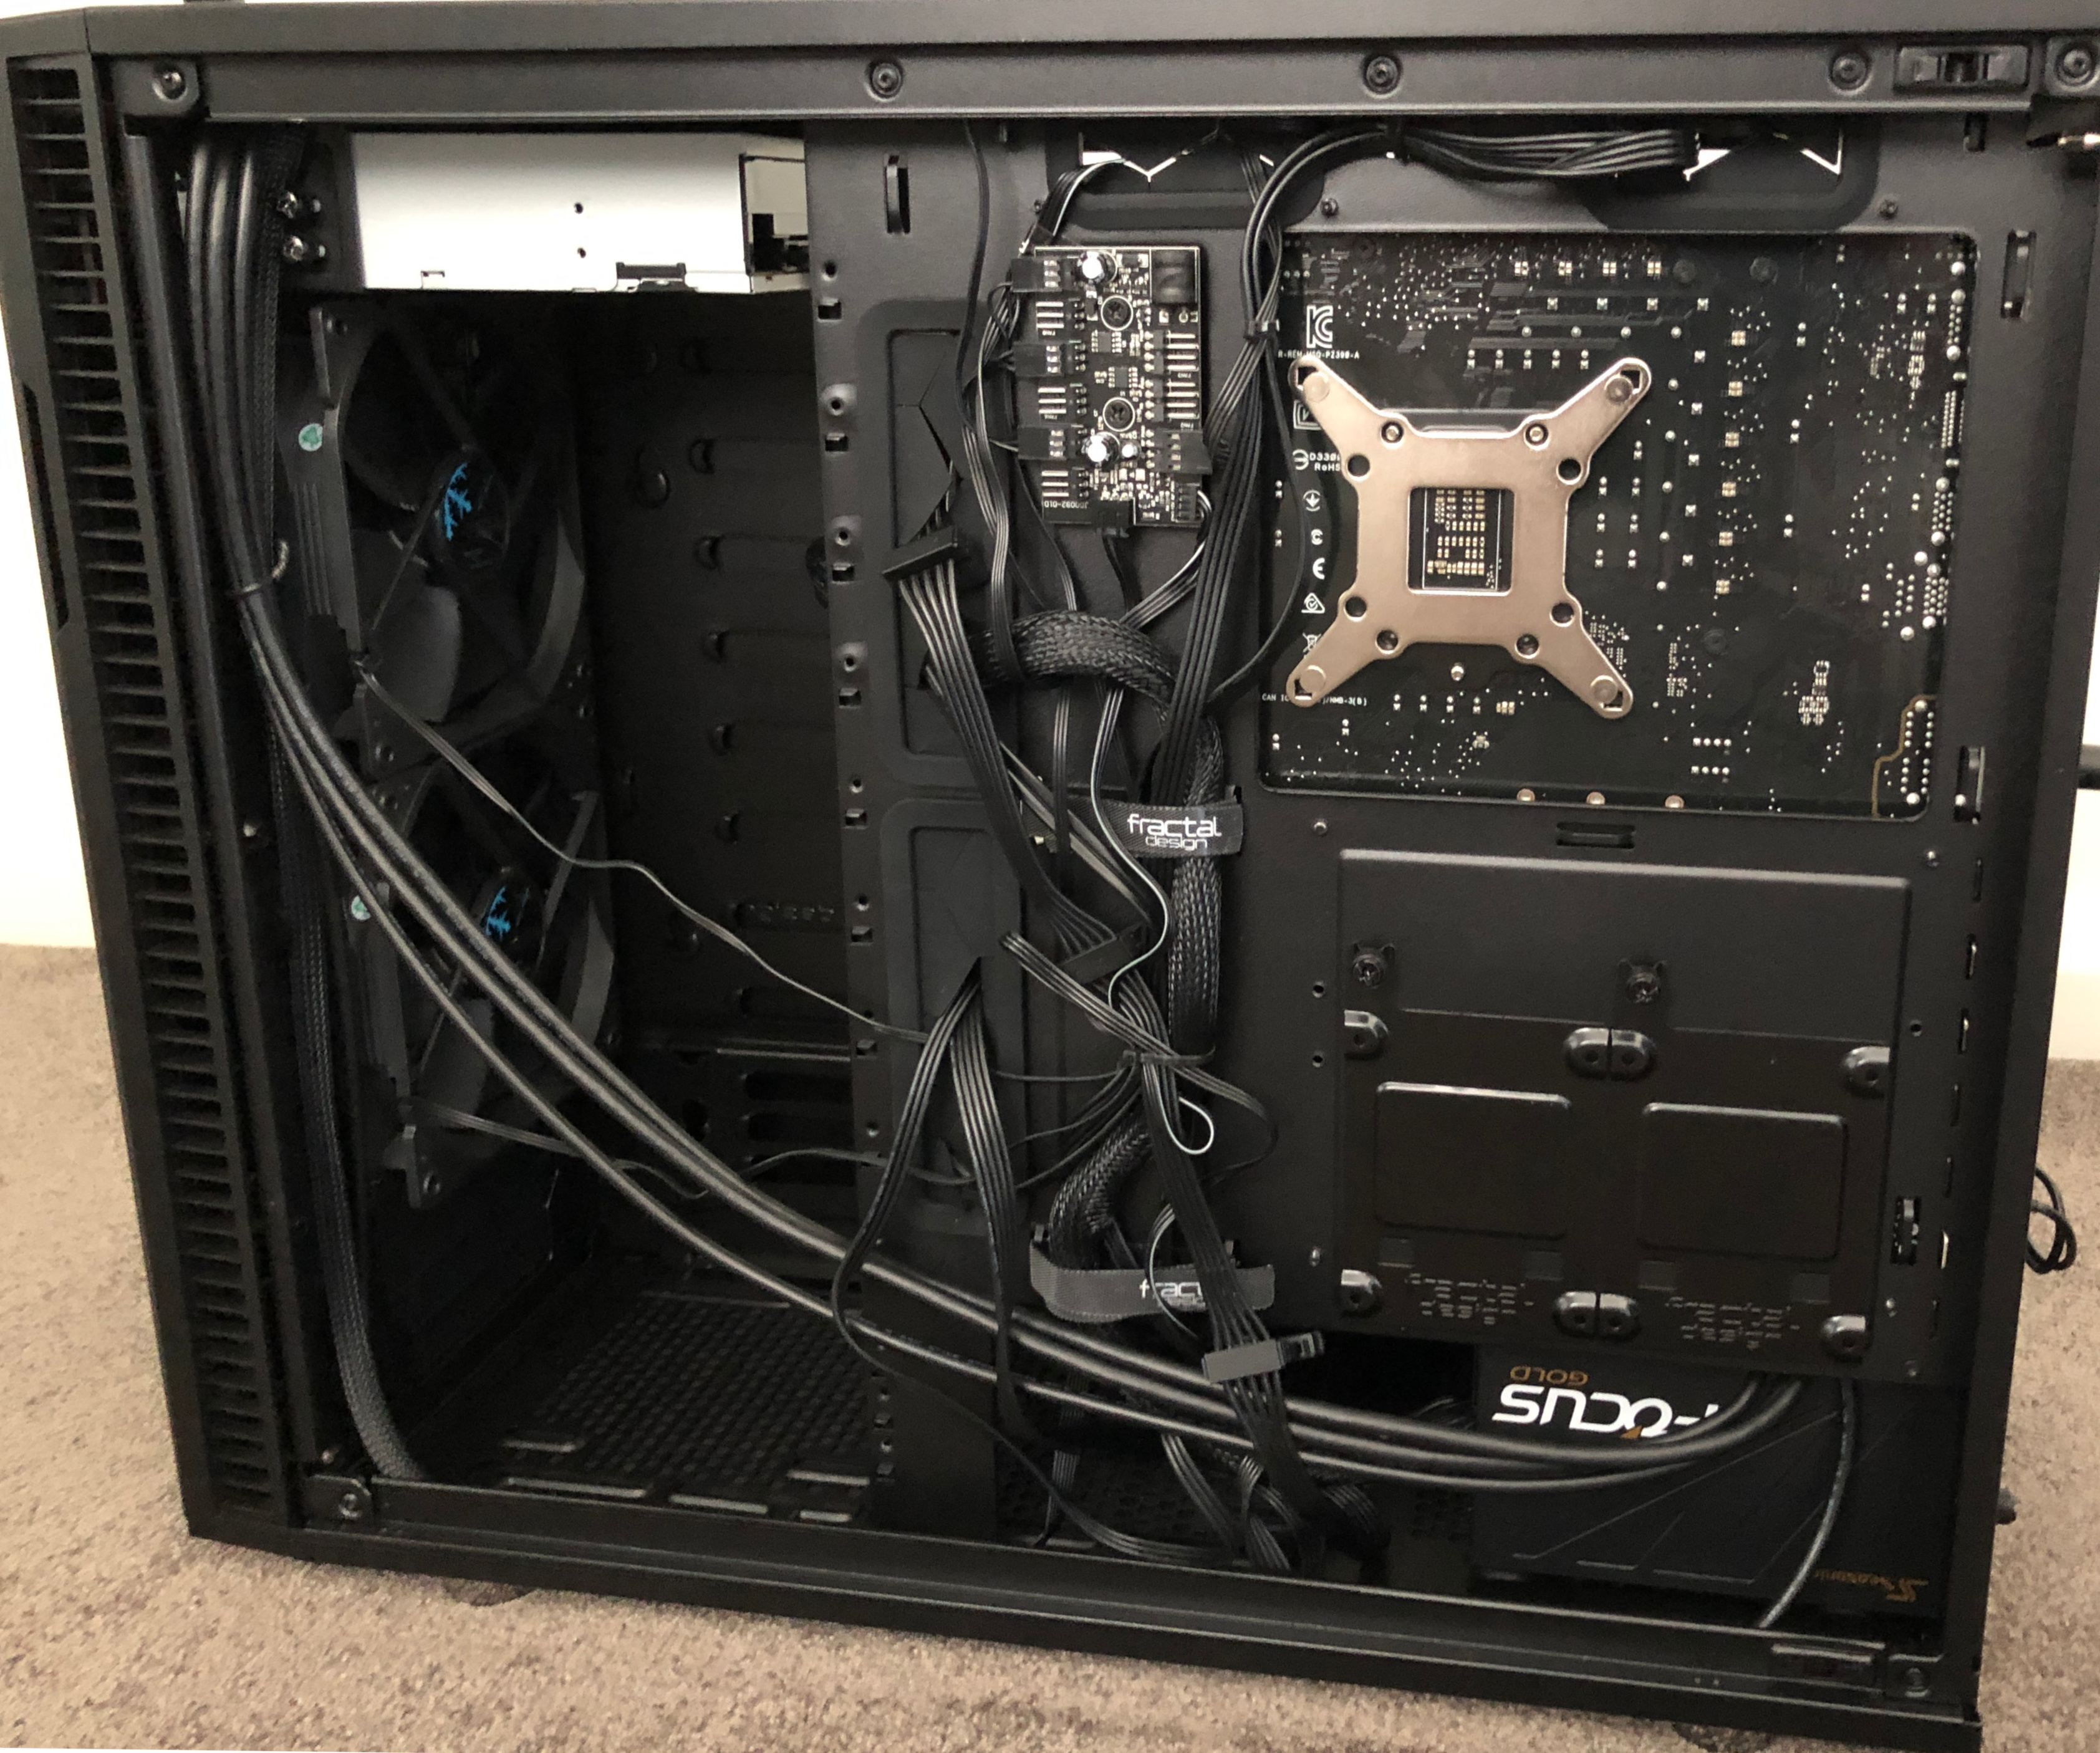
The rear of the case is designed to secure all of the cabling out of sight and out of the way of the motherboard and your components. There are several built-in straps to secure the cabling, along with some thin black zip-ties, and several built-in soft black plastic slots through which you can neatly pass the cables from the rear to the front. A fan hub is also provided at the rear, allowing you to plug in the 4-pin CPU fan, along with the three 3-pin case fans provided (X2 GP-14 fans, 2x140mm front, 1x140mm rear), and then pass a single 4-pin fan cable from the hub to your motherboard's 4-pin CPU fan header. See the System Core section for more details on configuring the fan hub in the UEFI BIOS. Note that the case also provides full access to the motherboard area directly behind your CPU, so you can install or replace the baseplate for a CPU cooler for example without having to remove the motherboard.
The case fans are more than adequate for my needs, because I don't overclock heavily, and my CPU fan is lined up almost perfectly with the front and rear case fans, so that there's an unfettered flow of air through the case from front to back. I've opted for a completely closed case setup due to noise being a high priority, so effectively, the biggest obstruction to the free flow of air is the case's front door. But there again, the thoughtful design has me covered; there are subtle air intake vents on the right and left sides of the case, just behind the front door area, so running this system with the door closed doesn't choke off the intake.
While on the topic of fans, I've noticed that there's still some confusion regarding determining the direction of airflow, so let's just clarify it once and for all. How can you tell if a fan is positioned to suck in or blow out air, especially when it's not on? This may seem like a silly question, but people sometimes get this wrong, especially with low RPM fans that make it hard to feel where the air is really going. There are several ways to work out the fan's intended direction of airflow:
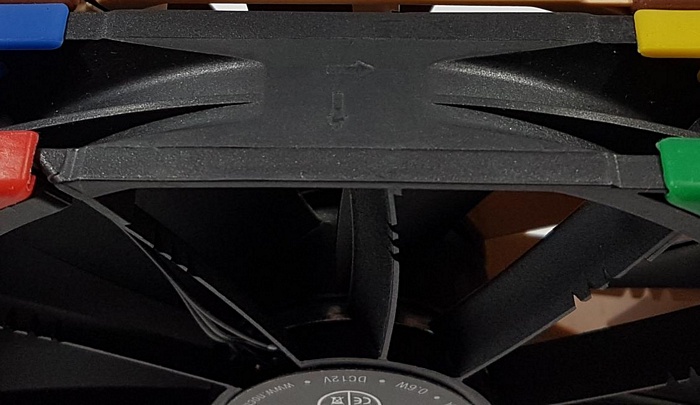
1. Most fans have small arrows on the edge of their frames indicating both the direction in which the fan turns, and the direction the resulting airflow will travel, as show in the image above.
2. If these arrows are missing, look at the hub (center) of the fan. Fans usually draw in air from the side with the cleaner-looking hub area (e.g. it's blank, or has a nice logo sticker on it), and expel it on the side where the hub shows visible wires and/or has the fan specs written on it.
3. If there are no arrows, stickers, or other visible indicators on the hub or rim, just look at the shape of the fan blades. When the blades appear concave to you (i.e., like cupped hands), that's the direction the air will be coming from, towards you, sucked in from the other (convex) side.
4. Lastly, if all else fails, then any grilles or struts that are in front of the fan blades indicate that side as being the direction in which air will be expelled.
Always position fans in your case such that they suck cool air in from the front and if necessary, the sides, preferably at the lowest points in the case where the air is coolest, blowing that cool air over the CPU, motherboard, RAM and GPU, where it absorbs some of the heat and is pushed along by the CPU fan (if there is one) towards the rear of the case. At the rear, typically at least one fan is installed towards the top, sucking hot air out of the case and expelling it up away from the PC. If you also have fan(s) at the top of the case, it's generally best to have them blowing outward, up and away from the case, because heat rises in the case. This article provides some basic diagrams that will help you visualize what I'm saying.
Lastly, be mindful of the impact of overall air pressure: if most of your fans are sucking air out of the case, then you get a net negative air pressure environment in the case; if most of the fans are blowing air into the case, it creates what's known as positive air pressure in the case. There are advantages and disadvantages to each. For example, net positive air pressure in a case will usually result in more dust buildup on your components, especially if any openings not filled with exhaust fans don't have good filter material. See this article for more details.
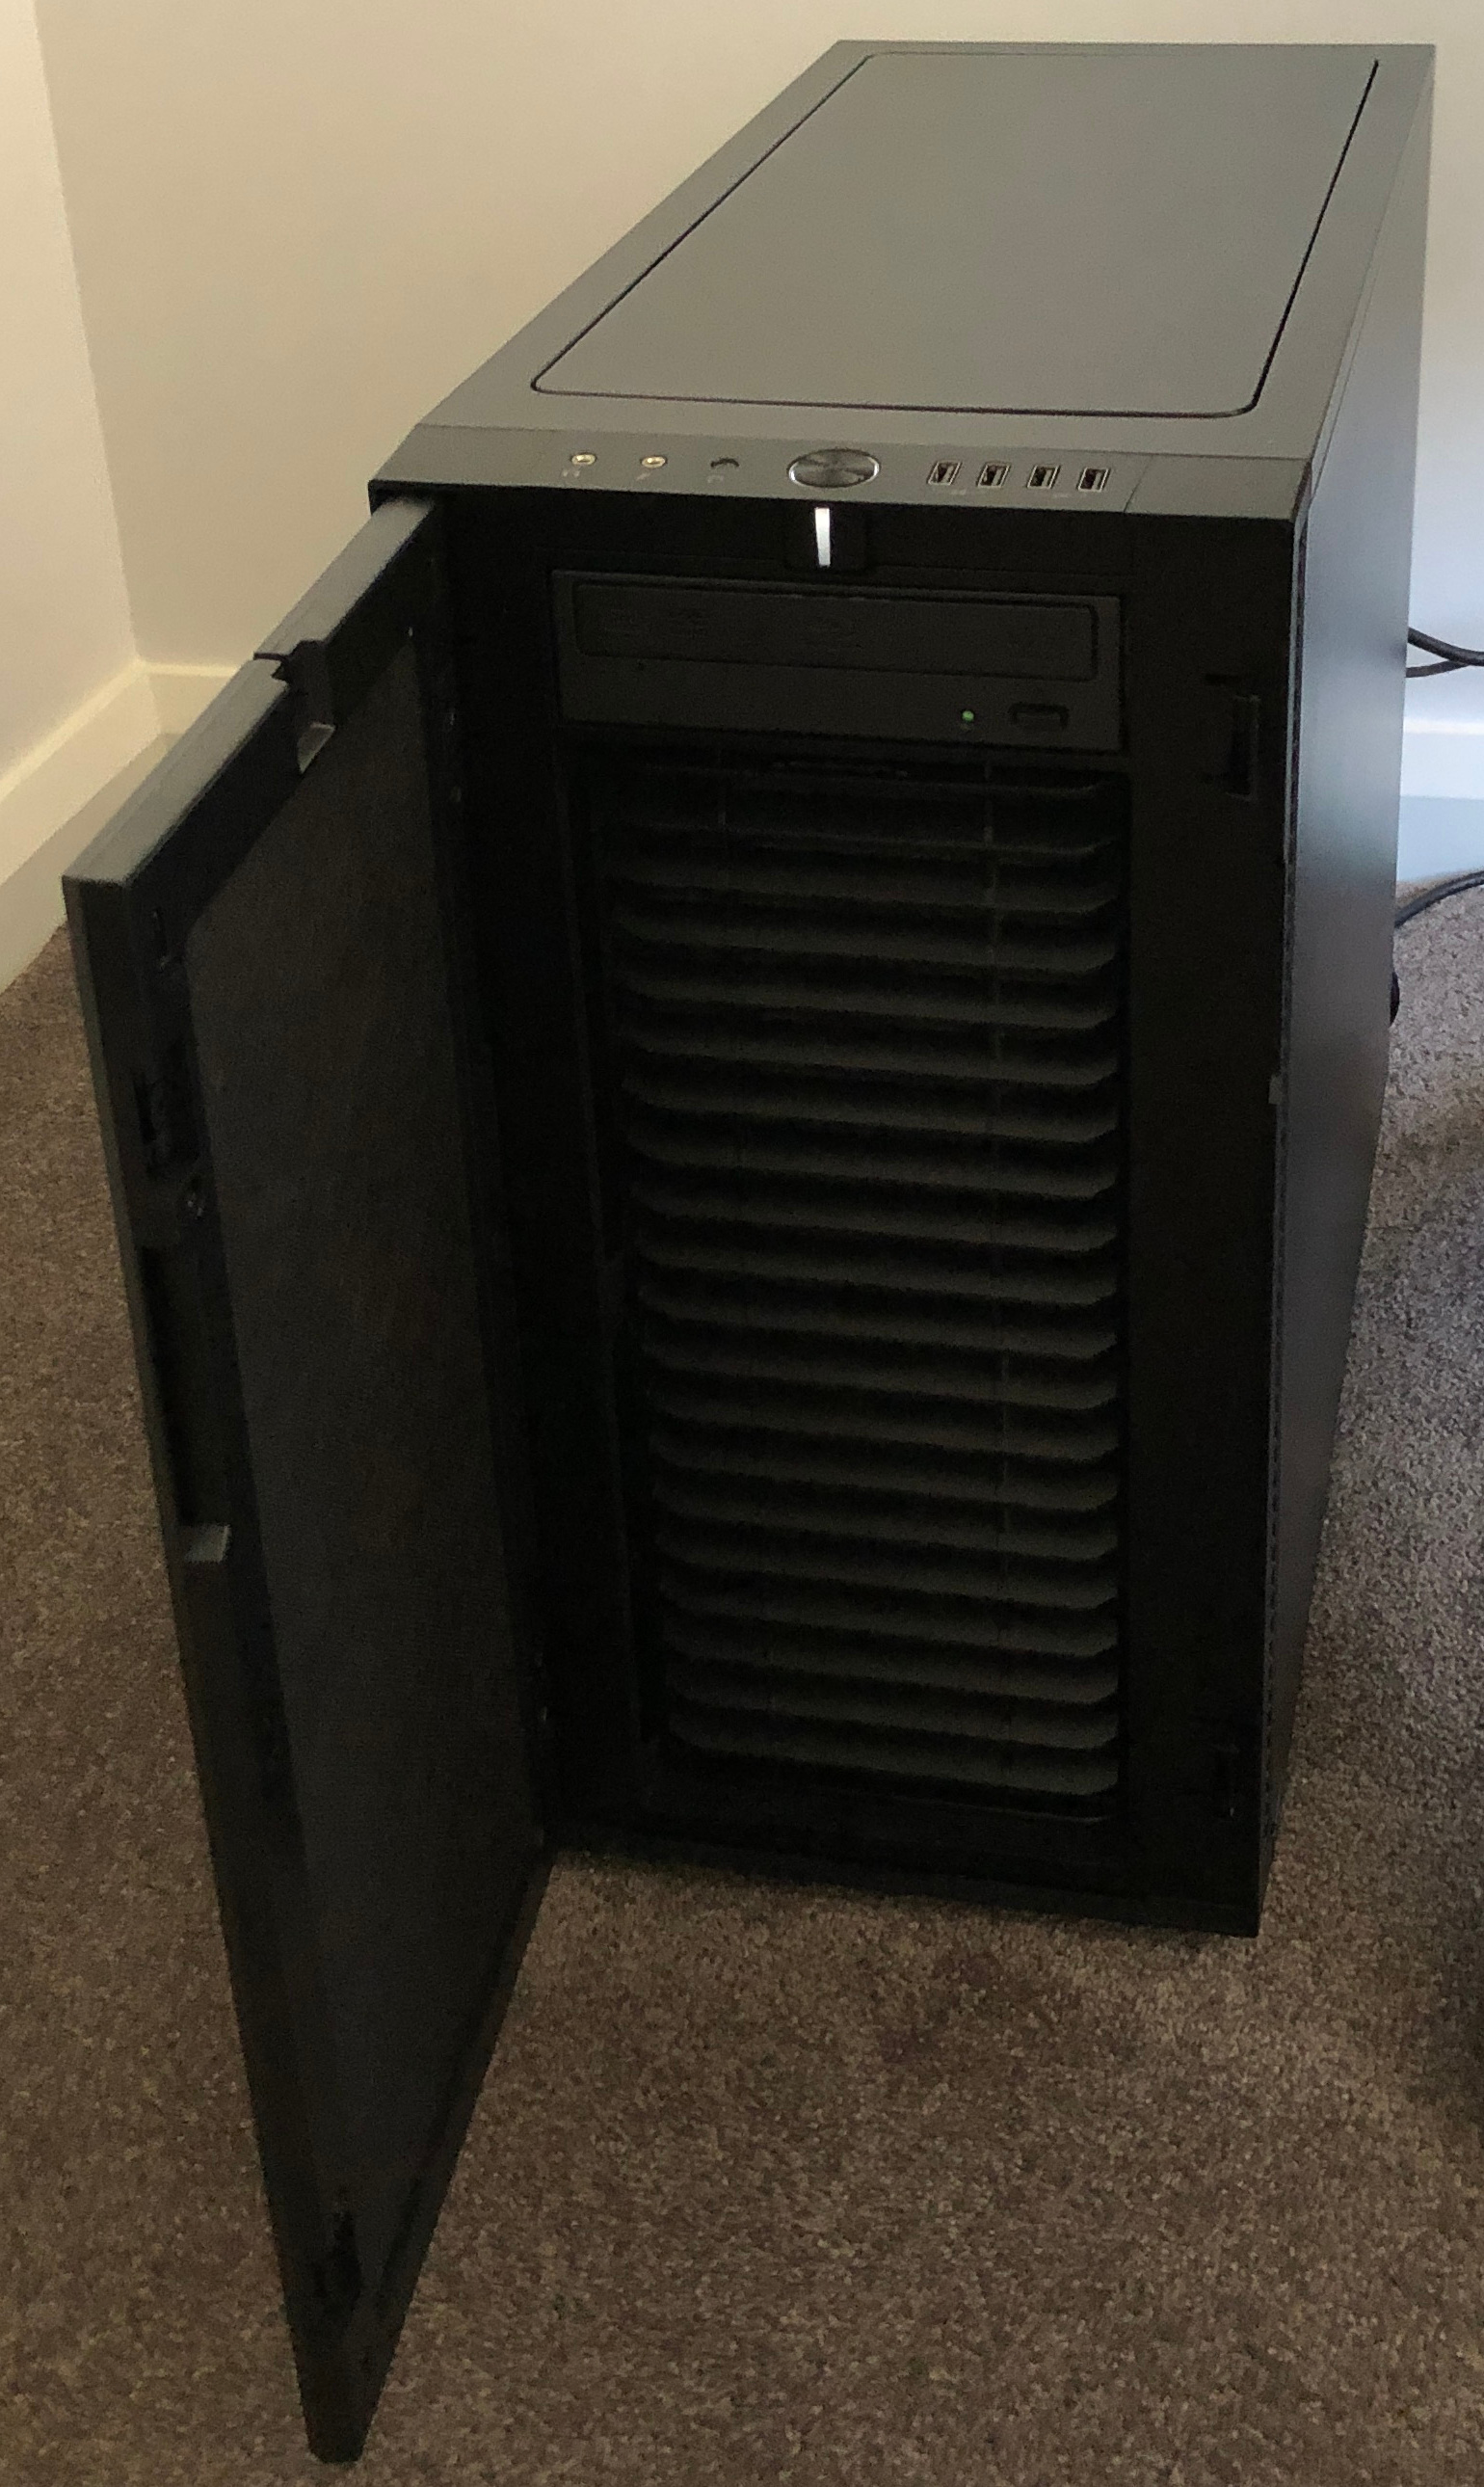
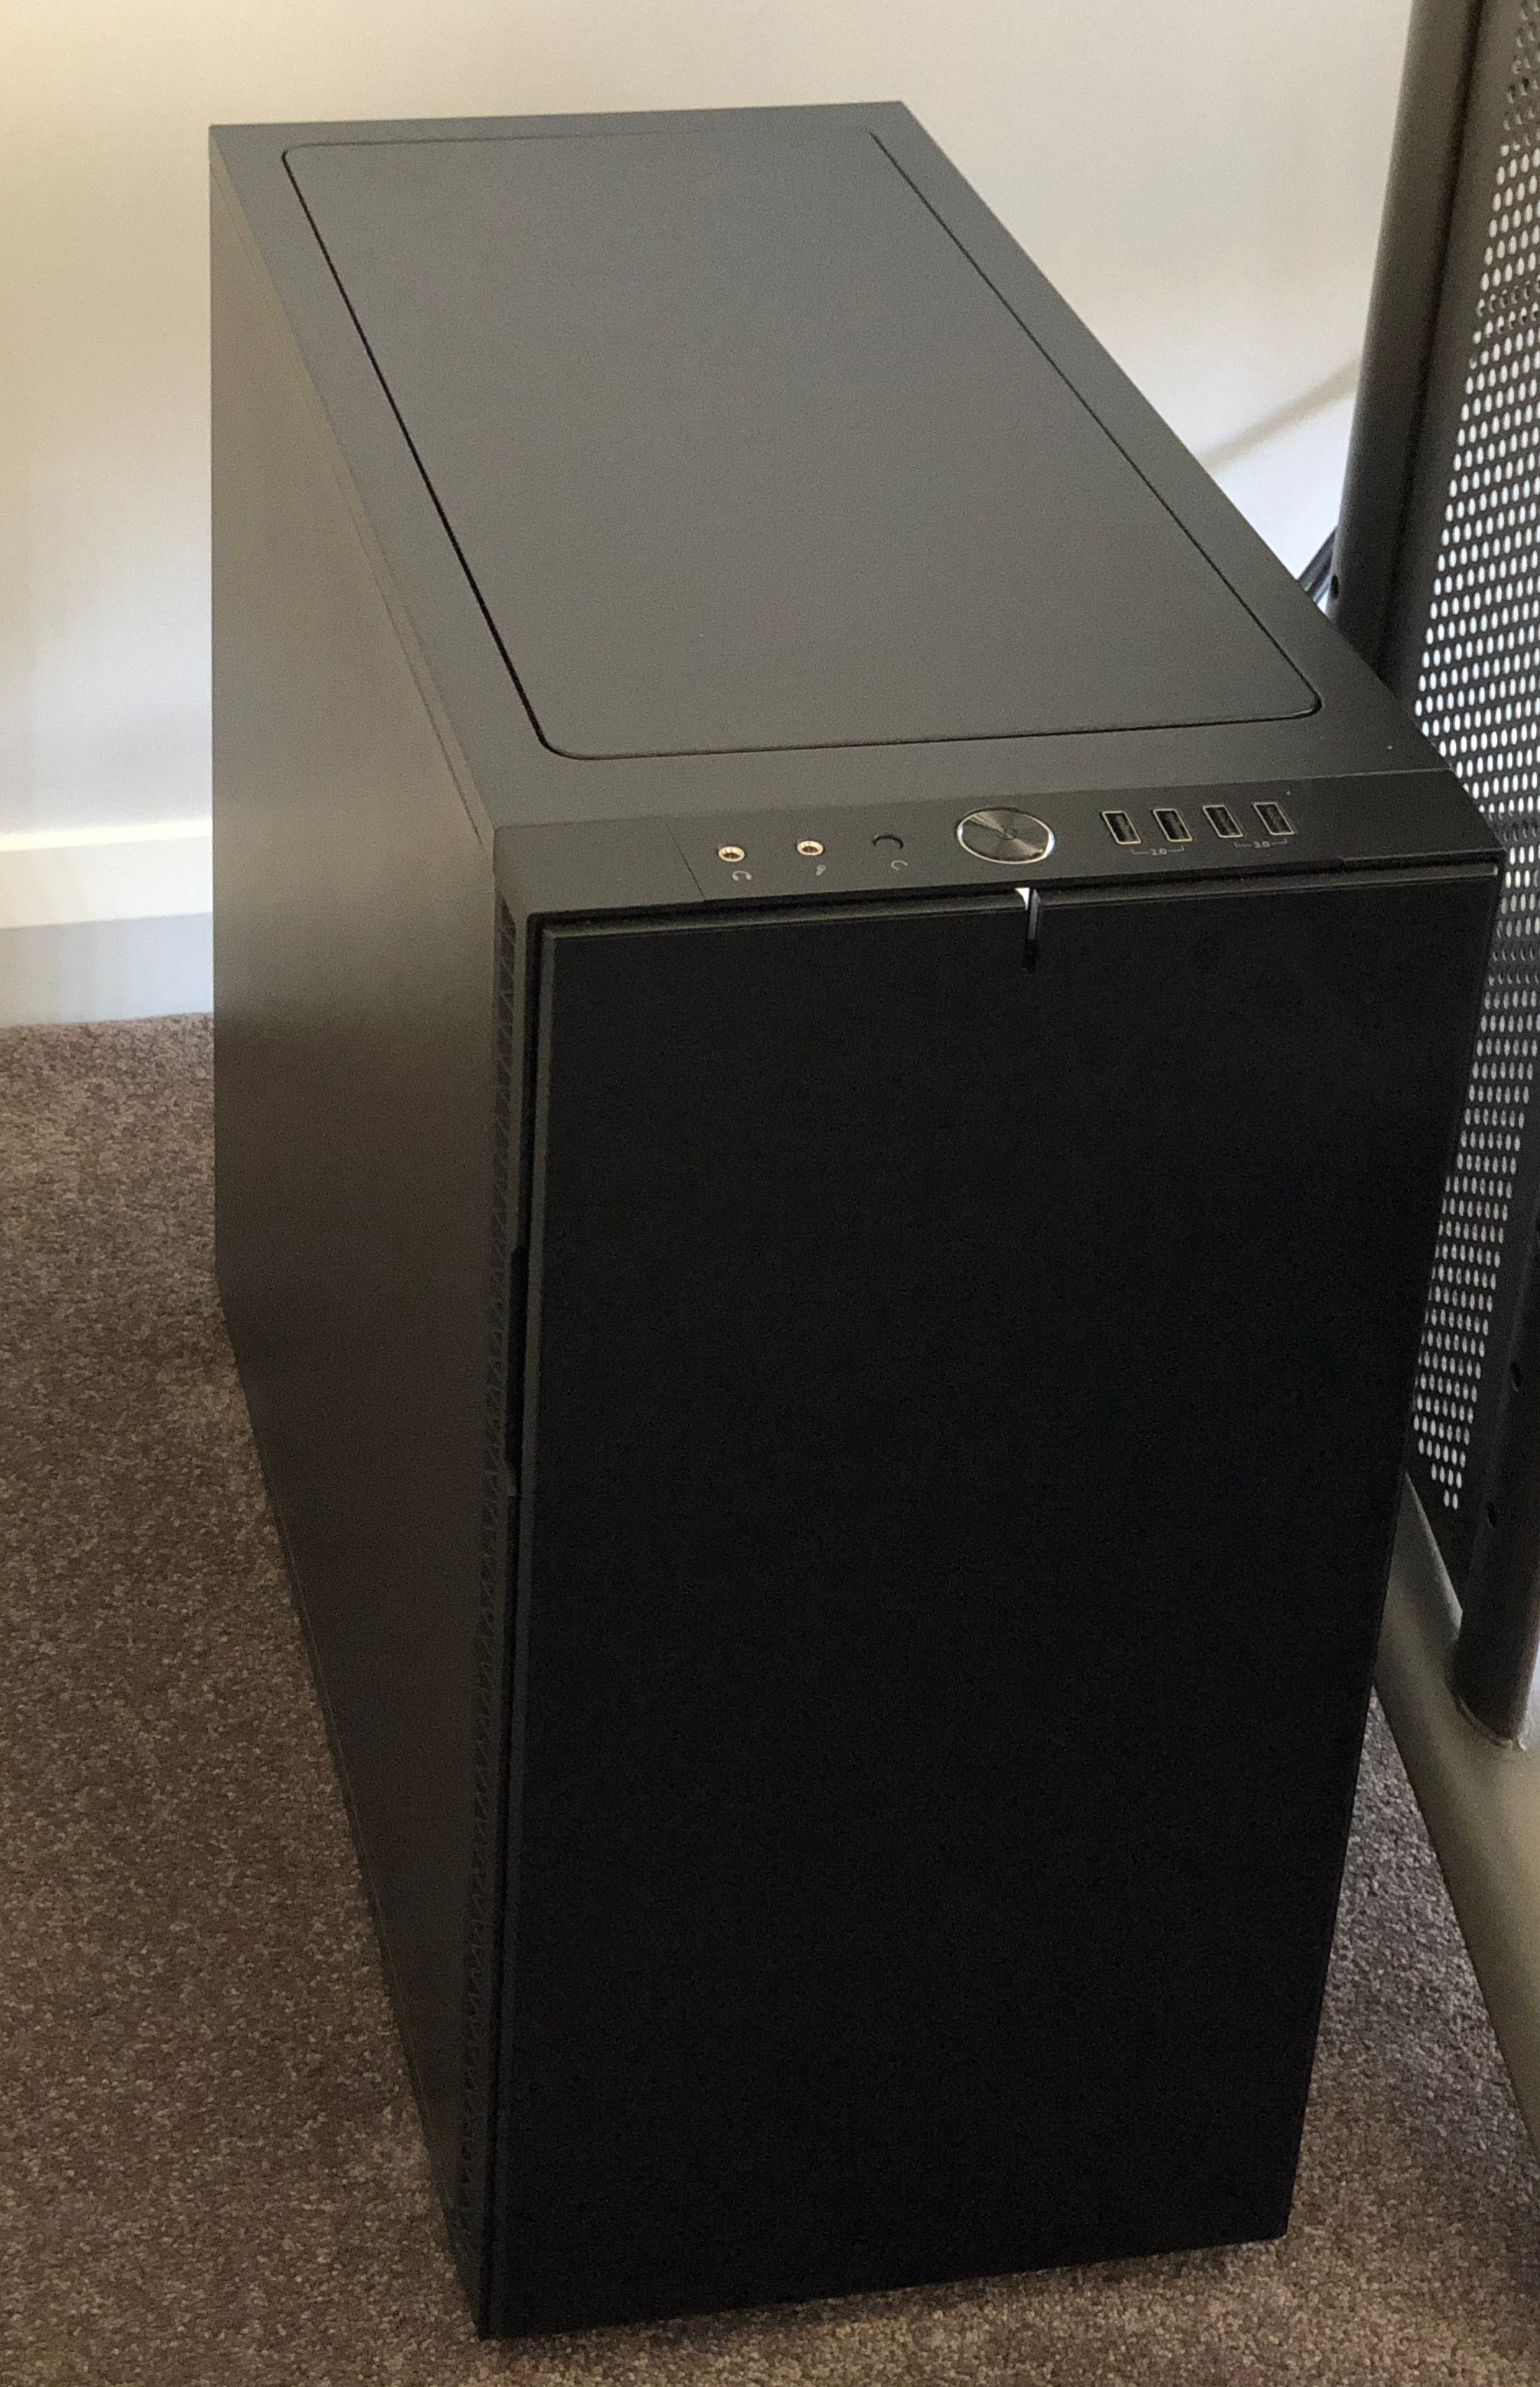
Aside from ease of access, I like the front door of the R6 because it looks less like a door, and more like a sealed panel, but a notch on its side allows me to easily open it whenever I wish. It's reversible, meaning it can be switched around to open from right to left or vice-versa, and of course it can be removed altogether if you wish. I typically leave the door closed because my goal is silence.
And oh boy, is this case silent. Without exaggeration, if I walk out of the room and come back a while later when the monitor has gone to sleep, it's easy for me to mistake the PC for being off and reflexively reach for the power button to turn it back on - the only thing that stops me is the white power LED saying "back off bub, I'm already on". That's not an exaggeration - the combination of the low-RPM silent CPU fan, the silent case fans, and a GTX 970 GPU I bought in large part because its cooling system shuts off when it's below 60C, means the only thing you can hear most of the time when using this system at low-load, such as right now while I'm typing this, is a slight fluorescent buzzing sound emanating from the monitor of all things (see the next section). It's only at medium to high loads that the system becomes audible, and even then, it's more of a lower frequency whooshing sound.
The only complaint I have is that the R6 doesn't have any carry handles or indentations that allow you to pick it up easily and move it around, especially once it's weighed down with internal components. If you pick it up by putting your hands under the base, be careful, as the bottom of the R6 has a sliding air filter that may cause the case to slip out of your arms, as almost happened to me.
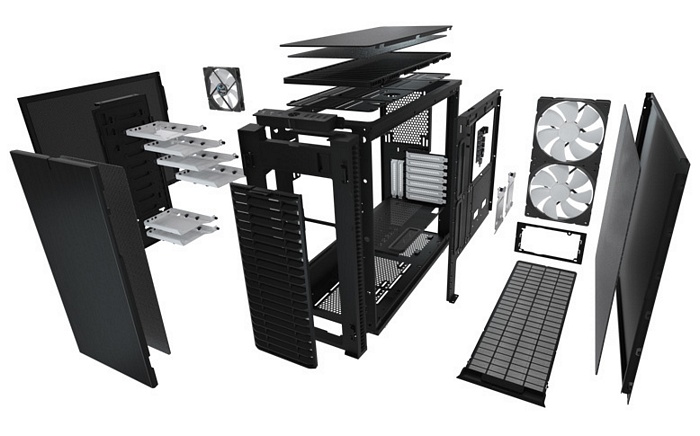
Speaking of filter material, the case has just the right amount of it in the necessary areas - whether the filter grilles in the front for the intake fans, the air filter at the bottom and top panels, or what is actually a sound-deadening material used on the inside of the two side panels to reduce noise. The air filters are removable for easy cleaning/replacement. Both side panels can be easily removed, and there's a pop-off top panel that can be removed by pressing a small button at the top rear of the case. The exploded view of the case highlights the many components that go into making it.
The case sits on four stubby metallic legs, so on my short-pile carpet it still allows cool air in underneath for the Power Supply that sits at the bottom of the case. But it doesn't make that clearance noticeable, at least on carpet, so it doesn't wind up looking like it's sitting on stilts.
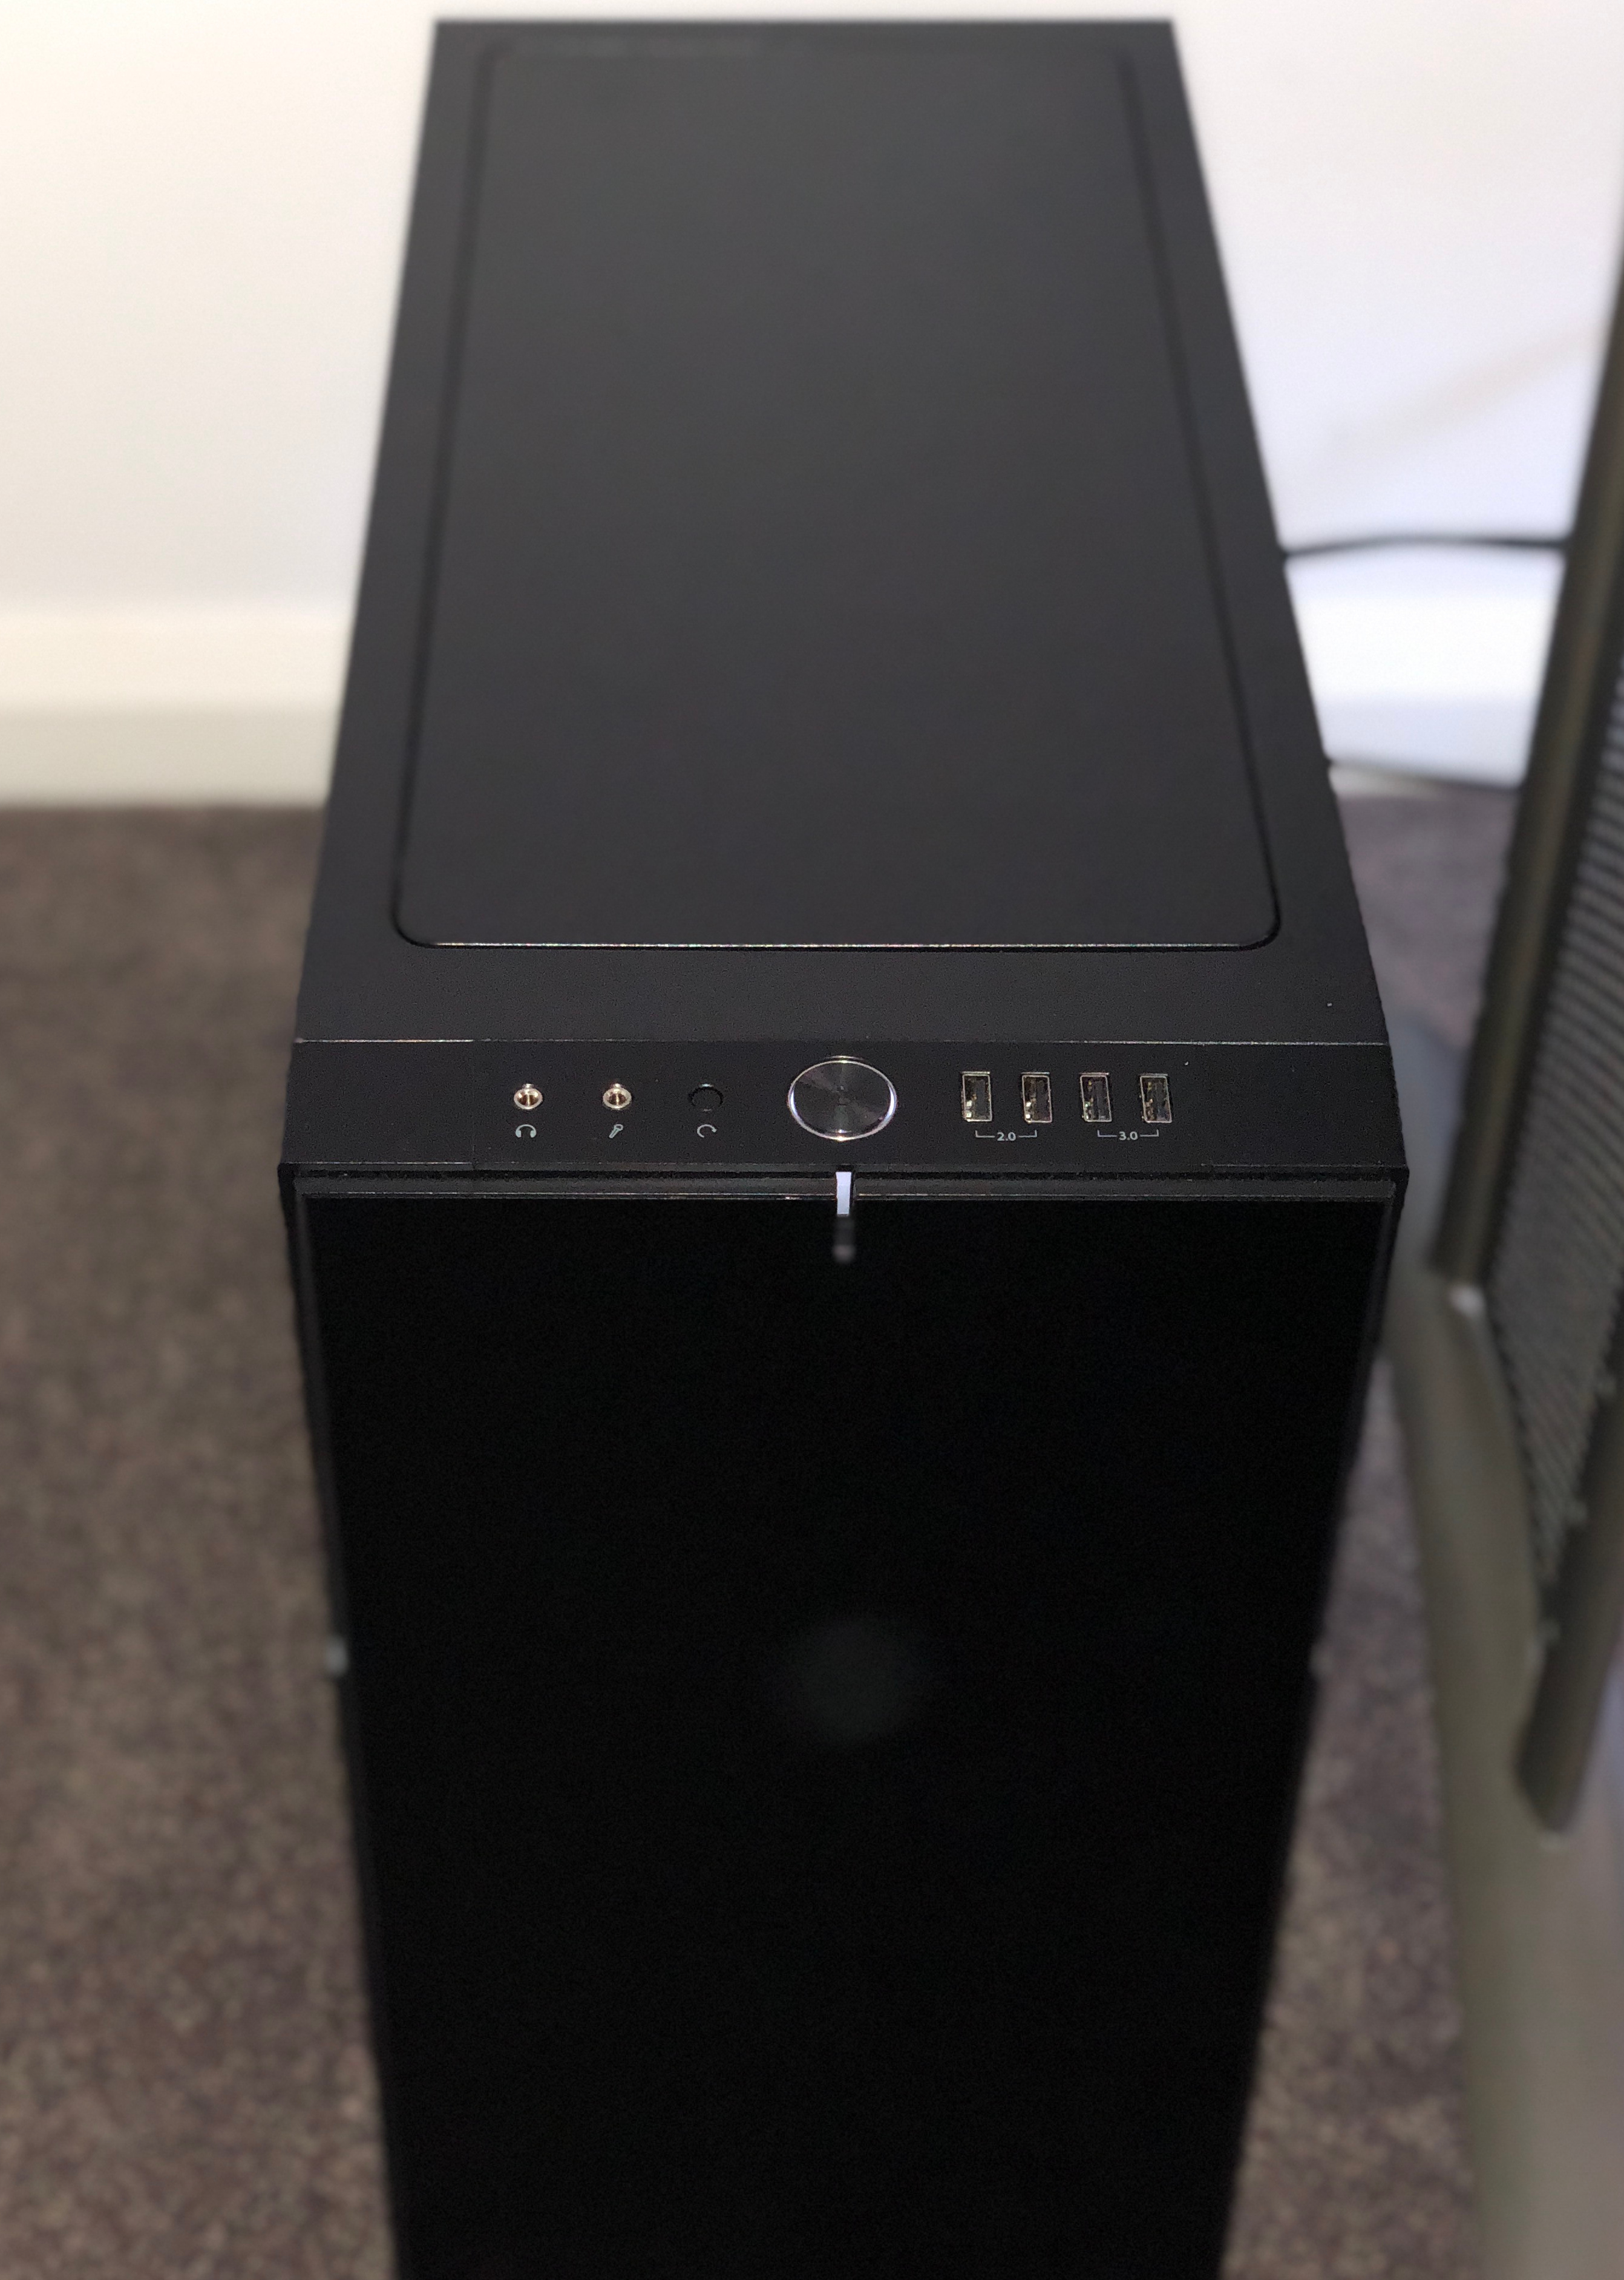
I really enjoy the look of this case. The finish is a semi-gloss slightly brushed black that looks far more impressive in person than my rather poor photography has revealed here. The front panel is functional yet elegant, with a headphone jack, a microphone jack, and the reset button at the left, two pairs of USB 2.0 and USB 3.0 ports at the right, and a very attractive metallic power button in the center. The power button has a wonderful tactile click to it, and a subtle white light surrounding it when on, accentuated by the small groove at the front of the case just beneath it, allowing you to see that white light flash when there's any drive activity. The only other lights visible are at the back of the case: a small blue LED on my Wi-Fi card that flashes to indicate network activity; and a barely-visible red light from the optical audio port. Perfect, just what I'm after.
All-in-all, this is the best case I've ever owned, and the quietest system I've ever used, and already it's stood up to some of the hottest days we've had, during a month-long heatwave with outside temperatures routinely exceeding 40C (104F), at the same time as I've been pushing my system to its limits by experimenting with overclocking and stress testing. I honestly can't fault it in any major respect, whether aesthetics (though that's subjective), usability during and after installation, or noise. Again, the only possible issue I could raise is that it's not easy to pick up and move around due to a lack of handles or areas that are easy to grip. But that's a compromise forced by the elegant design of the case, which doesn't allow for too many deviations from its clean straight lines. I don't need to move it around very often, so it's easily overlooked.
Next up is the monitor and GPU - one was easy to choose, the other hard, both wound up costing me nothing.
|
|