
Halo Tweak Guide
[Page 8] Advanced Tweaking
You've come to the part of the guide where we examine some neat things you can do with Halo which aren't available to be tinkered with in the in-game settings. Once again, I must stress there are no magic settings we'll find to double the game's speed, but there are a few tweaks here which should make life easier for you, whether in noticeably improving performance or overcoming any problems you have with the game.
Command Prompt Arguments
This section isn't about the disagreements I've had with my command prompt over the years. There are far too many of those to list here. Rather, the file Halo.exe can be run from a command prompt with a number of arguments (or switches) which enable/disable certain functionality in the Halo game. The full list of arguments are provided further below, but let's just look at precisely how to use them first.
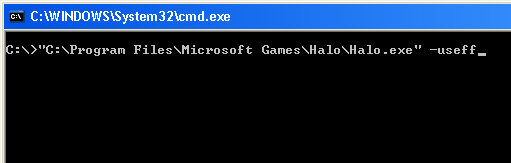
To open a command prompt, go to Start>Run and type "Cmd" (without quotes). This brings up an MS DOS command prompt. To start Halo using one of the arguments, type the full path to your Halo.exe file inside quotes (""), then follow it with an argument -argument. Make sure the argument is one space outside the quotes:
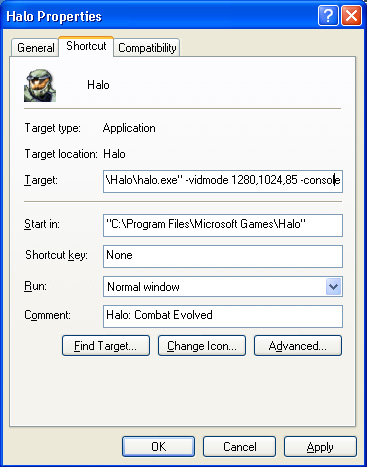
Now given most of us don't run our games from DOS prompts anymore, the usefulness of this tweak is that you can insert the arguments into the icon you use to launch Halo. Go to your Halo icon, right click on it and choose Properties. Under the Shortcut tab, in the Target field, immediately after the path to your Halo.exe and again one space outside the last quote mark, insert as many arguments as you like, each separated by a space from the other.
The full list of arguments can be seen by using the -? argument, and they are described in detail below:
-? Displays a list of all arguments.
-Nosound Disables all sound. This can improve performance on older machines, particularly if you have a slower CPU and are not using a recent sound card. Not recommended for regular Halo gameplay for obvious reasons.
-Novideo Disables video playback. Should remove the playback of the startup videos when you open Halo.
-Nojoystick Disables joystick/gamepads. No impact unless you have a gamepad or joystick connected to your system, and then it disables it. Can provide a slight boost in performance but is more useful for troubleshooting.
-Nogamma Disables adjustment of gamma. The in-game gamma slider will not affect the brightness of the game if this switch is used.
To use the following switches optimally, you must be aware of what your graphics card's DirectX Pixel Shader capabilities are first. A basic definition of Pixel Shaders and Vertex Shaders is here. In layman's terms Pixel Shaders can create incredibly realistic effects, such as shimmering water, or realistically textured and shiny walls. But the downside is they require hardware which supports the Shader version being used or the effect cannot be rendered. Check your graphics card's box, documentation, or do a search on Google for the card's specifications, looking in particular for which version Pixel Shader it supports.
Then using the arguments below, you can force your graphics card to use a lower shader version to gain better performance at the cost of some visual quality. Of course if the shader version you're trying to force is above, or equal to your card's maximum shader support then the argument will do nothing for performance.
-Use20 Forces the game to run as a Shader 2.0 card. This shows all graphical effects in the best possible visual quality. You will need a recent graphics card with full PS2.0 support such as the Radeon 9500 series or higher, or the FX 5600 series or higher. PS2.0 gives the biggest performance hit but runs Halo exactly as the developers intended it to be seen.
-Use14 Forces the game to run as a Shader 1.4 card. If you have a relatively new graphics card such as those mentioned above, then forcing PS1.4 mode on them will improve performance at the cost of some visual elements, namely:
This doesn't reduce visual quality greatly and can improve performance, particularly on lower end recent cards. Obviously if your card only supports PS1.4 at the most, it will already be running in this mode.
-Use11 Forces the game to run as a Shader 1.1 card. Once again, forcing this lower Pixel Shader mode on cards which support PS1.4 or PS2.0 will improve performance at the cost of the following elements:
This can significantly improve performance on such cards, but older cards will likely already be running with such effects removed.
-UseFF Forces the game to run as a fixed function card. This means that that regardless of your graphics card's capabilities, the game will run with the most basic effects. Along with the PS1.1 effects disabled above, this results in the removal of the following elements:
This can provide a significant performance improvement, however it is obviously at the cost of visual quality and effects. Older graphics cards (such as GeForce2 series) will likely be running under this mode anyway. If you really crave a performance improvement use this switch. I recommend that you only experiment with the above switches if you've tried most of the other tweaks in this guide. If you have an older or less powerful graphics card, it is already likely to be running in PS1.1 or Fixed Function mode anyway, so these switches are only really useful for those with cards which support PS2.0 or PS1.4 but who require a boost by forcing the card to run a lower mode.
-Safemode Disables as much as possible from the game. This is meant for troubleshooting. If your game doesn't crash, freeze or have problems in safe mode then this indicates there is some setting in Halo which is conflicting with your system, or your graphics/soundcard drivers. See the Troubleshooting section for more help.
-Window Runs the game in a window, as opposed to fullscreen. Not recommended as you may experience problems running in windowed mode.
-Width640 Forces the game to run at 640x480. If you want to force the lowest resolution possible on the game use this option, but I recommend using the Vidmode switch below to better tailor your resolution and refresh rate.
-Vidmode [W,H,R] Forces the game to run at the width (W), height (H), and refresh rate (R) specified. For example to force the game to run at 1024x768 with 100Hz refresh rate, use -Vidmode 1024,768,100. Make sure your monitor supports the settings you choose here, especially refresh rate. If you choose a refresh rate which exceeds your monitor's capabilities at the specified resolution you will get an "Out of Frequency" error and may damage your monitor.
There is something very important about this option - it overcomes the error caused by running a refresh rate fix or refresh rate override (see the Troubleshooting section). By using this switch you can run Halo at your chosen resolution and refresh rate without having to disable your refresh rate fix or refresh rate override. Note that you should make sure the Resolution and Refresh Rate settings under the in-game Video Setup screen are set to match the ones specified here. Also note that as of the 1.03 patch this shouldn't be necessary as the refresh rate issue is addressed in the patch.
-Adapter x Forces the game to run fullscreen on a multimon adaptor.
-Port x Server port address used when hosting games. See the Network Setup settings under the In-Game Settings section.
-Cport x Client port address used when joining games. See the Network Setup settings under the In-Game Settings section.
-IP x.x.x.x Server IP address used when you have multiple IP addresses.
-Screenshot Enables the "Print Screen" key to generate screenshots. By using this switch you will enable the ability to take screenshots within Halo by pressing your Print Screen key. Each screenshot will be saved in .tga format in a new Screenshots directory under your \Halo directory.
-Timedemo Runs four movies and writes out timedemo.txt. See the Benchmarking and Conclusion section below for more details of how this works.
-Console Enables the debugging console. This console allows you to access a range of commands in-game for troubleshooting and adjusting settings. See the Console Commands section below for more details and a full list of commands.
That covers all the command prompt arguments. As you can see, there are some very useful switches there, most notably the -vidmode one. Experiment a little to see which helps you with performance and troubleshooting, then insert the ones you want in your Halo startup icon and they'll be applied every time you run the game.
|
|