
Ghost Recon: Advanced Warfighter Tweak Guide
[Page 6] In-Game Settings (Pt.2)
Video
Resolution: This setting allows you to select the resolution of the game image, measured in pixels wide by pixels high at a particular refresh rate. For example 1280x1024@60 means 1,280 pixels wide by 1,024 pixels high at a 60Hz refresh rate. The higher the resolution, the more detailed the image on screen, and importantly the less jagged lines there will be (see Antaliasing further below), but the lower your performance. The number of resolutions listed here and the refresh rates provided are limited by what both your graphics card and monitor can handle. To customize your resolutions and refresh rates further, see the Advanced Tweaking section. Also see the Aspect Ratio setting further below.
Fullscreen: If this option is ticked, the game will take up the entire screen when running. This should provide the most optimal performance and in particular the most stable configuration given the way Windows manages memory. However if you want to run the game in a smaller window on your desktop, make sure to select a Resolution which does not exceed your current desktop resolution and then untick this box. Performance may not necessarily be any better than fullscreen mode, and if you experience any problems then switch back to fullscreen mode.
To access the settings below, click the 'Show Advanced settings' button in the Video section.
Texture Quality: Textures are the 2D surfaces on all 3D objects in the game. This setting essentially controls how detailed the surfaces of objects will appear in the game. The higher this setting, the crisper and clearer surface textures will be, at the cost of reduced performance and more likelihood of loading pauses/stuttering as you walk around and see new objects/characters. There are three settings here: Low, Medium and High, though note that unless your graphics card has 512MB of Video RAM (not to be confused with System RAM), then you will not see the High option by default. However there is a way to select the highest texture quality on cards with less than 512MB of VRAM - see the Advanced Tweaking section. For an animated visual comparison of texture quality, click this link: GRAW_Textures.gif (544KB). While the difference between Low and Medium is noticeable, the difference between Medium and High is not dramatic. Pay attention to the skull mark on the soldier's shoulder and the bricks on the wall for places where subtle texture differences are visible between the various settings.
More details of the performance impact of Texture Quality and some of the other setings below on performance is in this GRAW Performance Analysis. As you can see from the article, using High Quality textures results in a significant increase in Video RAM usage, and thus greater likelihood of slowdowns and hitches. You can offset this impact with the Managed Textures settings - see the Advanced Tweaking section.
Texture Filtering: The available options here are Trilinear, Anisotropic 4x, Anisotropic 8x and Anisotropic 16x - though note that 16x Anisotropic may not be available on all cards. Texture Filtering is basically a method of making textures appear clearer and crisper as they fade into the distance. For more details see my Gamer's Graphics & Display Settings Guide. Each level of texture filtering progressively improves image quality, but reduces performance. The precise performance impact depends on factors including how recent your graphics card is and how much Video RAM it has. The newer the graphics card and the higher the model, as well as the more Video RAM you have, the less noticeable the reduction in performance there will be, especially at higher resolutions. For the most part, there isn't a major performance impact so try at least Anisotropic 4x unless you're struggling for FPS on an older card, in which case just choose Trilinear as that is the lower possible.
Effects Quality: This setting controls the detail level of special effects in the game, like explosions. The available options are Low, Medium and High. For an animated visual comparison of the Effects Quality levels, click this link: GRAW_Effects.gif (438KB). Note that at the Medium and High levels, the effects quality appears identical; however at Low the heat distortion around the grenade explosion is absent. In other circumstances, things like particle effects (smoke, dust, etc.) will be reduced or removed when set to Medium or Low, though note again that the difference between Medium and High is not great, and of course the lower your setting here the more FPS you will have in situations where such effects are used. Medium is a good compromise for most people while still providing good effects.
Brightness: This slider controls how bright the game image will be. The further to the right the slider, the brighter the screen. This has no impact on performance, so set to suit your taste.
Dynamic Shadows: Dynamic Shadows are shadows which react realistically with light sources. Most objects in the game cast dynamic shadows, but some shadows (e.g. building/structure shadows) are fixed. The options here are Off, Low and High. At Off, all dynamic shadows are removed, which reduces realism but can significantly improve performance on many systems - especially in scenes containing multiple characters. At Low and High the shadows are enabled at successively higher quality, but at the cost of some performance. The visual difference between Low and High is vitually unnoticeable, so for most people I would recommend Low if you want to enable shadows.
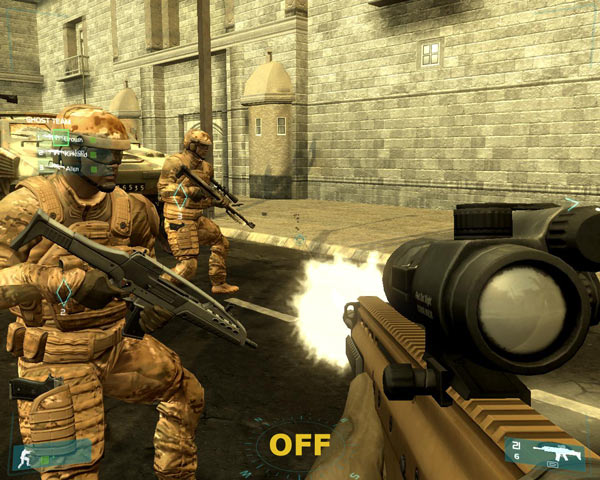
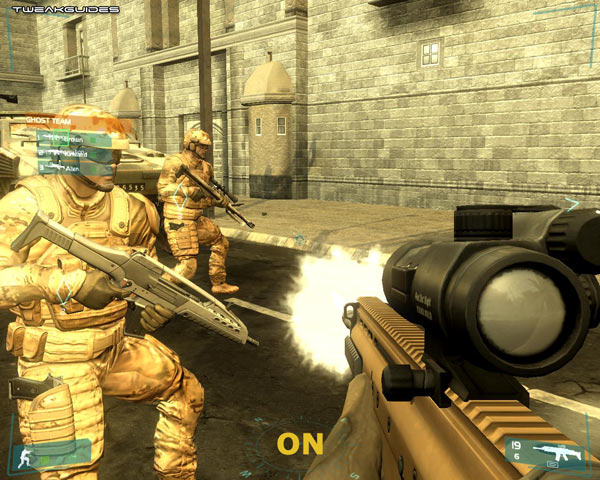
Dynamic Lights: If ticked, certain light sources will react dynamically with the environment, increasing realism but reducing performance when such lighting is visible. For an example, see the screenshot comparison above. At Dynamic Lights Off (unticked), the muzzle flash doesn't light up the surrounding area. At Dynamic Lights On (ticked), the muzzle flush is clearly lighting up the soldier standing to the left. For the most part dynamic lighting is not critical to the realism in the game, and can be disabled without a major visual impact if you want extra FPS.
Post Effects: This setting controls the quality of the space-related effects, particularly the lighting quality of the game. The available options by default are Low, Medium and High. For the most part I cannot find any visible difference between Low and Medium. However between Medium and High, the HDR (High Dynamic Range) effect becomes more clearly visible in the way the sky is lit - see this animated screenshot comparison: GRAW_PostEffects.gif (508KB). Note that the Off setting shown in the comparison is only available by editing the game's XML files. The impact of the highest setting is hard to demonstrate in screen shots, as it varies realistically depending on your surroundings. However if you really need the FPS, switching to Low Post Effects will give you a nice FPS boost without a major drop in image quality. If you want to switch Post Effects off altogether for a major FPS boost, or if you prefer that style of lighting, see the Advanced Tweaking section.
Antialiasing: Note, due to the type of Deferred Lighting method used by the developers, regardless of your Post Effects setting, Antialiasing is not possible in the game - even if you disable Post Effects, or try to force Antialiasing in your graphics card control panel. This is an unfortunate and contentious aspect of the game, since the gameplay relies a great deal on identifying small movements in your surroundings; something which the lack of antialiasing makes much harder due to jagged edges constantly moving and shimmering. However it is not resolveable as far as I know, so it's unlikely to ever be "fixed" by patching. Turn off any forced Antialiasing in your graphics card control panel, as it will not work regardless of which graphics card you use, and can only cause slowdowns and problems with GRAW.
Update: As of the 1.16 patch, an option for Antialasing has been introduced for GRAW. However this setting does not use any form of normal Antialiasing whatsoever. When set to Edge Smoothing, it uses a Blur Shader post-processing effect to generally blur the entire image and thus reduce the appearance of jaggedness. On the plus side, this effect has no significant performance impact on most graphics cards; on the negative side, it blurs everything, including textures, and thus makes the image appear much less crisp. Below is a comparative screenshot of the effect:
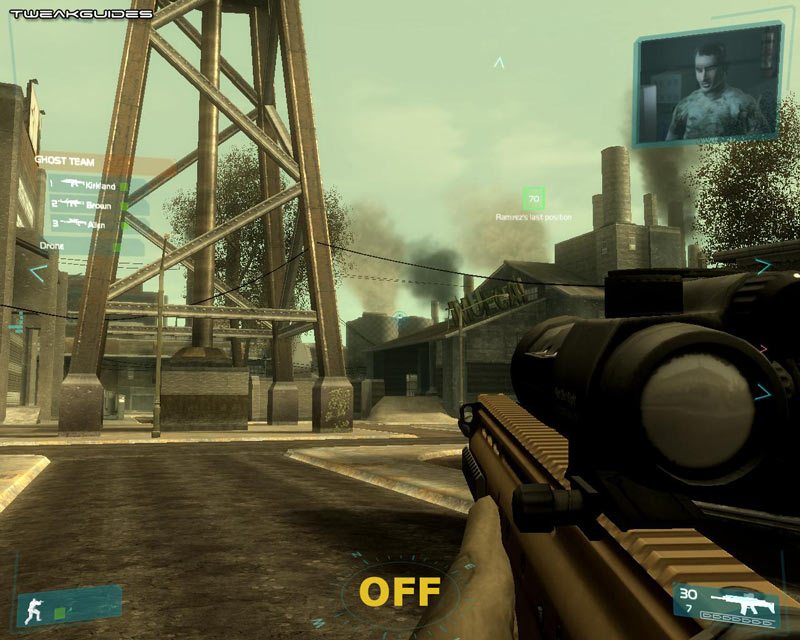
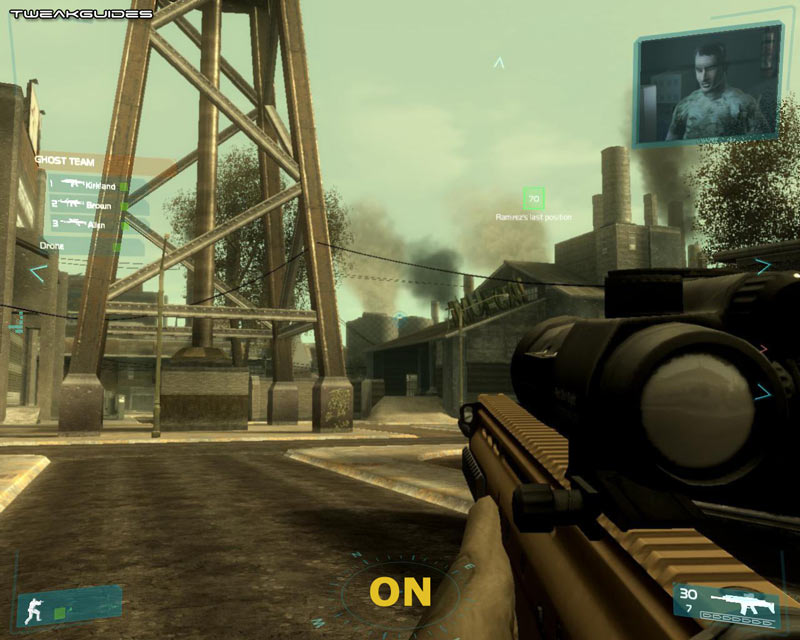
It is difficult to see the difference in the image as it is compressed for web view, but basically the image on the right is blurrier than the one on the left - it is more noticeable in-game. If you don't like this effect or want maximum performance, set it to Off. However again note this is not Antialiasing, and you cannot enable or force any real Antialiasing (such as that in your graphics card control panel) with the type of lighting the game uses.
Update 2: As of the 1.21 patch, an SLI checkbox has also been added, showing users with SLI configurations when it is enabled in the game.
Aspect Ratio: This setting determines the the correct ratio of width to height (in pixels) to output to the screen, and should be set to suit your particular display type. Most standard computer monitors, particularly the traditional CRT monitors, are 4:3 displays. Some LCD displays, and all HDTVs such as Plasma screens are widescreen, and so have a 16:9 aspect ratio. Some LCD panels though supporting 4:3 display, show images more correctly using 5:4 ratios. For non-CRT users, the best way to know your correct aspect ratio is to check your display's manual for its 'native' resolution. E.g. if your panel has a 1280x1024 native resolution, divide the width by height (1280/1024 = 1.25) and select the same ratio here (i.e. 5/4 = 1.25, so choose the 5:4 ratio). The best way to know if you have the absolute correct aspect ratio is to look at round objects in the game (e.g. your sniper sights or car wheels) - they should appear perfectly round, not oval. If in doubt, set this option to Auto.
Once you've chosen your Video options here, you will have to click Apply at the bottom of the screen to implement them. Importantly, it seems that changing some of the video settings during a game can result in FPS drops - even when lowering a setting - so to see the correct impact of your changes, quit and restart the game.
Audio
Master Volume: As expected, this slider controls the volume of all sound effects, voices and music in the game equally. Set the slider to your preferred position, this has no impact on performance.
Renderer: The audio renderer is the device the game uses to play back sound and music. Your default sound output device (usually a sound card) should be shown here. If not, make sure your device is being correctly identified by Windows, and make sure to install the latest audio drivers for the sound device (See the Essential Optimization section). If you have an unknown sound device, or have audio glitches you can select Generic Hardware. If Generic Hardware is not available to you, for fastest performance on lower-end sound devices, select Generic Software. Note that depending on the device you choose here, your options may be limited in the Quality setting below.
Quality: The audio quality for the game is determined here by selecting either Low, Medium, High or Extreme. Depending on your sound card capabilities, the High or Extreme settings may not be shown. At the Low setting, up to 20 separate audio channels are required. At Medium, up to 32 are used (the limit for most common sound cards). At High up to 64 channels are utilized, and at Extreme, only sound cards which can process 128 Channels will be allowed to see and choose this mode. You cannot force your sound card to use more channels than it can physically output, so check your sound card's specifications. In general the greater the number of channels, the better the audio quality in return for lower FPS and potentially more frequent stuttering/loading pauses. See the Advanced Tweaking section for ways of further customizing/troubleshooting the Renderer and Quality settings.
To access the settings below, click the 'Show Advanced settings' button in the Audio section.
Music Volume: This slider controls the volume of in-game background music. Set the slider to suit your taste, has no impact on performance; that is, setting the slider to the far left does not reduce memory usage by unloading music.
SFX Volume: This slider controls the volume of in-game sound effects like gunfire. Set the slider to suit your taste, has no impact on performance. Once again setting this to 0 does not remove sound effects from memory.
EAX Enabled: If you have an EAX (Environmental Audio)-capable sound card, you can tick this option to provide more realistic 3D sound positioning and better sound effects. However EAX can reduce performance on some sound cards, and can also cause audio glitches. If you're having sound issues, untick this option and restart the game to see if it helps resolve them.
Also note that since GRAW relies on your general Windows audio settings, make certain that you have the correct speaker configuration chosen under your Windows Control Panel>Sounds and Audio Devices>Speaker Settings. If your speaker configuration chosen in Windows does not match the actual speaker configuration you have connected to your system, you will find you get a range of audio glitches and missing sounds.
The next section goes into the Advanced Tweaking possible with GRAW.
|
|