
Ghost Recon: Advanced Warfighter 2 Tweak Guide
[Page 6] In-Game Settings (Pt.2)
Texture Filtering: This setting controls the way in which textures appear clearer and crisper as they fade into the distance. The available options here are Trilinear, Anisotropic 4x, Anisotropic 8x and Anisotropic 16x - though note that 16x Anisotropic may not be available on all cards. For more details see the bottom of this page of my Gamer's Graphics & Display Settings Guide. Each higher level of texture filtering progressively improves image quality, but reduces performance. The precise performance impact depends on factors including how recent your graphics card is, the resolution you are using, and how much Video RAM it has. The newer the graphics card and the higher the model, as well as the more Video RAM you have, the less noticeable the reduction in performance there will be, especially at higher resolutions. For the most part there shouldn't be a major performance impact so try at least Anisotropic 4x unless you're struggling for FPS on an older card, in which case just choose Trilinear as that is the lowest possible. Finally, make sure that if you have selected any level of Anisotropic Filtering here, that you do not also force AF for GRAW 2 in your graphics card's control panel - use one or the other, not both.
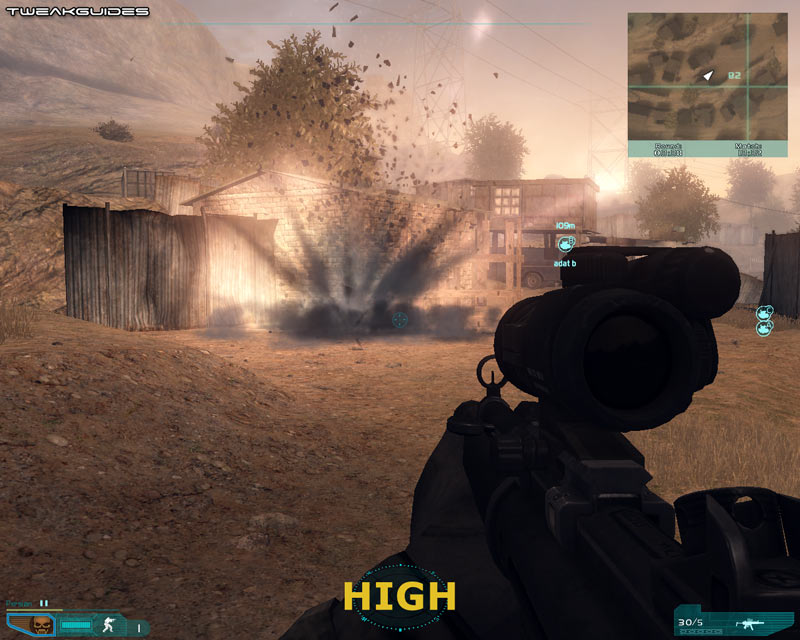
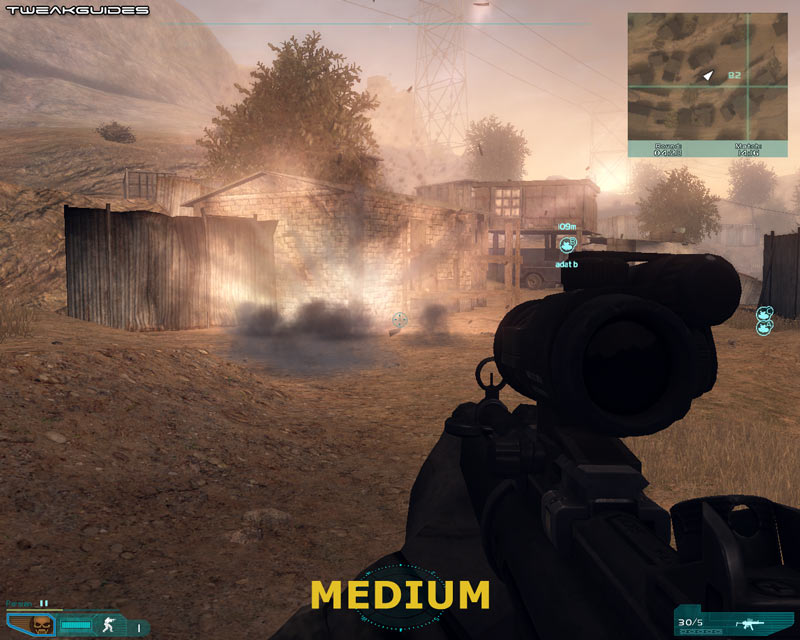
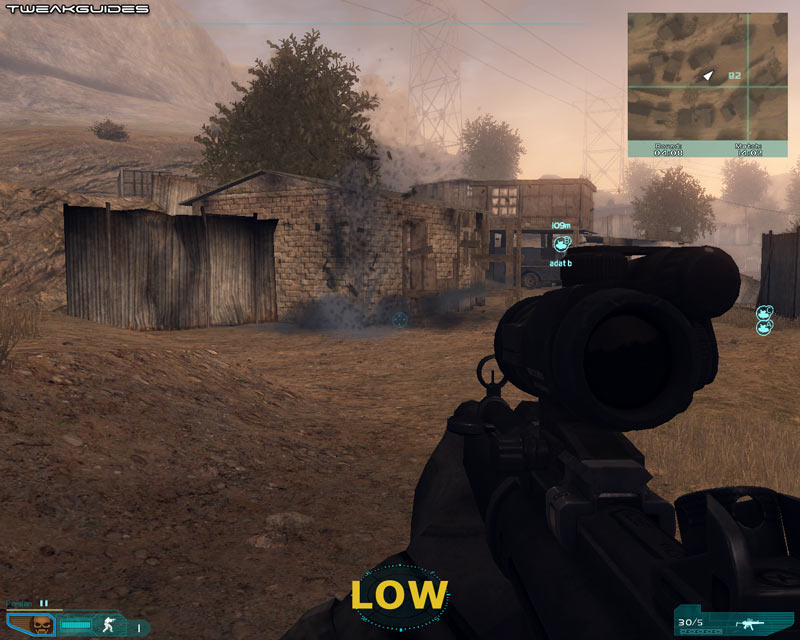
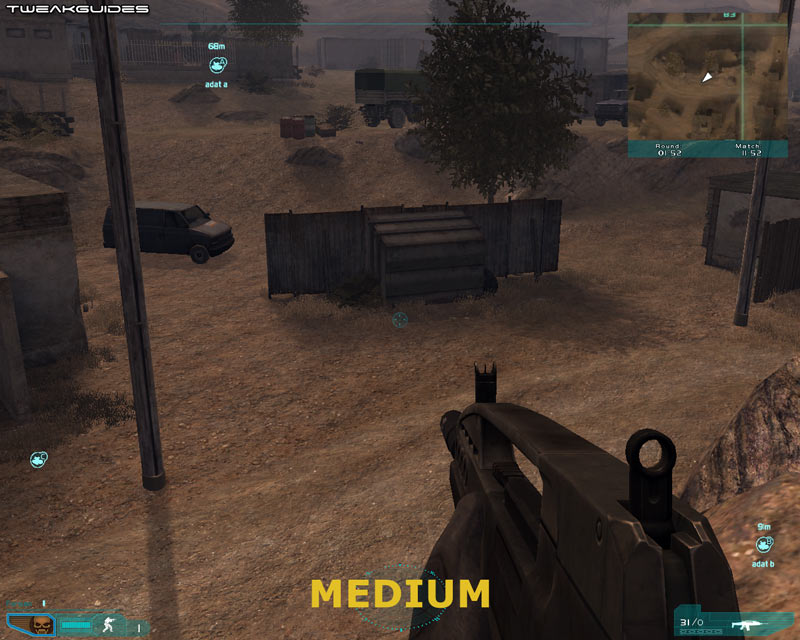
Effects Quality: This setting controls the detail level and richness of special effects in the game, like explosions and smoke. The available options are Low, Medium and High. See the screenshots above for a comparison of the different levels, though in reality the difference is hard to capture in screenshots. At the Medium and High levels, the effects quality appears almost identical; however at Low any heat distortion and much of the glare around the grenade explosion is absent. In other circumstances, things like particle effects (smoke, dust, etc.) will be reduced in quality when set to Medium or Low. For example the smoke from smoke grenades, while still serving its purpose of obscuring the view, will appear much more generic and not as realistic when Effects Quality is set to Low. The lower your setting here the better the FPS you will have in situations where such effects are used, in particular during heavy combat scenes.
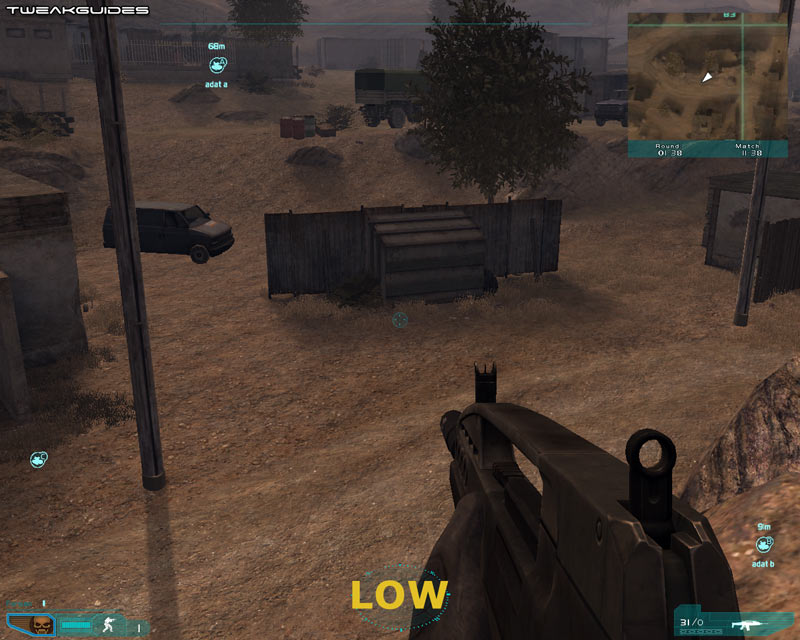
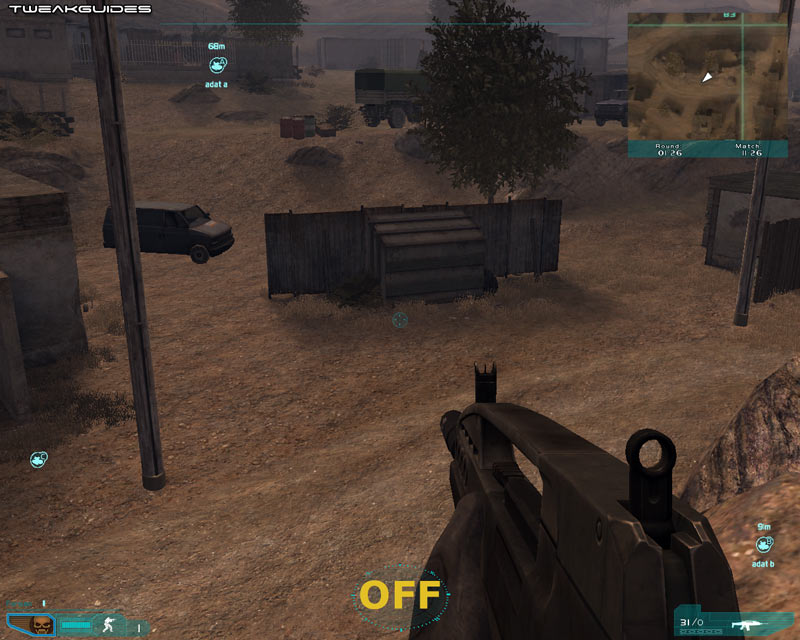
Dynamic Shadows: This setting controls the way in which certain objects cast realistic moving shadows based on light sources such as the Sun. The available options are Off, Low, Medium and High, and you can see a screenshot comparison of all four settings above. At both High and Medium, the poles, trees, van and barrels all cast shadows, though at Medium the shadows are slightly less distinct than at High because the game uses 1024x resolution Shadow Maps rather than 2048 resolution (See Advanced Tweaking section). However at Low the van, barrels and trees no longer have a shadow. At Off all dynamic shadows are removed, and only fixed shadows for static objects such as buildings and rocks remain. Reducing dynamic shadows will help improve FPS without a major sacrifice in realism.
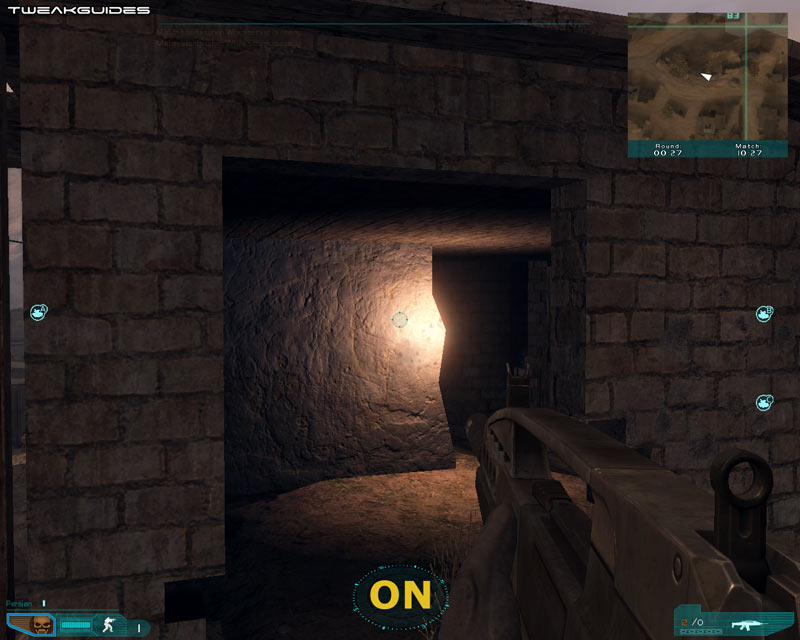
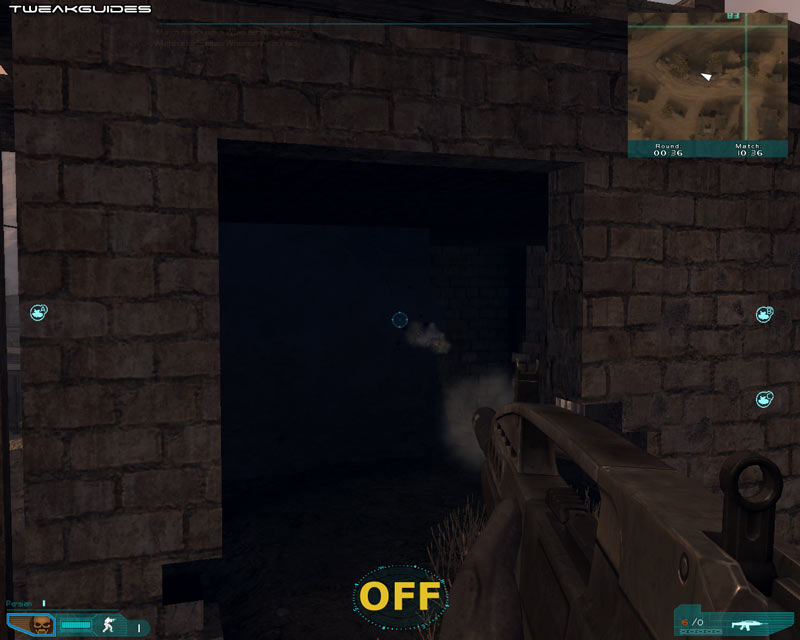
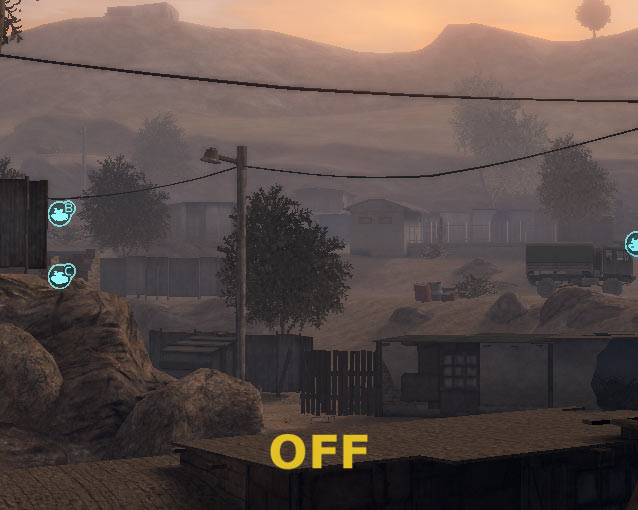
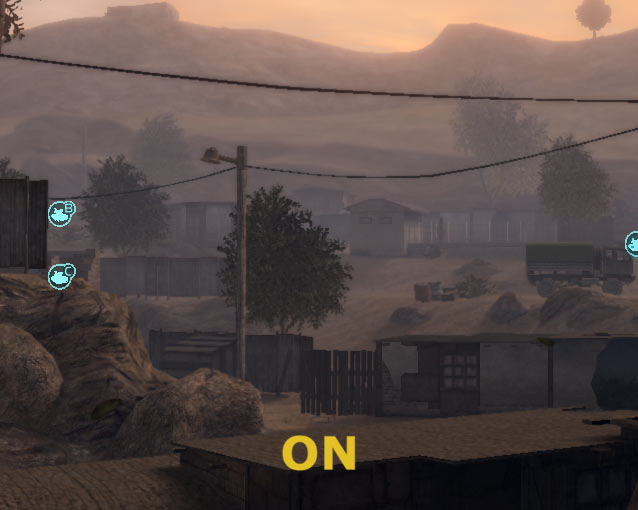
Dynamic Lights: If ticked, certain light sources (excluding the Sun) will react dynamically with the environment, increasing realism but reducing performance when such lighting is visible. For an example, see the screenshot comparison above. On the left, with Dynamic Lights On (ticked), the muzzle flush is clearly lighting up the inside of the darkened room. With Dynamic Lights Off (unticked), the muzzle flush doesn't light up the surrounding area. While best enabled for realism and possible gameplay advantage, you might have to to disable this option to improve framerates/prevent slowdowns in scenes with lots of gunfire or explosions.
Post Effects: This setting controls the quality of the lighting and the general atmosphere of the game. The available options by default are Low or High, however you can also turn Post Effects Off - see the Advanced Tweaking section for details. To see the difference between these three levels of Post Effects, examine this animated screenshot comparison: GRAW2_PostEffects.gif (494KB). Note that at Off the lighting is at its most basic; at Low the scene is more brightly lit and there's enhanced color to the lighting; at High the difference is very noticeable as the High Dynamic Range (HDR) lighting makes things slightly blurry and atmospheric. If you want the highest possible FPS, or perhaps the greatest advantage in spotting distant enemy in multiplayer, Off or Low Post Effects are best. However if you want more atmosphere in the game, and you also want to reduce the shimmering and appearance of jaggedness, I recommend High. The FPS impact should be minimal on higher-end graphics cards.
Anti Aliasing: Just as with the first Ghost Recon: Advanced Warfighter game, GRAW 2 uses a Deferred Lighting method which is incompatible with traditional Antialiasing. You cannot force Antialiasing for GRAW 2 in your graphics card control panel for example, nor should you, as this only causes problems. Fortunately, aliasing - the presence of jagged outlines - is far less pronounced in GRAW 2, as long as you have Post Effects set to High (see further above). For those who use Low Post Effects, or still find the presence of any jaggedness annoying, this setting allows you to select 'Edge Smoothing', to reduce the impact of jaggedness on screen. A screenshot comparison of a portion of the screen is provided above, however for the most part all this setting does is add blurring to the scene at the cost of quite a few FPS, even on high-end graphics cards, so I generally recommend leaving it at Off and setting Post Effects to High for a better overall result both in terms of image quality and performance.
Update: Nvidia users can now attempt to force proper Anti Aliasing in GRAW 2 using the instructions in this post on the GhostRecon.net forums. The improvement is noticeable, but the FPS impact can also be quite significant depending on the AA mode you use.
As a final note about the graphics, it should be understood that there is a limited draw distance for certain objects. In particular this means that beyond a certain distance you cannot see any friendly or enemy characters; they will be 'invisible'. You can see their muzzle flash if they fire, but that's it. This is done on purpose, and the draw distance can't be changed. It is fair in that if you can't see them, they can't see you. But it is worth keeping in mind especially if you play as a sniper.
Make sure to click the Apply button at the bottom left of screen to implement your video settings before moving on to the other options.
Audio
Master Volume: This slider controls the overall volume level in the game. It has no impact on performance, however I recommend initially adjusting the volume sliders for Music and Sound Effects separately (see below) before altering this. I've found that moving this slider in the game changes your global Windows volume as well, so it is best left unaltered.
Renderer: The audio renderer is the device the game uses to play back sound and music. Your default sound output device (usually a specific sound card) should be shown here, though in some cases it may not be available. If not, make sure your device is setup correctly in the Windows Control Panel, and make sure to install the latest audio drivers for the sound device (See the Essential Optimization section). If you have an unknown sound device, or have audio glitches, or there are no other hardware options, you should select Generic Hardware. If Generic Hardware is not available to you, or it causes audio glitches, for fastest performance on lower-end sound devices, select Generic Software. Depending on the device you choose here, your options may be limited in the Quality setting below.
Note that GRAW 2, just like the original GRAW, uses the OpenAL sound API. This means that you will have access to full hardware acceleration under Windows Vista/7.
Quality: The audio quality for the game is determined here by selecting either Low, Medium, High or Extreme. Depending on your sound card capabilities, the High or Extreme settings may not be shown. At the Low setting, up to 20 separate audio channels are required. At Medium, up to 32 are used. At High up to 64 channels are utilized, and at Extreme, only sound cards which can process 128 Channels will be allowed to see and choose this mode - namely cards like the SoundBlaster X-Fi. You cannot force your sound card to use more channels than it can physically output, so check your sound card's specifications. In general the greater the number of channels, the better the audio quality in return for lower FPS and potentially more frequent stuttering/loading pauses.
To access the following settings you will need to click the 'Show Advanced Settings' button at the bottom of the Audio options screen.
Music Volume: This slider controls the volume level for music in the game, and can be adjusted to suit your taste as it has no performance impact.
SFX Volume: This slider controls the volume level for all the various special effects in the game, and can be adjusted to suit your taste as it has no performance impact.
EAX Enabled: If you have an EAX (Environmental Audio)-capable sound card, you can tick this option to provide more realistic 3D sound positioning and better sound effects. While giving you a gameplay advantage in terms of providing better audio position, EAX can reduce performance on some sound cards, and can also cause audio glitches. If you're having sound issues, untick this option and restart the game to see if it helps resolve them.
Make sure to click the Apply button at the bottom left of screen to implement your audio settings before moving on to the other options.
The next section looks at the Advanced Tweaking possible for GRAW 2.
|
|