
Google Customization Guide
Author: Koroush Ghazi
Last Modified: April 2011
Introduction
At the start of May 2010, Google began forcibly implementing a new look for its world famous search engine which has quite a few people scratching their heads in wonder. Given that Google shot to tremendous fame and fortune based in large part on its minimalistic yet highly useful interface, it comes as a bit of a surprise to see that interface steadily becoming more cluttered, and some might say 'dumbed down', as feature creep sets in. Worse still, Google is purposely removing certain options to allow users to customize this interface. This guide covers the customization of the Google interface to allow people to resolve the most common of these annoyances.
Remove The Everything Sidebar
The single largest annoyance for many users of the new interface appears to be what's been dubbed the 'Everything' Sidebar, which appears at the left of all search results, as pictured below:
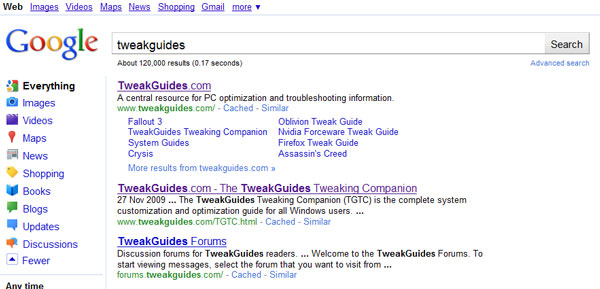
There is no way to remove the Everything Sidebar using the default Google Search preferences, so below are the details required to do just this:
The Quick & Easy Solution
In any browser the quickest and easiest way to return to a very basic Google Search appearance is to bookmark and use the Google Mobile Search interface: https://www.google.com/m - you can use this interface on a desktop PC, not just mobile devices, and it's highly likely to remain unmolested by Google in the future. It is perhaps a bit too minimalistic. Unfortunately, the other easy solution which involved using other Google addresses such as the following URL: https://www.google.com/webhp?hl=all no longer work. For a fully automated way of removing the Everything Sidebar, you can try the free plugins provided here for Firefox and Chrome users.
A more detailed and foolproof solution to removing the Everything Sidebar on any browser is provided below. Follow the instructions relevant to your particular browser:
Internet Explorer
While Internet Explorer is a good browser in many respects, it is very limited in the extent to which it can be customized using relatively simple methods. This is one of the reasons why you may wish to explore the option of using one of the other free web browsers. I personally use and recommend Firefox as an excellent balance between ease of use and functionality, security, and the greatest customization potential - see my Firefox Tweak Guide for more details.
However there is a way of customizing IE using the free IE7Pro Add-on which despite its name works with IE8. Follow these instructions:
1. Download and install IE7Pro, but during installation make sure the 'Enable Userscripts Plugin' option is ticked, and then select the 'Do not install ProgSense' option. Upon launching IE, if prompted to allow IE7Pro access through your Firewall, you can cancel such requests for our purposes.
2. Open Windows Explorer, right-click in an empty spot in a directory and select 'New>Text Document'. Open this document and copy and paste all the text from the following user script into it. Save this document and rename it DisableGoogleBar.ieuser.js.
3. Move the DisableGoogleBar.ieuser.js file to your \Program Files (x86)\IEPro\userscripts directory - note the (x86) part of the directory name doesn't exist on 32-bit versions of Windows.
4. In Internet Explorer, go to the Tools menu and select 'IE7Pro Preferences', then click the 'User Scripts' item in the left window of the preferences box, click the 'Reload All Scripts' button and tick the 'Hide Google Sidebar' box, then click OK.
5. There's no need to restart Internet Explorer, simply go to the Google Search page and search results should now appear without the Everything Bar. If the bar is still there, press CTRL+F5 to force refresh the page and load the new CSS style.
6. If you wish to disable the additional toolbar IE7Pro installs, right-click on the toolbar area and untick the new 'Grab Pro' item. This will also remove the 'IE7Pro Preferences' item in the Tools menu - you can re-enable this at any time by right-clicking on the toolbar area and reticking the 'Grab Pro' item.
IE7Pro also allows a wide range of other features for Internet Explorer, though its use requires careful consideration as it can destabilize Internet Explorer if you make too many custom changes.
Firefox
To remove the Google Everything Bar in Firefox, you will need to edit a UserContent.css file to add customized code. Follow these steps:
1. Go to the following folder:
Windows XP - \Documents and Settings\[Username]\Application Data\Mozilla\Firefox\Profiles\[randomstring.default]\
Windows Vista or Windows 7 - \Users\[username]\AppData\Roaming\Mozilla\Firefox\Profiles\[randomstring.default]\
OSX - ~/Library/Mozilla/Firefox/Profiles/[profile folder]/chrome or ~/Library/Application Support/Firefox/Profiles/[profile folder]/
2. As of Firefox 4.0, you will need to create a \Chrome directory under the folder above.
3. Create a new text document (e.g. right-click on an empty area and select New>Text Document in Windows) and rename it to UserContent.css (not UserContent.css.txt).
4. Open the file with Notepad or any text editor.
5. At the bottom of the file, copy and paste the following text into the document exactly as shown:
/* Remove Google Everything Bar*/
@-moz-document url-prefix(https://www.google)
div#leftnav {display: none !important;}
#center_col {margin-left: 0px !important;}
6. Save the document and close it. Make sure to place the document under the Chrome directory covered in Steps 1 and 2.
Close all instances of Firefox and then restart it, and when you next launch a Google search, on the search results page you should see the familiar (old) appearance for search results, minus the Everything bar. If you find the script doesn't work, change the https://www.google portion shown above to exactly match the address of the Google Search domain you normally use. To undo this change, delete the text above from UserContent.css and save it, or delete the entire file itself, then close and restart Firefox. Full details of how to add custom CSS code to Firefox are on this page of the Firefox Tweak Guide, including samples of other useful codes.
Google Chrome
To remove the Google Everything Bar in Google's own Chrome browser, unfortunately you cannot simply edit a user-based CSS file as in Firefox, so the best way to accommodate customization to the appearance of web pages is with the free Stylist Extension. Install Stylist, and then follow these steps:
1. Click the spanner icon at the top right of Chrome and select Extensions.
2. Click the Options button next to the 'Chrome Stylist' extension and select the Styles tab.
3. Click the 'Add new style' button, then in the box presented with the greyed 'Stylesheet text' prompt, copy and paste the following text:
div#leftnav { display: none !important; }
#center_col { margin-left: 0px !important; }
4. Enter a name in the 'Style Name' box at the top (e.g. Remove Everything Bar), then click the 'Prefix' drop-down box and select 'domain', then in the 'Site Domain' box enter the URL you normally use for Google Search, e.g. www.google.com or www.google.com.au, www.google.co.uk, etc., and finally, click the Save button at the bottom of the box.
There is no need to close or restart Chrome, the change will be implemented immediately. If at any time you want to disable or remove this change, follow steps 1 - 2 above then click the box with the name of this style, and either click the Disable button to stop it, or click the Del button to remove it altogether.
Opera
To remove the Google Everything Bar in Opera, you will need to create a custom CSS file which Opera can then force Google to use when loading in your browser instead of its default one. Follow these steps:
1. In Windows Explorer create a new text file by right-clicking in an empty area under a directory and select 'New>Text Document'. Open this document and copy and paste the following text into it:
div#leftnav { display: none !important; }
#center_col { margin-left: 0px !important; }
2. Save this document and rename it google.css.
3. Copy this file to the \Program Files (x86)\Opera\styles\ directory - note the (x86) part of the directory name doesn't exist on 32-bit versions of Windows.
4. Open Opera and browse to the main Google Search page, then right-click in an empty area of the page and select 'Edit Site Preferences'.
5. Select the Display tab and at the bottom of the dialog box click the Choose button, navigate to and select your custom google.css file, then click OK.
You do not need to close and restart Opera; the change will be implemented immediately when you refresh the page. To undo this change you can either delete the google.css file, or follow steps 1 - 5 above, this time removing google.css from the end of the file path under the Display tab.
Disable Localized Google
If you find Google forcing you to use a country-specific version of Google, such as Google Australia (www.google.com.au) instead of regular Google (www.google.com), then set your Google home page or bookmark to the following address: https://www.google.com/ncr - this will always display the generic global Google Search window, and search results will now always be from Google proper rather than those customized to suit your particular region.
Prevent Personalized Search Results
Since late 2009 Google began customizing the search results you see based on not only your location but by also storing a history of what you click. This means that over time the search results which appear for you will be different from those which other people see. Some people may not want this feature because its predictive nature may work against what you actually wish to find, and secondly, because we often want to see what others see as the result of a Google search (e.g. to check search rankings for a particular term).
To disable this feature you will need to launch a search from the main Google Search page, then click the 'Web History' link which appears at the top right of the search results page - you may need to click the small cog icon at the top right to access this link. Now click the 'Disable customizations based on search activity' link, and any subsequent searches you perform will show standard and not customized results. If you are logged in via a Google account, you may also wish to manage your web history in more detail.
Disable Link Fade-in
In late 2009 Google introduced a new way in which several links were displayed on its main Google Search page - they now fade into view after several seconds, or when you move your mouse. This can be annoying for some people, but given it's a JavaScript-based effect, the easiest way to disable it is to disable JavaScript for Google in your browser, which you can do as detailed under the Disable Search Query Suggestions section further below. However disabling JavaScript also disables several other Google features, so to just remove the fade-in for Google Search do as follows:
/*Disable Google Search Fade-in*/
div#ghead, #sbl, .fade, #fctr{ opacity: 1 !important; }
div#ghead, #sbl, .fade, #fctr{ opacity: 1 !important; }
Disable New Google Image Search View
As of July 2010, Google has changed the way images are displayed when you do a search using Google Image Search. It now provides just a gallery of images with no description of the image, its size or the site on which it is hosted, as shown here. You can enable a size tag for each image by going to the Everything Sidebar and clicking the 'Show Sizes' link at the bottom while in Image view. You can also see more details of each image simply by hovering your mouse over it.
Fortunately Google provides a simple (if somewhat obscure) way to revert back to the classic Image Search view: after launching an image search, scroll down to the very bottom of the results page and click the 'Switch to basic version' link.
However this choice may not remain in effect unless you are logged in with a Google account, in which case you can use the methods under the Disable Search Query Suggestions section below to disable Javascript for Google, which will force the classic Image Search view to always be used regardless of any Google settings. Note: if JavaScript is disabled and you see a blank page on image searches, you will need to first click the 'Images' link at the top of the Google Search homepage before launching an image search, rather than simply clicking the Images link on an existing search term.
Disable Search Query Suggestions
As of September 2010, Google has introduced a new Google Instant feature which provides instant search results as you type particular words or phrases. You can turn this feature on or off by clicking the 'Search Settings' link at the top right of the Google Search homepage - you may need to click the small cog icon to access this link - and selecting the relevant option under the 'Google Instant' section at the bottom of the preferences page.
However, as a result of Google Instant's implementation, Google has decided that the Search Query Suggestions feature (or Autocomplete as some call it) - which provides a list of suggested search terms as you type in the Search box as pictured here - and which could previously be switched on or off under the Google global preferences, is now always on. A Google employee has noted here that this is a deliberate decision by Google as part of their vision of a 'unified Google search experience'. This means that just like the Everything Sidebar, it is unlikely Google will allow users to disable this feature.
The easiest method of preventing this feature, and indeed several other annoying Google features, is to disable JavaScript in your browser. However disabling JavaScript altogether can also disable many useful and desirable features on various sites. A better alternative is to only disable JavaScript on a per-site basis, as follows:
Note again that disabling JavaScript for Google not only removes the Search Query Suggestions, it also forces classic Image Search view and disables the Link Fade-In effect on the Google Search homepage. If you want to disable only Search Query Suggestions without affecting any other JavaScript-based Google features, a slightly more advanced method is to edit your Hosts file in Windows as follows:
1. Go to the \Windows\System32\Drivers\etc directory.
2. Open the Hosts file with a text editor like Notepad.
3. At the bottom of the file, add the following line, substituting your own Google Search address as necessary (i.e., substitute google.co.uk, google.com.au, etc. for localized Google addresses):
127.0.0.1 clients1.google.com
4. Save the document and exit it. Note that if using Windows Vista or 7 with UAC enabled, you may need to first copy the file into one of your personal folders before being allowed to successfully save your edits, then copy this modified file back to its original directory.
Now regardless of which browser you use, Search Query Suggestion should no longer function in Google.
Conclusion
Historically, as companies have grown and diversified, they have often lost sight of their original vision. Google was founded on a simple yet extremely powerful and streamlined Internet search tool. It would be sad to see them slip into the realm of other less successful search engines which through the combination of a cluttered interface and too much interference with their user's desires to undertake clean, efficient searches, all lost their position in the hearts and minds of Internet denizens. While Google may wish to provide users with a 'unified experience', removing customization options and forcing certain changes on all users - a 'one size fits all' approach - is simply going to frustrate more and more users.
In any case I hope you've found this quick guide useful. If you're new to TweakGuides and wish to learn more about customizing and optimizing your Windows-based PC, please check the comprehensive TweakGuides Tweaking Companion PDF e-books for all the details you need.
Until next time, take care!
![]()