
Firefox Tweak Guide
[Page 12] Advanced Tweaking (Pt.4)
Web pages often use CSS (Cascading Style Sheets) to customize their basic elements, such as the color of hyperlinks, or the size and type of fonts used to display text in various parts of the page, and so forth. The Firefox files UserChrome.css and UserContent.css essentially work on the same basis - they allow users to customize the basic elements of the user interface and web layout presented by Firefox. UserChrome.css relates to elements of the Firefox user interface, while UserContent.css affects the appearance of web pages displayed within Firefox.
By default, neither of these files exist, and neither does the directory in which they should reside. Each of these must first be created under your profiles directory - refer to the start of the page 9 for more details of profiles. The first step is to create a \Chrome folder under your profiles directory, with the end result looking like this:
Windows XP: \Documents and Settings\[Username]\Application Data\Mozilla\Firefox\Profiles\[profilename]\Chrome
Windows Vista, 7, 8 or 10: \Users\[username]\AppData\Roaming\Mozilla\Firefox\Profiles\[profilename]\Chrome
Next, open this new directory, right-click in an empty area and select New>Text Document, then rename this newly created text file to UserChrome.css; repeat the same steps to create a UserContent.css blank file under the same directory. Make sure the .txt extension does not remain on either of these files, e.g. it must be UserChrome.css, not UserChrome.css.txt. These files can be edited using a text editor such as Windows Notepad, and along with a range of custom code from places like the Userstyles site, and a good CSS Tutorial you will be able to learn how to manipulate CSS code to create the perfect customizations to suit your own needs.
Below I provide a sample of basic tweaks which provide a handy demonstration of what is possible when using CSS to customize Firefox. You can copy and paste the code portion shown (highlighted in grey) exactly as is into the relevant CSS file to enable or disable different functionality. You can add as many tweaks as you like to a single .css file, and to undo any of them simply delete the relevant portion of code from the file. Note that you must close all instances of Firefox and restart the browser to implement any changes to the .css files.
UserChrome.css
Move the Tab Bar Beneath the Firefox Toolbar
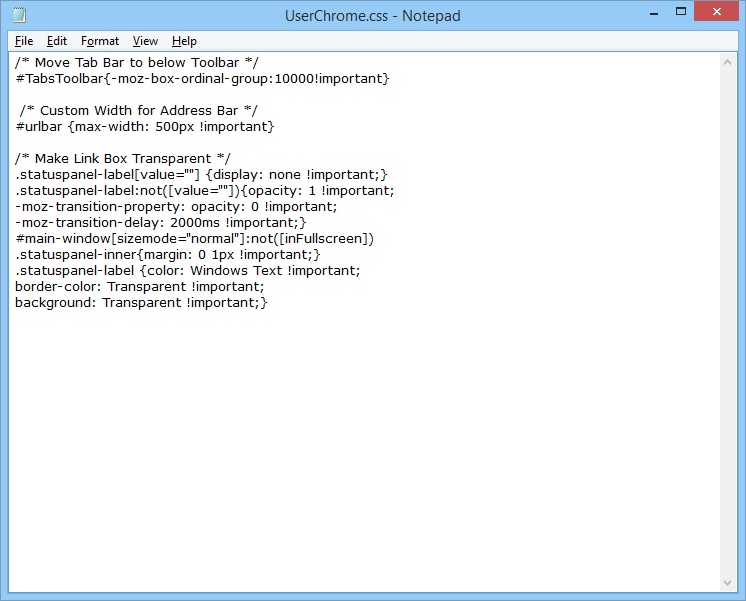
/* Move Tab Bar to below Toolbar */
#TabsToolbar{-moz-box-ordinal-group:10000!important}
This moves the Tab Bar, which contains all open tabs, to sit beneath the main Firefox Toolbar, which contains the Address Bar, Search Box, Bookmarks button etc.
Remove the Firefox Main Menu (Hamburger) Button
/* Remove the Hamburger Button */
#PanelUI-menu-button {display: none;}
This completely removes the Firefox main menu button, also known as the Hamburger button, shown at the top right of the screen. Note that once removed, the only way to access Firefox options and settings is via the Menu Bar (press ALT to view it) and keyboard shortcuts.
Customize Address Bar Width
/* Custom Width for Address Bar */
#urlbar {max-width: 500px !important}
This sets a custom maximum width for the main Address Bar, independent of the Search box to the right of it. Alter the 500px value above to whatever pixel width you want for the Address Bar (e.g. 300px for 300 pixels wide, 900px for 900 pixels wide, etc.).
Make the Link Box Transparent
/* Make Link Box Transparent */
.statuspanel-label[value=""] {display: none !important;}
.statuspanel-label:not([value=""]){opacity: 1 !important;
-moz-transition-property: opacity: 0 !important;
-moz-transition-delay: 2000ms !important;}
#main-window[sizemode="normal"]:not([inFullscreen])
.statuspanel-inner{margin: 0 1px !important;}
.statuspanel-label {color: Windows Text !important;
border-color: Transparent !important;
background: Transparent !important;}
The link box is the popup URL text box which appears at the bottom of the screen whenever you hover your mouse over a hyperlink. This tweak changes its background color from white to transparent.
UserContent.css
Change Cursor for Links that Open in New Tabs/Windows
/* Change cursor for links that open in new tab/window */
:link[target="_blank"], :visited[target="_blank"],
:link[target="_new"], :visited[target="_new"] {
cursor: crosshair; }
This changes your default cursor to a crosshair whenever you hover over a link which opens in a new tab or window as opposed to opening in the current tab/window.
In practice, rather than using UserContent.css, it's actually much easier to customize the appearance of web pages using the settings available under the 'Fonts & Colors' section of the Firefox Options, and for more advanced customization of website appearance use the Stylish Add-on, hence the relative lack of UserContent.css tweaks above. See the Firefox Settings and Add-Ons sections for more details.
The ability to customize Firefox simply by using CSS code provides a great deal of potential in tweaking Firefox's interface and web display capabilities with no need to install additional software in the form of add-ons. This reduces the potential resource usage and conflicts which can occur if you have lots of add-ons installed simply to make relatively simple adjustments to the Firefox UI. Of course the only real issue is that you have to find or generate the relevant CSS code to achieve the changes you want.
The next page brings the guide to a Conclusion.
|
|