
Firefox Tweak Guide
[Page 9] Advanced Tweaking
You can change a great deal of Firefox's behavior using the normal Firefox Options, as well as customizing various features through the use of Add-ons. There are, however, even more ways in which you can fine-tune Firefox to better meet your needs. This section of the guide deals with such advanced tweaking. It's more complex than the information covered earlier in the guide, but proper knowledge of advanced tweaking gives you even more control over various hidden features within the browser.
Before undertaking any tweaking however, it is vitally important that you understand Firefox's structure and where it stores different types of customizations, as well as the different methods by which you can apply various customizations and tweaks, and how you can protect yourself against data loss from unintended changes. I recommend that you familiarize yourself with all of the details below before attempting anything on the following pages.
Firefox Profiles
All of the changes you make to Firefox, including altering the main options, adding bookmarks, saving website login information such as username passwords, installing add-ons, and customizing the interface, are all saved to a specific profile folder. The location of this profile folder in Windows is as follows:
Windows XP: \Documents and Settings\[Username]\Application Data\Mozilla\Firefox\Profiles\
Windows Vista, 7, 8 or 10: \Users\[username]\AppData\Roaming\Mozilla\Firefox\Profiles\
If you can't see the directory path above on your system, you will need to enable the 'Show hidden files and folders' option found under the View tab of the Folder Options item in Windows Control Panel.
At least one profile directory exists under the location above, with a name consisting of a string of letters and numbers, followed by the actual profile name. For example, the default profile in Firefox would look something like this: pj8fzz9p.default. A profile holds all of your customized settings, so if it is deleted, all of the changes that you have made to Firefox will be removed.
Managing Profiles
Before making any of the changes in this section of the guide, or for the purposes of migrating all of your Firefox settings, tweaks and other alterations quickly and easily to another installation of Firefox, you can backup your profile. To do so, go to the relevant \Firefox\Profiles directory as listed further above. Then open your specific profile folder that begins with a string of numbers, followed by .default. This folder contains a number of subdirectories and files which hold all of your Firefox settings, passwords, bookmarks, extensions, etc. Copy your entire profile folder (the one starting with a string of numbers and ending with .default), and save it somewhere safe, as it contains secure information. This is also a good way of migrating your Firefox customizations to another installation of Firefox.
To restore a profile that has been backed up in the manner above, say to a new installation of Firefox you have made on a fresh install of Windows, do the following:
1. Launch Firefox at least once so that it creates a default profile folder.
2. Navigate to the \Firefox\Profiles directory, and rename the default profile folder to something else, e.g. from pj8fzz9p.default to pj8fzz9p.BACKUP.
3. Copy your previously backed up profile folder to the same \Firefox\Profiles directory, and rename it so that it has the same name as the existing default directory before it was renamed (i.e. rename it to pj8fzz9p.default in this example).
When you next launch Firefox, you will see that all of your customizations have been restored to this fresh installation of Firefox.
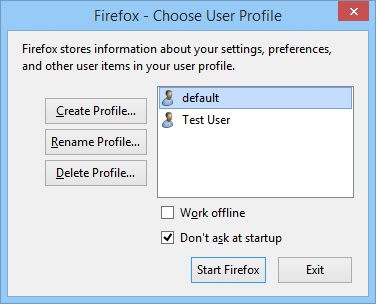
The Firefox profile manager allows you to create, rename, or delete profiles, and set which profile is used each time Firefox starts up. For example, using the profile manager you can create an entirely new profile so that you can safely test some tweaks, or to create separate profiles for different users, or simply to reset Firefox to its default settings. To access the Profile Manager, first close all open instances of Firefox, then go to Start>Search Box (or the Start Screen in Windows 8) and type Firefox -profilemanager and press Enter. This will open up the Profile Manager dialog box, and from here you can create a new profile, or delete or rename existing profiles. Note that if the 'Don't ask at startup' box is unticked, then every time Firefox opens, and if you have two or more profiles, it will first open the Profile Manager so you can select which profile to use. This is not normally required, so the box should remain ticked.
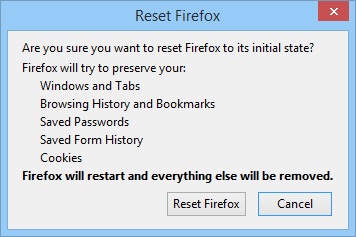
The easiest way to create a new profile with default settings and then migrate your most important data (bookmarks, passwords, history and cookies) to it is to type About:Support in the address bar, and press Enter. In the page that opens, click the 'Reset Firefox' button at the top right to commence the process and follow the prompts.
Bookmark Files
Your bookmarks are held under your Firefox Profile folder, as covered above, stored in a places.sqlite database file. As you make changes to your bookmarks in Firefox, up to 10 automatic backups of the changes are also held under the bookmarkbackups directory within your profile folder. In general you should not edit or alter any of these files directly - follow the directions below if you want to backup or restore your bookmarks.

To manage your bookmarks, do the following:
1. Open the Bookmarks menu and select 'Show All Bookmarks'.
2. In the Library window which opens you can see your current bookmarks under the 'Bookmarks menu' folder in the left pane. You can rearrange, rename or delete any of these just as you would using the Windows Explorer interface. Also check under the 'Unsorted Bookmarks' folder and if necessary move bookmarks from there to your other folders.
If at any time you wish to backup just your bookmarks, follow these additonal steps:
3. Click the 'Import and Backup' button in the Library.
4. You can select to backup your bookmarks as a .JSON file by clicking the Backup option, or as an .HTML file by selecting the 'Export HTML' item. Each file will contain all of your current Firefox bookmarks for the active profile, but it is important to note the difference:
Restoring Bookmarks
To restore or import new bookmarks at any time, whether from another browser, an existing Firefox .HTML or .JSON file, or from one of your automatic bookmark backups, follow the instructions below:
1. Open the Bookmarks menu and select 'Show All Bookmarks'.
2. In the Library window which opens, click the 'Import and Backup' button, then:
The automated bookmark backups which Firefox keeps are held as .JSON files in the \bookmarkbackups folder under your profile, in case you want to manually back them up to another location. If you find your bookmarks file appears to be corrupt or inaccessible, follow the instructions here to attempt repair.
Cookies, History, Saved Passwords
Cookies: Firefox stores your cookies in the automatically generated database file cookies.sqlite under your specific Profile folder.
History: Your browsing history is saved as part of the places.sqlite file in your profile directory, which is the same file that holds your bookmarks.
Saved Passwords: Your saved website login and password details are kept in the signons.sqlite and key3.db files in your profile directory. These files are encrypted for security purposes.
You can backup and restore any of these files if you want to transfer individual elements, such as just your saved passwords, to a new installation of Firefox. For example, backup just the signons.sqlite and key3.db files in your current profile directory, then copy them over the same files in the profile directory of a new installation of Firefox, and all of your saved login details and passwords will be restored.
Cached Files
As covered in the Settings section of this guide, the Firefox cache, also known as Offline Storage, is a location on your drive where Firefox stores website elements such as images, text, ads etc. This cache speeds up browsing because when you revisit sites, the stored version of the unchanged elements are loaded from the cache on your drive as opposed to having to be downloaded from the Internet. The cache doesn't store elements such as bookmarks, cookies, passwords etc - these are stored separately in your profile as covered above.
The location for cached Firefox web elements is different to that where your other profile elements are held:
Windows XP: \Documents and Settings\[Username]\Local Settings\Application Data\Mozilla\Firefox\Profiles\[profilename]\Cache
Windows Vista, 7, 8 or 10: \Users\[username]\AppData\Local\Mozilla\Firefox\Profiles\[profilename]\Cache
The cached files held this location are saved within multiple folders as a range of alphanumeric strings and not as filenames. This is primarily for security purposes, so that a malicious file/script in your cache can't be launched easily. Note that as of Firefox 32.0, a new caching system is enabled by default, which stores the cache in a separate Cache2 folder in the location above. See the browser.cache.use_new_backend preference in the Advanced Tweaking section for more details.
If you want to view or retrieve a particular image, document, flash video, etc. from the cache, the easiest method is to follow these steps:
1. Type About:Cache in the Address Bar and press Enter.
2. Select 'List Cache entries' under the Disk cache device - this are the files stored on your drive.
3. Depending on the cache size and your drive speed, it may take a while to list all the cached entries on your drive. All the cached entries will be shown as standard web links. Press F3 or CTRL+F to open the Search box if you wish to search for the relevant site/element.
3. Once found, click once on the link to open it up on a new page. A range of detail about the file will be shown.
4. If you still want to go ahead and view the actual item, click the link at the top of this page and it will be displayed as it normally would in the browser. I strongly recommend that you do not do this for any executable files such as .bat, .com, or .exe, unless you are 100% sure of the source.
5. If the item is something you wish to save, right click on the link instead and select 'Save Link As', and save the file as normal.
There is an element of risk involved in opening cached elements in this manner, however given the reasonably robust defences in Firefox, the chances of finding malicious software in your cache is minimal. This is particularly true if all you want to do is retrieve an image or text file.
Prefs.js & User.js
There is a file called Prefs.js in each profiles folder which holds most of the Firefox preferences you set in the Firefox Options menus, as well as those you manually change or add in About:Config. This file is automatically generated by Firefox and updated whenever you make changes to Firefox's configuration. Typically you won't need to manually edit this file. Instead, if you want to add customized preferences to Firefox outside of those available in the Options menus, there are two preferred ways in which you can do this:
1. You can create a new file in the same directory as Prefs.js called User.js. To create this file, open Windows Explorer, go to your Profiles directory, and under your current profile's directory - in the same directory as Prefs.js - right-click in an empty spot in the right pane and select New>Text Document. You can now edit this file using a basic text editor like Windows Notepad and manually insert commands in the file. Once done, right-click on the text document and rename it to User.js (not User.js.txt). Any preferences set in this file will override or add to those in Prefs.js.
2. A much easier way to customize the majority of Firefox's preferences - both the readily available ones and those which are usually hidden - is via the About:Config method, which is covered separately below, and in more detail on the next page.
The main uses for Prefs.js and/or User.js would be if you wanted to backup or copy across just your custom Firefox options and tweaks to another install of Firefox, or if you want to delete About:Config entries you've manually added but no longer want. Note that if you want to edit Prefs.js and/or User.js you should always close all open instances of Firefox first before opening either of these files in a text editor, otherwise your changes will not be properly saved or implemented in Firefox.
About:Config
To quickly and easily access a whole range of advanced customizations and preferences for Firefox, type About:Config in the Address Bar then press Enter. After accepting the warning prompt shown, Firefox displays a large range of preferences sorted alphabetically. We cover all of the key preferences, both those which are already shown under About:Config, and some which will need to be created by the user, starting on the next page of this guide.
Any changes made using the About:Config method are stored in the Prefs.js file in your Profile folder, as covered further above. It is recommended that you backup this file before using the About:Config method as a precaution, because some changes to About:Config cannot be easily undone without restoring or editing the Prefs.js file. If you didn't backup the file before making changes, you can manually edit Prefs.js with any text editor to remove the line(s) containing the altered preference(s) you don't want, and it will remove those preferences or reset them back to their default values. Any settings already available in the normal Firefox Options menus are best changed from within Firefox, not using About:Config or any other method.
UserChrome.css
This file is a style sheet which controls the Firefox interface, and users can insert various commands into it to modify the way Firefox looks beyond the settings available in the Options menu. This file doesn't normally exist in your Profile folder, and neither does the \Chrome subdirectory of your Profile folder which it needs to sit under. Go to your profile folder as listed at the top of this page, and create a new subdirectory called Chrome. For example, under Windows Vista, 7, 8 or 10 the full directory path should look like this:
\Users\[username]\AppData\Roaming\Mozilla\Firefox\Profiles\[profilename]\Chrome
Now under this folder, right-click in an empty space and select New>Text Document, and rename it to UserChrome.css (not UserChrome.css.txt). You can now edit this file with a text editor and add custom code as desired.
UserContent.css
As with UserChrome.css above, UserContent.css is another style sheet which controls the way in which web pages appear in Firefox, not the Firefox interface itself. This file also doesn't exist by default in your Profile folder, and you will have to create a new text file and call it UserContent.css under the \Chrome subdirectory of your relevant Profile folder (which you must also create, as covered above).
A range of UserChrome.css and UserContent.css tweaks are provided at the end of the Advanced Tweaking section on page 12. Note that you need to close and restart Firefox before any changes to UserChrome.css or UserContent.css are implemented.
On the next page we start looking at actual tweaks which can be applied to Firefox using the methods above, starting with About:Config tweaks.
|
|