
FEAR Tweak Guide
[Page 6] In-Game Settings (Pt.2)
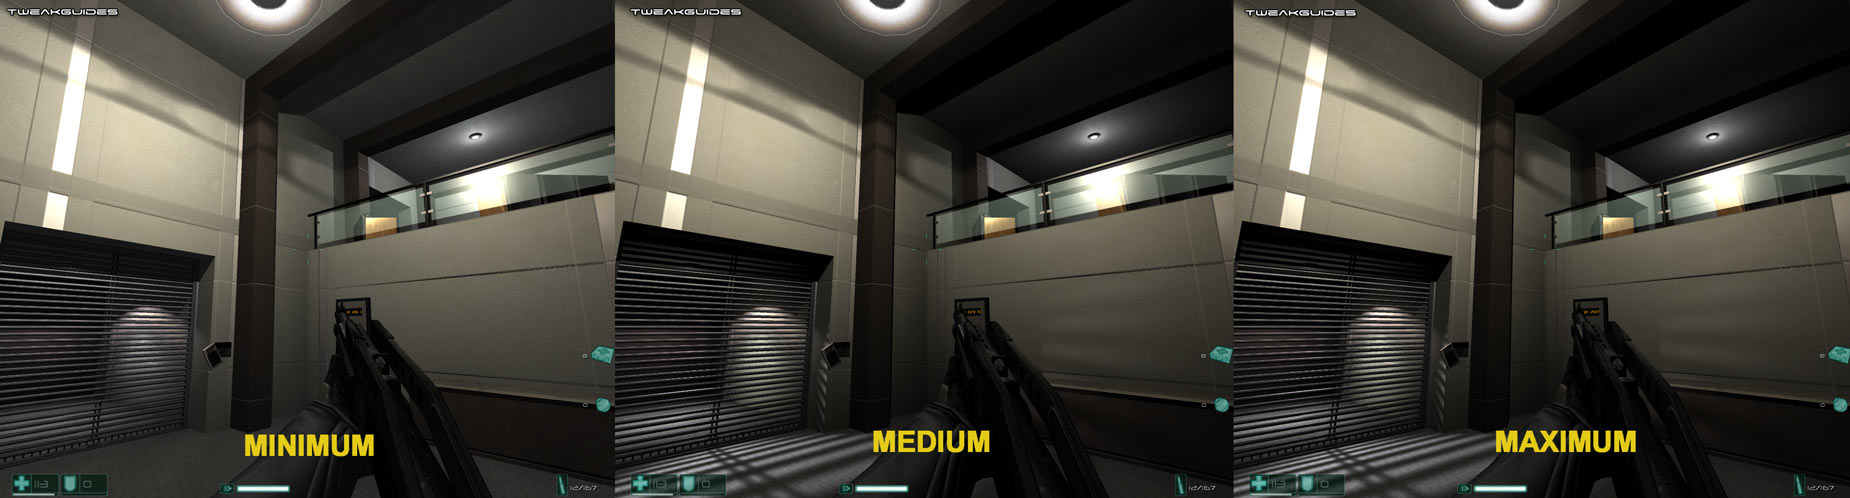
Light Detail: Controls the level of detail as well as the actual number of lights in the game. The higher the setting, the more detailed and more numerous light sources will be at the cost of performance. In the screenshot comparison above, if you look closely you will see that there is a noticeable difference between Minimum and Medium - the number of lights (and hence shadows cast) is less at Minimum - in particular the light behind the grills to the left only appears at Medium. The difference between Medium and Maximum is not noticeable.
Enable Shadows: If set to On, characters and objects will cast shadows. This greatly improves realism, however it also noticeably reduces performance - particularly depending on your Shadow Detail level and the number of light sources visible in certain areas.
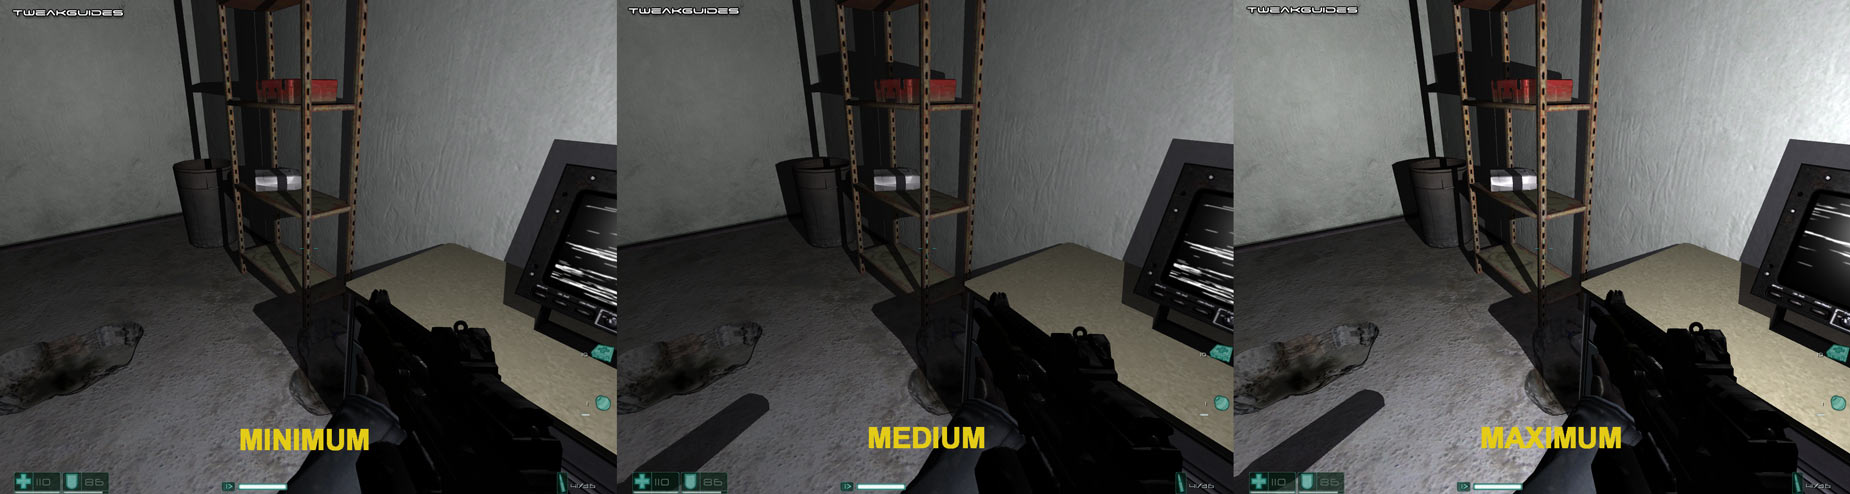
Shadow Detail: Determines the types of objects which cast shadows (if Enable Shadows is on). The higher the detail level, the more objects will cast detailed shadows at the cost of a noticeable drop in performance in areas with multiple light sources and/or with your flashlight on. Click on the screenshot comparison above to look at the details. Going from Maximum to Medium there is no noticeable difference. However from Medium to Minimum, the character's gun barrel shadow is removed (as is the character's shadow itself), the red health box and the bucket to the back also lose their shadows.
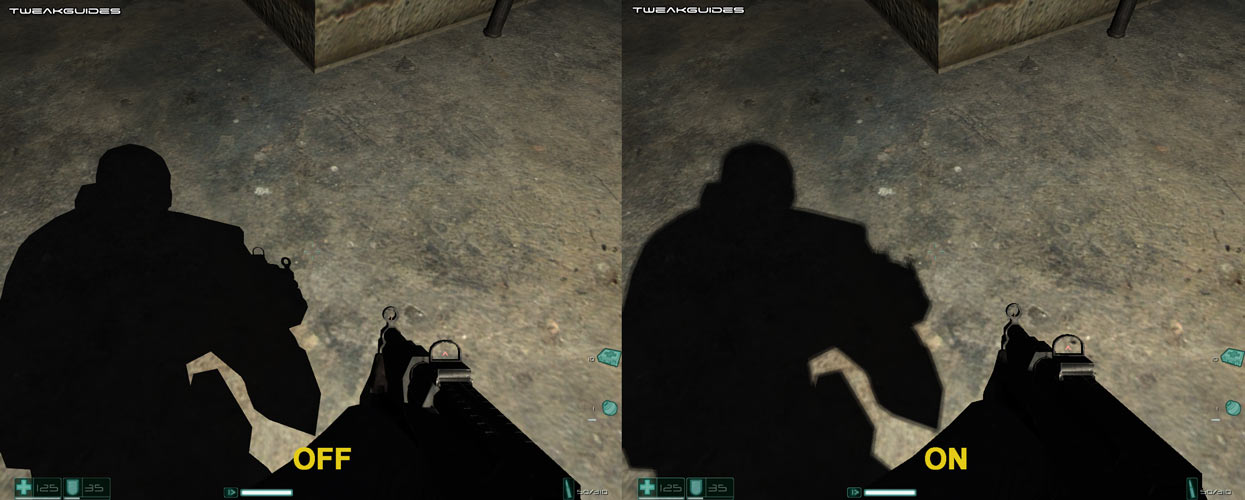
Soft Shadows: If enabled, Soft Shadows adds a bit of a haze to the edge of cast shadows to create a more realistic shadow appearance. The comparison is shown in the screenshots above. Unfortunately this method also brings with it a massive performance hit (at times halving FPS), and it is strongly recommended that all users disable Soft Shadows for optimal performance with little to no noticeable image quality loss. Note that enabling Soft Shadows along with FSAA is not recommended, and can result in graphical glitches. Further note that on ATI graphics cards enabling Soft Shadows along with Pixel Doubling (see below) results in a black screen - this is a known driver bug.
Texture Filtering: This setting determines the appearance of textures in FEAR - textures are the images covering every 3D object in the game. The higher the texture filtering method (i.e. Trilinear, 2x Anisotropic Filtering, 4x AF etc.) the sharper textures will appear as they fade into the distance at the cost of some performance. You can read more about texture filtering methods in my Gamer's Graphics & Display Settings Guide. It is recommended that if you wish to use texture filtering in FEAR, that you set your Anisotropic Filtering setting in your graphics card's control panel to 'Application Preference' and use the setting here.

Texture Resolution: This setting determines the resolution of the 2D images used for textures. The higher the resolution, the better textures will look, but the more video memory they will use. For those with lower amounts of Video RAM (e.g. 128MB or less), I recommend lowering this setting to Medium or below, otherwise you will experience consistently more in-game pauses and longer loading times. This setting can have a dramatic impact on smooth gameplay on lower-end systems, so don't select Maximum unless you have a high-end graphics card at the very least. Click on the screenshot comparisons above and note that from Minimum to Maximum the level of texture detail on the wall in particular becomes clearer and appears more 3-dimensional. This effect is much more apparent while moving around in the game, and the difference is most noticeable between Minimum and Medium.
Videos: Determines the number and resolution of in-game videos used.
Pixel Doubling: Contrary to what this setting sounds like, it doesn't double the resolution of the screen - in fact it halves it. Essentially this takes a single pixel (the smallest element on a screen) and expands it to fill twice the space. This means that at 640x480 the resolution is actually performing the same as if it was running at 320x240, but it expands to fill the 640x480 area of the screen. The result is better performance, but obviously much poorer image quality than the original resolution - the graphics start to look very blocky. Unless you really need the performance boost, leave this option set to Off.
DX8 Shaders: On graphics cards which support DirectX9.0, setting DX8 Shaders to On improves performance by forcing the use of DirectX8.0 shaders rather than the better-looking DX9.0 shaders. The performance improvement is particularly noticeable on older/slower DX9.0 graphics cards. In general the image quality loss is not significant, so if you're struggling for performance set this option to On, but if you want the absolute best graphics quality leave it Off.
Screen Resolution: Same as the Resolution setting under the Display options, however there is one major difference - this displays the current resolution, including unsupported resolutions. This is a good way of checking to see if a resolution you've set in the Settings.cfg file has been successfully implemented (See Advanced Tweaking for full instructions). However if you have set a custom resolution, don't click on this setting as it will force your resolution back to one of the standard resolutions.
Shaders: This setting determines the level of detail for shader effects. Just as with the DX8 Shaders setting above, the higher the level of shader detail, the slower the performance for older/slower graphics cards, but the better the quality of special effects in the game. Shader differences are not necessarily very noticeable, but can be seen in effects like heat hazes, water reflections, lighting etc.
Controls
This section is fairly straightforward - make sure you assign keys/buttons to all the important game functions. Of note, the Invert Mouse option if set to On means that pushing your mouse forward will tilt your character's view down, pulling it back tilts the view up; the Mouse Smoothing option attempts to smooth out jerkiness in mouse movements, and is best reduced as it can cause mouse lag at higher levels.
Game
These options should be set to taste as they have no performance impact with the exception of the SlowMo Effects setting below. Of note, you may want to reduce Head Bob to improve aim; and you can adjust the Difficulty setting at any time in the game if you're having a hard time getting through a particular section for example.
SlowMo Effects: When Slow Motion mode is enabled in the game, you get various blurring, bullet travel/impact shader effects. Disabling these by setting this option to Off can reduce the 'realism' of SlowMo, but noticeably improves any lag during Slow Motion mode for those with older/slower graphics cards.
Weapons
None of the settings in this section impact on performance so set to taste.
The next section covers the various known advanced tips and tweaks you can undertake to improve FEAR's performance and customize the game further.
|
|