
FEAR Tweak Guide
[Page 5] In-Game Settings
This section contains descriptions of all of FEAR's in-game settings, which can be accessed by clicking the Options item in the main game menu screen. Each of the main options sub-sections are covered below, and the performance and visual impacts noted. However the precise performance impact of each setting depends on your particular system hardware. For some good articles which do benchmark the actual difference between these settings on various hardware, see the: Gamespot FEAR Performance, AnandTech FEAR Performance, FiringSquad FEAR Performance and Bit-Tech FEAR articles.
There are screenshot comparisons provided below for some of the settings for which differences are harder to detect.
Display
Resolution: Resolution has a significant impact on FEAR's performance. FEAR is limited to 4:3 aspect ratio resolutions such as 1600x1200, 1280x960, 1024x768, 800x600 or 640x480 if selected here. Note that the actual resolutions available to you depend on your video card and monitor capabilities. The lack of popular resolutions like 1280x1024 is because the developers only officially support proper 4:3 aspect ratio resolutions and further they have also stated that users should avoid any resolution above 1024x768 as it is too strenuous for most current systems. This is not true - I can confirm that the latest 7800GTX and X1800XT cards can indeed perform extremely well at resolutions above 1024x768. Fortunately you can set a custom resolution like 1280x1024 by editing the .cfg files - see Settings.cfg under the Advanced Tweaking section of this guide.
Update: Note that as of the 1.08 Patch, widescreen support has been added to the game (See page 4 for details).
VSync: Vertical Synchronization (VSync) is the synchronization of your monitor and graphics card's abilities to draw a certain number of frames per second (or FPS) on the screen. This is referred to as the Refresh Rate, and is measured in frequency per second (Hz). Different monitors can achieve different refresh rates at various resolutions. For example a monitor which can provide 85Hz refresh rate at 1280x1024 means the screen is redrawing itself 85 times per second at this resolution. If Vertical Sync is enabled, your maximum FPS cannot exceed your monitor's refresh rate at your chosen resolution, and more importantly your overall FPS will be reduced. For this reason it is strongly recommended that you set VSync to off. The only down side is that if VSync is disabled, you may notice some image 'tearing'. This causes no damage to your monitor, but if really annoys you enable VSync. For more details see my Gamer's Graphics & Display Settings Guide.
Force Restart: This option was added from a recent FEAR patch. When set to On, it clears and restarts the graphics rendering engine in between level/map loads. This can increase loading times, but in return there is less chance of graphical glitches and greater likelihood of smoother and improved performance. It is recommended that most people enable this option to begin with, and only disable it if you experience problems or can't stand the increase in load times.
Gamma: Gamma is the overall brightness of the screen. Since FEAR is a relatively dark game, it is important that you don't have too low or too high a gamma, otherwise your image quality will suffer. This setting has no impact on performance, so use the small black box with text inside it below this setting to adjust your gamma correctly. The 'clearly visible' text should, as the name suggests be clearly visible. The 'slightly visible' text should be just legible, while the 'barely visible' text at the very top should be almost totally invisible.
Sound
Sound Effects, Speech, Music: These sliders determine the volume of the various audio elements of the game. Adjust to suit your taste. If you want to completely disable sound or music to improve performance, see under FEAR Config Tool in the Advanced Tweaking section. That is, setting a slider to the far left here does not remove that element from memory and hence there is no performance difference at the various slider levels.
Enable HW Mixing: If set to On, FEAR will use your sound hardware. This provides better performance and audio quality, however depending on whether your sound card is compatible with FEAR (See Readme.txt file), you may experience audio glitches with Hardware support enabled. Generally speaking most Audigy sound card owners should enable HW Mixing, those with onboard sound should disable it.
Enable EAX 2.0: If you own a sound card which supports EAX (Environmental Audio), you can enable this option for a reduction in performance but an increase in audio quality. Once again this can lead to hardware glitches, but before disabling EAX first make sure to go into your sound card's EAX Control Panel and click the 'All Effects Off' button, or untick the 'Enable Audio Effects' option. Also untick 'Enable CMSS 3D' under 'CMSS 3D Effects' if necessary, as this can cause 3D sound effects to come from the wrong locations in FEAR.
Enable EAX Advanced HD: Selecting On for this option enables Advanced HD on Creative sound cards, mainly the Audigy and X-Fi series. This provides even better audio quality and 3D positioning of sounds with a slight performance drop, but firstly make sure you've downloaded the latest sound drivers for your card. Once again if you have any audio glitches disable Advanced HD first, then also disable EAX if the trouble continues.
If you continue to have audio problems in FEAR, disable all three of the above options, and refer to the Troubleshooting Tips section of this guide for more resources which can help you out. The sound in FEAR seems to be problematic for many people
Performance
You can allow FEAR to automatically detect optimal settings here by clicking the 'Auto Detect' option, however it is strongly recommended that you take the time to manually adjust each of the settings below as they have a significant impact on the game's performance. Understanding them and being able to fine tune them will result in both better visuals and better performance than any auto detection method. Make sure that if you're going to use a custom resolution, that you set it first before changing these settings (See Advanced Tweaking section), so you can really judge your final performance at your desired resolution.
There are two main sub-sections here, the first relates to settings which are more CPU-dependant, while the second is for settings which rely almost solely on your graphics card's capabilities. Once you've adjusted these settings as described below, the best way to test the impact of your changes is to click the 'Test Settings' option and watch as FEAR runs through a preset demo sequence. Look out for graphical changes throughout the sequence, and at the end note your performance - pay particular attention to the minimum FPS result. If it's below around 25FPS, and if the '% below 25 FPS' is quite high, then you will get a lot of slowdowns and lagginess in the game. Keep changing settings until the bulk of your FPS lies above 25FPS for smoother gameplay.
Note that the Test Settings timedemo doesn't include any Artificial Intelligence (AI) calculations, since it's a scripted sequence. The performance figures from this test are indicative only, and in the game itself your performance may dip much lower in heavy combat scenes and/or when using SlowMo mode.
Advanced Computer Options
Single Player Physics: This setting determines the level of detail given to advanced Havok physics effects in the game, and the frequency with which the physics engine updates object states. While the game physics can't be turned off completely, lower settings here will improve performance especially for those with slower CPUs. However lower settings also disable some of the interactivity with various objects in the game, like being able to push over bookshelves etc.
Multiplayer Physics: Similar to the setting above, however this allows you to alter the more limited physics settings for multiplayer. Lowering this can help improve performance when online, but remember that everyone is still seeing the same basic information on their screen.
Max Hardware Sounds: This setting determines how many channels of sound are used when HW Mixing is enabled. The higher the setting the more channels used, which improves sound positioning from multiple sources, but reduces performance. Minimum is 32 channels, Medium is 64, and Maximum is 96.
Particle Bouncing: This setting determines the level of special particle effects, such as embers or sparks flying around after an explosion or from fault electrical equipment. The higher the setting, the richer these effects but the lower your performance.
Shell Casings: If set to On, shell casings from expended bullets are ejected from all weapons. This adds to realism but reduces performance slightly particularly in heavy combat scenes.

World Detail: Determines the level of detail and number of objects displayed in the game. The higher the level, the more realistic objects will be and the more objects will be displayed - but the slower your performance. Click the screenshot comparison above to see the difference between the three levels of this setting. Note some of the non-important items on the desk disappear. Only the stapler disappears when going from Maximum to Medium. At Minimum however the ledger and stapler are both gone. In other scenes you may notice details like the frosting on glass is removed, etc.
Corpse Detail: Determines the level of detail of corpses and how quickly they are removed. Obviously in situations where there are multiple corpses, such as heavy combat scenes, reducing this setting will noticeably improve performance.
Advanced Video Card Options
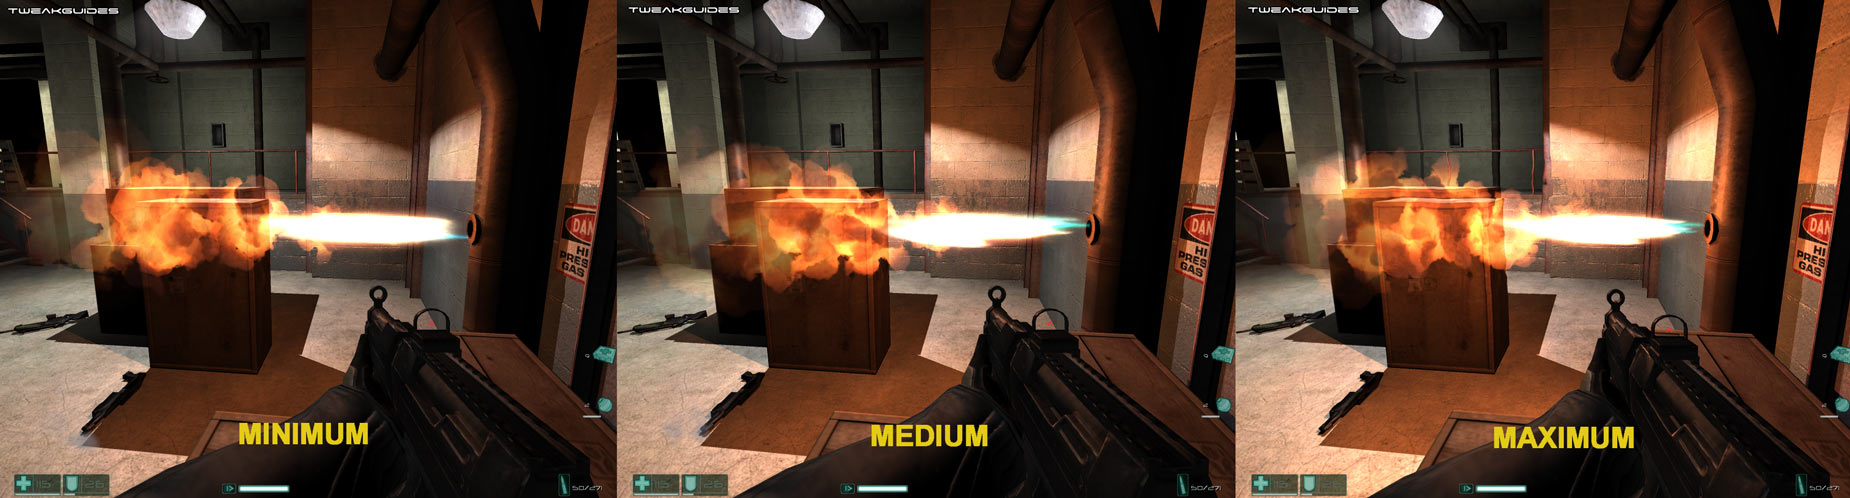
Effects Details: Determines the level of detail for a range of special effects. Lower levels reduce such visual effects in return for performance improvements. As the screenshot comparison above shows, the main change occurs between Maximum and Medium. In the shot above, the heat haze effect around the fire is only visible at the Maximum setting - it disappears at Medium or below.
Model Decals: Determines the number of decals (marks) made on characters in the game, for example when they are shot. Lower levels decrease realism in return for performance increases especially during heavy combat scenes.
Water Resolution: Controls the level of detail given to water in the game. Higher levels improve the realistic appearance of water at the cost of some performance in such areas. However in my comparisons of the three levels, I didn't notice much if any difference in the visual quality of water.
Reflections and Displays: Controls the number and quality of displays in the game, as well as reflective surfaces such as water. Lowering this setting removes some of the less significant displays as well as reducing image quality on the displays and removing reflections, but provides greater performance in such areas.
Volumetric Lights: If enabled this setting allows volumetric light effects - namely effects which light up the air in an area, such as a diffused glow around a character or object. While very realistic, these effects can reduce performance significantly in such areas on older graphics cards.
Volumetric Light Density: If Volumetric Lights are enabled, this setting controls the level of richness or density these effects have. The lower the setting, the less rich the glow and volume of such effects which can be a good compromise between performance and image quality, rather than turning off volumetric lights altogether.
FSAA: FSAA stands for Full Screen Antialiasing, a method of smoothing jagged lines on the screen. The higher the sample rate (i.e. 2x or 4x) the smoother jagged lines will appear in the game. You can read more about FSAA and see examples in my Gamer's Graphics & Display Settings Guide. In FEAR, the developers recommend the use of lower resolutions combined with some FSAA if you want to achieve better image quality, as opposed to higher resolutions with lower or no FSAA. However if you have an older video card or want more performance simply disable FSAA altogether as it can affect performance dramatically.
The next page continues the descriptions of the In-Game Settings.
|
|