
Crysis 3 Tweak Guide
[Page 4] Resolution & V-Sync
This section begins our look at the graphics settings in Crysis 3. These settings can be found under two sections of the Options menu: Graphic Options and Advanced Graphics Options. We start with the settings under the Graphic Options section.
Resolution: This determines the Resolution of the game image, measured by the number of pixels horizontally and vertically (e.g. 1920 pixels x 1080 pixels). The actual number of resolutions available here is limited by the capabilities of both your graphics card and monitor. The higher the resolution you choose, the more detailed the image will be. However, higher resolutions also generate an increased load on your system, particularly your graphics card, and hence reduce your overall performance. For the sharpest image on an LCD monitor, select the maximum available resolution here, which is also referred to as your Native Resolution.
You can improve performance by lowering Resolution. But if you use a resolution below your maximum (native), then it is recommended that you either set the Fullscreen option to No to run the game in a window on your Desktop, as covered further below; or disable any scaling in your graphics card's control panel. For NVIDIA users, this involves opening the NVIDIA Control Panel, going to the 'Adjust desktop size and position' section, selecting 'No scaling', and also ticking the 'override the scaling mode set by games and programs' box. This will result in black bars being shown above/below or on either side of the image, depending on the resolution you choose. Either method will avoid blurriness and image distortion when using a resolution lower than native.
An indication of the performance impact of changing this setting is shown below:
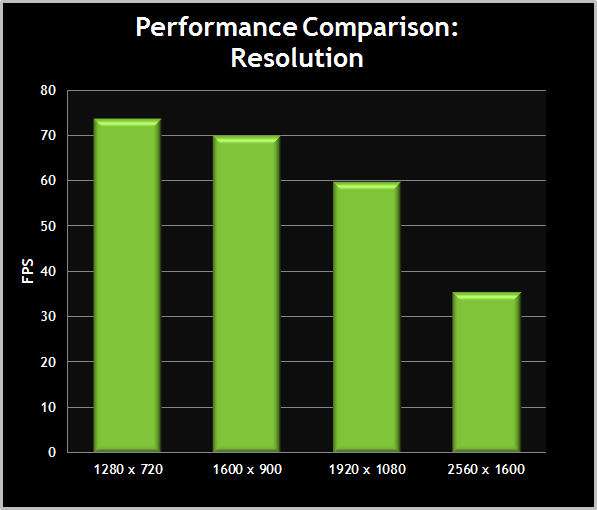
The graph shows the substantial impact that resolution can have in Crysis 3. The impact will vary depending on your CPU - for example, if you have a relatively weak CPU and a high-end GPU, then higher resolutions will bring less of a performance loss. If nothing else in this guide works to improve your performance, you will need to turn down your resolution.
Fullscreen: If this option is set to Yes, the game image takes up the entire screen, and this is generally recommended for optimal image quality and memory management. If you want to run the game in a window on your Desktop instead, then set this option to No. In windowed mode, the size of the game window that appears on your desktop will depend on your Resolution setting. Running in windowed mode is only recommended if you frequently switch between your game and the desktop. Furthermore, you can enable a fullscreen borderless window if you wish by setting this option to Yes, and enabling the r_FullscreenWindow command covered in the Advanced Tweaking section.
Note: You can switch between windowed and fullscreen mode at any time by pressing ALT+Enter.
V-Sync: This setting controls Vertical Synchronization, which determines whether your GPU will become synchronized to your monitor's Refresh Rate capabilities. When set to Yes, this will enable VSync, with the most noticeable result being that your maximum framerate is capped at around 60 FPS (for a monitor with a 60Hz refresh rate) or 120 FPS (for a 120Hz monitor). When set to Off, there is no FPS cap, however you may experience a phenomenon known as "tearing", whereby portions of the game image sometimes appear to be out of alignment ("torn") across the screen. This does no harm to your system, but it can be annoying.
There are several options available to you when it comes to VSync:
It is recommended that in the first instance you disable VSync in the game and try Adaptive VSync instead. If you experience any problems, or have noticeable mouse lag, or if Adaptive VSync is not available to you, the next thing you can try is to enable V-Sync in the game and combine it with Triple Buffering. This should reduce the incidence of tearing, as well as minimizing large FPS fluctuations, but note that it may still result in some mouse lag.
If you have disabled V-Sync completely, but want to cap your FPS to prevent large framerate fluctuations, see the Sys_MaxFPS variable in the Advanced Tweaking section.
|
|