
BioShock Tweak Guide
[Page 6] In-Game Settings (Pt.2)

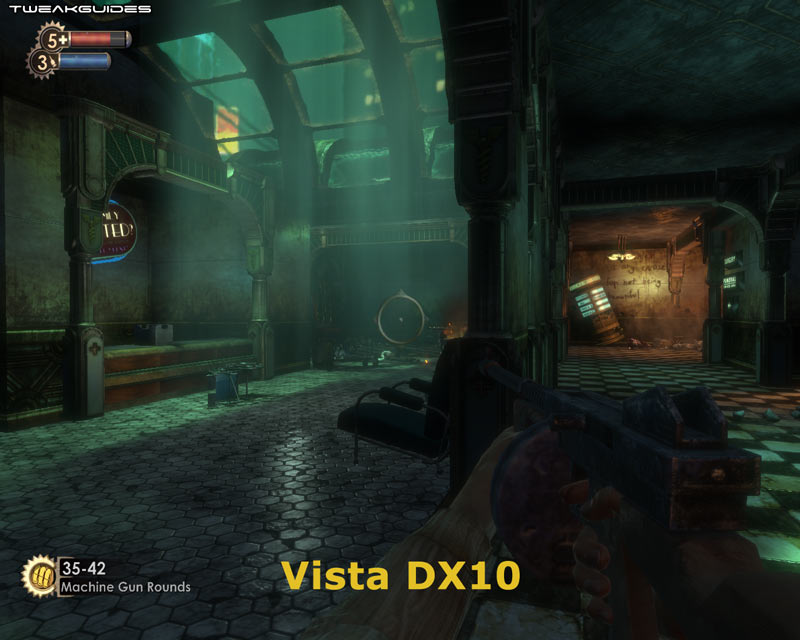
DirectX 10 Detail Surfaces: This option is only available if you're running Windows Vista and you are using a DirectX 10-capable graphics card, such as a GeForce 8 or Radeon HD2X00 series graphics card or newer. If set to On, the game will use DirectX 10 Shader Model 4.0 rendering to add the following effects:
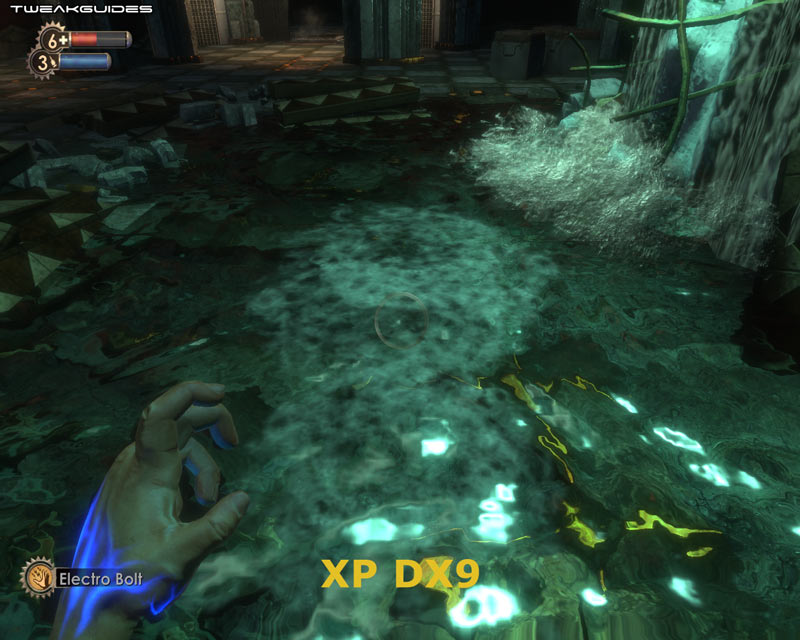
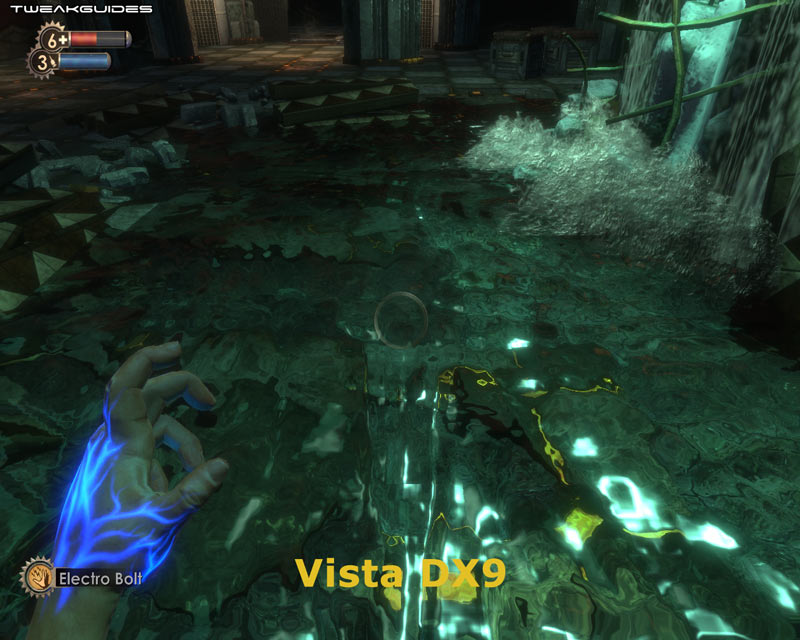
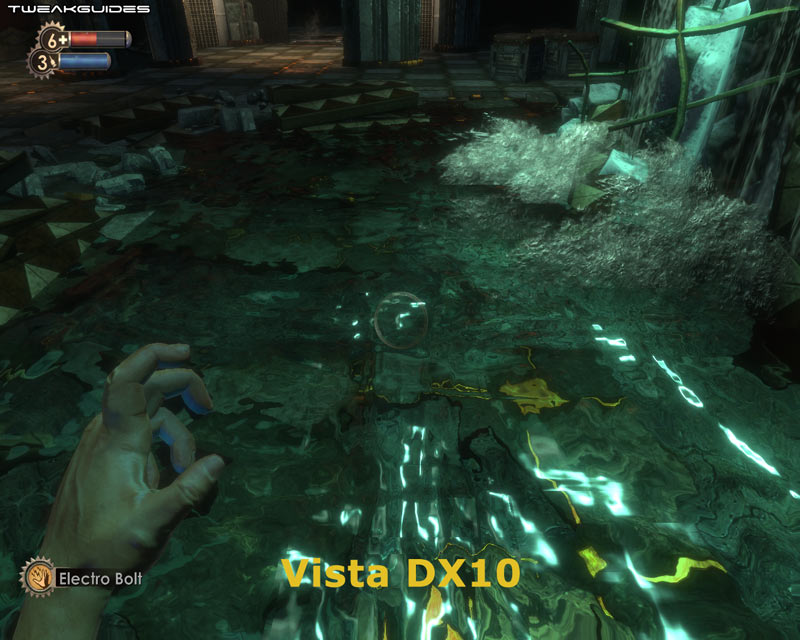
The first set of screenshot comparisons above shows that the difference between DX9 and DX10 is not greatly noticeable in an average scene. It would be difficult to distinguish between the two unless you are looking at fire or water effects, or at shadows, and even then the difference can be subtle until you look closely. The second set of screenshots above highlights the difference in the details between DX9 and DX10 for water effects. The three screenshots all show water ripples from the character walking backwards through a puddle of water. The XP DX9 image shows generic 'splash marks' in the wake, while both Vista DX9 and Vista DX10 show accurate DX10 ripple physics in action.
Importantly, this highlights an oddity which currently occurs with BioShock: it appears that if your graphics card is DX10-capable, then BioShock uses full DX10 effects even when you have the 'DirectX 10 Detail Surfaces' set to Off. This explains why Antialiasing is not possible in Vista DX9 mode, while it is in XP DX9 mode. It also explains why performance comparisons between Vista DX9 and DX10 mode which demonstrate that DX10 has minimal image quality or performance impact (e.g. in this article) are not entirely correct, because under Vista BioShock will always run in DX10 mode if it detects a DX10 graphics card.
There are three main ways to get BioShock to correctly run in DX9 mode on a DX10 card in Vista: In Games Explorer right-click on the BioShock icon and select 'Play-DirectX9'; or right-click on your BioShock launch icon, select Properties, and add -dx9 one blank space after the last character in the Target box; or you can disable individual DX10 effects by editing the relevant DX10 .ini settings (See Advanced Tweaking section for details). In any case the actual performance difference between proper DX9 and DX10 mode can be quite pronounced in some areas, so if you're struggling for FPS run in proper DX9 mode, or use BioShock under XP for maximum FPS.
Actor Detail: This option can be set to Low, Medium or High. It doesn't actually relate to just the details on actors (i.e. characters), rather it is supposed to determine the overall level of detail in the environment. As it is lowered, 'decoration objects' and some effects will be removed. However in testing I have not noticed any real difference from changing this setting. Also note that you will need to restart the game each time you alter this setting for the changes to come into effect.
Texture Detail: This setting has three options: High, Medium and Low. As Texture Detail is lowered, textures become progressively more blurry. You can see an animated screenshot comparison of the different texture levels by clicking this link: Bioshock_Textures.gif (858KB). As demonstrated, there is a clear increase in blurriness even at Medium, and by Low textures are so blurry that the text on the poster is illegible. Given most textures in BioShock are already not very high resolution, and the fact that you won't gain any real performance by reducing this setting, I recommend keeping this slider at High. The only reason you should lower it is if you notice a great deal of stuttering and loading pauses as you move around the game world, and given BioShock's engine uses a streaming approach for textures, stuttering should be minimal.
Adjust Brightness: Use the slider to adjust your brightness so that the grey text on the wall to the left is visible but barely so. Has no performance impact. You can also adjust Contrast and Gamma separately if you wish - see the relevant settings under the Advanced Tweaking section.
Finally, note that as you adjust the various graphics options in this section, the Graphics Quality slider will show either Low, Medium, High or Custom. This slider doesn't control any specific setting itself, it's just an overall indication of the rough level of graphics options you're using. You should adjust each of the graphics settings individually to get optimal results rather than using this slider.
Customize Controls
Mouse Sensitivity: This slider controls how sensitive the mouse will be to your movements. The further to the right the slider, the greater your view movements will be in the game when you move the mouse. If you wish to adjust the mouse sensitivity even higher than the maximum of 9 here, see the MouseSensitivity setting in the Advanced Tweaking section.
Mouse Acceleration: Some people are complaining about the feeling of mouse acceleration in BioShock. While there's no in-game fix for this, see under User.ini in the Advanced Tweaking section for a binding which can help reduce this.
Mouse Lag: If you are experiencing 'mouse lag', that is a feeling of reduced sensitivity or sluggishness in your mouse, regardless of how high you set the mouse sensitivity slider, you should first make sure you are consistently getting sufficient FPS, especially in more complex scenes such as during combat. Use FRAPS to check your FPS, and keep in mind that typically anything below 20-15FPS will bring about mouse lag in any game, so you will have to lower your settings appropriately to prevent this as much as possible. Importantly, make sure to disable VSync as not only is it know to cause mouse lag, it also reduces performance which can make mouse lag even worse. If these steps don't help to reduce mouse lag, see the ReduceMouseLag, DoubleBufferMouseLag and CaptureMouse variables in the Advanced Tweaking section.
Invert Look: If set to On, pushing your mouse forward will make your character look down, and pulling your mouse back will make him look up. If set to Off, the opposite will occur. Set to suit your taste, has no impact on performance.
Vibration: This option enables or disables vibration on an XBox 360 controller connected to the PC. If no such controller is connected the option is greyed out.
Use XBox 360 Controller: If you have an XBox 360 controller for Windows and it is connected to your PC, you can enable this option to use that instead of the normal mouse/keyboard combination. If no such controller is connected the option is greyed out.
Customize Keys: Clicking this button at the bottom of the screen allows you to customize all your major key bindings. For the most part the default setup is quite good, however you can change any bindings here, or you can do it in your User.ini file, which also allows more complex bindings and customizations (See Advanced Tweaking section).
Audio Options
Audio Mode: This slider controls the number of audio channels the game will use. Make sure it matches your current speaker configuration.
Use Reverb: If set to On, this option enables reverberation, which basically makes sounds echo more in larger spaces. This adds to the realism and atmosphere of Rapture. Disabling this option makes sounds much flatter, but on sound cards which don't support EAX, Reverb can cause problems and reduce performance so it should be disabled. Even sound cards or onboard sound solutions which are EAX-compatible might benefit from disabling Reverb if you are having audio problems.
Use Creative EAX Audio: If your sound card supports Creative's Environmental Audio (EAX), then you can turn this option on to improve audio richness and quality in the game at the cost of some performance. Once again, some sound cards or onboard sound solutions which are nominally 'EAX compatible' may have issues with crackling or popping audio when EAX is enabled, so this option should be turned off to see if it helps.
Sound Effects, Music, Voice Over Volume: These sliders control the volume levels for the game's sound effects, music and any voice overs. They have no performance on impact so set to suit your taste.
If you're having problems with sound in BioShock, make sure that you've installed (or even reinstall) the latest game patch (see page 4), the latest audio drivers for your audio device, the latest DirectX update found here, and uninstall any third party 'codec packs' you may have installed, or third party media players which install custom codecs of their own, as these can interfere with the game's FMOD Audio Engine. Finally, see the MaxChannels setting under the Advanced Tweaking section.
Note: Since Bioshock uses the FMOD audio engine you don't need the Creative ALChemy patch in Windows Vista to experience full hardware functionality from your Audigy or X-Fi sound card.
Gameplay Options
Adaptive Training: If set to On, this option provides various messages on the screen highlighting relevant features of the game and the environment as you wander the game world. It is adaptive in that it tries to only tell you things it feels you don't already know or aren't noticing. It's useful when you're new to the game, but after a while it can become annoying so you can disable it once you're familiar with BioShock. Then if at any time you need a hint as to what to do if you get stuck, press the H key (or press the M key to bring up the map).
Dialog Subtitles: If set to On, displays text subtitles whenever there is spoken dialog in the game. Has no performance impact, set to suit your taste.
Art Subtitles: If set to On, displays text subtitles for the various text written on in-game graphics, such as posters and banners. This is mainly useful for people using non-English versions of the game, or those who find some of the graphical text hard to read due to low settings for example. Has no performance impact, set to suit your taste.
Quest Arrow: When set to On, a large arrow appears at the top of the screen highlighting the direction you should go to complete your current mission. You can enable or disable this depending on whether you need this feature, as it has no significant performance impact.
Item Shimmer: If set to On, all objects you can pick up will periodically display a shimmer effect to get your attention. This makes things easier to find when you're searching, but if you find this annoying and want an extra challenge and more realism turn this Off. Has no significant performance impact either way.
Usable Object Highlight: When set to On this option surrounds all usable objects in the game world, such as levers, buttons, etc. with a golden glow. Once again this makes finding usable objects much easier, but for an extra challenge and greater realism you can disable this effect. The performance impact is not significant either way, so set to suit your play style.
Note: Objects or characters which are part of your current mission Goal will still retain a gold glow regardless of these settings.
Update: The following option has been added as of the 1.1 Patch:
Disable Vita-Chamber: This setting allows you to disable the use of Vita-Chambers. If set to Off, whenever your character dies in the game, rather than being reincarnated at the nearest Vita-Chamber, you will be sent to the main menu and will have to reload an existing save game to continue. This makes the game more challenging for those who prefer it. This option can be enabled or disabled at any time during a game.
The next section looks at advanced tweaking for BioShock.
|
|