
Neverwinter Nights 2 Tweak Guide
[Page 6] In-Game Settings (Pt.2)
Render Far Shadows: This option controls whether more distant shadows are drawn, and in outdoor areas disabling this option (if you have Shadows on) can significantly improve performance with only a relatively minor drop in image quality.
Full Screen: If enabled, runs the game in full screen mode which is recommended for maximum stability. If unticked, the game will run in a window which may improve performance if a low resolution is also chosen.
Show Weapon Trails: If enabled, weapons will show a 'trail' behind them whenever they are used. This helps to indicate which character(s) or creature(s) are attacking, though again the performance impact is such that whether you enable or disable it should solely come down to whether you like this feature or not.
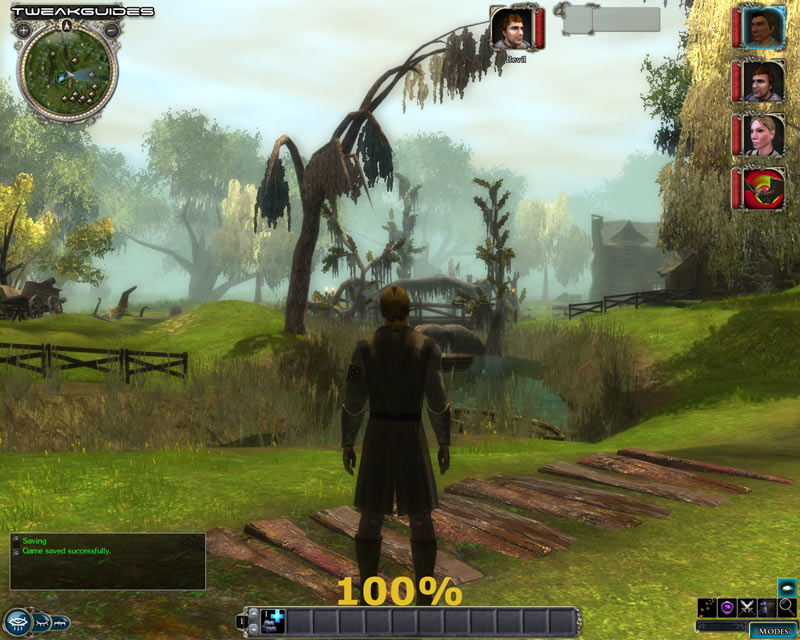
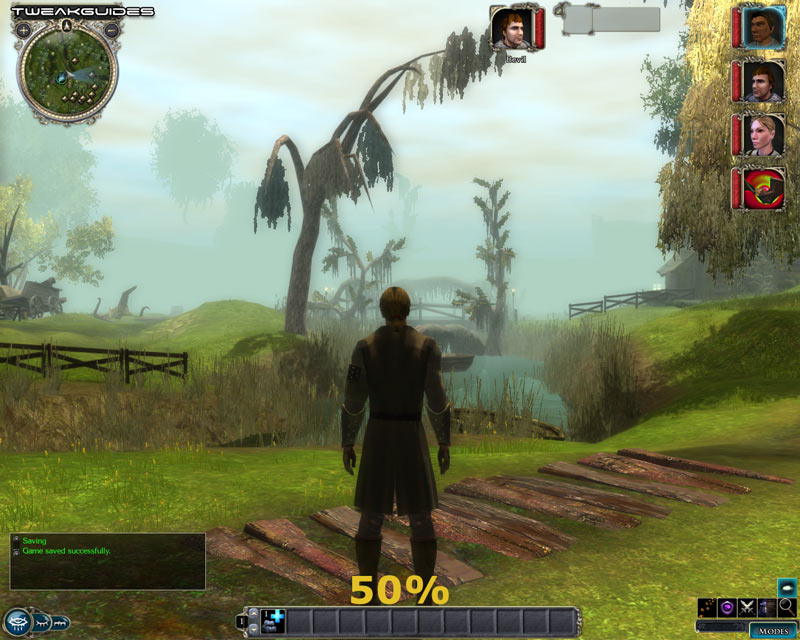
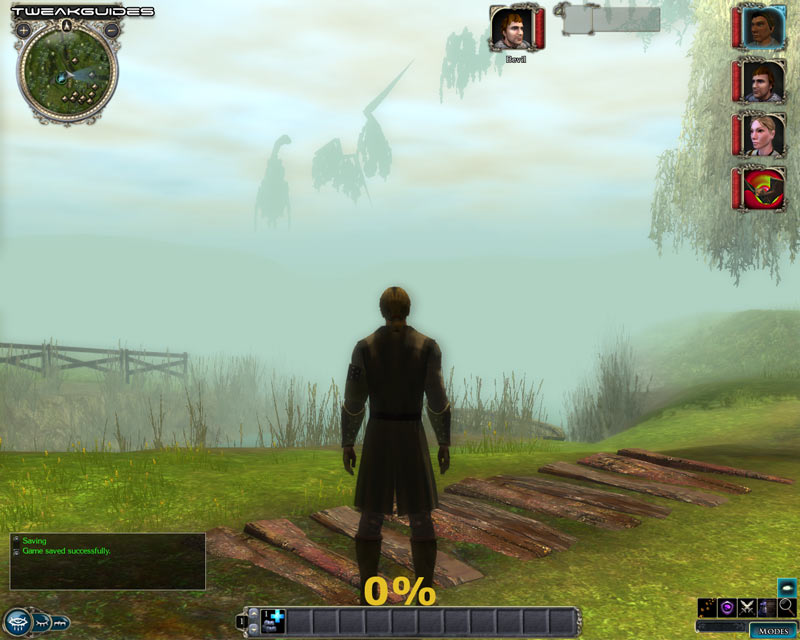
Horizon Distance: This slider controls the amount of visible detail in the game world as it recedes into the distance. By reducing the amount of visible detail you can increase performance, particularly on low-end graphics cards. The screenshot comparisons above show the impact of reducing this slider. At its maximum of Far (100%) you can see that the view distance is quite far, but not infinite. At the midpoint of the slider, the reduction in view distance becomes noticeable, with increased fogging and an increase in FPS. At Near (0%) the fogging is quite noticeable, and most objects aside from those very close to the character are no longer visible, however FPS is noticeably much higher. For those wanting to reduce slowdowns in large outdoor scenes but retain some image quality, a value of 75% or more is recommended.
Advanced Graphics
The settings in this section are important, but are also dependent on the settings further above (and vice versa), so make sure you understand those first before adjusting these. For example if you disable Shadows altogether, then adjusting the three Shadow Quality options here will have no impact.
Shadow Quality Settings: There are three boxes here which control the resolution of shadow maps used in the game if Shadows are enabled. A Shadow Map determines how shadows appear in the game. The resolution of a shadow map determines how much detail these shadows will have. An animated screenshot comparison can be seen by clicking this link: NWN2_ShadowMaps.gif (821KB). The comparison shows the four settings for Environment Shadow Quality (Near) option, as an example of the impact of changing the shadow resolution. Pay close attention to the slight changes in the details of the leaf shadows on the left side of the character. It's actually very difficult to show the true impact of these settings with screenshots, as the difference is not as noticeable until you see the actual shadows moving around in the game world: the lower the setting, the lower the resolution of the shadow map used, and hence the more jagged, blocky and shimmery these shadows will be, especially as they move about. However these settings can also have a dramatic impact on framerate if you have Shadows enabled, especially if you have Shadows set to High (see the Shadow setting further above). I strongly recommend that all but the highest-end systems set these options to the lowest settings available. Each separate setting is described below.
Character Shadow Quality: These setting controls the resolution of character shadows and point light shadows, so if the Shadows setting is on Medium or Higher and/or you have Point Light Shadows enabled, then the higher this setting, the greater the reduction in FPS in most scenes. By itself the performance impact of altering this setting is not necessarily noticeable, except in circumstances with lots of character shadows and/or light sources. So to prevent slowdowns in large combat scenes I recommend this be kept at Low.
Environment Shadow Quality (Near): This setting controls the high resolution environment shadow maps only used if you have the Shadows setting at High; if Shadows is Medium or lower this setting has no impact since there are no environment shadows. High resolution environment shadow maps are used for shadows cast by objects closer to the player. The animated comparison linked further above shows the subtle difference in detail as the setting is raised from Low to Very High. As noted above, the difference is much more noticeable in the game world when animated shadows are viewed, as a higher setting will reduce the jaggedness and shimmering of such shadows. However this can also greatly reduce FPS and make using High shadows untenable on most systems in most areas, so is best set to Medium on most systems.
Environment Shadow Quality (Far): This setting controls the low resolution environment shadow maps only used if you have the Shadows setting at High; again if Shadows is Medium or lower this setting has no impact since there are no environment shadows. Low resolution environment shadows are those used for objects in the medium to far distance, and the difference between the resolution levels is primarily in the jaggedness/blockiness of such shadows as this setting is reduced. This setting may need to be lowered to prevent the system slowing down significantly in outdoor areas with longer views.
For those who use High shadows, the framerate difference between setting the above variables to their highest as opposed to their lowest levels can be extremely large. You can more than double your FPS just by lowering these settings, even from their mid point to the lowest level, and in the process make the use of the High Shadows setting viable on many systems. Many slowdowns particularly during heavy combat are due to the use of shadows, so lowering shadow quality is the best compromise method of maintaining shadows and hence realism without sacrificing FPS too badly.
Note: Aside from the names of these options changing as of the 1.10 Patch, there also appears to be an issue with some of these settings 'sticking' at times. If this happens to you, you can try to manually adjust the shadow resolutions by changing the HiRezShadowMapSize, LowRezShadowMapSize and CharacterAndPointLightShadowMapSize settings in the nwn2.ini file - see the Advanced Tweaking section for details.
Texture Filtering: This setting determines the type of filtering used to display textures as they fade into the distance, much like the texture filtering settings in most other games. The higher the setting, the crisper and clearer the surfaces of distant objects and terrain will be. Texture filtering is explained in plain english at the bottom of this page of this page of my Gamer's Graphics & Display Settings Guide.
As a final comment about the graphics settings, any time you change a setting always make sure to click the 'Apply Changes' button first before moving on, and when completely finished then click Accept.
Gameplay/Audio
Level of Difficulty: While altering the difficulty may have some minor CPU performance impacts, for the most part you should set this to suit your tastes. A full description is already provided below this option in the game as to the gameplay impacts of each difficulty level.
Level of Violence: Controls the blood and gore in the game. At Full all violence effects are shown; at low the blood effects are removed. I'm unsure as to the difference between Low and Off as they appear similar.
Sound Provider: This setting allows you to choose the sound playback mode used for sound in NWN2. I generally recommend that Audigy/X-Fi sound card users select the EAX 3 option for optimal audio quality and performance. Those who have other sound cards or onboard sound which supports EAX are better off selecting EAX 2 or even EAX, and if your sound card has any issues or audio glitches, progressively move through the DirectSound3D modes until finally if all else fails then select the Miles Fast 2D sound which provides the most trouble-free performance at reasonable audio quality. The main difference between the sound providers is the differing level of 3D audio they provide, with EAX 3 providing the richest variety of 3D sound effects, but requiring appropriate sound hardware.
Volume Settings: These sliders control the volume levels of the background music, character voices and in-game sound effects respectively. Set them to suit your taste, as there is no performance impact; that is, setting the sliders to 0 does not remove those sounds from memory. To actually disable all sound you can use the DisableSound setting covered in Advanced Tweaking.
2D/3D Bias: This slider controls the balance between 2D sounds and 3D sounds. 2D sounds are those which aren't dynamic and don't have any specific positioning in the game world, while 3D sounds are positioned and varied. By moving this slider from left to right, you increase the richness of the sounds in the game world, adding more 3D sound effects like background environmental noises (also depending on the Sound Provider you choose - see below). Moving the slider to the left steadily reduces these 3D sounds, steadily removing even things like sword impacts, footsteps and the like. For the most part this setting doesn't appear to actually have a major impact on performance, as it only reduces the volume of these sound effects and doesn't seem to remove them entirely. On almost all systems I recommend having this slider to the far right (or close to it) to experience the full range of sound effects in the game, particularly if you have EAX enabled. To actually change the number of channels devote to 2D and 3D sounds, see the Number 2D Voices and Number 3D Voices settings under the Advanced Tweaking section.
Enable EAX: If your sound card supports EAX (Environmental Audio), then enabling this option allows you to improve the audio quality in the game with minimal to no real performance impact. I recommend enabling this option (along with the one below), and only disabling it for troubleshooting purposes. Select the exact EAX provider suitable for your sound card (See below) to ensure optimal performance.
Enable Hardware Sound: If enabled, uses your sound card's hardware to process sounds. This is recommended in providing the best performance and sound quality, and should only be disabled for troubleshooting purposes.
EAX Level: I don't know precisely what this slider does, as altering it appears to have no noticeable impact on the number of EAX effects or their quality.
Interface
These options allow you to adjust what is shown on the Heads Up Display on the main game screen. You can enable or disable the Horizontal and Vertical Hotbars, as well as the Modebar and small Minimap. Adjust these to suit your taste, altering them should have no real impact on performance.
Tooltip Delay: Tooltips are the small boxes which pop up when you hover your mouse over an item or option. They contain details and help text - such as those in the game's option menu. You can adjust the delay (in seconds) before these boxes pop up after you hold your mouse over the appropriate area. If tooltips annoy you, set this to the maximum value and you won't see them as often.
Context Menu Delay: In the game, whenever you right-click and hold your mouse over a character or object, a dropdown Context Menu appears. You can adjust the time delay (in seconds) it takes before this menu appears by using this slider.
Enable Buy/Sell Confirmation Dialog: If you find it annoying to have to click Yes or No to confirm or deny the sale of every single item you wish to sell, you can disable this option and thus double-clicking each item will automatically buy or sell it as appropriate.
Quickcast Autoclose: If enabled, as soon as you cast a spell using the Quick Cast menu, the menu will then automatically close.
Automatically Set Target When Taking Action: If enabled, as soon as you select a target for your current action, such as casting a spell on it, it will automatically become your current target for further actions.
Automatically Run Actions on Current Target: If enabled, any time you choose to cast a spell or take an action for example, your current target will automatically be the recipient of this action unless otherwise specified.
Targeting Markers: If enabled draws a target market on any character or object which is your current target for action. Once again the performance impact is negligible, so set to suit your taste.
Keymapping
This section allows you to map various keys to game controls based on your tastes. It's important to note that you can map camera movement commands to keys if you don't like using the mouse to move or adjust the camera.
The next section looks at the Advanced Tweaking possible in Neverwinter Nights 2.
|
|