
A Guide to HDTVs
[Page 14] Calibration
You may have heard the term before, but just to be clear, Calibration on an HDTV is a process which involves configuring your TV's settings so that it provides the most accurate and pleasing image quality. Given the large number of brands, models and settings available across HDTVs, there's absolutely no way for me to provide recommended settings for each TV. In any case, using other peoples' settings is usually not optimal, given everyone has different viewing environments, source components and tastes. The best way to correctly configure your TV is with a combination of understanding what the various basic settings do, knowledge of the general procedure to run through, and awareness of the inherent limitations of each type of technology as covered in the rest of this guide.
Throughout this section you will repeatedly see the term "accurate" used. Calibration of a TV is an attempt to get it as close as possible to accurately reproducing source material the way it was intended. This is usually done by changing your settings so that the results on your screen match known standards for HD video material. The result is that if an actor is supposed to be wearing a pale red shirt in a movie for example, a calibrated TV will show that shirt in exactly the same shade of red that is intended. If that pale red shirt comes across as a neon bright red shirt on your TV, it's not accurate.
In reality, some people will not like an accurate image for a range of reasons. This depends in large part on what that person has been conditioned to seeing. More often than not, the average person will be used to oversaturated colors, and will prefer cooler rather than warmer color temperatures. Thus when their TV is calibrated to the correct Rec. 709 Standard, whites will appear slightly yellowish to their eyes, and colors may seem muted. Similarly, the correct Contrast and Brightness settings may not represent a bright and vivid enough image, and the correct Sharpness may not look crisp enough to their eyes at first. Since personal taste is involved, there is scope for you to adjust the settings to reach a reasonable compromise between accuracy and the image which most pleases your senses. However it is always best to start off with the correct settings and then fine tune them as you wish.
Initial Steps
There are several initial considerations before doing any type of HDTV calibration:
Cables
An important aspect of getting optimal image quality is the cabling you're using. This requires a brief run-through for those unfamiliar with the different types. The hierarchy of common cabling from worst to best is as follows:
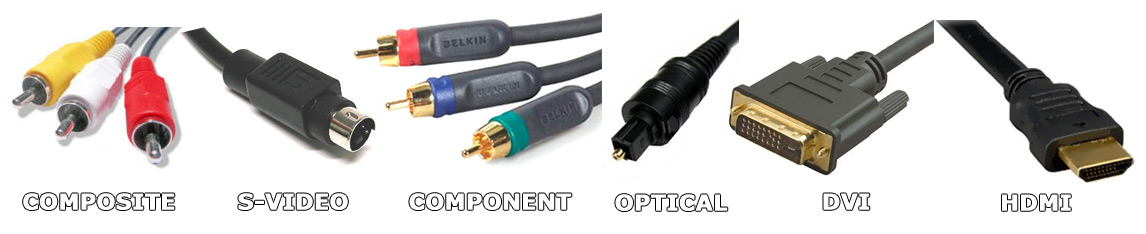
If you use a non-digital cable you may experience noticeable degradation in image quality on an HDTV. More importantly, the High-Bandwidth Digital Content Protection (HDCP) encrypted copy protection method implemented on Blu-ray discs means that DVI or HDMI cable use is essential. Using cables and devices which do not support HDCP can in many cases result in the content either not being played back at all, or being played back at reduced resolution; this is up to the content provider to determine. The HDCP "handshake" as it's known - the verification of HDCP secure status between the playback device and the TV - is also one of the reasons why you may see your screen briefly blank out one or more times when turning on the player or initiating playback of a Blu-ray disc.
The quality of HDMI cabling is another important issue which needs further explanation, as it is a major source of confusion. This confusion has arisen due to what's been dubbed the HDMI Cable Scam: cable manufacturers who create inordinately expensive HDMI cabling with dubious promises of quality improvements over cheaper cables. Various reviews such as this one, this one and this one back up the fact that in general, cheaper HDMI cables perform the same as expensive ones. As this Analog vs. Digital Cable article explains, since HDMI is transferring information in digital form, if the HDMI cable experiences any interference or signal degradation, the resulting transmission errors will show up as freezing or dropped frames, and other very noticeable glitches. This is similar to what happens when you have a poor quality signal when watching a Digital TV broadcast. In other words you will definitely know if your HDMI cable is not performing well for any reason - it won't show up as marginally increased grain, or less vibrant colors for example. The subtle improvements in image quality which expensive HDMI cabling claims to bring are non-existent, and hark back to the days of analog cabling.
In short do not buy expensive HDMI cabling, especially for shorter cable runs of up to 6 feet (2m). HDMI cables retailing for as little as a few dollars each are just as good. As long as the cable is certified to meet the HDMI standard, and as long as it's classified as High Speed (Formerly called HDMI 1.3 or HDMI 1.4), it should have sufficient bandwidth to meet all of your needs, including full 1080p 3D TV, without any problems, and with exactly the same image quality as the most expensive cabling. The only potential benefits of more expensive cables are more robust connectors, and better shielding to prevent signal interference on very long runs of cabling.
Make sure you finalize the source components and cable connections before calibrating your TV, as changes in the source or cabling, or changing the ports on the TV to which you connect your components will result in changes in the accuracy of settings. For best results, you should have every video output going directly from your source to your TV via HDMI cables, as this prevents the image being rescaled or otherwise reprocessed multiple times and hence avoids any loss in image quality between the source and the screen. If this is not possible, you can connect your various components to an AV receiver and connect the receiver via a single HDMI cable to your TV. In reality there are a multitude of component/receiver/TV configurations which are possible, and it will require some thought and planning on your part to ensure that (a) the signals go through the least number of transitions before reaching your TV; and (b) that each component, as well as any AV receiver intermediary, are configured to ensure that the signal is not manipulated in any way between the source and the destination. Refer to your receiver, component and TV manuals for more details.
Basic Calibration
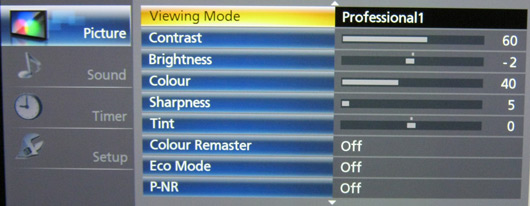
The picture controls most of us would be familiar with include the Picture mode, and the Contrast, Brightness, Color and Sharpness controls. In addition to these, the Tint, Gamma and Color Temperature controls should be considered among the settings you can configure in a basic calibration. The term 'basic calibration' refers to the fact that this isn't an instrumented method as such - anyone can perform these tests and set the appropriate value by eye alone. It doesn't provide optimal results, but it should provide relatively pleasing results with a minimum of fuss. For a proper instrumented calibration see Advanced Calibration later in this section.
To assist in basic calibration, you will need HD test material which provides an objective way of measuring the accuracy of the image on your TV. The best free test material I've found is the AVSHD 709 Calibration Disc. Download the AVCHD version from the link above and burn it to a DVD for use on your Blu-ray player. Another source of calibration test material for either a Blu-ray player or a DVD player is the free THX Optimizer which comes on several THX-certified Blu-ray and DVD movie discs as listed here. You can also buy specialized calibration discs such as the Digital Video Essentials HD or Spears and Munsil Blu-rays. The instructions below refer to the AVSHD method.
Picture Mode: Choosing the correct picture preset, also known as the picture mode or viewing mode, forms the foundation for all your other settings, so it must be selected carefully. Modern HDTVs come with several such modes, usually accessible at the top of the TV's Picture menu. It is important to note that each preset isn't simply just another storage point for your basic settings; these various picture modes have each been factory calibrated to contain fundamental differences in terms of the color reproduction method they use, the types of video processing which is applied to the image, and the overall level of image brightness - even at the exact same basic settings across all presets.
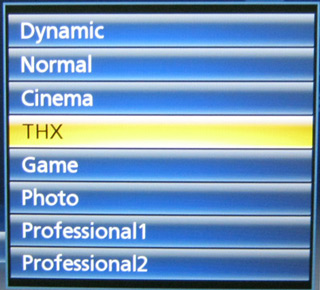
The presets come with various names such as Dynamic, Vivid, Cinema, True Cinema, Movie, Film, Standard, Custom, THX, Game and so forth. At least one of these modes on most recent TVs should be close to being accurate (i.e. meeting the Rec. 709 standard). You will have to do some research to find which mode this is on your particular TV. For example, on recent Panasonics this will be the THX, Professional or True Cinema mode; and on Samsungs this is the Movie mode. It's very important to select the correct mode if you want an accurate reproduction of colors and optimal image quality, so take your time finding the right one before you proceed with any other changes.
Brightness: This control effectively determines what is known as the Black Level - the brightness or darkness with which blacks are presented. Higher values will result in a washed-out milky look to the image, while reducing black level too much results in what is known as Black Crush - deeper looking blacks at the cost of loss of detail in darker areas.
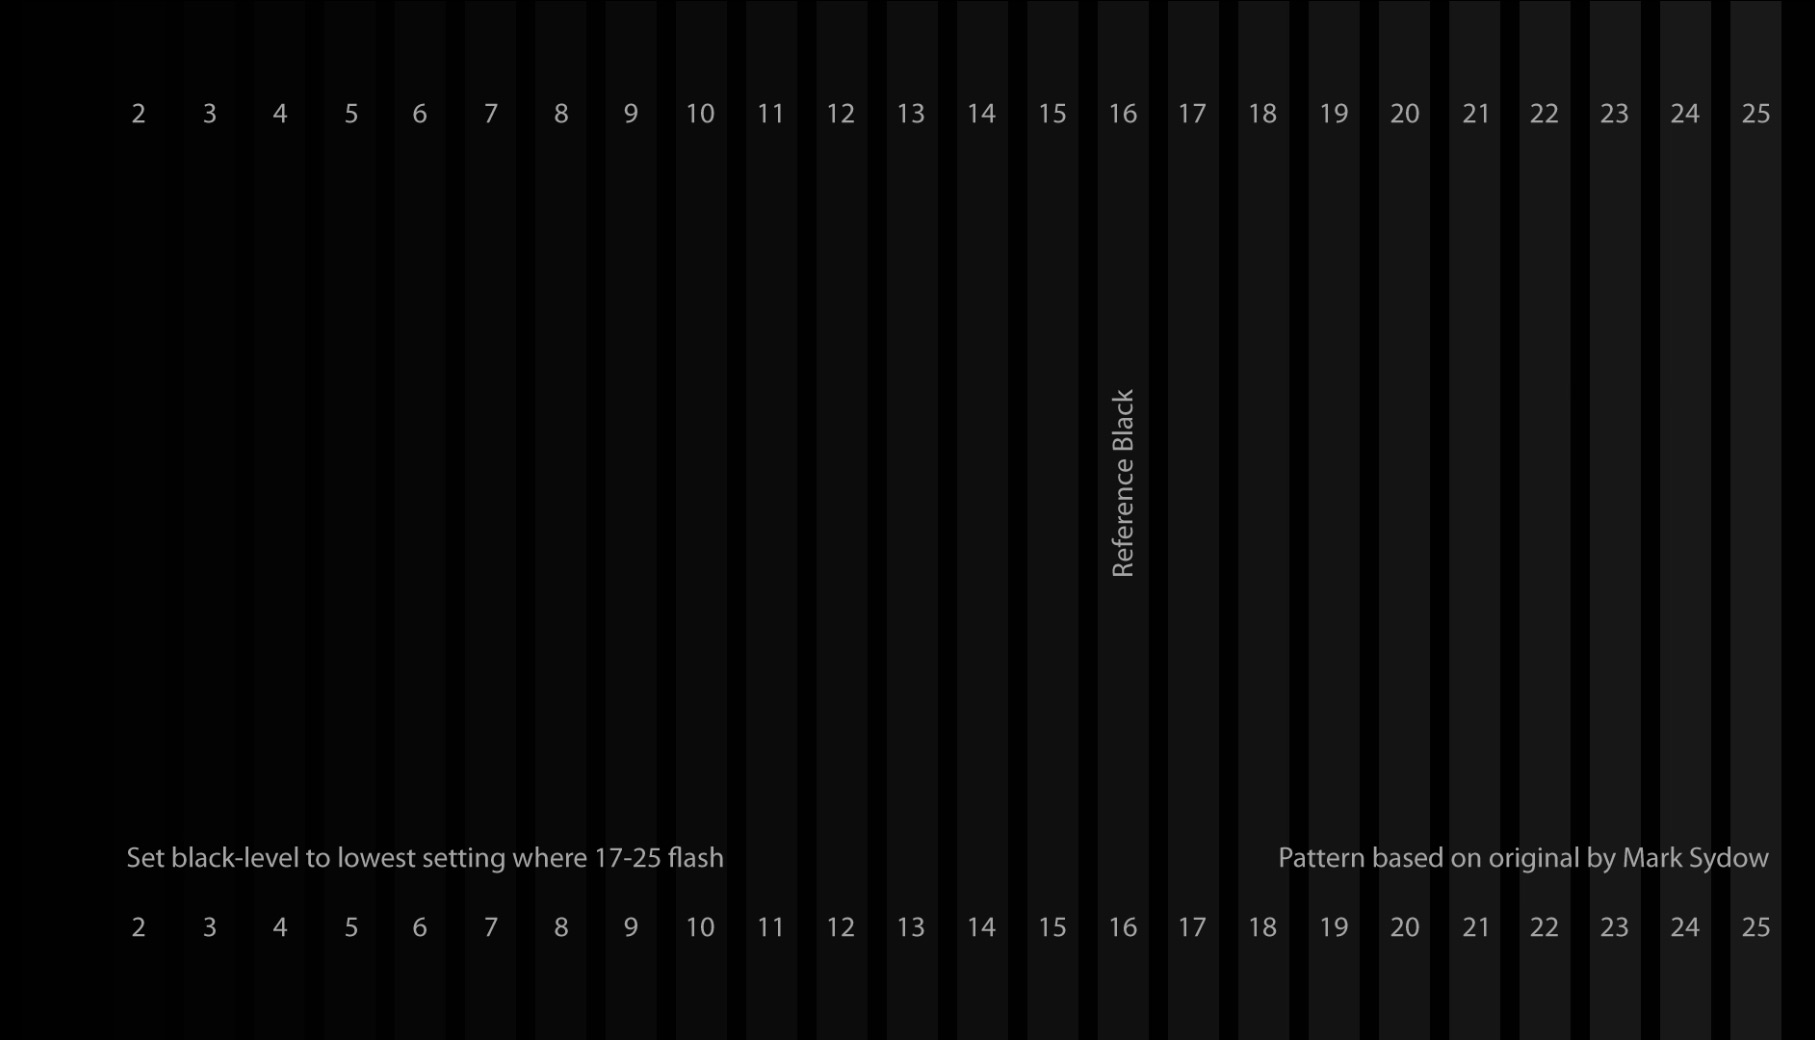
The correct value can be determined using the AVSHD calibration disc. On the AVSHD main menu select the 'Basic Settings' item at the top and the very first screen you will see is used to determine the correct brightness. Adjust your Brightness control so that only the bars numbered 17-25 at the right of the screen are visible and flashing. You can then press the Chapter Forward button on your remote to go to the next screen, where a correct Brightness setting should allow you to see at least bars 19-28 flashing in the middle dark area of the screen. Once you've found the correct Brightness setting, you may wish to lower it one or two notches further. This can help produce a slightly deeper look to the image and will also reduce some noise in the image, without any significant loss of detail in black areas.
Contrast: This control generally determines how bright the screen will be. It is also known as the White Level, in that it determines how bright whiter areas will appear. Its impact will differ on LCDs which have a separate Backlight brightness control. On such LCDs, the Backlight brightness setting determines the overall brightness of the screen, while Contrast will control how much detail is visible in white areas. Use a combination of both settings when conducting the tests below.
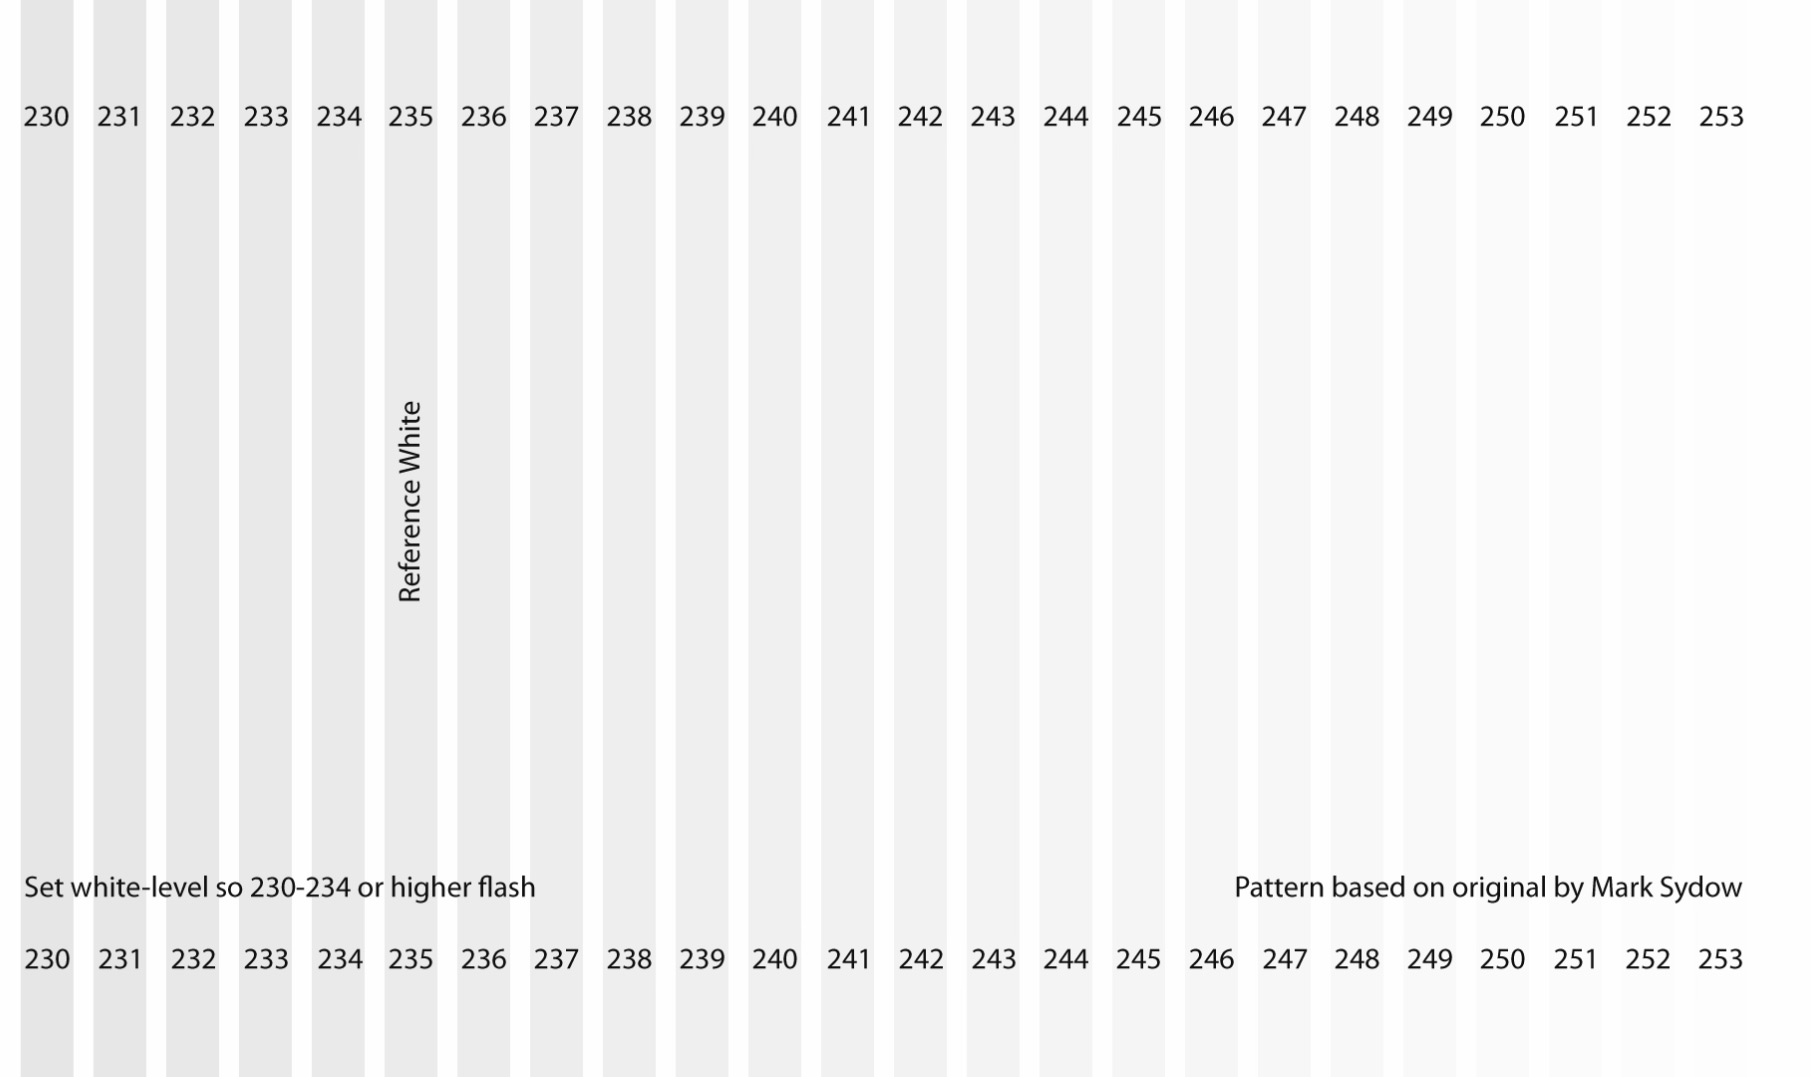
Go to Chapter 3 of the Basic Settings section of the AVSHD disc. The numbered bars from 230-234 should always be flashing; if not, there's something wrong with the way your devices are outputting the image and you will need to investigate further. You can raise Contrast until only the bars 230-244 are visible, at which point any more Contrast will be too much. However this is not necessarily the ideal level; there are several important considerations when setting Contrast:
The correct level of Contrast is difficult to give as a precise value. The aim is to have a reasonably bright image, but one in which fine details in white areas are not lost and the image is not uncomfortable to view. As long as bars 230-234 remain visible in the AVSHD test mentioned above, you can set any reasonable value which suits your personal circumstances. Avoid an extremely high Contrast (and/or Backlight brightness) setting as it is harmful for your eyes, can result in unnatural colors, and is potentially harmful to your TV.
Color: This control is also known as Color Saturation, and controls how bright or dull colors appear to be. The higher the Color control, the richer the same color will appear. However this control can't correct major deviations in color accuracy, such as when whites and greys appear overly green or yellow - for that you must first use the correct Picture mode as discussed earlier, then use the Tint control if available. The process to adjust the Color control is covered below.
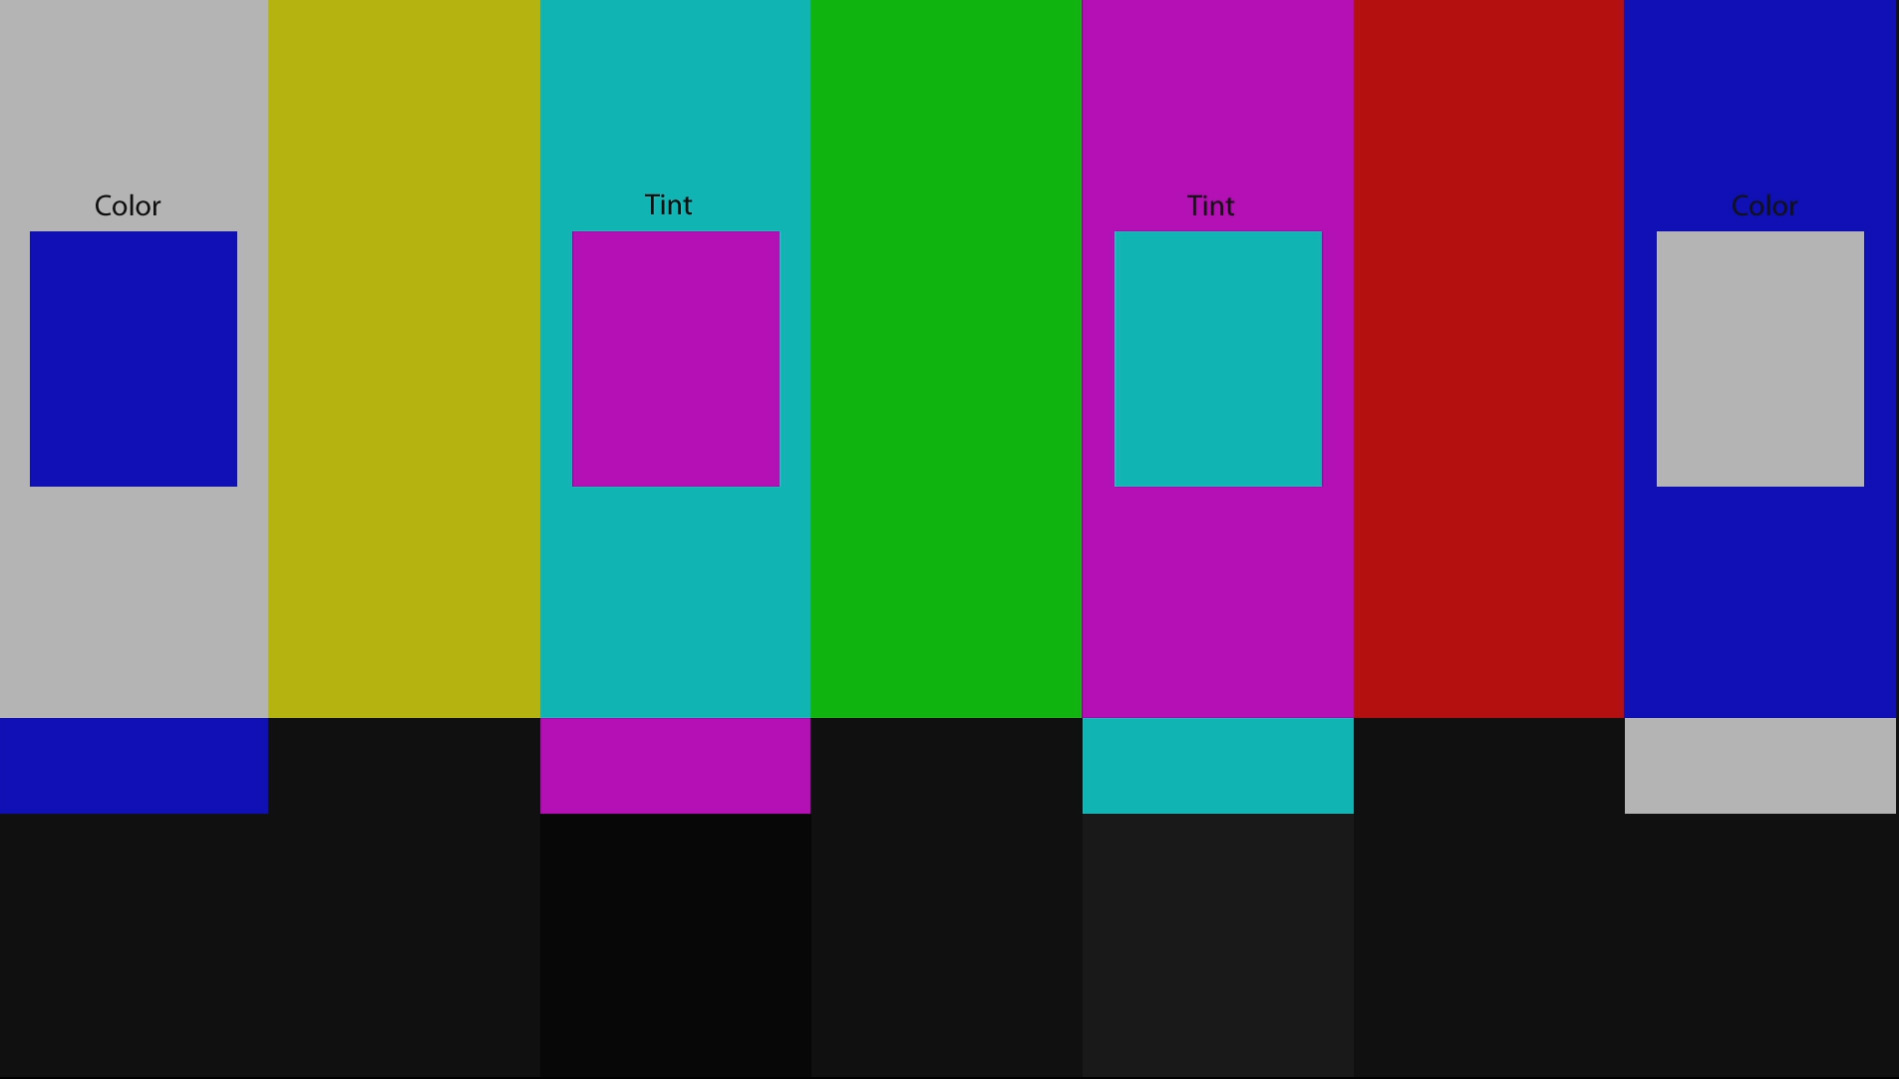
In the Basic Settings section of the AVSHD disc, go to Chapter 4 where you will see a screen which contains several colored bars and flashing color boxes within them. To complete this test, you will need to view the image through a special blue filter, available in one of several ways:
With the test image viewed through the appropriate blue filter, adjust the color control so that the grey bar with the flashing blue box, and the blue bar with the flashing grey box (marked 'Color' at the far left and right of the screen) both come as close as possible to being uniform solid blue bars with minimal flashing visible in the boxes. Once this is done, you can refine the colors to further reduce the flashing boxes by using the Tint control if available. Adjust Tint so that the flashing magenta (pinkish red) and cyan (light blue) bars and boxes marked 'Tint' also reduce their flashing. You may have to readjust the Color control after adjusting Tint.
In practice this is a rough but reasonable way to get desirable color saturation. Once you have set it via this method, the Color control will inevitably need to be fine tuned as you view different source material, until you reach a good compromise. Make sure you use source material for which you are already familiar with the intensity of the colors used, as color reproduction varies by source. Pay careful attention to reds, pinks and oranges in particular, because if these appear to "bloom" around the edges, and peoples' faces look slightly sunburned, or if objects like trees and grass appear plasticky or neon-like, then Color is set too high, or Contrast is set too high, or both.
Color is one of the trickiest things to get right, especially as most TVs have some sort of inherent color bias towards red or green (even in the most accurate picture mode) which means dialling down the Color control will make some colors look right while others look over or under-saturated at the same time. This is where Tint helps in adjusting the overall balance of Red, Green and Blue.
Sharpness: This control is widely misunderstood. Most people realize that it controls the crispness of the image, but don't fully comprehend that on an HDTV, it is an artificial technique which adds undesirable elements to the image to make it look sharper. Just like Edge Enhancement discussed under the Source Material section, as the Sharpness control is raised, the image is altered so that where edges are detected, subtle highlights are added around them to raise the perceived contrast around the edge. This makes edges look sharper, but it creates white halos around them and can also reduce detail in other areas of the image. Essentially, raising Sharpness doesn't draw out any more information from the video source. The amount of detail in the source remains constant - all Sharpness does is to highlight the more prominent details at the cost of loss of more subtle detail, along with the introduction of visual glitches. For this reason, it is recommended that Sharpness be set as low as possible.

On the AVSHD disc, Chapter 5 of the Basic Settings section has a screen where you can examine the impact of the Sharpness control. Look closely at the edges of any dark line or area - there should be no hint of any white halos or ghostly outlines of any type. Also look at the dark curved lines - they should be smooth along their length. Keep lowering Sharpness until the outlines, and the white dots in the middle of the main box, start to appear blurry. On a decent HDTV using a Blu-ray player connected via DVI or HDMI this should not occur even if you reach a zero Sharpness setting.
Initially, because you may be used to higher sharpness in the image, you may find reducing the Sharpness control will make things look too soft to your eyes. You will have to allow yourself time to get used to the reduction in artificial edge enhancement. A Sharpness of zero is ideal, as this allows an HD image to come through unaltered. However some people will find this setting a bit too blurry when viewing DVD material, even after allowing themselves to adjust. In that case I recommend using a Sharpness in the range of 5% to 10% as a compromise. This prevents DVDs from becoming too soft, and also adds a small amount of crispness to Blu-rays without any noticeable artifacting. It can also help counter the slight softening effect which Overscan introduces, if you use it.
Tint: This control should only be set in combination with the Color control, and using the appropriate test screen, as covered further above.
Color Temperature: This control determines the temperature of white, which according to the appropriate D65 standard should be equivalent to around 6,500 K (Kelvin), similar to ambient daylight at midday. If Color Temperature is overly "warm", that is at lower color temperatures approximating less than 3,000 K, whites and greys will start to take on a yellowish or reddish tinge. At Color Temperatures above 5,000 K, also known as "cool", whites and greys will progressively start to turn more bluish, especially around the 9,000 K mark.
Using the correct Picture mode should get you close to the correct 6,500 K color temperature - typically this is a THX, True Cinema or Movie mode as discussed earlier. Color Temperature presets of Cool, Normal and Warm on some picture modes also allow you to set something close to an accurate level by selecting the Warm or low value. However because most people are used to a cooler and slightly bluish temperature for white, this may look incorrect and slightly reddish at first. You will need to allow your eyes to adjust, and if you still have doubts, try the Normal or middle value as a compromise. The only way to accurately set Color Temperature is to do an Advanced Calibration.
Gamma: This control isn't available in all picture modes, and even if it is, it shouldn't be adjusted unless you understand its complex nature. Known more formally as Gamma Correction, it basically determines the gradation of brightness on your TV - the amount of brightness for any particular level of light specified in the source.
The reason Gamma exists is because of the way the human eye perceives light. Our eyes are much more sensitive to changes in lower levels of light than to the same changes in brighter areas of light. So while an imaging device like a camera typically has a linear (1:1 or straight line) relationship between light input and output, our eyes have an exponential (power or curved line) relationship, similar to Gamma. Source material such as movies take advantage of this property by encoding brightness to use more data at the darker end, and less at the brighter end. This results in more efficient use of RGB data, such that that an 8 or 10 bit color depth with Gamma encoding can be just as effective as 12 or 14 bit color depth without it - see the Color Reproduction section for details on color depth.
On traditional CRT monitors, this special source Gamma encoding is automatically compensated for by the inherent input/output characteristics of CRT monitors; CRT monitors also have a non-linear relationship between voltage input and light output which is the opposite of the gamma encoding in the source, and the combination of the two cancel each other out to result in perceptually smooth gradation of brightness. An HDTV is not like a CRT however, and has a linear relationship between input and output. So a form of software Gamma correction is required on an HDTV to correct the source Gamma encoding into something which visually looks smooth. This is what the Gamma control on an HDTV does - it determines the shape of the exponential curve which applies to this Gamma correction. There is a lot of debate regarding the correct value for the Gamma control, but in practice the standard target is around 2.2 to 2.35.
In plain English: setting Gamma too high will make the image generally darker than the source intended, and will reduce detail in dark areas, while setting the gamma too low will give an overly bright and washed out image. For correct image reproduction, set your Gamma control to the available option which is closest to the target range, either 2.2 or 2.4. This must be done in combination with the correct black level and white level as covered under the Brightness and Contrast controls further above to achieve a level of brightness gradation on your TV which is as the source material was intended to display. For more details see this Gamma FAQ.
Image Processing: There are a multitude of options on any modern HDTV designed to ostensibly improve the image by manipulating it in one way or another. The same option may also vary in name from brand to brand, as some manufacturers give them proprietary titles. As such, there are too many of these options to individually cover in this guide. The general rule is this: turn off as many of these image processing enhancements as you can, because with few exceptions, they will reduce image quality rather than improve it. This is because they are all post-processing features, so called because they apply image processing after the source image has been received in the TV, altering the source from its original form. You should of course experiment to see what each option does, and refer to the manual and do further research for details, but again, the majority of these extra features can and should be turned off.
Below are a few of the more common image processing options you may find:
Overscan: Rescales the image by expanding it slightly to ensure that there are no gaps at the edges of the image. You can test for the degree of Overscan currently used on your display by going to Chapter 5 of the Basic Settings section of the AVSHD test disc. Look at the edges of the screen to see how much overscan has been applied. If the option to disable Overscan is available to you, consider the fact that some material has been made with the assumption that Overscan will be used. Thus if overscan is disabled, you may see small flashing white lines or dots and/or thin black bars around the edge of these images. This may cause distraction, and on plasmas, may unevenly age the phosphors around the edges of the screen. For more recent TVs, especially high-end TVs with reasonably good video scalers, enabling Overscan will result in only a very mild softening of the image which may be imperceptible. Any form of rescaling reduces image quality though, so if you want the sharpest image possible, disable Overscan.
The final result of your calibration efforts may not necessarily please you entirely. This is because the methods covered above are limited by the imprecision which comes with doing everything by eye. You are also adjusting the settings to a standard which although accurate, may give a look that you are not used to seeing on a TV. You do have some scope to adjust the settings to better suit your tastes, even if they may become inaccurate. While I don't recommend exaggerated settings such as garishly bright colors, extremely high or low gamma values, or incredibly bright contrast settings for example, in the end if you understand what each control is doing, and what the correct target is, then it is up to you to as to how much you deviate from this for personal taste reasons, or perhaps as part of certain compromises that are necessary to overcome some of the limitations of your particular TV.
If over a period of time and with some fine-tuning you are still not satisfied with the image quality of your TV, then instead of obsessing over it and spending countless hours continuing to attempt to tweak it by eye, it may be time to consider the instrumented approach, which we look at below.
Advanced Calibration
An advanced calibration differs from a basic one in a critical way: it uses an instrument to take objective measurements from your display. This ensures that your results are as close to the standards as possible, and removes a lot of the guesswork and repetition involved in calibrating by eye. If conducted properly, the results of an instrumented calibration can provide a noticeable improvement over the basic method.
The easiest and best way to do an advanced calibration is to hire a professional calibrator who has been certified by the Imaging Science Foundation (ISF) to perform the process on your TV. A list of ISF calibrators in your area can be found here. There are two main drawbacks to this method. The first and most obvious one is the fee: a professional calibration will cost several hundred dollars or more. Although the results will ensure that you are getting the most out of your TV, it may not be economical to spend that much on a calibration. The second reason is that professionally calibrated settings do not necessarily apply from one TV to another, even of the exact same brand and model. This means that should your TV need to be replaced or repaired under warranty for example, you may have to pay to have it calibrated again. This also applies if you have multiple TVs in your home, as each one has to be calibrated separately.
Another option which can provide extremely good results, but which requires time and effort, is a do-it-yourself (DIY) calibration. You will still need to outlay some funds to purchase the necessary equipment, however this outlay will typically be a fraction of the price of a professional calibration, and will also give you the tools and knowledge to perform multiple calibrations on your own TVs and computer monitors, and those of friends and relatives, at no further cost. The process is the same regardless of whether it is a plasma or LCD. The requirements to conduct a DIY advanced calibration are as follows:
Instrumentation: You must purchase or borrow an instrument which can accurately measure the red, green and blue components of light coming from a display. This is a critical requirement as part of setting the White Balance controls for an accurate grayscale, covered further below. The cheapest such instrument is a Tristimulus Colorimeter, or colorimeter for short. While there are several types of colorimeters available, the most popular being the Spyder and i1 range, the i1 Display LT is the best balance of price and accuracy. It has a slightly more expensive brother called the i1 Display 2, however the hardware is identical to the LT version; only the software (which we don't require) is different. If you have more money to spend, a Spectroradiometer (also called a Spectrophotometer) like the i1 Pro is generally more accurate than a colorimeter, but costs much more. For the most part, any colorimeter, particularly an i1 Display LT/2 should be more than adequate. Try to avoid purchasing a used meter of any type as their accuracy can deteriorate over time, especially if stored improperly.
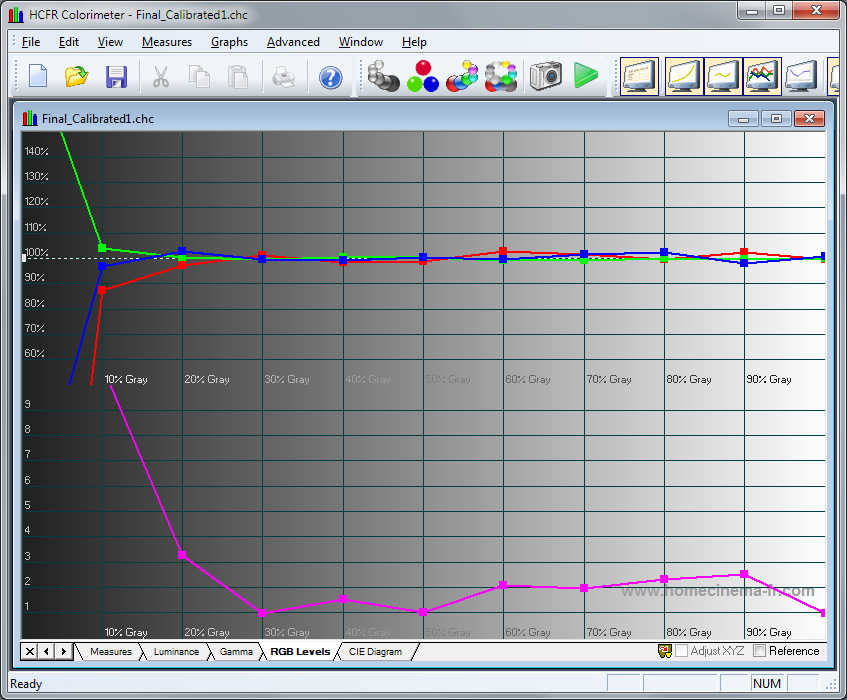
Calibration Software: Although your colorimeter may come with calibration software of its own, it will typically not be appropriate for our needs. This guide, and many other guides and forums on the Internet, assume the use of the free Color HCFR software, as pictured above. This software needs to be installed on a PC or laptop in order to interpret and display the information received from the colorimeter. The alternative is CalMAN calibration software which is not free, although it is a bit more intuitive to use than Color HCFR, and this bundle consisting of CalMAN and an i1 Display 2 colorimeter is reasonably good value for example if you want to go down that route.
Calibration Disc: Your TV needs to display specific test images in order for the colorimeter to take appropriate measurements. Fortunately the free AVSHD 709 calibration disc we used in the Basic Calibration section further above is useful for advanced calibration as well. You can use Digital Video Essentials HD or the Spears and Munsil disc instead if you already have one of them.
Customizable Settings: Your TV must have a set of White Balance or Grayscale calibration controls of some type so that you can adjust at least two of the three colors in the red, green and blue mix that combine to produce a color image on an HDTV. The basic set of these controls is called a 2-point white balance, and allows for low end (known as RGB Brightness, Cutoff or Bias) and high end (known as RGB Contrast, Drive or Gain) adjustment. Some TVs come with a 10-point white balance which allows even greater control, and this is desirable. Refer to your TV's manual for the precise name and location of these controls in your menus. If you cannot find these controls, then you will have to access the Service Menu to use them, and that can be quite risky, may void your warranty, and is beyond the scope of this guide. The settings in the Service Menu are best left to a professional calibrator.
Calibration Guide: The actual process of calibration is quite detailed and has too many variables and instructions to cover in the space allotted in this guide. Instead I recommend running through this detailed Greyscale & Colour Calibration for Dummies guide. You can also refer to this Basic Guide to Color Calibration as well if you want advanced details on the concepts and methods involved.
The primary benefit of an instrumented calibration, whether performed by you or by a professional calibrator, is that it takes all of the guesswork out of getting accurate colors. This means that once calibrated, you can view any source material on your TV and be confident that any variations in color you see are as intended, rather than due to poor settings. The image will also have a much more natural look to it, and any image flaws will be minimized.
Regardless of which calibration method you choose, whether basic or advanced, calibration of some type is necessary on any HDTV to achieve optimal image quality. Without it, even the best TVs can provide a relatively poor quality and unsatisfying image.
|
|