
The Gamer's Graphics & Display Settings Guide
[Page 4] The Graphics Process (Pt.3)
Step 7 - The GPU Processes the Data
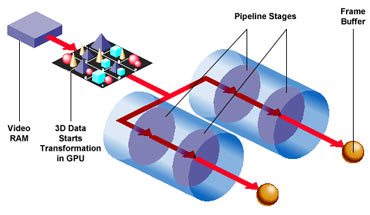
The GPU now accesses the data in VRAM and undertakes a range of complex graphics calculations in what is commonly referred to as the Graphics Pipeline. This 'pipeline' has several stages, the aim of which is to repeatedly convert raw three dimensional (3D) data into something viewable on a two dimensional (2D) display screen:
1. Transformation - We start off with raw Vertex data, a vertex being a point in 3D space which, when several are joined together later will make up Wireframe 3D shapes called polygons. In the first stage of the pipeline, this raw 3D vertex data is transformed in such a way as to create and place all 3D objects correctly into what will be a 2D space - that is, the screen surface of your monitor. Everything is scaled and positioned correctly relative to each other. A Vertex Shader may be used at this point to apply certain effects such as warping of objects.
2. Lighting - All the objects are then lit correctly based on the location of the light source(s) and any reflective surfaces. The data is still in vertex form though, so it's basically still just lots of points with different shades of color based on the lighting applied.
3. Viewpoint - The objects are then further adjusted to account for the fact that they will be viewed from a particular angle and distance. So objects closer to the virtual viewer are made bigger, objects further away smaller, and everything is rotated and moved around appropriately.
4. Clipping - Objects that would not be visible to the viewer based on the current Field of View (FOV) are essentially removed. For example, if you have a FOV of 90 degrees, which is typical for most games, the remaining 270 degrees of objects around you which you can't see at any one time will be removed. This is done to reduce the amount of wasteful calculations the GPU would otherwise have to do for something that's not visible.
5. Triangle Setup - At this point all the vertices (points) are joined together to create triangles or polygons, i.e. multi-sided wireframe shapes, which is what we are more familiar with when picturing basic 3D graphics on a computer screen.
6. Rasterization - A Pixel is the smallest unit of graphics information displayed on your monitor. Since everything in a 3D scene will end up being displayed on a flat 2D surface as a pixel, every object in the scene is assigned a particular pixel location on the screen.
7. Culling - This process picks up where clipping left off; every pixel which would still not be visible is removed. Even though they are within your field of view, the rear side of objects that are facing you, objects obscured by other objects, etc. are all removed as they are effectively not visible to the viewer at the current time and hence not worth wasting additional computational power over.
8. Texture & Shading - At this point, each pixel making up the image has any relevant colors or effects applied to it. A Texture is a 2D image which is added to a 3D object's surface to make it look realistic. A Pixel Shader may combine a range of color, depth and texture effects to relevant pixels to create special effects like wrinkled, glossy or transparent surfaces on objects.
The graphics data is now ready for display.
Performance Tip: A modern graphics card actually has multiple pipelines operating at the same time and this multi-threading allows the graphics card to undertake the various stages listed above in parallel and thus perform them much more quickly. As expected, graphics cards with more pipelines generally perform better. It is only relatively recently that graphics cards have been able to render detailed 3D graphics in real-time fast enough to display smoothly. In the past, complex 3D scenes (e.g. for movie special effects) were rendered slowly over a period of sometimes hours or days, whereas now they can be done dozens of times a second. Gaming is one of the most calculation-intensive things you can do on a home PC, so do not underestimate how much stress an entire PC is put under when playing a complex 3D game. It's not just your graphics card which gets a workout; the more recent the game, the more complex it is likely to be, and hence the greater the likelihood that it brings out latent instabilities anywhere on your system and causes crashes and lockups on systems which are not properly configured.
Step 8 - The Data is Sent to the Frame Buffer
The data from the steps above - a single completed image also known as a Frame - is sent for temporary storage to an area of VRAM called the Frame Buffer. As the name suggests, this area buffers (stores) frames, ready to send them through to your computer monitor as required.
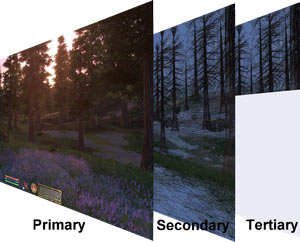
There are usually two buffered images (frames) held at any one time, a process called Double Buffering. One completed frame is held in the Primary (or 'front') buffer, while another one is being composed in the Secondary (or 'back') buffer. The Primary buffer is the one whose output is displayed on your screen at any time. While the contents of the primary buffer are being displayed on the monitor, the graphics card is preparing another frame in the secondary buffer, and as soon as your monitor is preparing to refresh itself again, the buffers are 'flipped' so that the newly completed content of the secondary buffer is then displayed while what was the primary buffer (now secondary) empties itself and composes another new frame. This Page Flipping technique helps prevent a potential bottleneck and increases performance when displaying frames rapidly in a row in 3D applications.
The larger the resolution and the more complex the image, the more data it has and hence the more space it will take up in the frame buffer. If any additional effects are being applied to the frame, like Antialiasing to smooth jagged lines, or Anisotropic Filtering to clear up distant textures, then that will further increase the size of the image (frame).
Performance Tip: Usually only two frames are held in the frame buffer. However Triple Buffering is a technique which provides a third, or Tertiary buffer in the frame buffer, improving performance when Vertical Synchronization (VSync) is enabled, because it gives the graphics card more room to work on completing frames while it is waiting for the monitor to signal that it is ready to receive a new frame. However this also understandably uses up more VRAM and thus can increase stuttering and hitching on some systems. For full details see the Triple Buffering section of this guide.
Step 9 - The Image is Sent to the Screen
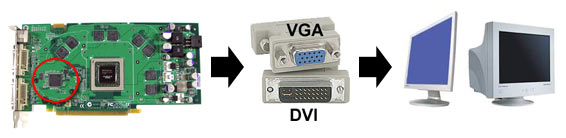
The prepared image is now ready to be displayed. On traditional CRT monitors, the data would be sent from the Frame Buffer through a RAMDAC (Random Access Memory Digital to Analog Convertor), up the video cable to your monitor. The RAMDAC was necessary to convert digital information (i.e. information in 0's and 1's) in your VRAM to an analog format (i.e. video signal voltages) displayable by CRT monitors.
On a modern digital display, such as an LCD monitor, a RAMDAC is not required if you use a pure digital connection such as DVI (Digital Video Interface) or HDMI (High-Definition Multimedia Interface) between your graphics card and display. Using the DVI or HDMI input on digital displays such as an LCD monitor/TV or Plasma TV results in the original digital signal travelling unaltered to be displayed on your screen. Using the older VGA connection requires that the digital signal be converted to analog (by the RAMDAC) and then converted back again to digital by the LCD monitor before being displayed, which is not as efficient.
Performance Tip: As this step highlights, LCD monitors provide the best image quality when connected using a pure digital connection such as DVI or HDMI, as there is no likelihood for data degradation through repeated conversion. A digital display with a digital connection provides the most accurate image reproduction.
That covers the basics of how 3D graphics work on your system. Hopefully you now have a clearer understanding of how your system works when playing a 3D game, and hence you should be better armed in both troubleshooting any problems and working out the best ways to improve performance. Remember though that the best way to configure Windows and your system for optimal performance and stability is by reading the TweakGuides Tweaking Companion.
The next section delves into the details of a range of common graphics settings which gamers often encounter. Understanding precisely how these work is once again critical to both troubleshooting and performance optimization.
|
|