
Fallout 3 Tweak Guide
[Page 5] In-Game Settings
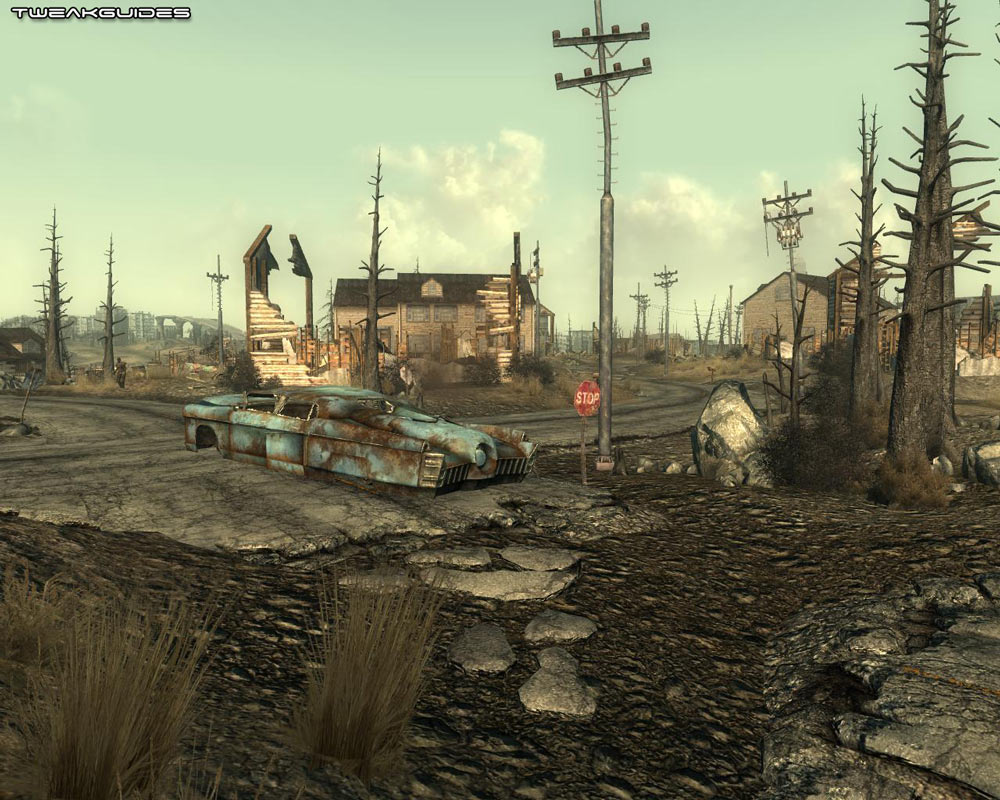
In this section of the guide I provide detailed descriptions and recommendations for all the in-game settings to allow you to achieve a good balance between image quality and performance. It is virtually impossible to provide a specific measure of the performance impact of any particular setting, as it varies significantly based on different types of hardware, as well as your chosen resolution and the interaction of a whole range of other settings. However a general indication of the impact is given for all settings which affect performance. Note that to make best use of the screenshot comparisons provided, open each shot up in a separate tab in your browser and then use CTRL+TAB to quickly flick between the tabs and better notice the differences. Alternatively you can save the screenshots to your drive and flick between them that way.
To access the main game settings, start Fallout 3 and click the Settings item. However Importantly, to access all the graphics settings, you will need start the Fallout 3 Launcher. If you're using the trick on page 4 of the guide to bypass the Launcher (and hence the disk check component), then you can manually open the Launcher at any time by running the FalloutLauncher.exe file in your \Program Files\Bethesda Softworks\Fallout 3\ directory. Once the launcher is open, click the Options item to access the settings. There are a range of graphics settings in the launcher which are unavailable in the in-game Display section of the settings, so it's essential to adjust your graphics settings in both the Launcher and the in-game settings.
Gameplay
Difficulty: This slider controls the overall difficulty of the game. In particular it determines to a certain extent how challenging your enemies are in combat. However unlike Oblivion, Fallout 3 does not automatically scale its difficulty according to what level you are, it has a more complex method than that - read this page for a description of how the level scaling system is designed to work in Fallout 3. In short there is scaling of sorts, but it is more complex and resolves many of the level scaling issues people complained about in Oblivion.
Save on Rest: If set to On, whenever you rest in a bed, the game will automatically be saved over your latest autosave at the start of your rest.
Save on Wait: If set to On, whenever you Wait (i.e. try to rest outside of a bed), the game will automatically be saved over your latest autosave at the start of your wait.
Save on Travel: If set to On, whenever you use the map to quick travel from place to place, the game will automatically be saved over your latest autosave before you arrive at your destination.
If you want to reduce loading times and/or stutter, you can disable any or all of the above options for a reduction in hard drive usage, though obviously you should then make sure to manually save regularly. In fact as a general piece of advice, I strongly recommend that you not only save often, but that you save to several different slots so that if something goes wrong with one save game - whether due to a quest bug or tweaking mishap - you have another relatively recent save to fall back on.
Display - Launcher Options
Whenever you launch Fallout 3 from the default desktop icon, you will see a small Launcher menu appear. In this menu screen, click the Options item, and you can adjust all of the graphics-related settings here. As noted further above, many of these options can also be adjusted using the in-game Settings>Display menu (see further below), however the settings covered in the Launcher menu are much more comprehensive, so it is strongly recommended you configure all your graphics options in the Launcher first and foremost before adjusting or fine tuning additional settings in the in-game Settings menu.
Graphics Adapter: This allows you to select your graphics device, and should show the correct description for the main graphics card in your system. If the information is incorrect and you can't select the correct card, then make sure to check your BIOS settings as well as installing the latest graphics drivers for your card - see the TweakGuides Tweaking Companion for more information on correct system setup.
Aspect Ratio: This setting determines the ratio of width to height for your monitor. If you are running a non-widescreen traditional CRT or LCD monitor, then the correct ratio will be 'Standard (4:3 or 5:4)'. If you are running a widescreen monitor then you should select either 16:9 or 16:10 options. If you're unsure as to which is correct, select each one and test to see whether round objects like car wheel hubs or the buttons on your Pip-Boy 3000 appear perfectly round (correct) or oval (incorrect) in the game.
Resolution: This determines the width and height of the game image displayed on your screen - for example 1280x1024 is 1,280 pixels wide by 1,024 pixels high. The higher the resolution, the more detailed the image will appear on your screen because there are more pixels showing, but the more power it takes to display it. The list of available resolutions shown is limited firstly by the maximum possible for your monitor and graphics card together, as well as what you have selected under the Aspect Ratio setting above. The number of resolutions shown is also affect by whether you've ticked the 'Show All Resolutions' option in the lower right of the screen. Your choice of resolution alone can have a major impact on performance, so if necessary lower it if nothing else works to improve your average FPS. You can also set custom resolutions - see the iSize W and iSize H settings under the Advanced Tweaking section. Note: if you have a widescreen monitor, Fallout 3 has native support for all widescreen resolutions, however there are some minor glitches/issues; you can find a detailed report regarding Fallout 3's widescreen support here. If certain screen elements are not correctly in view at your chosen aspect ratio and resolution, you should also refer to the fDefaultWorldFOV, fPipboy1stPersonFOV and fRenderedTerminalFOV .ini variables in the Advanced Tweaking section.
Antialiasing: Anti-Aliasing (AA) is a method used to smooth the appearance of jagged lines in a game; the higher the sample rate, the smoother the image. It's described in more detail on this page. This option allows you to choose whether to enable this function or not, and the sample rate of the AA if used. The higher the sample rate chosen, the greater the performance impact in return for smoother edges on graphics.
Anisotropic Filtering: Anisotropic Filtering (AF) is explained in more detail near the bottom of this page, and is essentially a method of making textures sharper as they recede into the distance. This setting controls the sample rate of AF used, up to 15x AF. The higher the sample rate used, the crisper and more distinct surfaces will appear in the distance, at the cost of some performance. This setting is of major importance in Fallout 3 because even at the highest Texture settings, the game uses somewhat low resolution textures in many instances, and this can result in somewhat blurry visuals. By using a reasonable amount of AF, e.g 8x (8 Samples), most systems should notice a minimal performance drop in return for noticeably improved image quality. If necessary lower other settings to accommodate at least some AF, because Fallout 3 benefits greatly from it.
Detail: Here you can select the overall level of graphics detail used in the game. The preset options are Low, Medium, High and Ultra, and if you're curious, you can see precisely what settings are altered at each of these presets by examining the contents of the Low.ini, Medium.ini, High.ini and VeryHigh.ini files found under the \Program Files\Bethesda Softworks\Fallout 3 directory. In practice however I strongly recommend ignoring the presets and clicking the 'Advanced...' button to manually adjust all the various settings as per this section of the guide, as this will yield the best combination of image quality and performance to suit your tastes.
Windowed: If ticked, this box forces Fallout 3 to run in a window as opposed to fullscreen mode. In Windowed mode the game only takes up a portion of the screen - however make sure that the in-game resolution you choose is equal to or less than your desktop resolution, otherwise there will be portions of the game screen which will be off the edges of your display. Some people claim they get better performance and/or enhanced stability when running Fallout 3 in a smaller window, however bear in mind that in practice it can reduce performance in Windows Vista because of the Aero rendering overhead which applies to non fullscreen applications. I strongly recommend Fullscreen mode (i.e. untick this box) for optimal performance. Note that the developers warn that in Fullscreen mode if you ALT+TAB back to the desktop, this may destabilize your system, again because of Windows memory management issues.
VSync: Vertical Synchronization (VSync) is the synchronization of your graphics card and monitor's abilities to redraw an image on the screen a number of times each second, measured in Hz - for full details, see this page. Whether LCD or CRT, your monitor will have a maximum rating in Hz for each resolution (e.g. 1280x1024 at 75Hz). When VSync is enabled (ticked), your maximum FPS will be capped at your monitor's maximum refresh rate at your chosen resolution, and more importantly in some areas your FPS may drop by as much as 50% if the graphics card has to wait to display a whole frame. Thus enabling VSync can have a negative performance impact. To offset this impact, you can enable Triple Buffering.
Unfortunately in Fallout 3 VSync is enabled at all times, even if this box is unticked. You can force VSync off by editing the iPresentInterval=1 variable in the Fallout.ini file to iPresentInterval=0 (See the Advanced Tweaking section). You should also check to make sure your graphics card's control panel doesn't have VSync forced on - whether via a specific Fallout 3 game profile or in the global options (see the Nvidia Forceware Tweak Guide or ATI Catalyst Tweak Guide for more details). Disabling VSync should be the optimal option, as it can increase framerates and more importantly, it will reduce mouse lag. However unfortunately in Fallout 3 it can also increase the micro-stuttering/juddering/skipping issue (as covered in the Troubleshooting Tips section). In any case experiment to see what your results are with this setting, though again, remember that it can only be turned off properly by manually editing the relevant line in the .ini file mentioned above. If you just want to reduce mouse lag without disabling VSync, see the Max Frames to Render Ahead tweak on the last page of this guide.
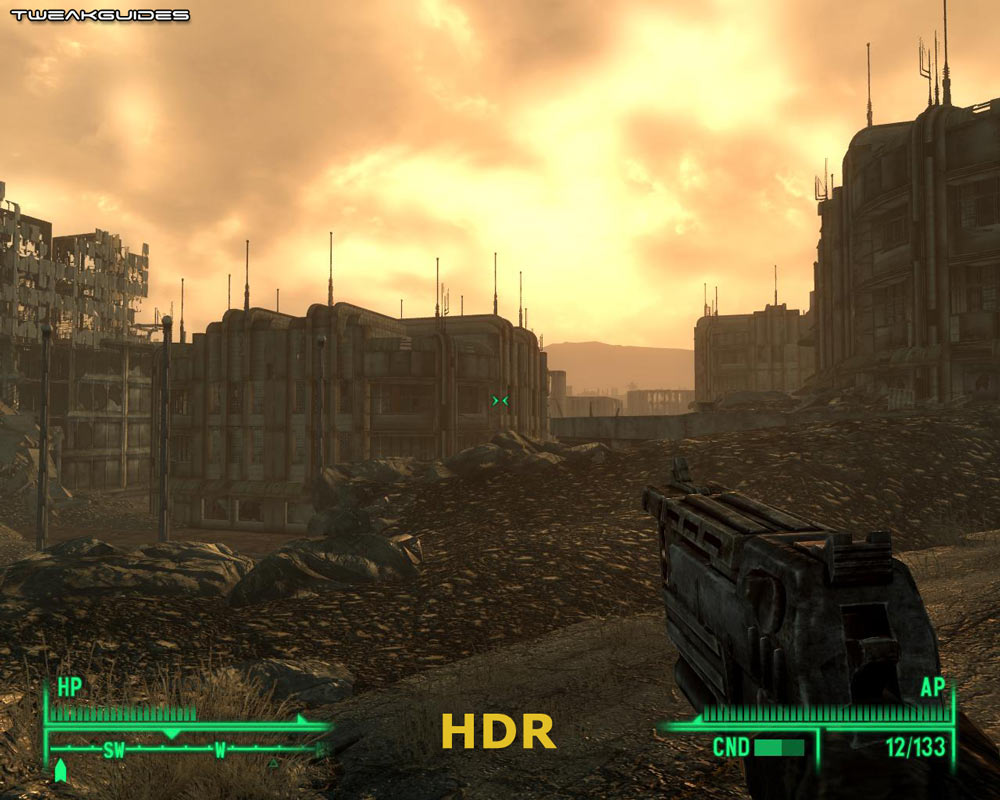
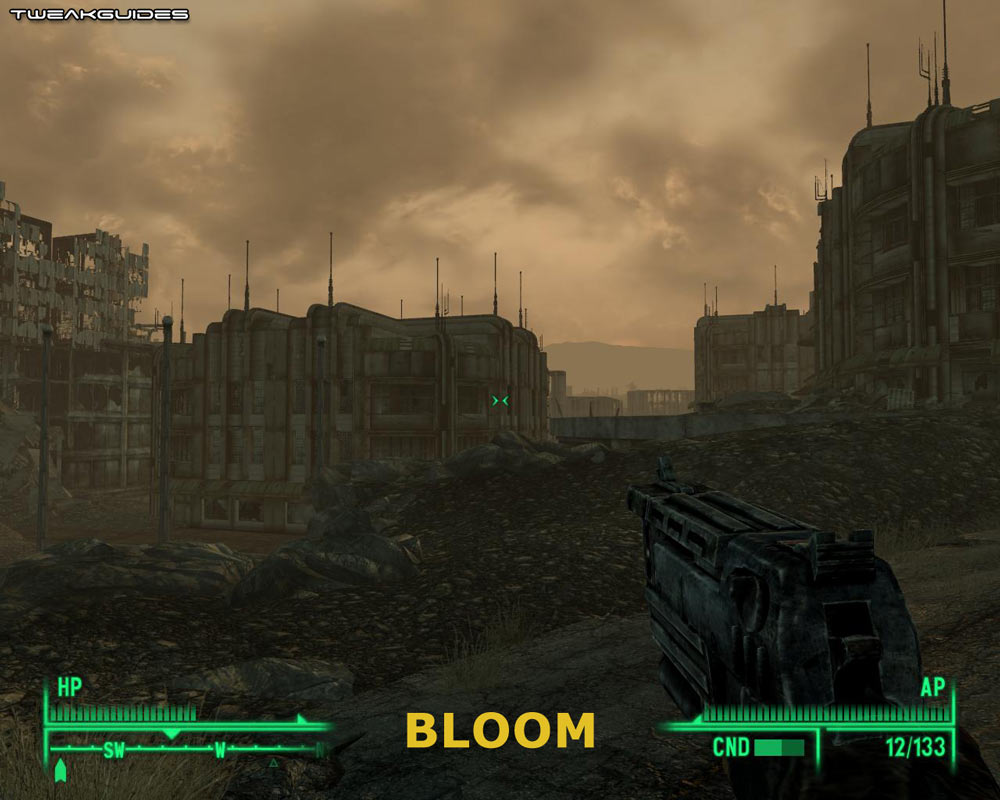
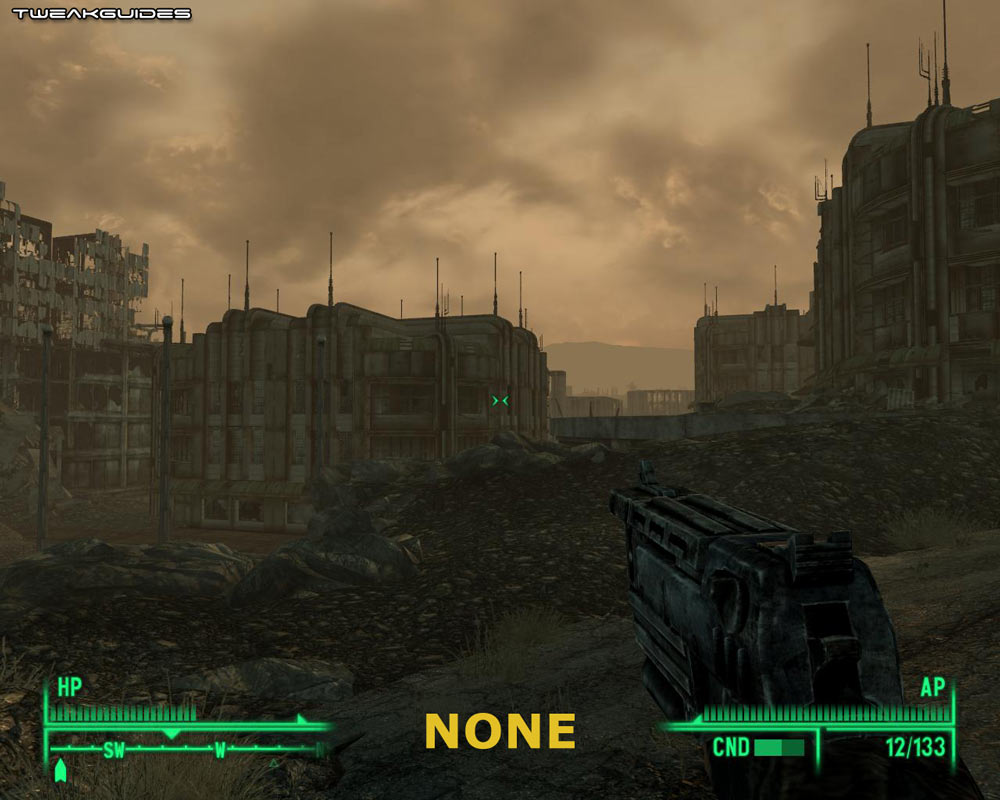
Screen Effects: This option determines the level of post-processing effects applied to the game image. There are three options available here - HDR, Bloom, and None. When set to HDR, the game will use full High Dynamic Range lighting, a form of lighting effect which dynamically alters based on the way it interacts with various objects and surfaces, as well as the environment in which the light source is portrayed. As the screenshot comparison above shows, the most noticeable impact is that HDR lighting makes the scene much more vivid. However what the screenshot can't show is that HDR makes contrasts in lighting more noticeable and dynamic, so for example looking at a bright scene after looking at a dark scene suddenly makes the light even brighter. The HDR in Fallout 3 is a bit exaggerated at times, but generally looks good. HDR is mutually exclusive with the Bloom option - one cannot be enabled at the same time as the other. Bloom is a lighting effect which, similar to HDR, alters the appearance of lighting in an attempt to make it seem more realistic. However unlike HDR, bloom is not dynamic and can be considered less realistic. Again, refer to the screenshot comparison further above. However interestingly, in Fallout 3 there appears to be little use of Bloom lighting, because when the None setting is chosen, the image quality looks much the same as when Bloom is chosen. In terms of framerate, HDR is more intensive than Bloom and None, however again, in my testing the difference didn't appear to be major.
Display - Advanced Launcher Options
When you click the Advanced button under the details section of the main Launcher options screen, you will be shown a large number of additional graphics-related settings which you can adjust. They are each covered below in detail, separated under the relevant tab headings:
[Detail]
Texture Quality: The options here are High, Medium and Low, and note that this setting is identical to the in-game 'Texture Size' setting. Textures are the 2D images placed on the surface of all 3D objects in the game. When this option is set to High, the resolution of the 2D texture images used is at the best possible, meaning the textures appear more crisp and real, especially when examined close up. At Medium and Low respectively these textures progressively drop in quality, losing a lot of detail - see an animated screenshot comparison by clicking this link: F3_Textures.gif (1.1MB). Note in particular that in the comparison you can see that from High to Medium, the detailing on the ground as well as on the wheel hub of the car is most noticeably reduced. By Low virtually all detailing in all visible objects has been removed or greatly blurred, significantly reducing realism.
In Fallout 3, even at the highest setting, the textures can appear somewhat pixellated and blurry at the best of times. Unfortunately there's not much that can be done to improve them except to use Anisotropic Filtering (See further above) to make medium and long distance textures much clearer, and also install texture mods of various kinds (See the Mods section on page 4). Indeed because of the relatively poor quality of the textures in the game, I don't recommend lowering this setting below Medium unless you absolutely have to. Lowering Texture Quality will not improve FPS as such anyway, the main reason to lower this setting would be to reduce stuttering. This is because textures load from your hard drive into your graphics card's Video RAM (VRAM), and the larger the texture resolution, the larger the texture data and hence the more swapping your graphics card has to do to constantly load new texture data from the hard drive into VRAM to decompress and display them. Whenever you enter new areas or see new objects/creatures/buildings, the higher this setting the more loading pauses/stutter you will get, especially if you have less VRAM, less system RAM and especially if you have a slower hard drive. See the Troubleshooting Tips section for more details on stuttering.
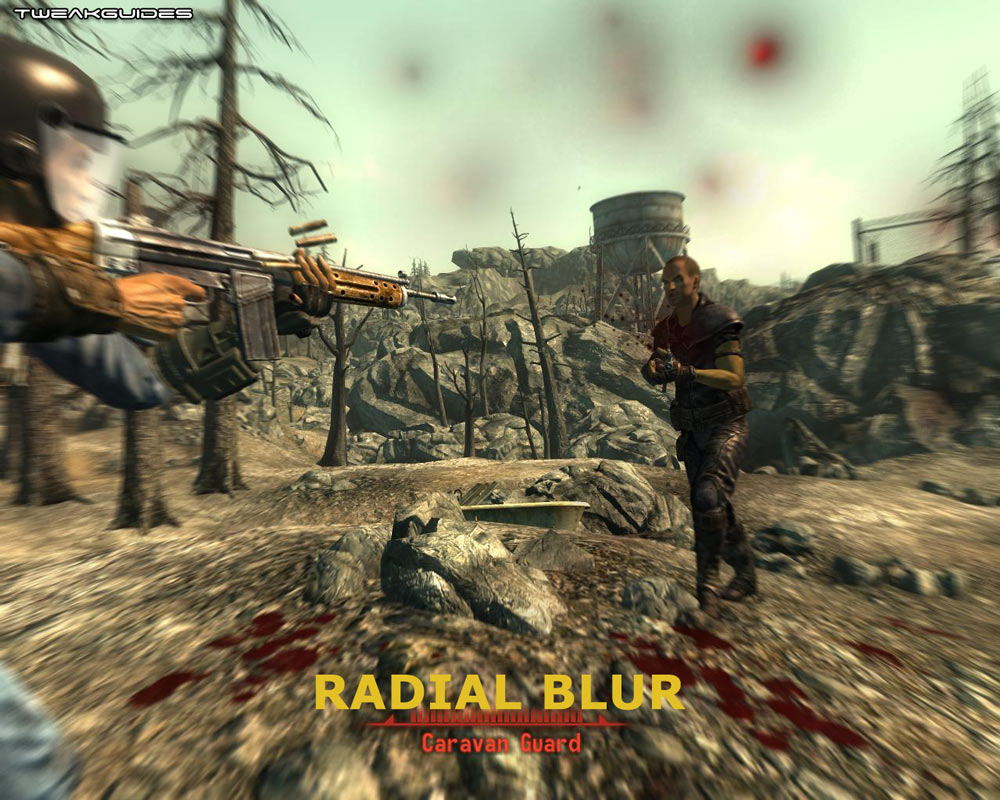
Radial Blur Quality: This setting controls the degree to which the 'radial blur' effect occurs, visible when you are hit in combat for example. An example of radial blur is provided in the screenshot above - the edges of the screen are blurred more than the center to simulate action and disorientation. The available options for this setting are High, Medium and Low, and in practice while altering the setting only lessens its visual effect slightly, it can improve performance, especially during combat. For those who dislike radial blur, or indeed the other blur effects particularly during combat, it appears you cannot disable them completely, even via advanced tweaking.
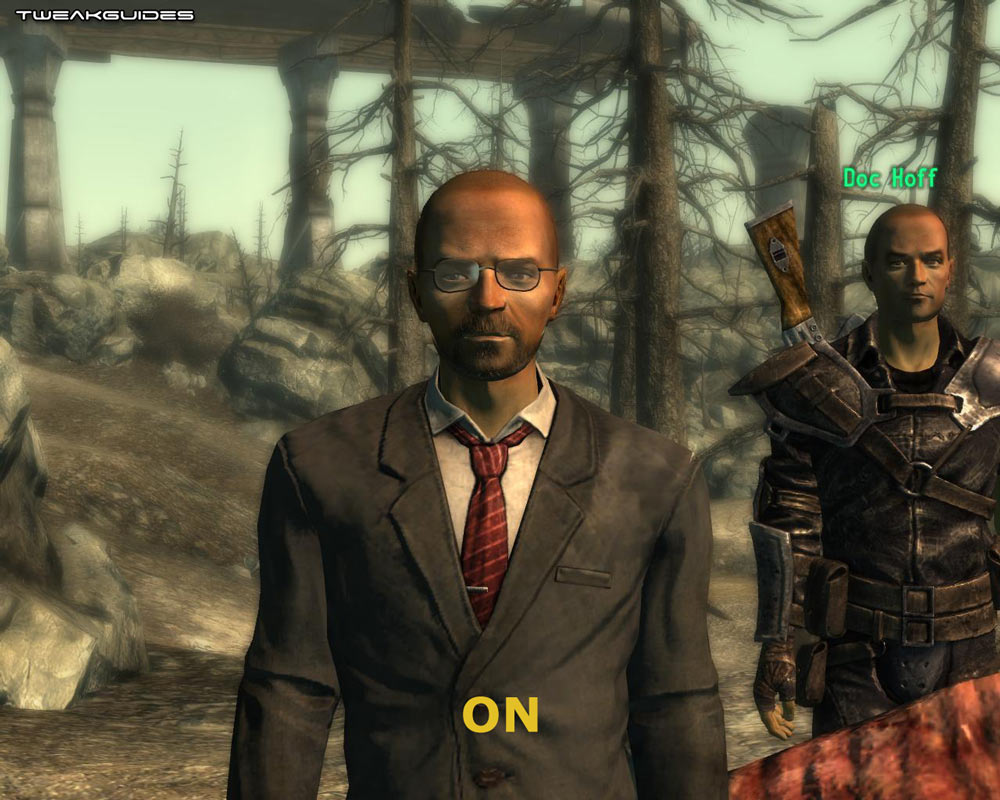
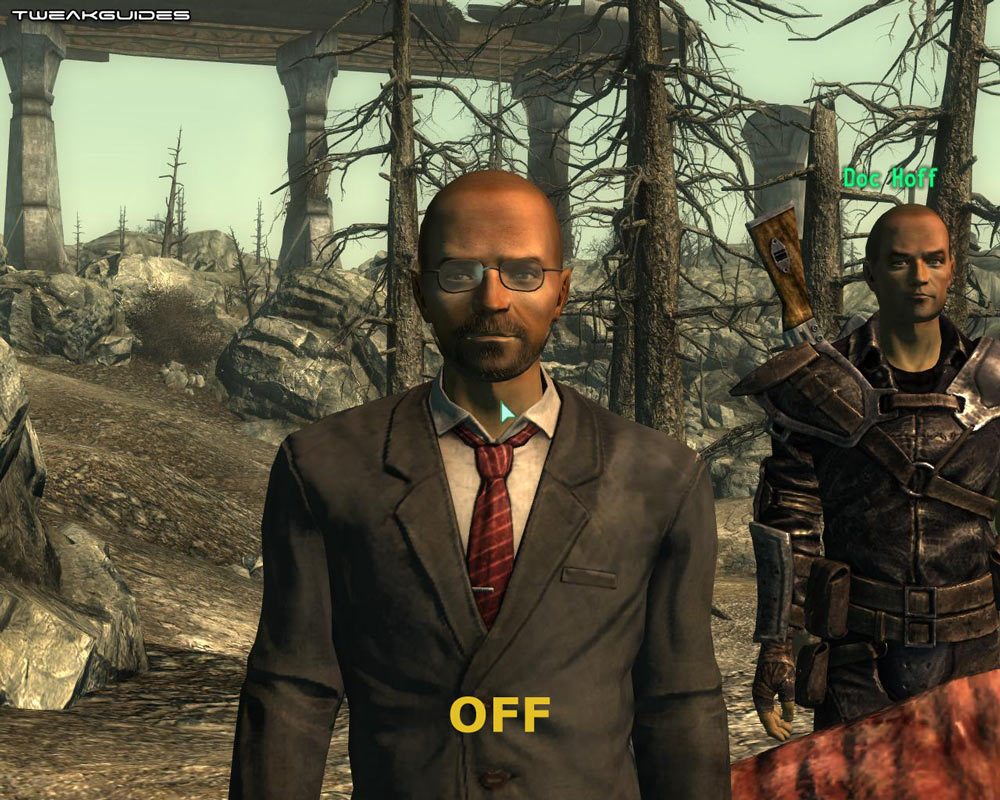
Depth of Field: This option controls whether Depth of Field is enabled or not in Fallout 3. In practice what this means is that when ticked (on), you will notice that in certain circumstances, such as when speaking with people or during VATS combat, objects further away from your focus will appear slightly blurry while those in focus remain clear and distinct. A screenshot comparison is provided above - note the background is blurred when Depth of Field is enabled, accentuating the people in the foreground. Enabling this option can reduce FPS, and also may not be to some peoples' tastes, but it does make things look more 'cinematic' in some regards.
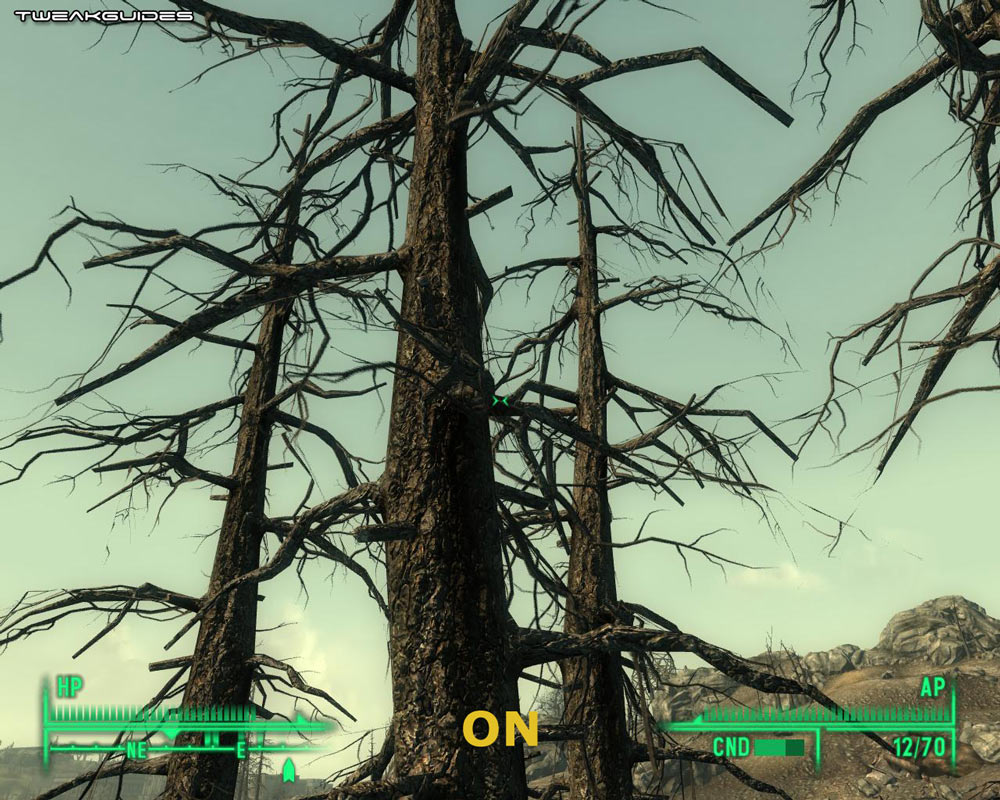

Transparency Multisampling: Transparency Multisampling is a form of Antialiasing (See further above) which is applied only to transparent textures, in other words textures which have see-through portions, such as trees, bushes, chain-link fences or objects with glass or clear plastic portions. When enabled (ticked), and you also have the Antialiasing option enabled, this setting applies Transparency Multisampling on top of regular AA, making transparent objects less jagged. As the image comparison above shows, interestingly not only does Transparency Multisampling smooth out the jagged twigs on the tree branches, you can also see additional twigs not otherwise visible when it's disabled; the same goes for other foliage such as bushes - using Transparency Multisampling gives them slightly more volume. Enabling Transparency Multisampling will reduce performance, however the precise FPS impact and visual quality will depend on your graphics card and AA level, as the newer card series provide both better image quality and less of a drop in FPS when AA is applied.
Decal Cap: This slider determines the maximum number of decals - primarily blood splatters on the ground - which are visible at any one time. The more decals are allowed, the more potential FPS drop you will experience. The maximum possible here is 10 decals, however you can increase this limit, or disable blood splatters altogether, by using the iMaxDecalsPerFrame .ini variable. You can also further adjust decal usage with the fDecalLOD2 and uMaxDecals variables, or disable all types of gore by using the bDisableAllGore variable. All of these are covered in the Advanced Tweaking section.
The next page continues the In-Game setting descriptions.
|
|