
Dark Messiah of Might & Magic Tweak Guide
[Page 6] In-Game Settings (Pt.2)
Advanced
Several of the settings under this section have a major impact on image quality, performance and stability in Dark Messiah of Might & Magic, so they deserve your full attention. By default the game recommends particular settings based on your system specifications - these are denoted by a * next to them. The recommended settings are not too bad, however there is still scope to use the information below to modify them further to suit your tastes and improve performance as well as increasing stabiliy and reducing stutter.
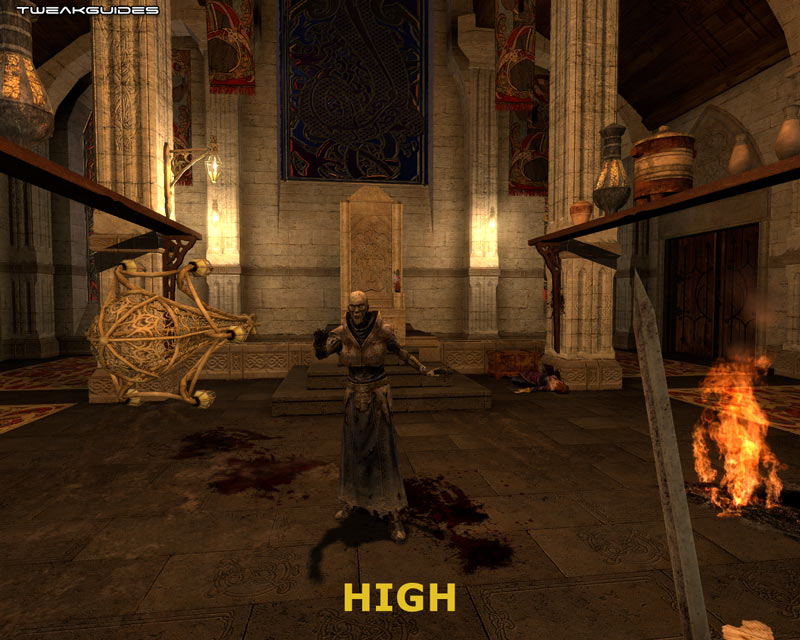
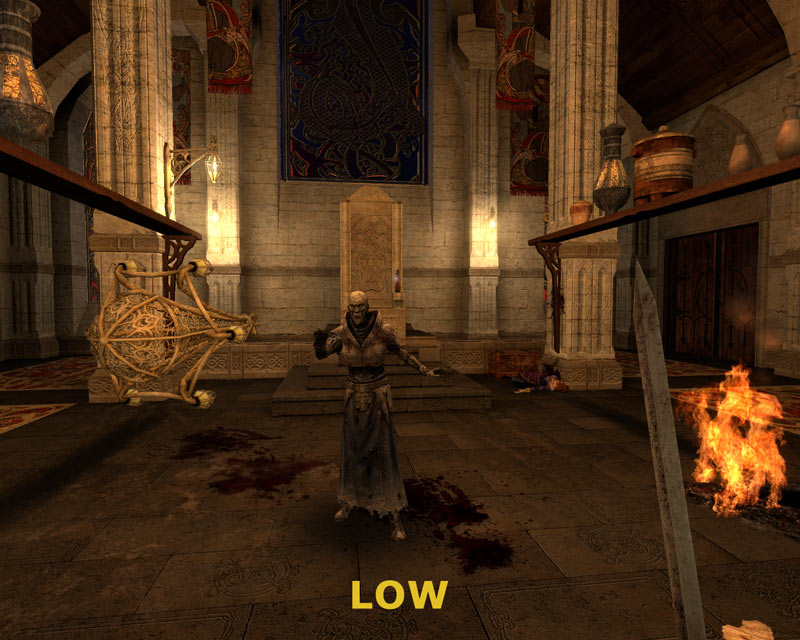
Model Detail: This setting controls the number of polygons used for objects in the game. There are three settings: Low, Medium and High - and the differences between the three levels are virtually unnoticeable. You can see an animated screenshot comparison by clicking this link: DMOMM_ModelDetail.gif (660KB). Note that there is no real difference at all between the three shots, only the red railings, the ropes to the right and the wood to the left lose a bit of detail. I've confirmed this in many areas of the game - it appears that in Dark Messiah the model detail consistently uses high polygon counts regardless of this setting, and only a few non-essential pieces of scenery lose their details if this is lowered. If you need additional FPS then the Low setting provides the best performance without any noticeable drop in image quality, so it is ideal to use. Also note that in heavy combat scenes where there are a lot of highly detailed monsters and NPCs, if you're struggling for performance you should also consider using the violence_hgibs and violence_agibs commands to have corpses quickly vanish and thus keep FPS from dipping too low - see the Advanced Tweaking section.
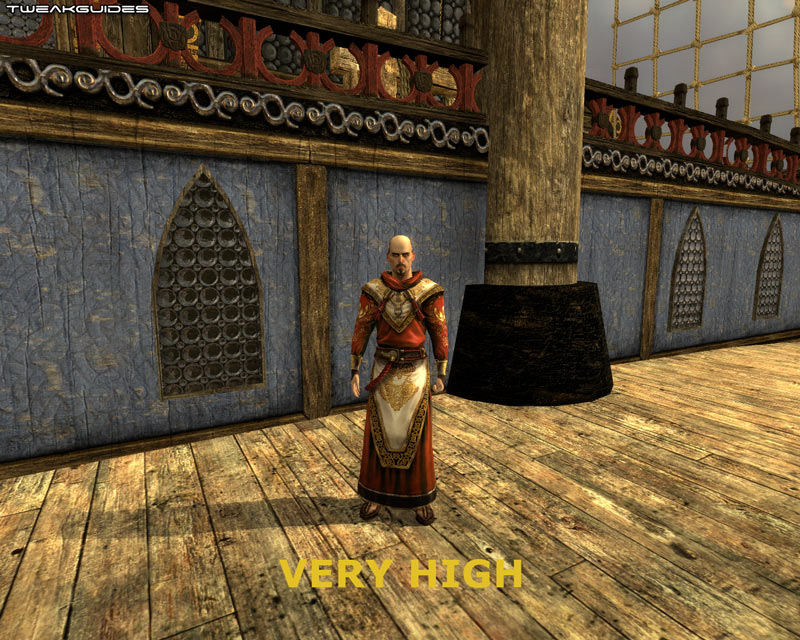
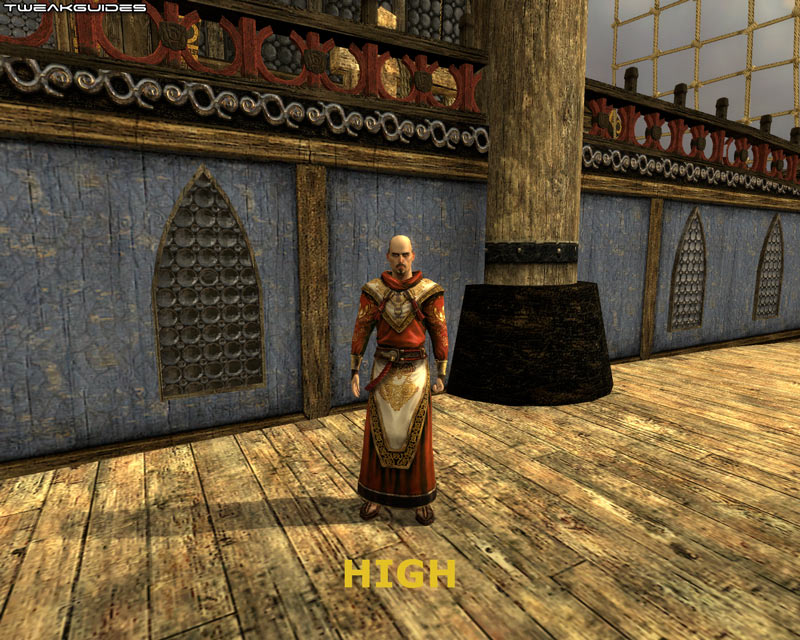


Texture Detail: Textures are the 2D images used to create the detailed surfaces of all 3D objects in the game. The settings here are Low, Medium, and High. Update: As of the 1.02 Patch onwards, Very High has been added. In fact what has happened is that Low and Medium have remained the same, while High has been renamed Very High, and a new intermediate setting called High has been created. The new High setting still uses Medium textures for scenery, but High textures for NPCs. To see the difference between these texture detail levels, see the screenshot comparison above. Note the gradual loss of detail in the surfaces of the wooden floor, the NPC's clothes and the blue wall. You can also see an animated screenshot comparison of a different scene which highlights the differences more clearly by clicking this link: DMOMM_TextureDetail.gif (907KB). Note the loss in detail of the text on the stone surface in particular, and the surface of the floor as well. For the most part the difference between the High and Medium settings is not noticeable as only NPCs are slightly more detailed at High, but High is probably a good choice as a balance between performance and visual quality. The difference between Very High and High/Medium is not major, but Low is noticeably blurrier than both.
Important: The Texture Detail setting is of critical significance to Dark Messiah, and is the cause of much of the long loading times and stuttering issues in the game (See Troubleshooting Tips section for details). Unlike older Source games like Half Life 2, Dark Messiah uses a lot of very rich, varied and detailed textures for object, character and environment surfaces. The higher the texture setting, the higher the resolution and size of these images used for surfaces, and hence the longer they take to load up from your hard drive, take up more space in memory, and as you wander around they will constantly load up, causing stutter and pauses. On some systems this constant swapping of data also leads to crashes to desktop. So on systems with less than 2GB of RAM and/or slow hard drives and/or a graphics card with only 128MB of Video RAM I strongly recommend using the High or Medium texture setting or even lower. This, combined with the stuttering tweaks on page 8 of the guide, and also turning off Auto Save (See In-Game Settings), will help reduce much of the stuttering. Fortunately the Medium setting does not differ greatly from the High setting, so using it will not radically reduce realism in the game. Finally, note that the mat_picmip 1 setting often quoted as a fix for stutter is exactly the same as setting in-game Texture Detail to Medium, as that is what that command variable controls - see the Advanced Tweaking section.
Shader Detail: This option can either be set to Low or High, and theoretically controls the level of the special effects drawn by shaders, which are complex graphics functions supported by your graphics card's hardware that allow for special visual effects in the game. However after exhaustive testing in Dark Messiah I have yet to tell the difference between the Low and High setting as they appear to result in identical visuals and special effects. If you want the best performance for no real image quality drop, select Low.
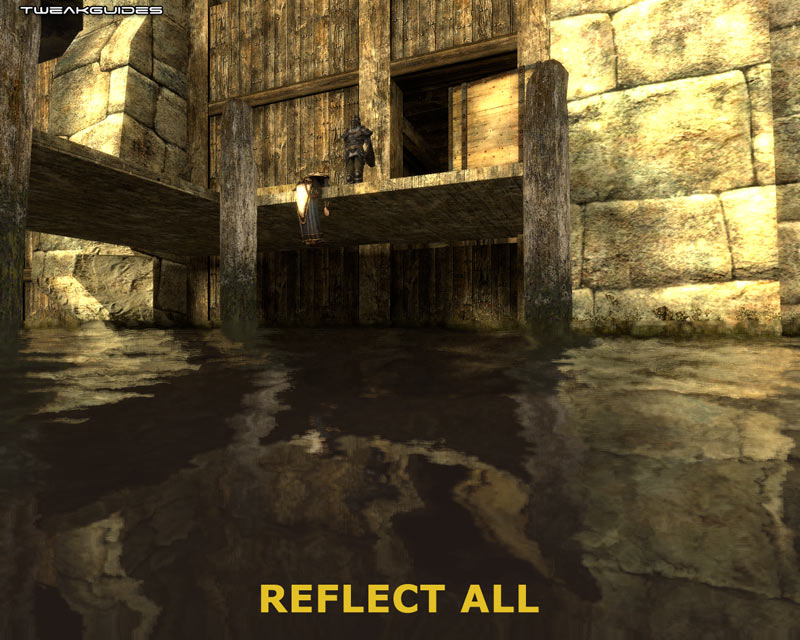
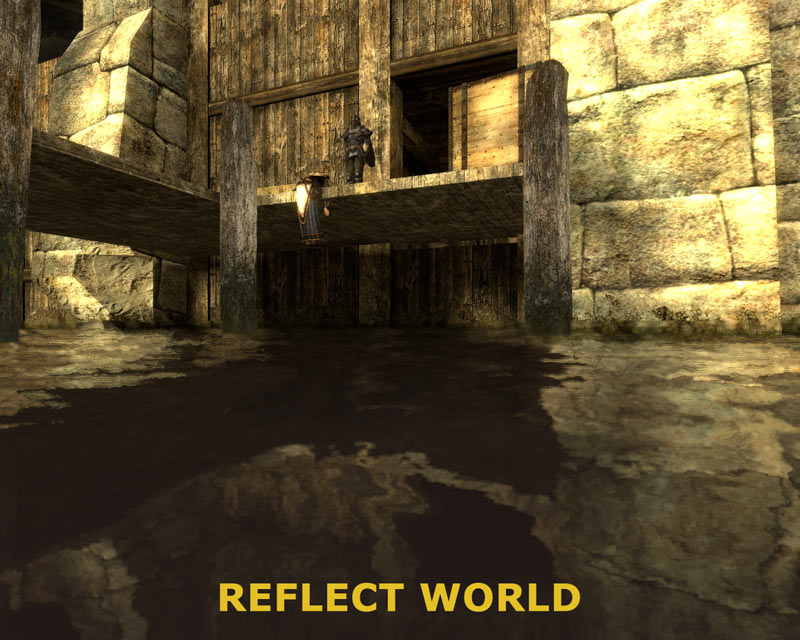

Water Detail: This setting controls the realism of the water in the game by determining how complex the reflections on the surface of water are. The options are: 'Simple reflections', 'Reflect world', and 'Reflect all' - see the screenshot comparison above to see the difference. Note that Reflect All reflects all objects as accurately as possible including the background, the NPC and the corpse, and the large crate on the right; Reflect World only reflects static world objects, not dynamic objects such as NPCs or moveable objects - thus the reflection does not show the NPC, the corpse or the crate; Simple Reflections also reflects only major static objects but with less complexity, however it actually still looks quite realistic. If you want the best image quality select Reflect All, however if you want a good compromise of performance and image quality I recommend Simple Reflections, particularly as reflections are a major source of FPS drops around water areas.
Shadow Detail: This option can be set to Low or High. At the Low setting, most of the dynamic shadows available at High are disabled and replaced with static shadows - see the screenshot comparison above. Note the shadows of the shelves and of the NPC itself. Low provides the best performance, particularly in areas with multiple lights and multiple objects, but can seem a bit unrealistic as sometimes shadows don't fall in the right places relative to light sources, and NPCs get blob shadows. However given the Low setting still provides for some shadows, and in particular replaces the performance-draining complex shadows that NPCs cast, it is worth using if you need the FPS.
GFX Detail: This setting supposedly controls the general graphics (gfx) detail in the game world, and can be set to either Low, Medium or High. Once again after a great deal of careful examination of screenshots at different levels, it is difficult to see any visual or performance difference at all when altering this setting. However there is one noticeable difference - at High there appears to be an additional heat-haze/blur effect on Sareth's hand when he has the Flame Arrow spell activated for example. It's very subtle, and may reduce performance on older graphics cards, so unless you want small touches like this, set this option to Medium or Low for no real drop in image quality. Furthermore the setting appears to be broken, as no matter how many times I set it High, it returns back to Medium when I next check it in my options. Try using the mm_fxquality_level 2 command in the Advanced Tweaking section if you want to force this to stay at High.
Update: As of the 1.02 Patch onwards this setting should be fixed and will 'stick', however if it doesn't use the method above to force it remain as chosen.
Antialiasing Mode: The options here are None, 2x, 4x and 6x. Antialiasing (AA) is described in my Gamer's Graphics & Display Settings Guide, but basically it is the smoothing of jagged lines. The higher the sample rate of Antialiasing used, the smoother jagged lines in the game will appear, but the greater the performance hit. The precise performance impact depends on your graphics hardware - newer graphics cards generally take much less of a performance hit from AA than older cards - and the higher your display resolution, the greater the negative performance impact of Antialiasing. In general if you're struggling for FPS Antialiasing is one of the first things you should disable. Regardless of whether you choose to use Antialiasing or not, I strongly recommend that you set Antialiasing in your graphics card's control panel to 'Application Preference', and then set the AA level in DMOMM, otherwise there may be conflicts.
Filtering Mode: The options here are Bilinear, Trilinear, Anisotropic 2x, Anisotropic 4x, Anisotropic 8x and Anisotropic 16x. Texture filtering determines how clear textures remain, especially as they fade into the distance - the higher the texture filtering mode used, the clearer distant textures will appear, particularly when viewed at sharp angles. More details and some examples are at the bottom of this page of my Gamer's Graphics & Display Settings Guide. Bilinear and Trilinear texture filtering are very similar in appearance, with Trilinear providing a slightly greater performance hit for a tiny improvement in image quality. Anisotropic Filtering is more advanced, and can improve the clarity of distant textures quite a bit. In general the performance impact from Anisotropic Filtering should be minimal on most graphics cards, but a high level of AF combined with a high resolution will certainly reduce FPS. For most people I recommend Anisotropic 2x or 4x as being a good balance of performance and image quality. As with Antialiasing, I strongly recommend that you set Anisotropic Filtering in your graphics card's control panel to 'Application Preference' first before using DMOMM's in-game Filtering Mode setting. Forcing AF in the control panel may conflict with the setting here and cause problems.
Wait for Vertical Sync: Vertical Synchronization (Sync) is the synchronization of your monitor and graphics card's abilities to draw a certain number of frames per second on the screen. The full details of VSync are covered in plain english in my Gamer's Graphics & Display Settings Guide. In simple terms I recommend everyone disable VSync, as when it is enabled not only does it cap your maximum FPS to your monitor's refresh rate, it can also actually halve your overall FPS. If Vertical Sync is disabled, your FPS will improve, however you may notice some screen 'tearing' - the top and bottom portions of the screen sometimes being slightly out of alignment, particularly during fast turning motions. This causes no damage to your monitor, and is usually unnoticeable, however should you find the tearing unbearable enable VSync, but be aware of the sharp performance drop.

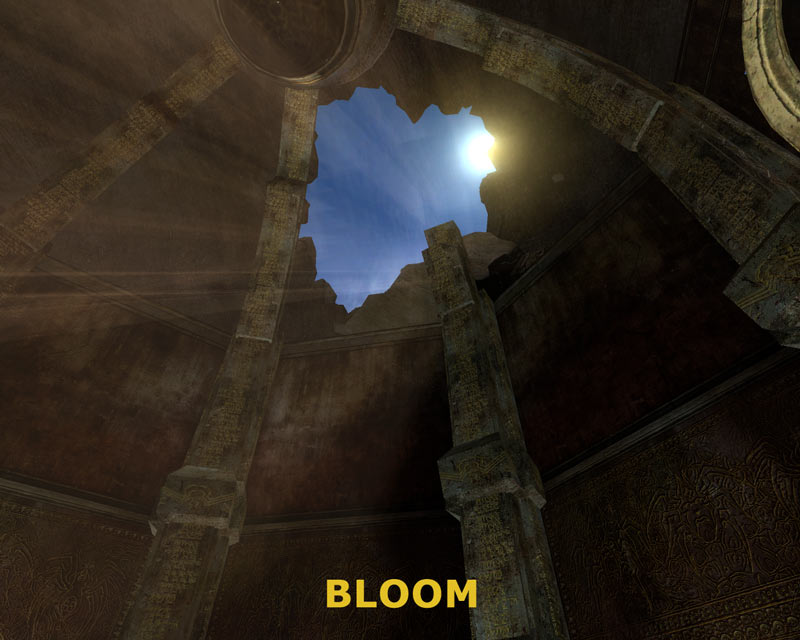
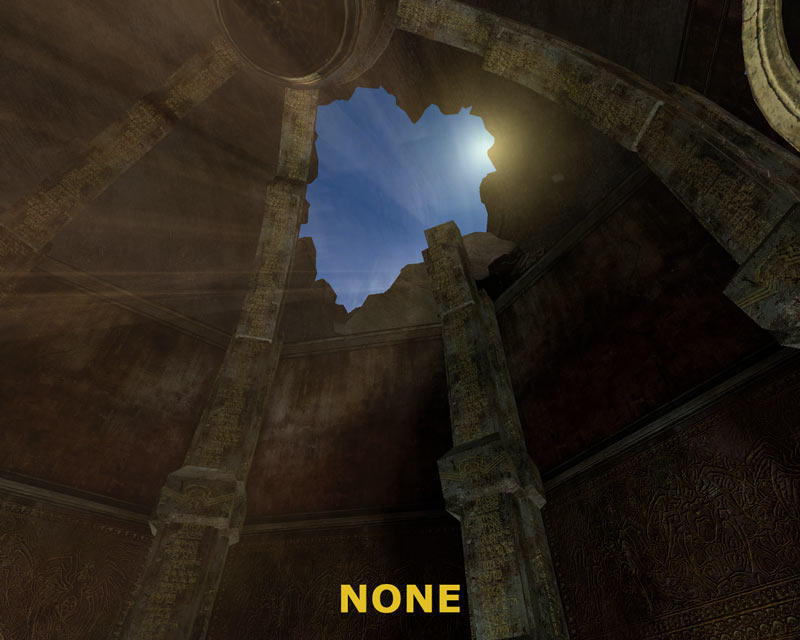
High Dynamic Range: This option allows users to set the type of special lighting used in the game. When set to Full, High Dynamic Range (HDR) lighting is used, utilizing Shader Model 2.0 (SM2.0) effects to create dynamic contrasts in lighting throughout the game. Most lights will appear far more bright and glarey when looked at, and more importantly the perception of lighting changes dynamically, so that walking into a dark room after being in bright light for example will mean the room will momentarily appear darker than normal before the light normalizes again - to simulate your eyes adjusting. This option is the most realistic but also has a greater performance hit than the other options here. Bloom lighting is often mistaken for HDR, however the difference is that although it can look similar, Bloom is not dynamic and also has less of a performance hit than HDR. If you select None, neither of these lighting effects will be used and the game lighting will appear a bit more 'dull', but will increase your FPS. Screenshot comparisons of all three are shown above.
Hardware/Software DirectX Level: This section at the bottom of the Advanced Options box shows you the maximum level of Hardware and Software DirectX support your graphics card can provide in DMOMM. Since the game requires a graphics card which can support DirectX9.0, you should see 'DirectX v9.0' or 'DirectX v9.0+' here for both, and you won't be able to alter them here. In particular your Software DirectX Level setting should always show 'DirectX v9.0' since you must run the latest release of DirectX 9.0c for the game to operate properly (See Troubleshooting Tips section for details). However you can reduce the Hardware DirectX Level used by the game in order to gain performance or provide support for older graphics cards at the cost of image quality or graphics glitches - see the -dxlevel and mat_dxlevel commands in the Advanced Tweaking section.
Make sure once you've changed any of these settings to click OK, then click the Apply button back on the main options box to put them all into effect.
Gameplay
Crosshair: This option controls whether a crosshair is shown whenever you equip a bow - if unticked no crosshair is shown for the bow, but the main circular crosshair will remain. Set to suit your taste, and if you want to disable the circular Stealth crosshair as well, see the mm_hud_displaystealth command in the Advanced Tweaking section.
HeadBobbing: If enabled, your character's view will bob up and down and side to side as you move around. If this bothers you, or indeed adds to motion sickness, you should disable this. In general I find the bobbing in the game a bit excessive and unrealistic, so I'd recommend unticking this option for most people.
Always Display Inventory Belt: If ticked, a transparent 9-item wide 'inventory belt' is displayed at all times at the bottom of the screen. This is handy for seeing which current items are bound to which particular numerical key (shown in the bottem right of each item's box). However if you don't use the belt you can untick it here to remove it - the performance impact is negligible so set to suit your taste.
Auto Save: If ticked, the game will regularly create an autosave point at key areas/events throughout the game. This is useful if you forget to save manually, however unfortunately the autosave feature also causes noticeable in-game stutter whenever it is triggered. In general I strongly recommend disabling the auto save option (untick it) to reduce stutter, and getting used to manually autosaving less frequently by pressing F6, or by pressing ESC during a game and creating a new save point.
The next section deals with Advanced Tweaks which can be used to further customize Dark Messiah's performance and functionality.
|
|