
STALKER: Clear Sky Tweak Guide
[Page 5] In-Game Settings
In this section I provide full descriptions, comparitive screenshots and some recommendations for STALKER: Clear Sky's in-game settings, allowing you to determine your personal balance between image quality and performance. While I try to note the general performance impact of each setting, it is impossible for me to give exact performance impacts as this depends on a range of variables including your specific hardware combination and your other game and system-wide settings in combination.
To access the in-game settings start the game and on the main menu screen select Options. The various settings available are covered in detail below:
Video
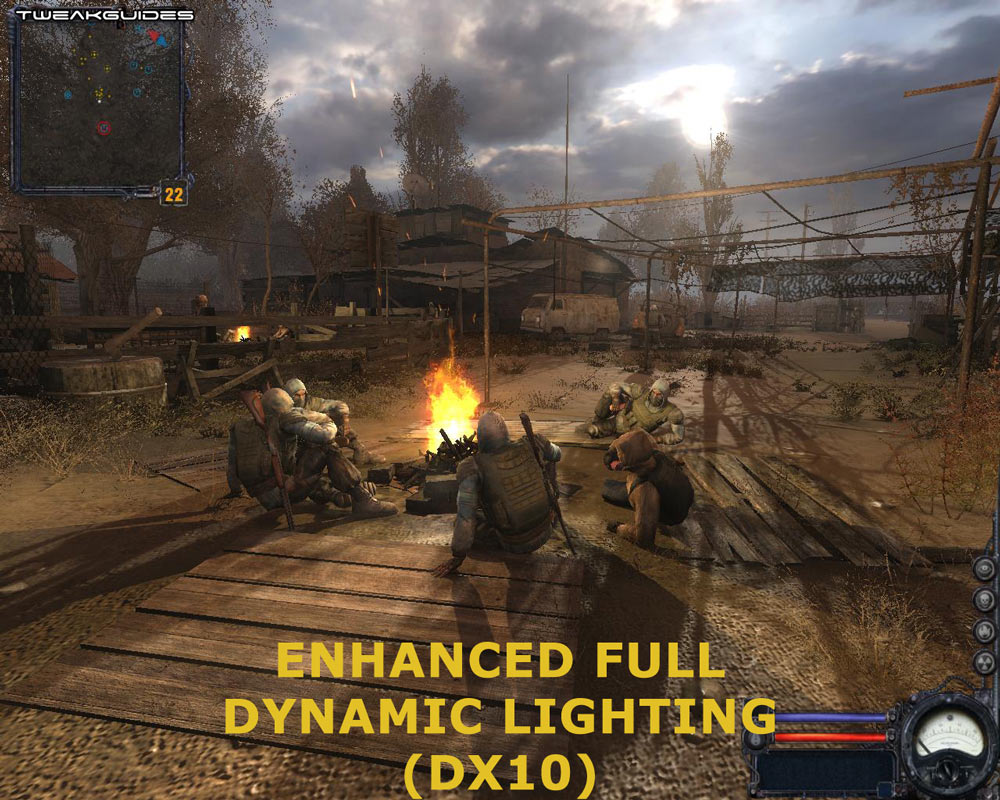
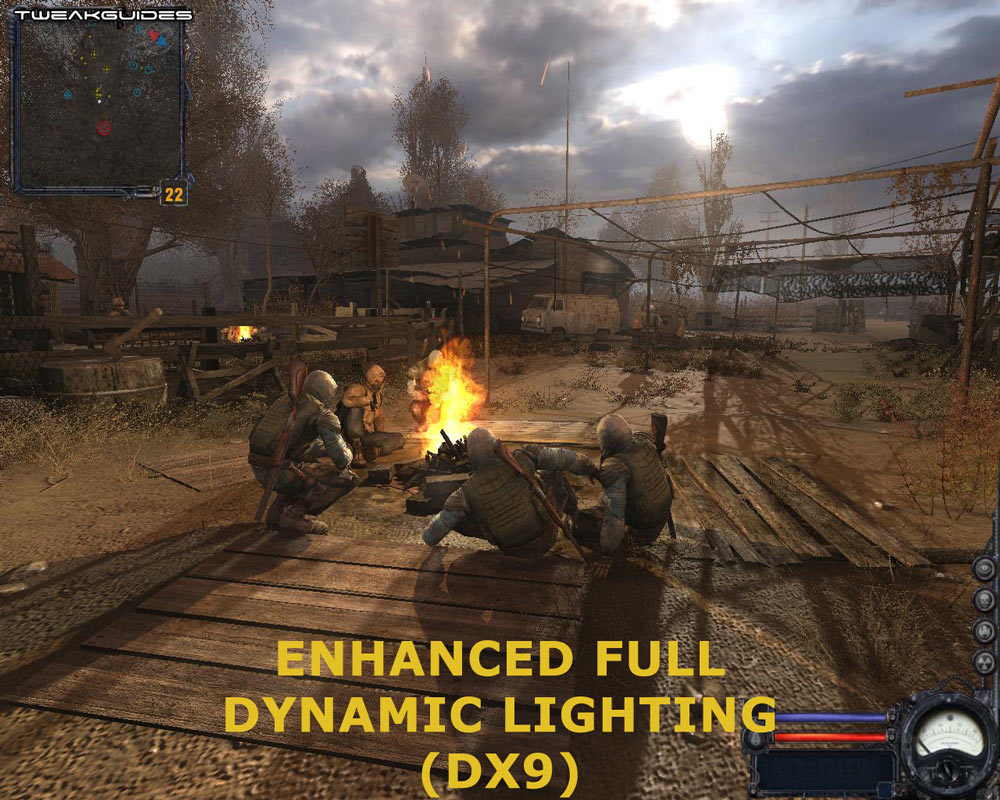
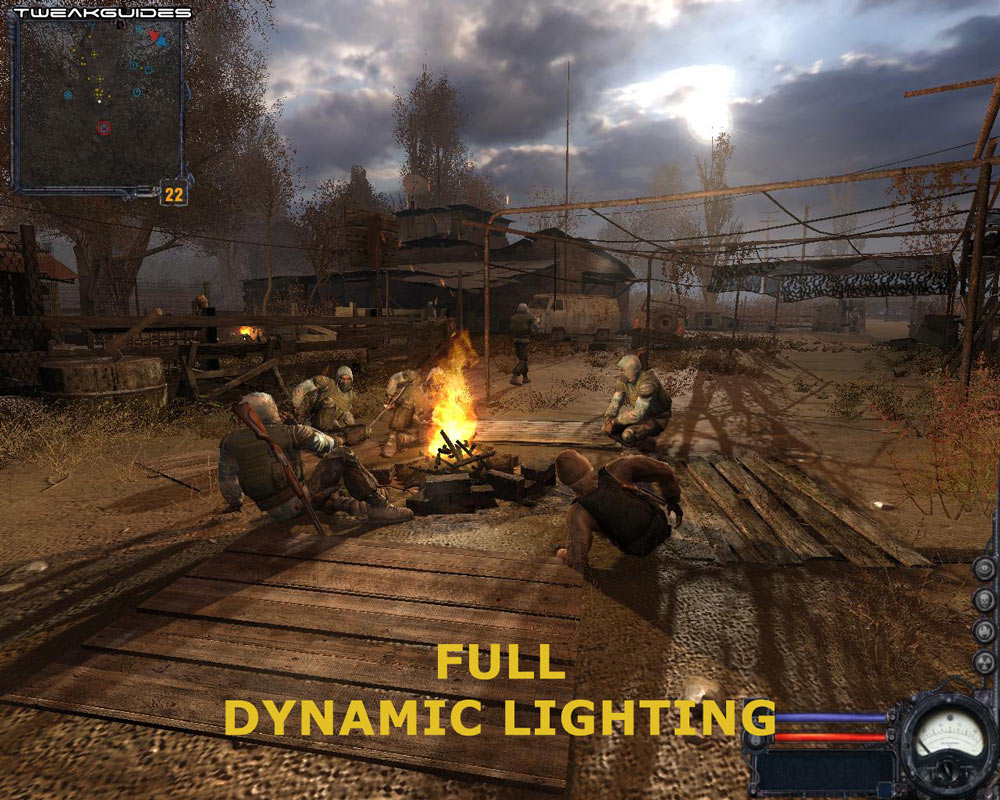
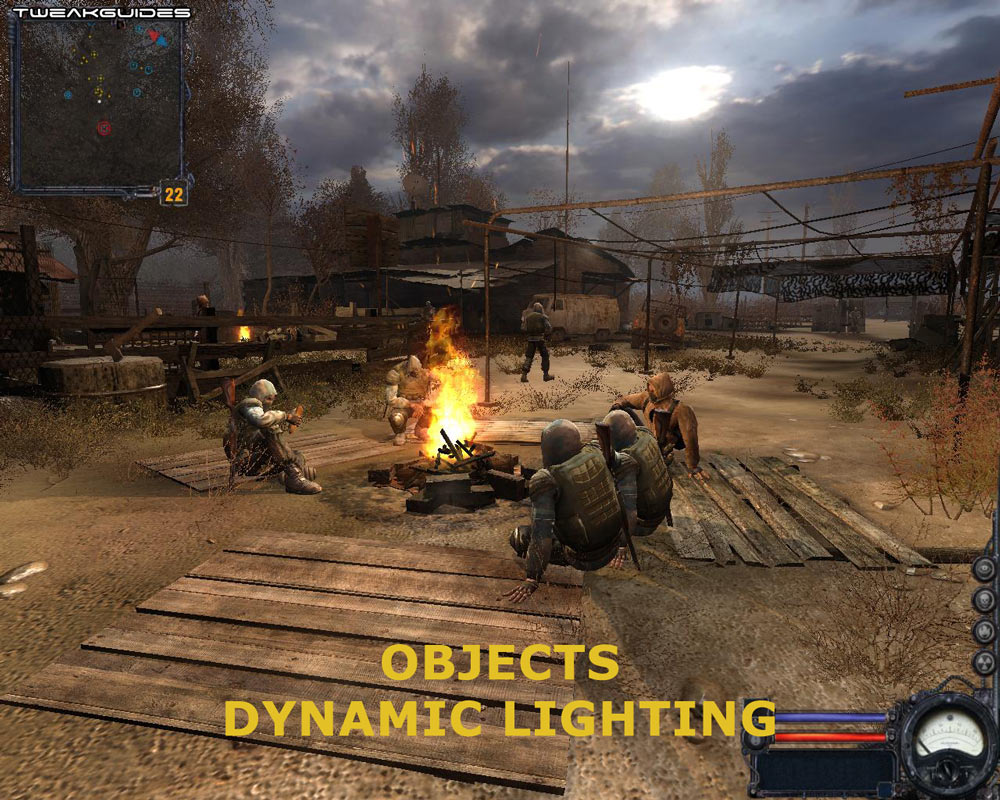
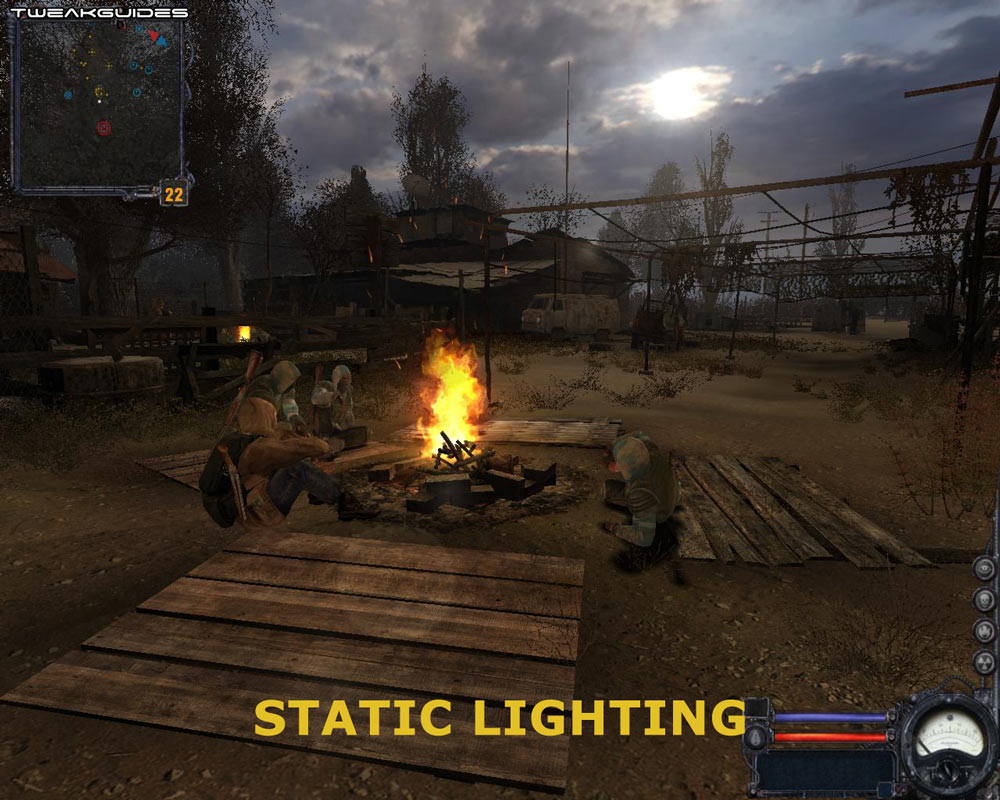
Render: This setting determines the renderer used for generating the game's graphics, and hence has a major impact on the overall visual quality and performance in the game. The options include (from lowest to highest): Static Lighting, Objects Dynamic Lighting, Full Dynamic Lighting, Enhanced Full Dynamic Lighting, Enhanced Full Dynamic Lighting (DX10). Note that the first three modes were available in the original STALKER, but the two 'Enhanced Full Dynamic Lighting' modes are new to Clear Sky, and the DX10 render mode in particular is only available in Vista when using DX10 hardware. Screenshot comparisons of all five are provided above, and each is explained in detail further below:
Update: As of the 1.5.06 Patch, there is also a DirectX 10.1 option which can be enabled on graphics cards which support it when using Enhanced Full Dynamic Lighting DX10 mode. Use of the DX10.1 renderer may improve performance and image quality - see the updates below and on the next page for details.
Importantly, while these rendering modes can affect performance greatly, the impact also depends on the other relevant settings you have enabled. For example whether you've enabled or disable one or more of the Shadow-related settings, such as Sun Shadows, can have a major bearing on the performance and visual impact of any of the dynamic lighting modes. As noted above, you can also individually enable or disable particular settings in the Advanced section of the Video Options, though some settings are unavailable when using certain modes. Note: Make sure to read the Conclusion section of this guide for important information about graphics performance in Clear Sky.
Furthermore, there are a range of advanced variables which can help you to customize the appearance of lighting in the game. For example you can use the r2_gi variable to turn on a more realistic (but FPS-draining) Global Illumination lighting method; you can customize the appearance of HDR using the r2_tonemap_middlegray variable; you can change how glossy surfaces appear under lighting using the r2_gloss_factor variable; and you can add motion blurring by using the r2_mblur command along with the -mblur switch. Some of these settings will not function properly under the new Enhanced modes in Clear Sky, while there are also additional settings to tweak the appearance of the new features of the enhanced mode, such as using the r2_dof_ and r3_dynamic_wet_surfaces_-based settings to adjust Depth of Field and Wet Surfaces effects respectively to better suit your tastes. See the Advanced Tweaking section for more details of all these.
Quality Settings: You can choose from one of four predefined quality settings here (Minimum, Low, Medium, High, Maximum), which in turn will adjust the Advanced graphics settings (covered further below) accordingly. I do not recommend using a preset as you will get much better results customizing the advanced settings individually to suit your own preferences. See the Advanced settings further below for details.
Resolution: This setting allows you to choose the resolution for the game, as shown in pixel width by pixel height. The options shown are restricted to those supported by your particular combination of monitor and graphics card. The higher the resolution chosen, the more detailed the image but the lower the performance of the game. For more details and tips on resolution see this page of my Gamer's Graphics & Display Settings Guide.
Gamma, Contrast, Brightness: These sliders control the overall brightness and definition of the image on screen. They have no impact on performance so set to suit your taste.
Full Screen: If enabled (lit), runs the game in full screen mode which is recommended for maximum stability. If unticked, the game will run in a window which may improve performance if a low resolution is also chosen. Again, windowed mode is generally not recommended as it can cause problems with Windows resource management. Note that if you want the window to be centered in Windowed mode, you can use the -center_screen switch - see the Advanced Tweaking section for details.
[Advanced]
The following settings are available when you click the Advanced button at the bottom of the screen. It is strongly recommended that you adjust them individually rather than using the 'Quality Settings' preset above.
Note: Depending on the Render mode you have enabled, certain Advanced settings will not be available to be changed (see above). So if a setting appears unable to be changed, it is because you are not using a high enough render mode.


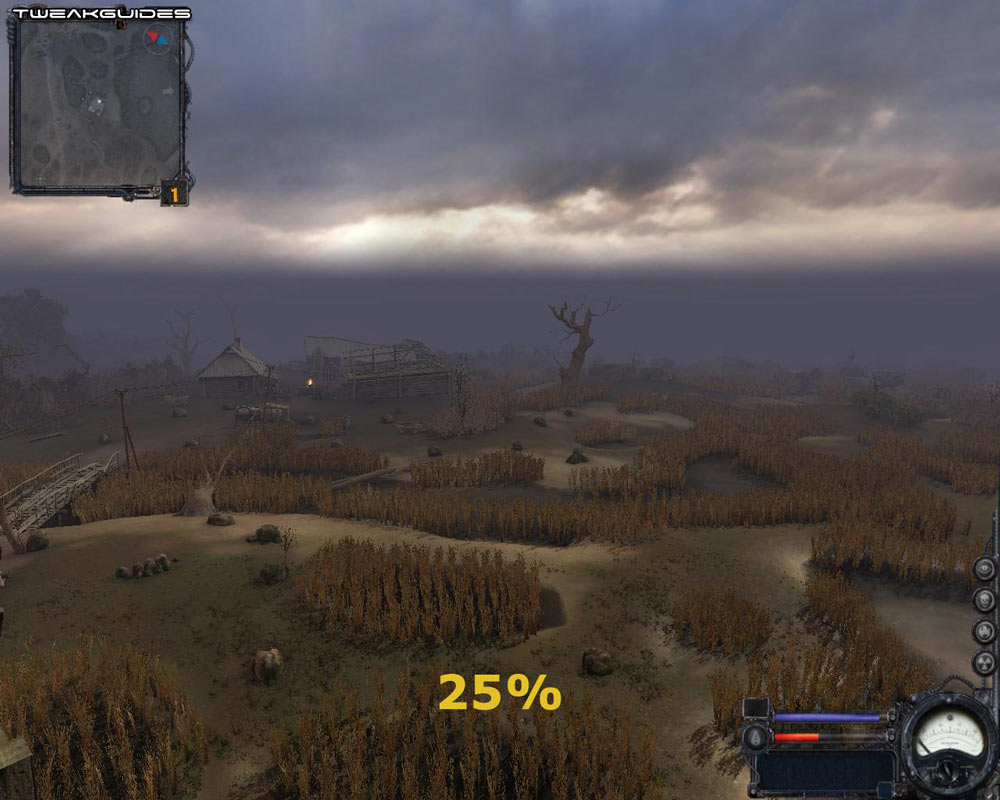
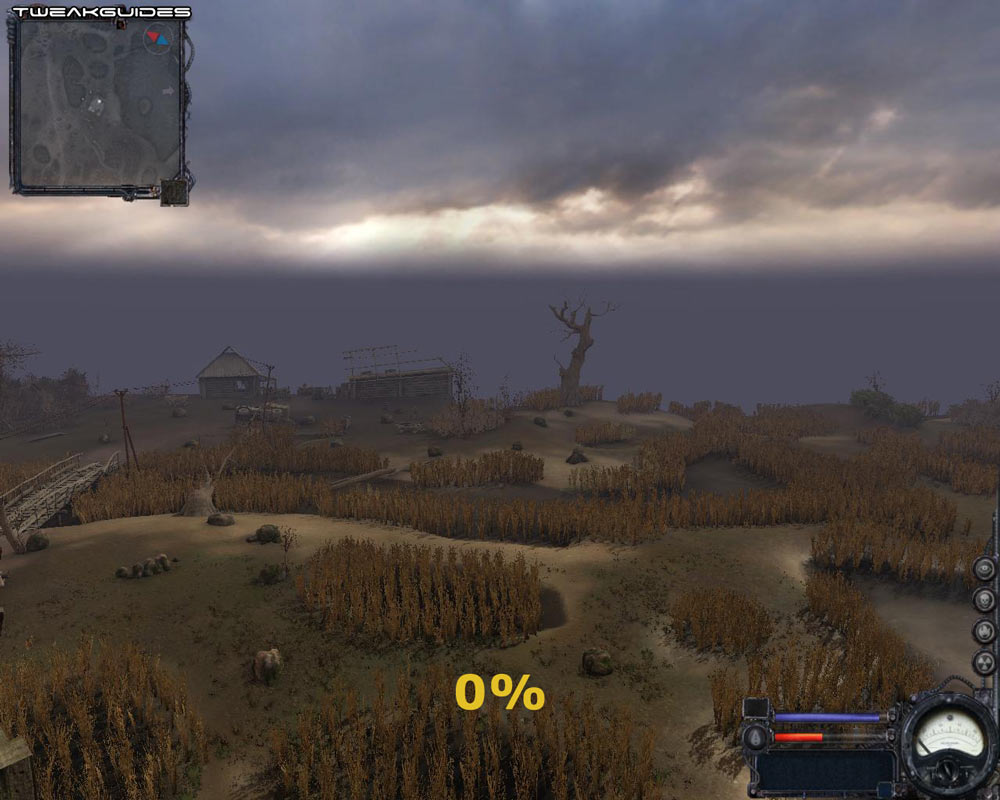
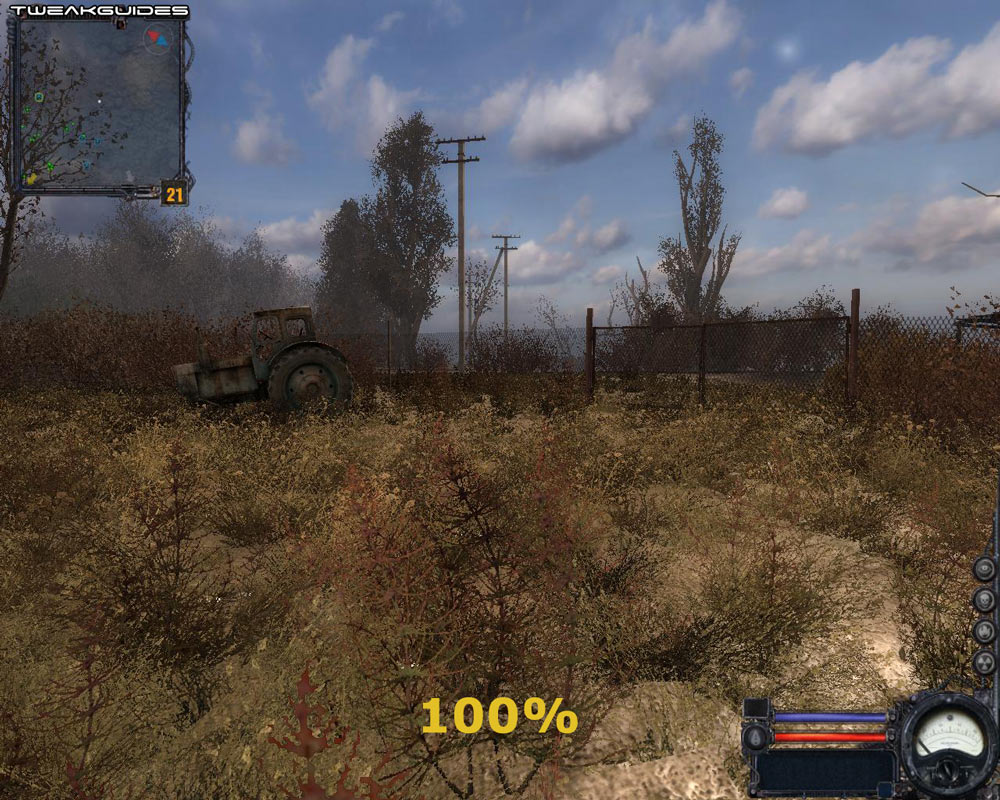
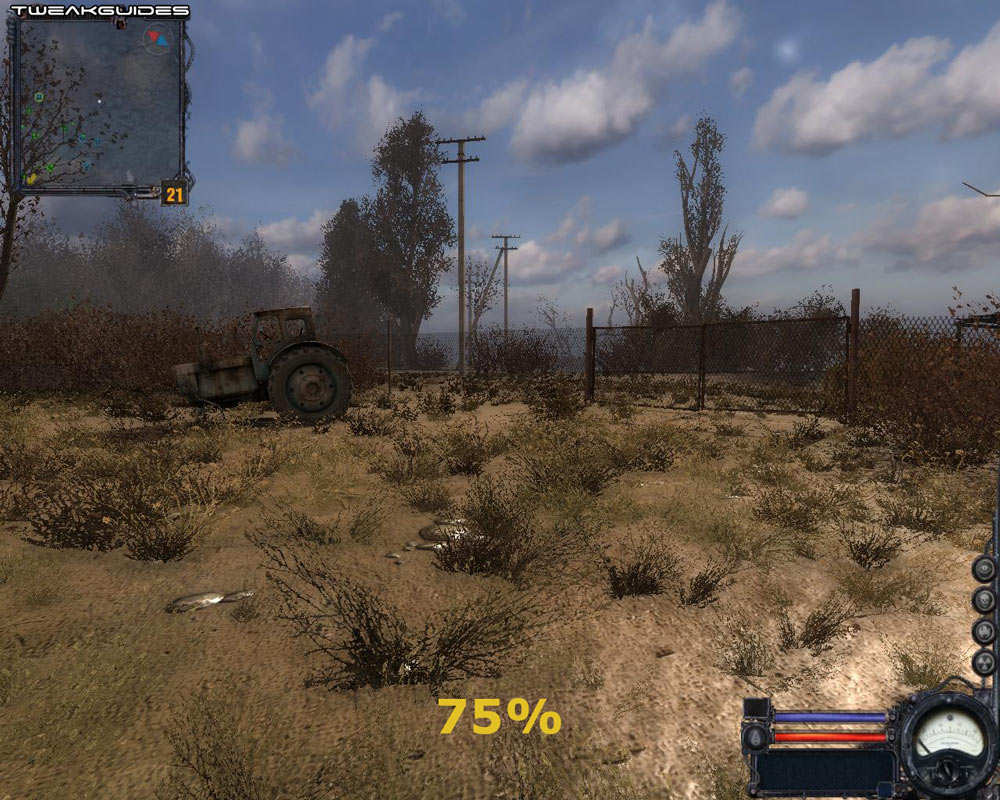
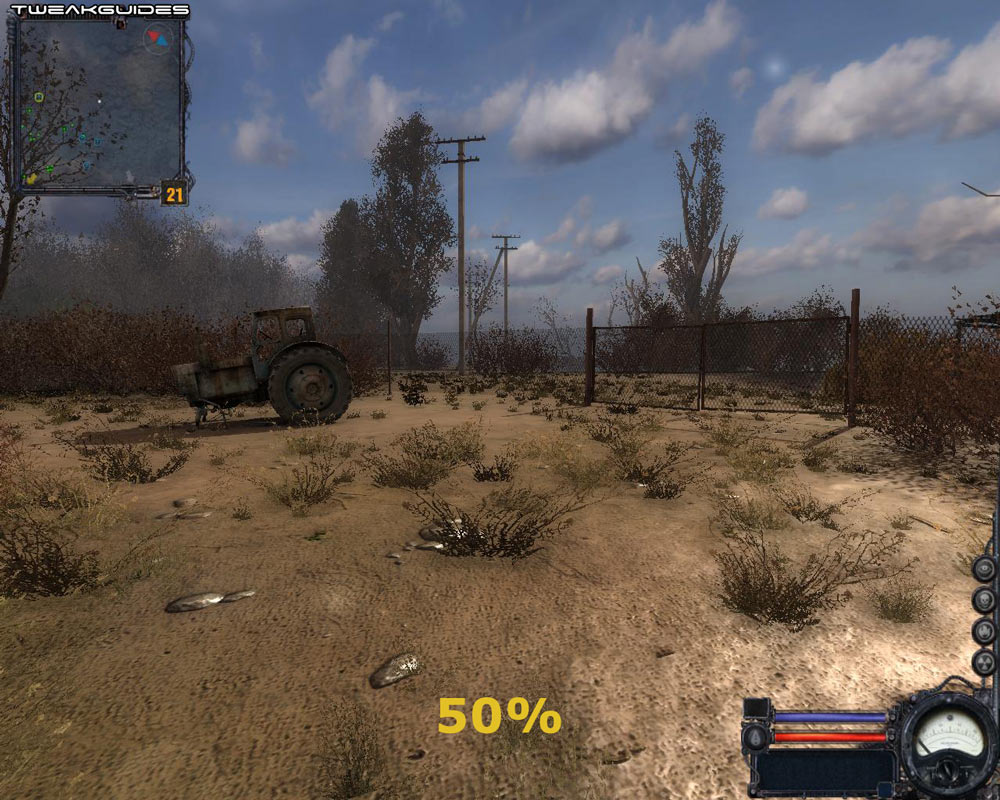
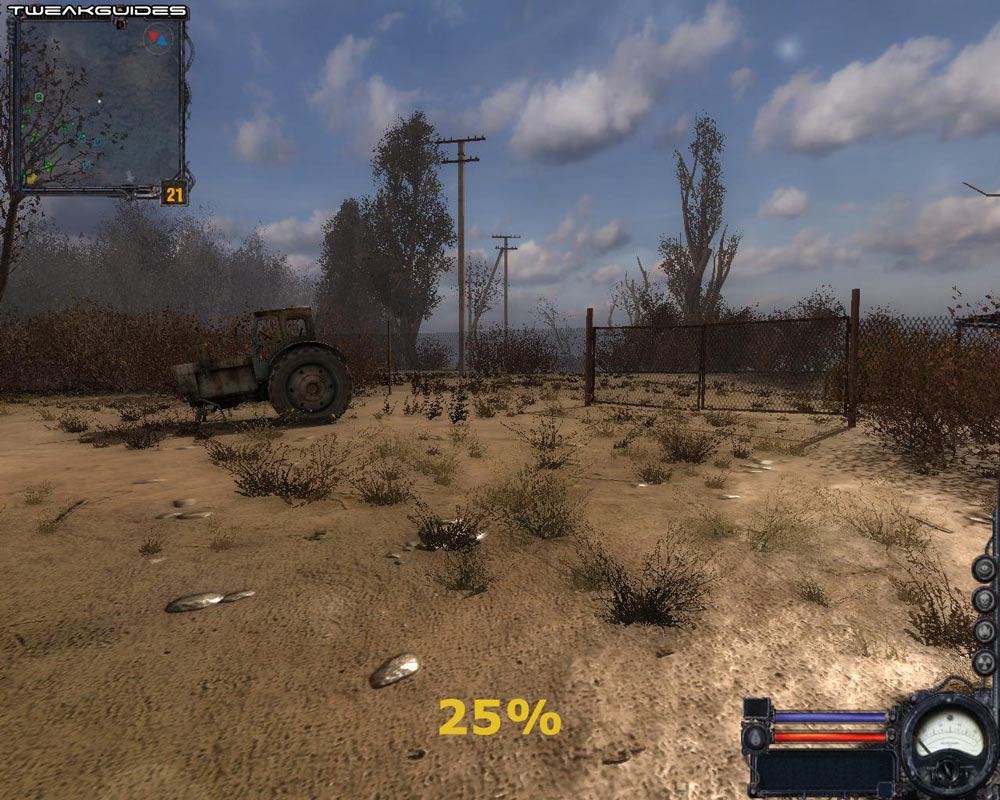
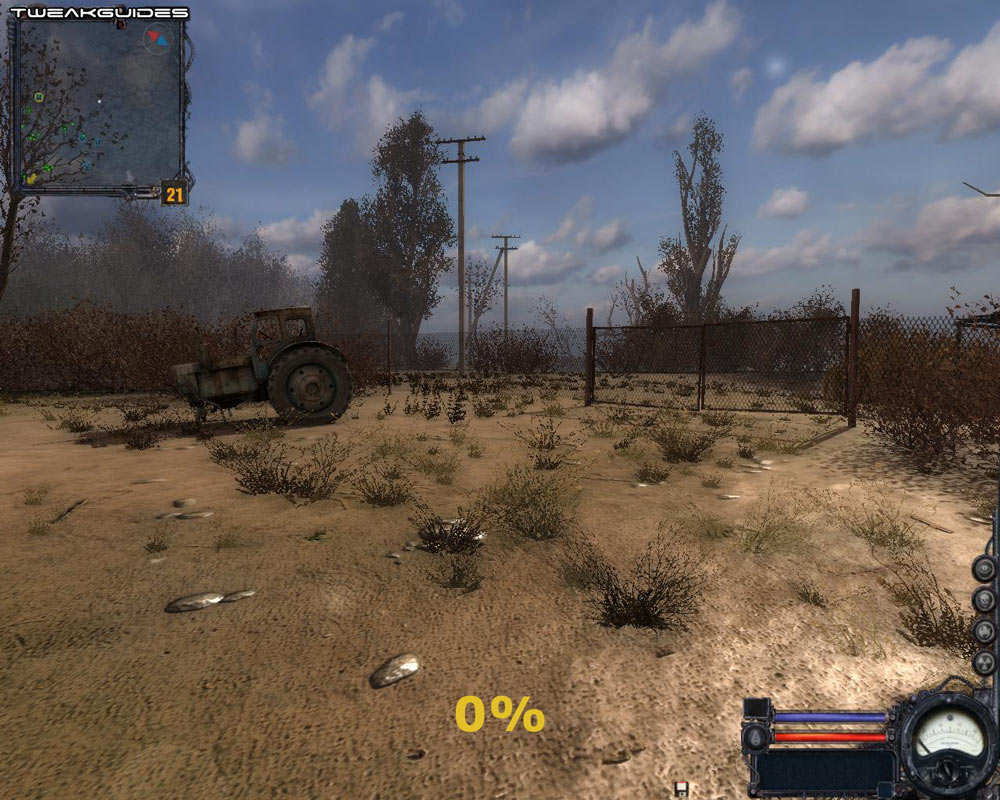
Vision Distance: This slider determines the maximum viewable distance in the game world. As viewing distance is lowered, FPS rises because less of the game world has to be rendered. As the screenshot comparisons above show, the practical difference between the 100% and 50% points along the slider is insignificant. In fact even at 25% only a barely noticeable reduction in the far distance is discernable. The main visual impact is between the 25% and 0% point on the slider - at 0% there is a clear drop in visibility, although even then it's not major. If you're after a few extra FPS with no noticeable drop in image quality, set this slider around the 50% or even 25% mark. Any lower may place you at a slight playing disadvantage since even the use of binoculars won't extend your viewable distance, and hence you may miss seeing some distant enemy or distant buildings/objects.
Object Detail: This slider changes the Level of Detail (LOD) on objects in the game world. As the slider is moved to the left, fewer polygons are used to construct these objects, which can improve performance. However in practice the only noticeable difference is when the slider is actually reduced at or close to 0% - trees further away will become generic-looking blobs and lose their detailed branches. While changing this setting can help improve FPS particularly in large outdoor areas, it is not a major factor in affecting performance. You can further change the LOD level by using the r2_ssa_lod_a and r2_ssa_lod_b commands - see the Advanced Tweaking section.
Texture Detail: This slider controls the quality of the textures used in the game. Textures are the images which cover the surface of every object in the game world. The further to the right this slider, the more detailed those textures will be. An animated screenshot comparison of the various positions on the slider can be seen by clicking this link: ClearSky_Textures.gif (1.8 MB). Aside from the detailing on the tree, pay attention to the detail on the ground to at the base of the tree, and the mound of rubbish on the right side. The main impact of using more detailed textures is not so much a drop in FPS, but an increase in loading times and stuttering/loading pauses during the game. This is particularly true for those with graphics cards that have lower amounts of Video RAM. Importantly, if you change this setting, to see its correct impact you need to quit and restart STALKER otherwise no visible change will occur.
Anisotropic Filtering: Anisotropic Filtering (AF) is explained in more detail on this page of my Gamer's Graphics & Display Settings Guide. Essentially it is a method of making textures sharper as they recede into the distance. This slider controls the sample rate of AF used, up to 16x AF. Most recent graphics cards can enable a reasonable level of AF, such as 2x or 4x, which provides a good level of image quality without any real drop in FPS, however the further to the right you go on the slider, the more noticeable the FPS impact becomes. You can also use the r1_tf_mipbias or r2_tf_mipbias variable (depending on which renderer you're using) to increase texture clarity - see the Advanced Tweaking section.
Antialiasing: Antialiasing (AA) is a method of reducing the jaggedness of lines in 3D graphics. It is explained in more detail on this page of my Gamer's Graphics & Display Settings Guide. However Clear Sky's game engine uses a form of rendering called Deferred Shading which effectively means that in the DX8 and DX9 modes it can't support proper Multisampling Antialiasing which would remove all the jagged outlines in the game world, regardless of which type of graphics card you have. Thus the Antialiasing option has no real impact on performance or image quality - unless you use it under DirectX 10 mode, at which point it does reduce jaggedness, but only on world geometry such as buildings, boxes, objects, NPCs; unfortunately it does not reduce jaggedness on foliage such as bushes and trees - you need to enable the 'Antialias A-tested objects' option for that to occur. It also comes at a very steep performance cost. For DX9 mode you can instead use the r2_aa command to enable and customize a fake form of blurred AA - see the Advanced Tweaking section for details.
Update: As of the 1.5.06 patch, if Antialiasing is enabled, you can also access the new 'Antialias A-tested objects' option to also apply MSAA to transparent objects like foliage. See this option on the next page for more details.
Grass Detail Density: This slider controls how thick the presence of grass is in outdoor areas. Grass can cause a noticeable drop in FPS while wandering around outdoors, since it is present in many areas. As seen in the screenshot comparison above, lowering the slider from the far right (100%) to around the 75% mark thins out the grass dramatically, though it still leaves some grass coverage for a noticeable boost in FPS. By around 50% most grass is gone, and by 25% or less a few small patches are left. Note that this setting affects grass and small bushes, not all foliage (e.g. the tall reeds in the swamp are unaffected by this setting). Note further that you may need to quit and restart Clear Sky to see the impact of changing this setting.
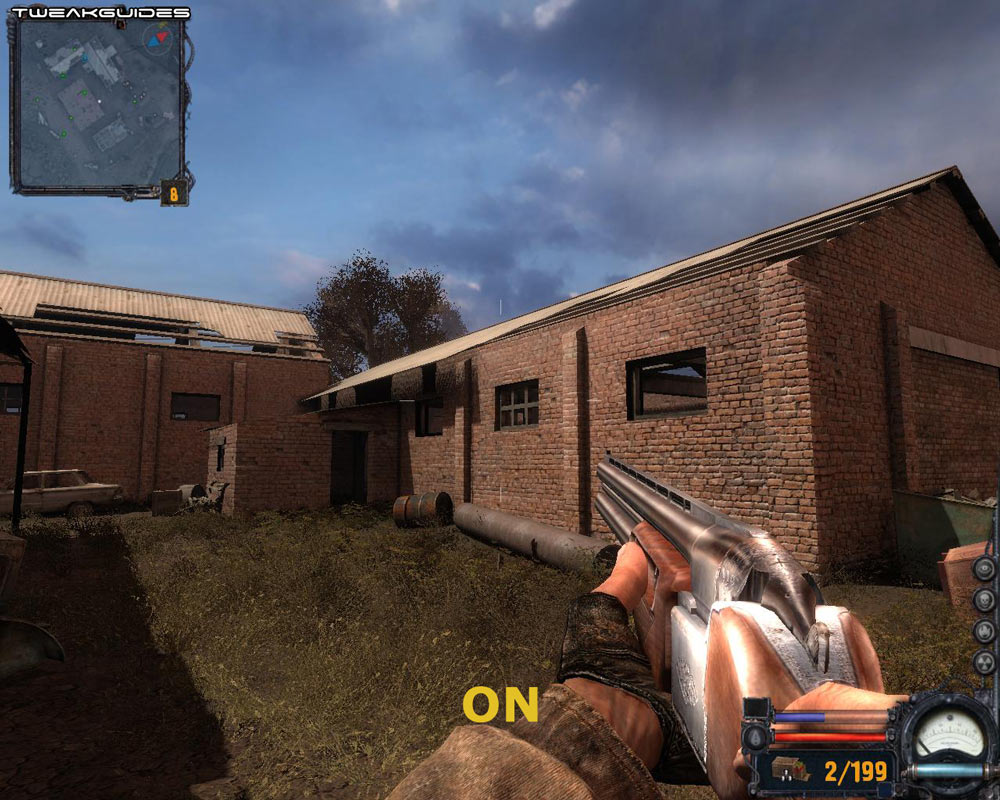
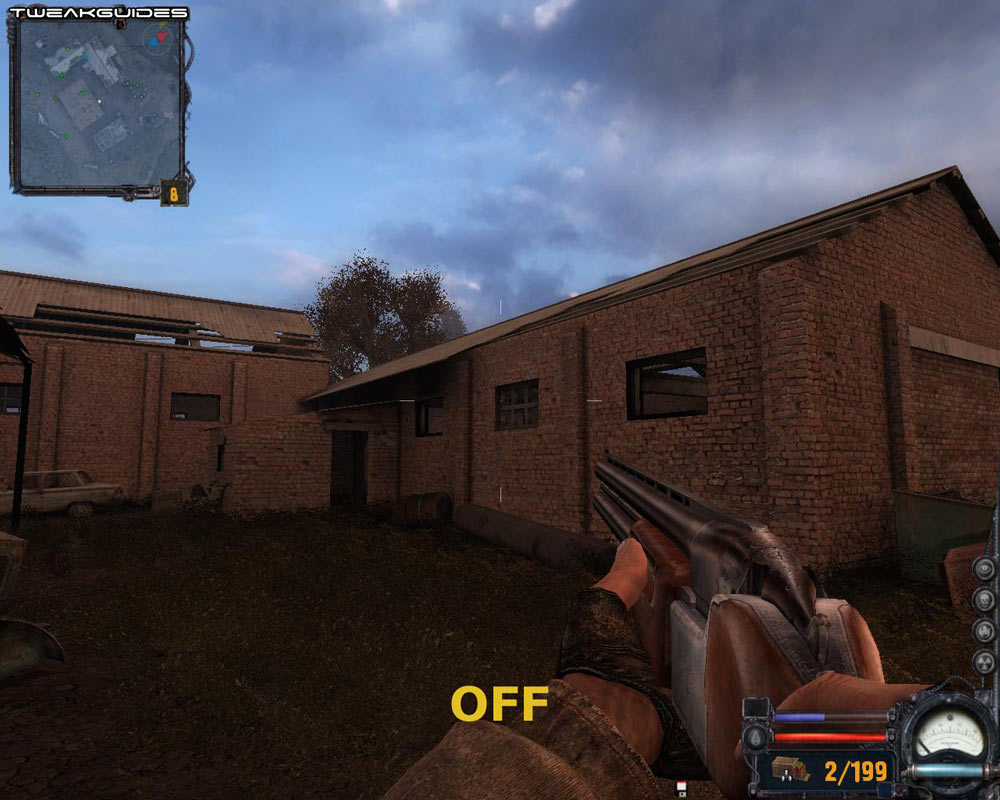
Sun Shadow: When enabled, the Sun is a dynamic light source (depending on your Renderer chosen - it has no impact in Static Lighting mode), and as such all objects can cast shadows from their exposure to the sun. While this greatly enhances the realism and atmosphere of the game, it can also greatly reduce performance. See the screenshot comparison above for the visual impact of changing this setting.
Lighting Distance: This slider controls the visibility distance of lighting sources in the game. Experimenting with this setting I found no real visual impact as the slider position was changed. However my FPS did improve slightly from lowering this slider, so it can be a useful little performance boost with no noticeable drop in image quality.
The next page continues the descriptions of Clear Sky's In-Game Settings.
|
|