
Call of Juarez Tweak Guide
[Page 8] Advanced Tweaking
Aside from the in-game settings, Call of Juarez has several files spread throughout the directories the game installs that can be manually edited to further customize the game. These files come with the file extension .scr which is usually reserved for Windows screensaver files. However these particular files can be edited using a text editor like Windows Notepad or Wordpad. You just need to open up the text editor first and then manually navigate to and open the relevant file through the text editor. Alternatively you can rename each .scr file to .txt, open it, edit it as required and the save it and rename it back to a .scr extension. Remember however that before editing any of these files, first make sure you make a backup copy of them.
The main batch of .scr configuration files we can usefully edit can be found under your \Documents and Settings\[Username]\My Documents\call of juarez\Out\Settings\ directory in XP, or \Users\[Username]\Documents\call of juarez\out\Settings in Vista. These hold your in-game settings, as well as a range of other parameters which can't be accessed from within the game. Below we discuss how to change these in each file, but options which can be fully changed using the in-game settings will not be covered below - the appropriate thing to do is to use the in-game settings to alter them.
Usage
Each .scr file has a range of settings listed at the top with a ! in front of them. These are not the settings you should alter - they are inserted by the developers to define how each command works, and what parameters it accepts. For example, the !Resolution(i,i) definition at the top of the Video.scr file tells the game engine that the Resolution variable listed further below will accept two Integers (whole numbers) to set the resolution width and height. The !Shadows(s) definition indicates that the Shadows setting at the bottom of the file accepts Strings, and the strings it can accept are listed: "None", "Low", "Normal", "High", and "VeryHigh".
So when editing .scr files, do not alter any settings with ! in front of them. Only edit the values in the lower part of the file. Note that the values show in brackets below are just indicative, not recommended values. Note that the standard .scr files are for DX9 mode, and the ones ending in _DX10 only apply in DX10 mode as you'd expect.
Video.scr
Resolution(1280,1024)
This option controls the game's Resolution, just like the in-game setting of the same name. However if you want to try setting a custom resolution, you can set it manually here by replacing the existing resolution values with a pixel width and pixel height you prefer. Make sure that the new resolution is supported by your monitor, and note that at certain resolutions you may get graphical glitches or even an entire portion of the screen being blank.
BPP(32)
This setting controls the Bits Per Pixel used, or the color depth of the image. 32 bit is the default and optimal value, but you can lower this to 24 or 16 (or even 8) bit, reducing the number of colors available to be shown, and thus images will show more visible color gradations. In return you may see a performance boost at the cost of image quality. Note, reducing BPP will only work if you set the Postprocess variable (see further below) to Simple or None, otherwise the results will be a blurry, grainy screen image.
TexBPP(32)
Similar to the BPP variable above, this option controls the Bits Per Pixel of Textures. You can lower this in isolation or in conjunction with the BPP setting, the results being that textures will show more color gradation and a purplish tinge in return for possibly improved FPS. Unlike BPP, you don't need to alter the Postprocess setting for a change in TexBPP to work. Importantly, I found that changing the BPP setting can result in problems with the Windows Desktop such as desktop icons all reverting to the default Windows .exe icon. To fix this, use the Repair>Rebuild Icons option in TweakUI. Furthermore, it seems lowering the BPP or TexBPP can result in your shaders being stuck at these levels, even if you raise these settings again. To fix this, delete your shader cache - see the Troubleshooting Tips section.
TextureQuality("Normal")
This is the same as the Texture Quality slider in the in-game settings. The only reason I raise this here is to note firstly that the in-game settings are actually incorrectly labelled. That is, although you have the option of Low, Normal or High in the in-game settings, they actually correspond to Very Low, Low and Normal here respectively. This can be verified by the fact that when you select High in the game for example, it appears as "Normal" in this variable. There doesn't appear to be a true High setting available in the final version of the game.
Filtering("Anisotropic")
This variable is the same as the Texture Filtering option in the in-game settings. It should be adjusted there, but note that there is an additional option here called "AnisotropicTrilinear". I've tried using this value and while it appears to be no different to the Anisotropic setting, you can try for yourself to see if this improves image quality for you.
Shadows("Normal")
This variable is once again the same as the in-game setting of the same name. Note that a value of "Normal" equates to Medium in the in-game settings. Further note that there is a "VeryHigh" value which cannot be used in the game. Trying to set VeryHigh here simply resets Shadows to Off when the game next starts.
FXQuality(4)
After doing careful comparisons across a range of different levels of this setting, I can see absolutely no image quality or FPS difference when this setting is changed. In theory a value of 4 provides the best quality and a value of 0 provides the worst, but this variable - as interesting as it may appear - seems to have no impact.
WaterQuality(0)
This setting allows you to independently control the quality of water in the game. Lowering the quality of water can improve FPS in such areas. The possible values for this variable range from 4 to 0, with the lower the value the better the quality. At 4, no water is visible. At values of 3 through to 0, the water quality remains almost identical for all intents and purposes.
GrassQuality(0)
This option is the same as the Foliage Quality in-game setting. The lower the value, the greater the quantity of grass shown. A value of 0 is equivalent to High Foliage Quality, 1 is Medium and 2 is Low. Values of 3 and 4 simply seem to result in High quality grass regardless.
EnvQuality("FullDynamic")
This option can be set to FullDynamic (the default), RareDynamic and Static, however I have not been able to tell what impact this has on the game. It doesn't appear to affect things like tree or grass movements, it doesn't affect the shader quality nor does it have any discernable impact on FPS. If anyone knows what this actually does, please Let Me Know.
ShaderPath(3)
This option is the same as the Shader Model in-game setting. When set to 3, it uses Shader Model 3.0 (if supported by your graphics card), and a value of 2 is Shader Model 2.0. You can attempting to use a value of 1 (Shader Model 1.4) or 0 (Shader Model 1.1), but depending on your graphics card this may cause the game to either have missing textures/objects, or simply crash the game.
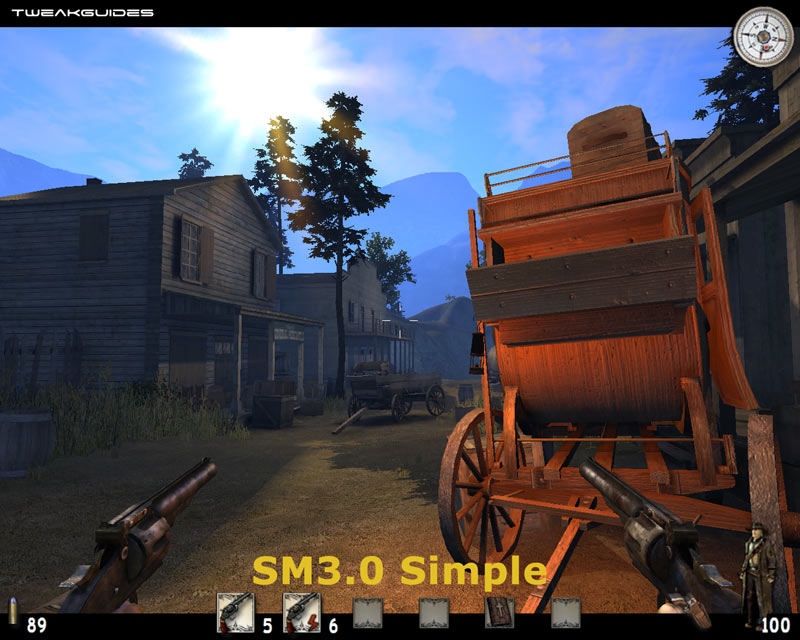
PostProcess("Normal")
This important option controls the general shader effects used in the game. This includes things like the lighting, as well as surface, fire and glass effects. You can already alter certain surface shader effects using the Material Quality in-game setting. And you can disable HDR lighting by using Shader Model 2.0 in-game setting. However by using this command, you can do things like turn off HDR while still using Shader Model 3.0 for example, which results in improved FPS, so it is handy to have. The available options are None, Simple and Normal.
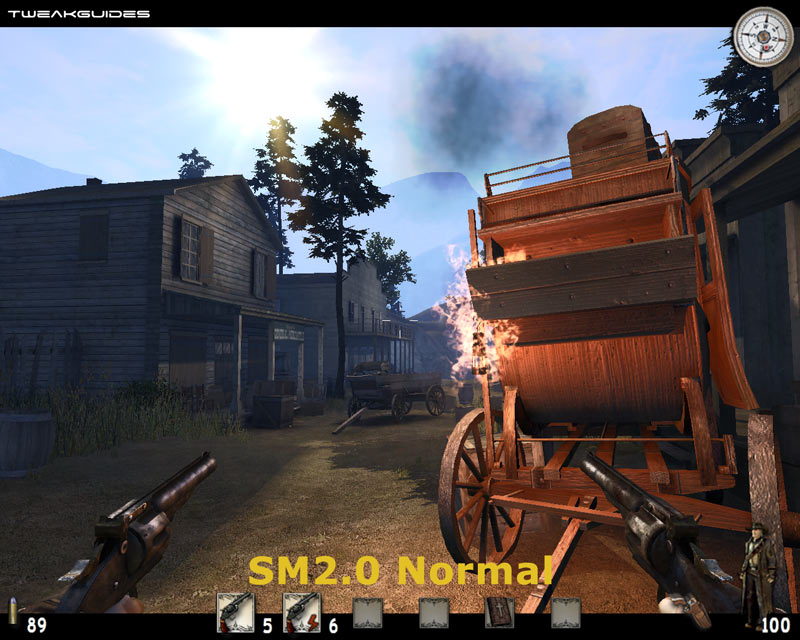
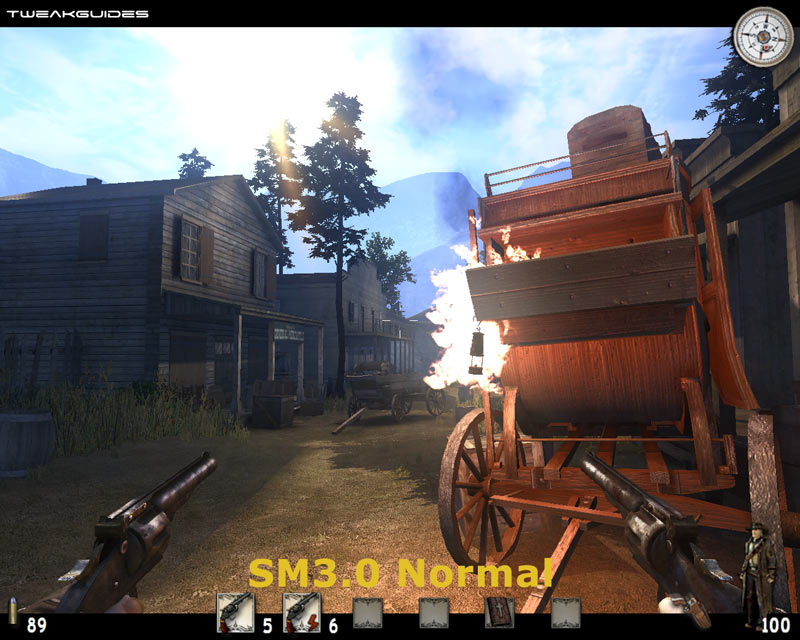
Normal provides all available shader effects, but also has the greatest performance hit. See above for a screenshot comparisons of SM3.0 and SM2.0 at Normal, and also see the Shader Model setting in the In-Game Settings section of the guide for further comparisons.
Simple mode has the following major effects under SM3.0 and SM2.0:

SM2.0 Simple
SM3.0 Simple
Under both SM2.0 and SM3.0 in Simple mode the distorted window glass are gone - this means that all glass will become black. The only way to resolve this under Simple mode is to set Material Quality to Very Low, which makes all glass completely transparent, but unfortunately also makes all surfaces appear very flat, as the bump and displacement mapping effects are removed.

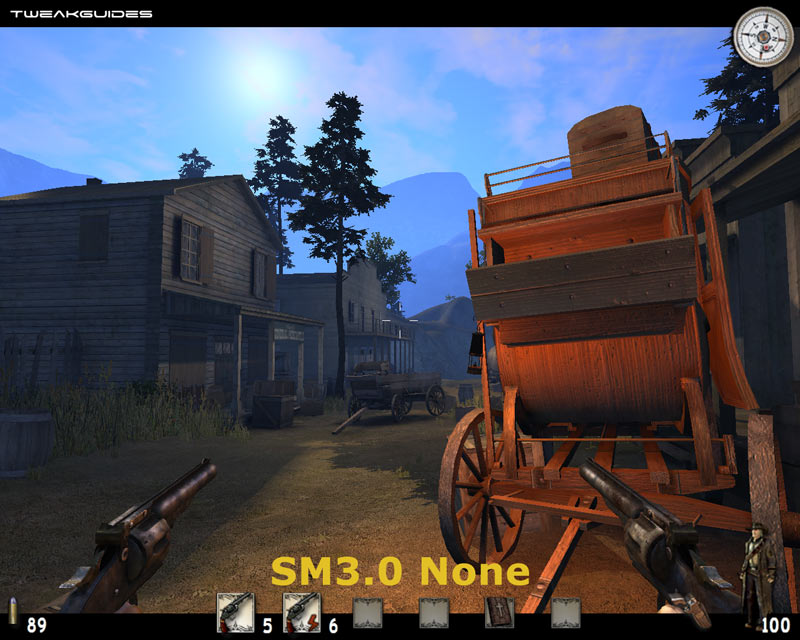
At None, all shader effects are removed for both SM2.0 and SM3.0 as shown in the screenshots above. Your gun's muzzle flash and bullets will completely disappear for example, as will any sign of bullet impacts (decals). There will be no smoke or dust effects. Fire will become invisible. The lighting will become simplified, and you can tell this by looking at the sun which is now just a small blurred disc. This mode is only for those who are really struggling for performance, however the option exists if you need to take it.
In general, SM2.0 with Simple mode is the least buggy and most acceptable compromise for those wanting to improve performance and still maintain sufficient effects to keep the game playable. Even on SM3.0 graphics cards, the possible reduction in performance from using SM2.0 will be offset by the increase in performance from losing HDR lighting and some of the more complex shader effects, so give it a try.
Important: When changing Post Processing options and/or Shader Model versions, you should make sure you clear your shader cache (See Troubleshooting Tips and Shader Model under the In-Game Settings section). I've found that often the changes in Post Processing mode are not applied correctly if the game is only modifying existing shader files in the cache - you will get better performance and less chance of glitches if you delete the shader cache directories completely and let them be recreated each time. It will take longer to load the next time, but it is necessary for correct application of PostProcess changes.
The next page continues the Advanced Tweaking.
|
|