
Battlefield 2142 Tweak Guide
[Page 6] In-Game Settings (Pt.2)
Video
Battlefield 2142's performance relies greatly on your video settings so pay particular attention to the descriptions below if you want a good balance of performance and image quality, and of course if you run a graphics card which is old, slow or unsupported, keep this in mind if your performance is still poor at any setting. For specific performance comparisons using various graphics cards, read this article, for comparisons using various CPUs read this article - note that they refer to the Beta version of the game and not the final version, though of course performance should be similar.
Display Mode: This setting controls the display resolution of Battlefield 2142. It shows the number of horizontal pixels by vertical pixels and the particular Refresh Rate (shown after the @ sign) the screen will run at. See the Resolution and Refresh Rate sections of my Gamer's Graphics & Display Settings Guide for more details in plain english. Unfortunately the game doesn't appear to support 1280x1024 or above or a range of widescreen resolutions by default, so if you can't find the resolution you want here, first choose the one closest to it (at the highest refresh rate), then see the Advanced Tweaking section for details on how to set a custom resolution for BF2142. Note further that if you can't launch into BF2142 after changing this setting, make sure to disable any refresh rate forcers - see the Troubleshooting Tips section.
Note: While you can set any custom resolution for BF2142 using the method detailed later in this guide, you cannot force 'true' widescreen support (i.e. with the correct aspect ratio, filling the entire screen properly). This is because true widescreen resolutions will increase your Field of View (FOV), which increases peripheral vision and is considered an unfair advantage by PunkBuster anti-cheat software. This is covered further at Widescreengamingforum.com and there is no 'fix' for this.
Update: Widescreen users can now try Widescreenfixer to force proper widescreen support in BF2142.
Update 2: As of the 1.50 Patch, BF2142 has proper support for widescreen resolutions without requiring an external fix. To access a widescreen resolution add +widescreen 1 to your launch icon - see the Advanced Tweaking section for details.
Presets: These are preset video configurations included in BF2142. If you don't want to individually adjust all the settings below, you can select a preset which you believe corresponds to your system's capabilities. However note that obviously preset values are not going to be optimal, and that's exactly why there are a range of video options available. I strongly suggest adjusting the options below rather than relying on a preset if you want the best performance/image quality compromise.
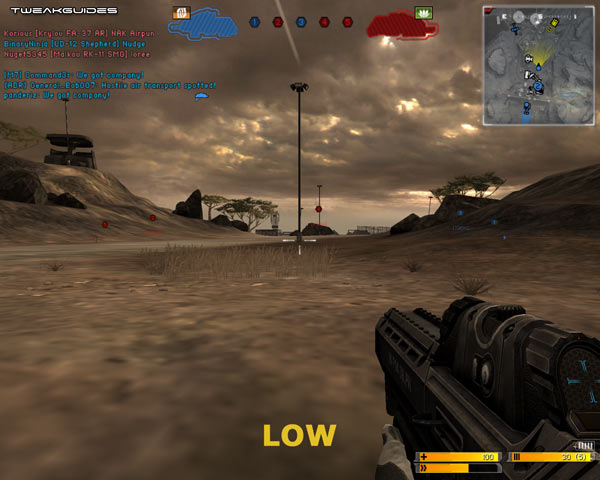
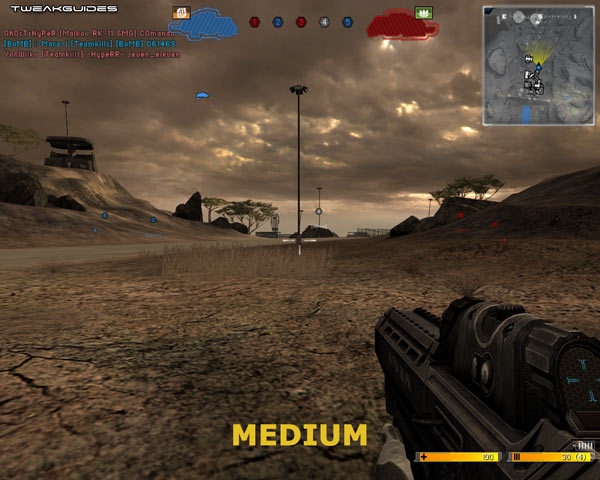
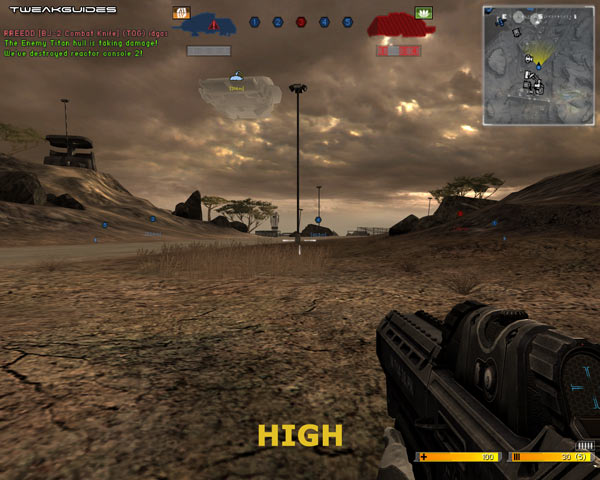
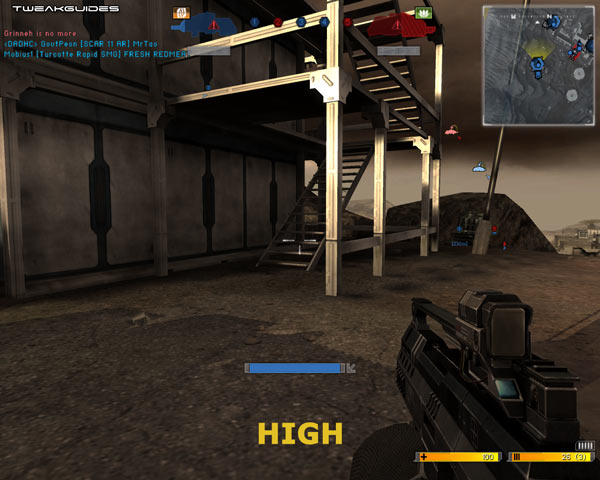
Terrain: This setting controls how rich the details on the terrain are. The available options here are Low, Medium and High - see the screenshot comparison above for differences. In general the Terrain setting controls the details on the ground, rocks and foliage around the map. The most obvious difference in the screenshot comparison is the quality of the soil, which is much richer and detailed at the High level, slightly less so at Medium, and dramatically lower quality at Low. Note also the detailing in the hills to the left as this setting is lowered. However raising the Terrain level can decrease performance, especially at the High level. The image quality difference between Low and Medium is pronounced, while that of Medium to High is not so noticeable - therefore Medium is recommended for most people.
Effects: This setting controls various special effects in the game. The lower this setting, the less rich and detailed special effects are. The difference between Medium and High is not noticeable, but when set to Low the most significant impact is that decals such as bullet holes will no longer appear on walls and objects, and explosions and energy effects have much less size and volume/glow. However even at Low the explosions, smoke and puffs of dust from bullet impacts will still appear. The Effects setting has it's most significant impact on performance during heavy combat scenes when lots of effects and explosions are visible, or when using energy weapons for example, so if you are slowing down significantly in these situations reduce this setting to to improve FPS and responsiveness. Note that you cannot disable certain effects like that of EMP hits or the blurry camera effects - these are a part of the gameplay regardless of your settings, and to disable them (even if possible) would be considered a cheat.
Geometry: The Geometry setting controls the Level of Detail (LOD) setting for various objects and landscape in the game. The options are Low, Medium and High and for most intents and purposes there is virtually no difference between the three levels. At higher levels certain objects will appear more detailed, such as slightly rounder boulders and more curved landscape (i.e. more polygons visible). More importantly, at the higher levels vehicles will come into view sooner when far away, as more of their details are shown earlier. Obviously performance is better at the lowest level, but the extent of it depends on your system. For the reason that it may help you detect vehicles sooner, you may want to set this to Medium or High.
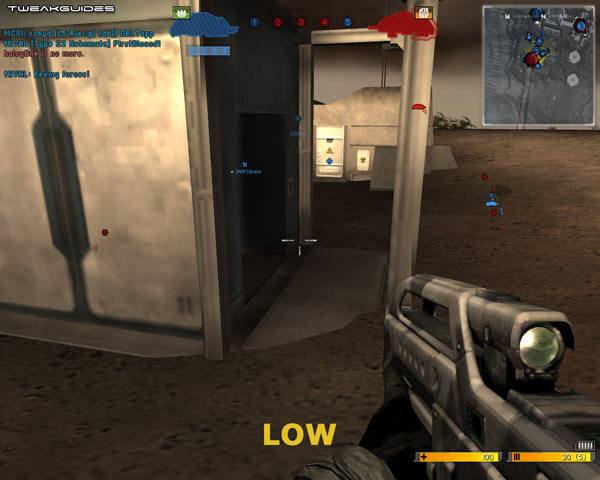
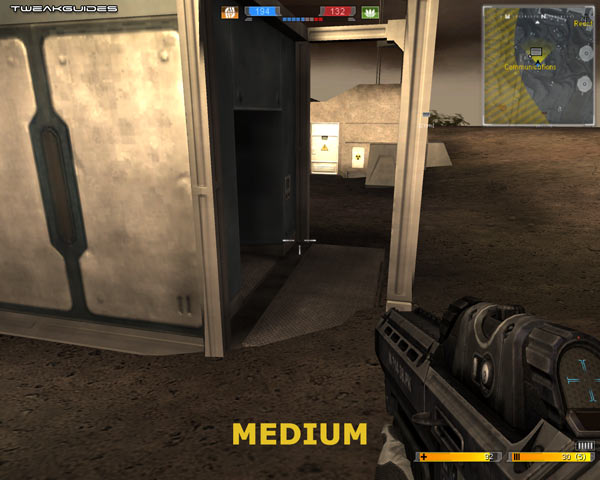
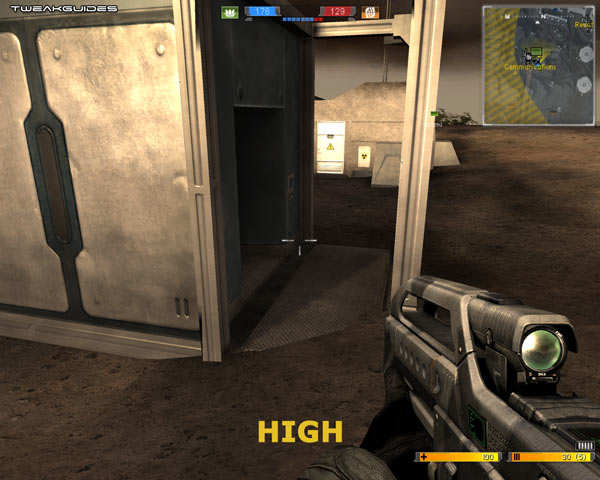
Texture: Textures are shown on the surfaces of every 3D object in the game. The higher this setting, the better these surfaces appear, with more detail and realism. However at higher settings more Video RAM is required to hold all of them for rapid access by the game. Thus on systems with only 128MB of Video RAM and/or slow hard drives I recommend using Medium or even Low to ensure smoother gameplay. The High setting will improve image quality slightly over the Medium setting, but will contribute greatly to frequent loading pauses and generally reduce performance in the game. The image quality difference is shown in the screenshot comparison above. As the setting is lowered you can notice the progressive blockiness and loss of detail in the shiny wall on the left, and also the loss of detail in the metal floor on the right. The ground also becomes much chunkier and more blurry from High to Medium to Low. Set this option to the level at which you experience minimal stuttering in-game.
Lighting: This setting controls the lightmaps used for static objects in the game, such as buildings. The screenshot comparison above shows the difference - pay particular attention to the shadow of the building. The difference between High and Medium is negligible, while Medium to Low results in the complete removal of the fixed shadows for the building. This is far less realistic, but can also give a significant gameplay advantage in spotting enemies trying to hide near buildings. I recommend Medium Lighting as a balance of realism and performance, but you may prefer Low for the gameplay advantage, though I believe this is bordering on being a (legal) exploit of sorts.
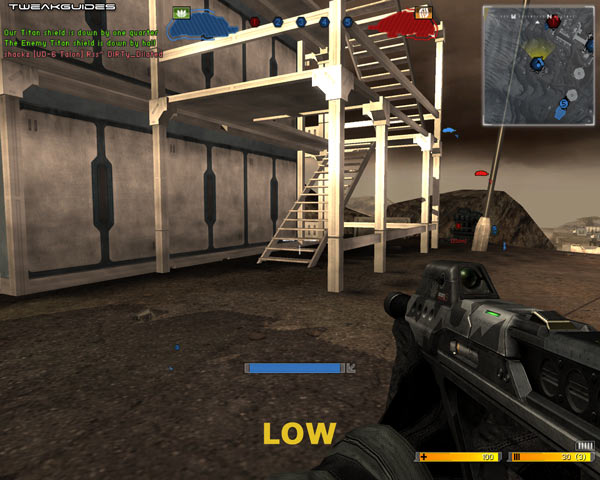
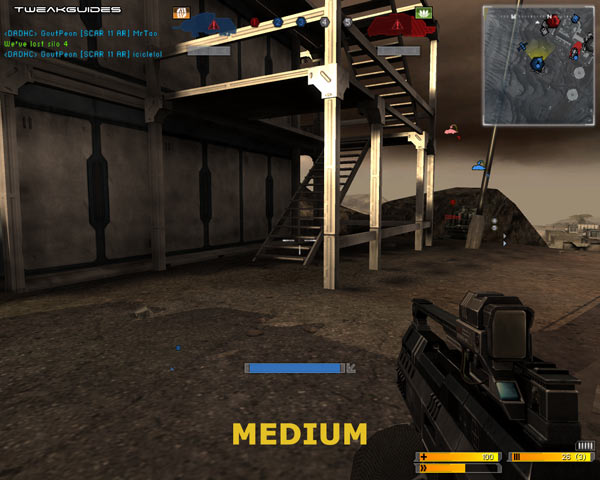
Dynamic Shadows: This setting controls the shadows cast by moving objects. These 'dynamic' shadows can be switched Off, or set to Low, Medium or High. Each higher level of dynamic shadows means slightly more detailed shadows are cast, particularly for the shadows cast by players and vehicles. However this setting can have a noticeable impact on performance, particularly when there are multiple sources of light. Setting this to High or even Medium can result in increased lag/jerkiness during gameplay, and in particular during heavy combat scenes. I strongly recommend Medium or Low for most people, although setting this to Off removes all shadows and thus noticeably reduces realism in return for maximum performance.
Dynamic Light: This setting relates to lighting from muzzle flashes, fire, explosions, missiles etc. The available options are Off, Low, Medium and High. Quite obviously turning these lights Off reduces realism significantly, but improves performance noticeably. Dynamic lights interact with objects to cast shadows (See Dynamic Shadows setting above), and as such the impact of this setting also depends on your settings for Dynamic Shadows. I recommend Medium or lower for this setting, as a setting of High can again contribute to pauses, lag and jerkiness in the game.
Antialiasing: The options here are Off, 2x, and 4x. When enabled, Antialiasing (AA) smooths the appearance of jagged lines. The higher the level of Antialiasing (i.e. 2x, 4x, etc.), the greater the negative performance impact in return for better image quality. For more details and examples see my Gamer's Graphics & Display Settings Guide. If you're going to enable Antialiasing for BF2142, I recommend setting Antialiasing to 'Application Preference' in your graphics card's control panel, then selecting the level of AA in the in-game settings. For most people I recommend setting this option to Off for optimal performance as it can have a major negative impact if enabled.
Texture Filtering: This setting controls how crisp and clear textures look as they fade into the distance. The available options are Low, Medium and High, and the higher the setting the less blurry distant textures such as the terrain will appear, in return for a decline in performance. The texture filtering settings at Medium and High should correspond with 2x Anisotropic Filtering (AF) and 4xAF respectively, with Low being Trilinear. For more details and a screenshot example, again refer to my Gamer's Graphics & Display Settings Guide. For most people the Medium setting should be optimal for performance purposes while still maintaining good image quality.
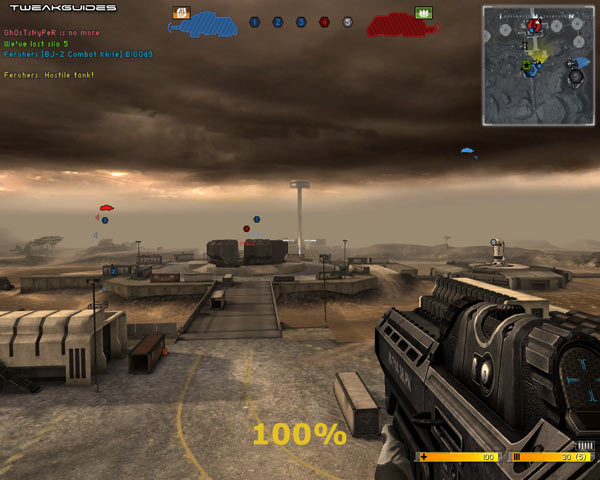
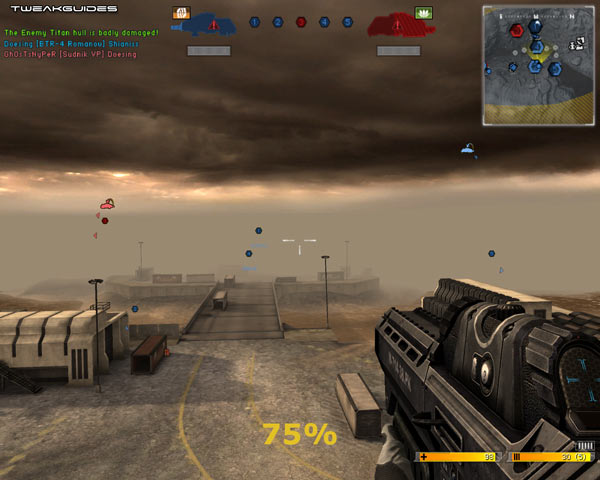
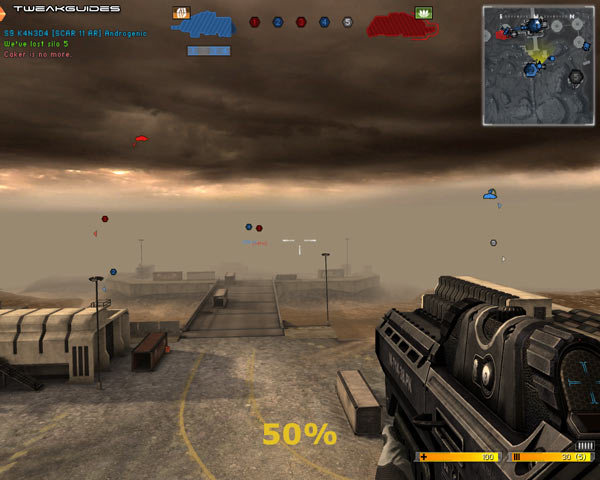
View Distance Scale: This slider determines the amount of visible detail your character can see in the distance. The screenshot comparison above shows the differences at 50% (the minimum), 75% and 100% (the maximum) View Distance settings. Note the tall tower in the distance and even some of the objects in the middle distance become invisible at 75% view distance. The difference between 75% and 50% is indistinguishable in the screenshot. While reducing the view distance improves performance due to less scenery being rendered, it is strongly recommended that you do not reduce your view distance below 100% to start with. A reduced view distance can place you at a major disadvantage in the game against other players who use 100% view distance, making it harder for you to spot distant players and vehicles. Keep this setting at its maximum and reduce other settings first to improve your performance if you can, then come back and lower this if all else fails.
Enhanced Lighting: This option can be turned on (Yes) or off (No) and is supposed to control Bloom lighting in the game. Upon testing the setting in the full version of the game, there appears to be a subtle increase in the bloom effect in the sky and on energy weapons - that is, they are slightly brighter with the option enabled. Experiment for yourself to see the difference it makes, but if you want to be sure of maximum FPS set this to off for no real image quality impact.
As soon as you change any of these graphics options, the game automatically saves your changes, and some changes will need a restart to apply. Note that as the warning dialog tells you, your shaders may need to be optimized each time you change settings - particularly when you choose settings which you haven't used in the past. See the Clearing Shader Optimizations tip under the Troubleshooting Tips section of this guide for more details of shader optimizations.
Audio
Audio Renderer: This setting determines the type of audio device which is used to playback the sounds in the game. The options are Software, Hardware and Creative X-Fi. The Software renderer is the most basic, and provides adequate, at times scratchy sound quality, but gives the best performance for most machines. The Hardware option should be chosen if you have dedicated sound card, and provides good quality audio with a slight performance drop. The Creative X-Fi setting provides the best audio quality and can and should only be used by people who own Creative X-Fi hardware. Note that the X-Fi must be set to 'Gaming Mode' if available to take advantage of this setting.
In general, I recommend Hardware audio renderer if you have any form of sound card in your system and the option is available. Note however that some sound hardware doesn't support this option in BF2142 (See the Readme.txt file in your \Program Files\Electronic Arts\Battlefield 2142\Support directory for a full list of supported audio hardware). If your card supports it I recommend enabling it - the positioning of sounds is a very important advantage in Battlefield 2142, and having Software audio with low quality sound (See Sound Quality below) will make the sounds very unrealistic, and thus make it very difficult for you to determine enemy positions correctly.
Sound Quality: The options here are Low, Medium, High and Ultra High. Note that Ultra High is only available for those using a Creative X-Fi card and the X-Fi Audio Renderer. At Low, sound quality is quite poor, sounding almost like Mono instead of Stereo. Low is not recommended for the reasons given above, and because the performance difference between Low and Medium is not significant. As such Medium is recommended for most people, though High provides the best audio quality for a slight decrease in performance. Note that some people report performance issues and crashes using the Ultra High mode on an X-Fi, so reduce this to High if you're using an X-Fi sound card for a potential fix to this problem.
Enable EAX: If the Audio Renderer is set to Hardware, and you have sound hardware which supports Creative's Environmental Audio (EAX), you can select Yes here to enhance the audio quality. Enabling EAX results in slight a reduction in performance, however the sound effects in BF2142 become much richer and more realistic, and provides much better positioning. Once again if you have hardware which supports EAX, I recommend you tick this box as it provides you with an advantage in locating enemies for a minimal performance hit.
English VO Only: If ticked, this option forces all players (enemy and friendly) to speak English and not their native language for voice overs (VO's). Selecting Yes may improve performance slightly as less sounds are loaded into memory.
Game Volume: The Effects, Music and Help Voice Over sliders in this section control the volume levels of these particular audio effects. Set to suit your taste - note that reducing the sliders to 0% does not disable any of these effects, so there is no performance improvement from doing so.
Voice Over IP: If you want to use Voice Over IP (VOIP), select Yes here. VOIP allows you to use a microphone hooked to your computer to speak directly with other Battlefield 2142 players who are on the same server and who are logged into the VOIP network. Note that enabling VOIP can introduce more lag into your game due to the additional CPU and bandwidth overhead - so set this to No if you don't use VOIP or if you have a slower machine.
You can adjust the Transmit and Receive voice volumes using the two sliders provided, and if you find that even at 100% Transmit your voice sounds weak to others, select Yes for the 'Boost Mic Gain' option and readjust the Transmit volume accordingly. The 'Microphone Threshold Test' section allows you to set the threshold up to which your voice/background sounds are disregarded. For example, increasing the slider to 100% means that unless you speak very loudly into your microphone, you will not transmit any noises over VOIP, whereas a threshold of 10% means pretty much every noise in your immediate environment will be sent over your VOIP channel. Click the 'Start Microphone Test' button to test the threshold for your normal speaking voice, and set it accordingly.
Note that you can also setup your BF2142 microphone settings interactively by using the Battlefield 2142 Voice Setup software. To do this, go to your \Program Files\Electronic Arts\Battlefield 2142 directory, and run the BF2142VoiceSetup.exe file, and follow the prompts. When finished, click the 'Save Settings' button and the relevant settings in the Audio section will be adjusted accordingly.
Note once again that all changes in the Audio section are automatically saved and applied as you adjust settings here.
Community
The Community section of BF2142 is primarily to view the latest official EA News on the game, as well as the Credits which you can read through. Of most interest to many people would be the Battle Recorder and Custom Games options covered below:
Battle Recorder: The Battlerecorder allows you to play back demos which have been bookmarked from particular servers you've played on which have Battlerecorder enabled, as well as those which you've saved in your Battlerecorder Library. These demos contain full footage of all gameplay during a particular round. Battlerecorder is an option which must be enabled on a server to work, and can't be used to record games by clients (i.e. individual players). To record and play back your own custom demos see below.
Creating Demos: To make a custom demo of any length, you must be in Singleplayer mode, or on a server of your own creation (See Local Servers below) - you can't record your own demos on Multiplayer Internet servers. To start recording a demo, use the demo.recorddemo [demoname] command in the Command Console (See the Advanced Tweaking section). When you want to stop the demo, use the demo.stoprecording command in the console. Your demo has now been saved as a [demoname].bf2142demo file in your \Program Files\Electronic Arts\Battlefield 2142\mods\bf2142\Demos\ directory.
Playing Back Demos: To play back a custom-made demo, you can use the Battlerecorder. To do this you must copy your demo into the \Documents and Settings\[username]\My Documents\Battlefield 2142\Profiles\Default\demos\ directory (if that directory doesn't exist, create it under the Default profile directory). Then when you go into the Battlerecorder section of BF2, you will find that the demo is listed under the 'Battlerecorder Library' area, and you can simply highlight it and play it from there.
Note: whenever you run a demo through Battlerecord you can use the movement keys to 'fly' around and use a range of commands to change your view, switching to different player views for example and zooming in and out of the action. The list of commands is shown here (they're the same as for BF2), although note that the T and Q control roses don't appear to work properly at times.
Custom Games: This section allows you to launch any custom games you or someone else have created for BF2142. Basically that means mods, and highlighting the mod name and clicking Activate will enable the mod. For installation and usage instructions, check the site where you downloaded the particular mod. For some mods you can download for free, see the Patches, Maps & Mods section of this guide.
The next section goes into detail about the types of Advanced Tweaks you can use in Battlefield 2142.
|
|