
Amiga Emulation Guide
[Page 3] WinUAE Settings
This section covers all of the major WinUAE settings we will need to alter to make sure the emulator accurately emulates the Amiga 500 with minimal problems. Each section of the settings is covered below:
Paths
The first thing we have to do is set the paths to the various files WinUAE uses to store its files. The most important directory to check is the ROM path make sure this points to the directory where you are storing all your game image files (.ADF, .ADZ) and Kickstart image (.ROM). If necessary create a new directory and place all your disk images/ROM files there see the last page of this guide for more details on where to get game images.
Important: On Windows Vista and Windows 7, make sure to at least set the Configuration directory path somewhere under your personal folders (i.e. \Users\[username]\), as this will not require Admin privileges to access. Setting it anywhere else, such as under the \Program Files\ directory, may mean your configuration files will not save if you have UAC enabled. I recommend all the other paths here also be set to a location under your personal folders for the same reason. For example, create a new directory called Amiga under your \Users\User1\Documents\My Games directory, place your ROMS directory there, and point WinUAE there for all paths shown.
Once you've placed all your .ADF, .ADZ and .ROM files in the ROMs directory of your choice and changed the path here to point to it, click the 'Rescan ROMS' button to make sure they are all found and recognized by WinUAE. This can resolve the error message that a valid ROM hasn't been found at WinUAE startup for example.
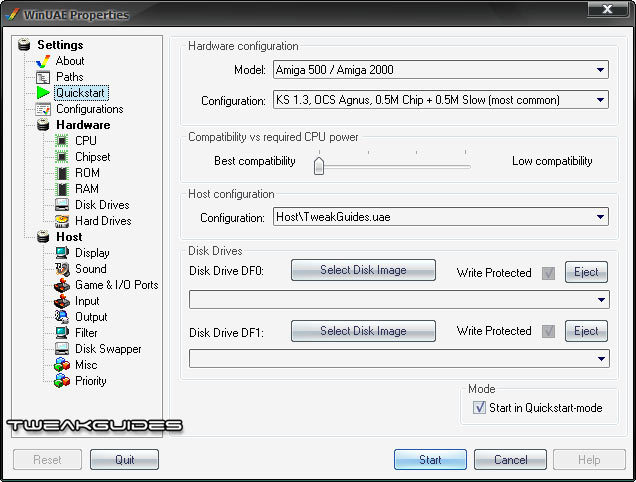
Quickstart
This is the common startup screen for WinUAE. Each time you start up WinUAE it allows you to quickly and easily select an Amiga disk image to load up, and click the Start button to load into Amiga emulation. As such, I recommend you tick the 'Start in Quickstart mode' box at the bottom right of this screen.
Model: For our purposes, we want to select 'A500' to emulate the original Amiga 500.
Configuration: Select the '1.3 ROM, OCS, 512KB Chip + 512KB Slow RAM' option. This translates to a setup using Kickstart 1.3, Amiga Original Chipset, 512KB Chip RAM and 512KB of Slow RAM. These are the specifications of the original Amiga 500.
Compatibility vs. required CPU Power: As the name implies, this slider allows you to choose how accurately WinUAE emulates the Amiga. I strongly recommend moving the slider to the far left (Best Compatibility) to give an authentic Amiga experience and minimize problems with games. However if you have an old CPU then reduce the slider to the right for better performance.
Configuration: This allows you to choose the various configuration files you have saved for WinUAE. See the Configurations section below for details.
Emulated Floppy Drives: These boxes allow you to select the disk image(s) to load when the Amiga emulation starts. For example, click the 'Select Disk Image' button next to Floppy Drive DF0: and you will be taken to your ROMs directory (as set in the Path settings above). Once you've selected the disk image you want to load and click OK, it's path and name should be displayed in the box. Once you click the Start button at the bottom of this screen, WinUAE will start Amiga emulation mode and begin loading that disk image.
Some things to note: by default we want these boxes empty, since typically you don't want a particular disk image to be loaded up each time you start WinUAE. Press the Eject button to clear the box(es). Furthermore, DF0: was the default built-in drive in the Amiga 500, and hence the first disk of any disk image set must be put into this box first. For example, if you're running the game Sword of Sodan which came on four disks, you'd need to insert the 'Sodan 1' image in DF0:, and then if necessary 'Sodan 2' in DF1. Alternatively, you can swap disks from within Amiga emulation by pressing F12, coming to this screen, pressing the Eject button and selecting the next disk image to insert into DF0.
Configurations
This screen allows you to define configuration files which hold the various configurations we set up in WinUAE. For example, you may want one configuration with settings which emulate an Amiga 500, and another configuration file which holds the settings which emulate an Amiga 1000.
For most people though, the main use for the Configuration file is to save their settings and have them automatically load up each time you launch WinUAE. To do this, you will first have to change all your settings as covered in the rest of this guide. Then come back to this section and follow the instructions below:
In the Name box enter the name you want to give the configuration file, then click the Save button - you settings will be saved in this file under your Configuration directory with the specified name and the .UAE file extension. Give the configuration a description if you wish, e.g. 'Amiga 500'. Then at any time you change any WinUAE settings, come back to this section, highlight the file and click the Save button to ensure your settings are always saved.
If you've done the above and your configuration still doesn't appear to be saving/loading at WinUAE startup, try the following:
1. Make sure your settings are the way you want them - that means run through all the instructions below first and make sure each and every set is set correctly.
2. Click on the bolded Hardware section heading in WinUAE, and in the Name box enter a name for the configuration - I suggest the same one as you use for your main config file. Then click the Save button.
3. Highlight this newly created config file in the box at the top of the window, and tick the Autoload button.
4. Click on the bolded Host section heading in WinUAE and do the same as steps 2-3 above.
5. Go to the Quickstart section of WinUAE and in the Configuration drop-down box, select your configuration name.
6. Go to the Paths section and click the 'Rescan ROMs' button.
7. Go to the Configurations section, make sure your main configuration file is chosen and click the Save button.
This should guarantee that all your settings are saved, and that each time you load up WinUAE all the settings will automatically be applied.
Hardware
The majority of the hardware settings should already be set correctly given we chose the 'Amiga 500' emulation under the Model and Configuration options in the Quickstart screen. This automatically configures the hardware settings to their correct values for Amiga 500 emulation.
CPU and FPU
The CPU should be set at 68000 this is the original Amiga 500 Motorola 68000 series CPU and the other options available are for the variations of this chipset which were used in later Amigas.
If you selected 'Best Compatibility' on the Compatibility slider on the Quickstart screen, the remaining options here are preset and greyed out. If the slider is on another setting however, you can alter these settings at the cost of possible problems in games and general Amiga emulation.
Chipset
The OCS (Original ChipSet) option should be selected here for accuracy. If you find you are having problems in certain games, select the 'Full ECS' chipset which is a later (non-Amiga 500) version of the chipset that performs better.
The 'Cycle exact' option should be ticked for maximum accuracy and compatibility, however also select 'Faster RTG' if you are having performance problems in games (e.g. if you have a slow CPU).
The Collision Level setting controls the interaction of sprites in games. Select 'Sprites and Sprites vs. Playfield' for accurate emulation.
Sound Emulation is quite important, as buggy sound is something which can occur on many machines. I recommend selecting 'Emulated, 100% accurate' to begin with. If you have sound-related problems, you can come back here after changing other sound settings (see Sound below) and change to Emulated for possible improvement.
Advanced Chipset
Unless you have specific needs to further customize the chipset settings here, simply leave the 'Compatible Settings' box ticked.
ROM
This screen lets you select the Kickstart ROM image used to begin Amiga emulation (See Kickstart 1.3 ROM section above). You must have a working ROM image for Amiga emulation to begin in any Amiga emulator, including WinUAE.
In 'Main ROM File' click the small '...' box at the far right and browse to where your Kickstart ROM image file is located and select it. You should see the full name and details of the Kickstart image shown in this box. For example, mine says 'Kickstart v1.3 (A500,A1000,A2000) rev 34.5 (256k)'.
You can leave the other boxes blank, as they are not required for Amiga 500 emulation which only needed a single ROM file.
I stress again - do not email me asking about ROM files as I will not respond - please see the Kickstart 1.3 ROM section of this guide for more details.
RAM
To reproduce the Amiga 500 environment correctly, the Chip RAM slider must be set to 512 K, and the Slow RAM slider must be set to 512 K as well. The Amiga 500 had no Fast RAM, so that must equal 0 (none). Changing these values can improve loading and game performance, however it can also ruin compatibility as many early Amiga 500 games were never designed to run with additional memory. The Amiga 500 only came with 512 K onboard (Chip RAM), and an additional 512 K (Slow RAM) expansion could be purchased separately and plugged in underneath the casing in the expansion slot.
If you're still having problems set the Slow RAM slider to 0 as well, and only leave the 512 K of Chip RAM as this was the absolute minimum any Amiga 500 came with.
Floppy Drives
This screen allows you to configure how many drives the Amiga has available. The Amiga 500 came with one internal 3.5" Double Density floppy disk drive (3.5"DD) which held 880KB of information on a single floppy disk, looking exactly the same as those used in modern 3.5" PC floppy drives. There were no Hard Disk drives for the Amiga 500, and while you could buy an external 5.25" Single Density drive (5.25"SD) it was not common.
DF0: is the default Amiga floppy drive, which was built into the side of the Amiga 500 case. It is the drive which the system checked and loaded from first, and it should be set to 3.5"DD and never changed or disabled.
DF1: was usually an external add-on 3.5" drive, and I recommend you set DF1: to 3.5"DD.
DF2: and DF3: were additional external drives you could connect to the Amiga 500, and for the most part I recommend disabling them as it was not very common for these to exist on an Amiga setup, and you may find compatibility problems with some games.
Note that WinUAE can't use any original Amiga disks you insert into your PC floppy drive as they are not readable by modern PC floppy drives. WinUAE requires disk image files in .ADF or .ADZ format. These images are typically downloaded and need to be placed in your ROMS directory - see the Amiga Games section for details on how to get disk image files.
I suggest you leave all the drive boxes empty here (select Eject for each of them), since we don't want any disk images to be in the drive by default whenever we start Amiga emulation. We can use the Quickstart section to load up disk images as needed. Note that when you have a disk image loaded up, you can untick the 'Write Protected' option on the drive to allow the disk image to be written to this is useful for saving games for example, but it will alter the disk image file. As such, I recommend having backups of all your original game images stored somewhere else in case the image becomes corrupted through a bad save for example.
You can use the 'Create Standard Disk' or 'Create Custom Disk' buttons to create blank 3.5" or 5.25" disk images, for games which require save disks for example. To create a blank disk for the Amiga 500, select 3.5"DD, click the 'Create Standard Disk' button and then give the disk a name like Blank, and save it to your ROMS directory.
Using the 'Floppy Drive Emulation Speed' slider, select '100% (Compatible)' to perfectly imitate the 3.5" floppy drive speed on the original Amiga 500. This will obviously mean that games and disk images will take a while to load by modern standards, but that's the price you pay for nostalgia. If you want to speed up image loading, select the Turbo option by moving the slider to the far left, however this may cause problems with loading certain games. If you want even greater speeds, move the slider to the far right (e.g. 800%), but again this can prevent some games from loading.
If you simply want to speed up loading at any time during Amiga emulation, press the END+PAUSE keys together to speed things up, then press these keys again when you want to go back to normal drive speeds or if you experience any problems.
Hard Drives
As mentioned, the Amiga 500 did not come with a hard drive. This was reserved for it's older brother the Amiga 2000 which was the high-end model at the time. For this reason I won't cover this option in detail, as I simply don't have much experience with Amiga hard drives to know the correct options to choose to emulate other Amigas.
The next page continues the setup instructions for WinUAE.
|
|