
ATI Catalyst Tweak Guide
[Page 5] Windows Graphics Control Panel
Once you've installed the Catalyst drivers and performed a bit of initial optimization and tidying up, you come to the point at which you need to make some major and minor adjustments to your graphics card's operation using the generic Windows Graphics Control Panel. To access it, in Windows XP go to Start>Control Panel and double-click on Display to open the Display Properties box. In Windows Vista, go to Start>Control Panel>Personalization and select 'Display Settings'.
Settings
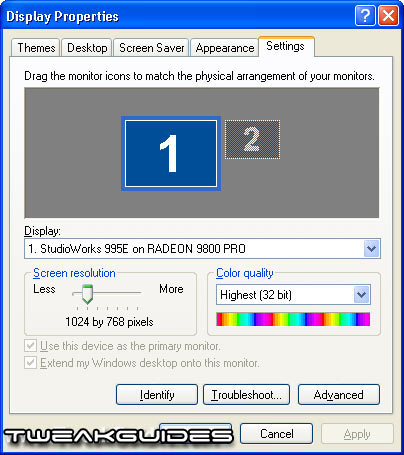
Display: In this drop down box you will usually find at least two items, the first being your current monitor, and the second being a 'Secondary' device, which can be chosen if you have two output devices connected to your system, such as two monitors or a monitor and a TV. To see which device you are currently outputting to, click the 'Identify' button at the bottom of the box, and a large number '1' will appear on your primary display, and if connected, a '2' will appear on your secondary display. If you do not see two output devices then your graphics card does not support dual displays.
Screen resolution: This setting determines your Windows Desktop resolution, and can be chosen to taste. It won't determine the resolution for games - you set those within each game. Choose a resolution which is comfortable to view. Higher resolutions require greater graphics power to render, though this doesn't have any real impact on performance in games or on your desktop.
Color quality: This setting determines how many possible colors can be used on your Windows Desktop. The higher the bits (i.e. 16 bit, 32 bit) the greater the number of possible colors and hence the richer the graphics will appear. You can set this to taste, however it is important to note that when playing games, it is often recommended that you match your desktop color quality with that chosen in the game to prevent any graphical anomalies or problems. Higher color quality requires greater graphics power to render in 3D games, but makes little difference to your desktop (2D) performance.
To access the rest of the settings, click the Advanced button. Each section of the Windows Graphics Control Panel is covered in more detail below. Note that some of these tabs may not exist in Vista, and that some of the options may have slightly different names:
General
DPI Setting: DPI is Dots Per Inch, and you can select a higher or lower DPI by choosing 'custom setting...'. The higher the DPI from the default (96), the larger everything will appear on your screen. Conversely the lower the DPI, the smaller everything will appear.
Compatibility: Whenever you change your screen resolution under the Settings tab, this option will determine whether you need to 'Restart the computer before applying the new display settings', or if the computer will 'Apply the new display settings without restarting' or whether it will 'Ask me before applying the new display settings'. I personally recommend the second option, 'Apply the new display settings without restarting' as it provides the fastest method, and should cause no problems with recent applications or games. If you get a blank screen or display corruption with this setting when changing resolutions, you have an older monitor which requires you choose one of the other options.
Adapter
This tab lists information about your graphics card (also known as a 'graphics adapter'). If the information is incorrect, you may need to reinstall your drivers using the 'clean install' method (See the Catalyst Installation section), and also ensure you have the latest motherboard drivers installed (See the Essential Optimization section). If you want to check this information against another source, you can install SiSoft Sandra and run the 'Video System Information' module.
Properties: Clicking the Properties button will show you the current graphics device and driver version you are using.
List All Modes: This button provides a list of all the resolutions and refresh rates your current graphics card and monitor combination supports. It is important to remember what the highest resolution and refresh rates are for your system, since if at any time you set a resolution and/or refresh rate higher than is supported, you will get an 'out of frequency' error on your monitor, and it will not display any image. This can sometimes cause damage to your monitor, so be careful not to exceed your system's capabilities in this regard. Usually your system will prevent you from being able to use higher resolutions/refresh rates than are supported.
Monitor
This section lists information about your current output device. Clicking the Properties button shows the device along with its current drivers. You should try to update these drivers by doing a search on Google for your monitor manufacturer's website, or for your particular monitor's brand and model number. Having the latest monitor drivers means optimal image reproduction, so it's worth making sure you have the latest drivers.
Screen Refresh Rate: This box shows the current refresh rate used to display your Windows Desktop. The refresh rate is the number of times per second your graphics card and monitor redraw the image on your screen. This is typically expressed in terms of Hz, which is a measure of frequency. For example, 100Hz = 100 times per second. The higher the frequency, the more comfortable the image is for your eyes to view. The lower the frequency, the more flickering you may notice, and long term exposure to low frequency displays can harm your eyes.
To adjust this value, first tick the 'Hide modes that this monitor cannot display' box, for the reasons explained under the Adapter section above. Then select the highest available frequency in the drop down box and click Apply to see the difference. Also refer to the Tidying Up section for more information about Refresh Rate fixes/overrides if the highest value here is 60Hz.
Troubleshoot
Hardware Acceleration: This setting determines the level of advanced functionality support supplied by your graphics hardware. There are certain graphical functions which are sped up when run through your graphics card, and this slider determines just how many of those are actually accelerated by doing so. This slider should always be set to the far right (Full Acceleration) for maximum performance.
However, there may be instances where you are experiencing a great many graphics-related problems and for the purposes of troubleshooting, you may lower the slider one or more notches to the left. If doing so reduces the frequency of crashes and problems, then you will need to run through the various procedures in this guide for ensuring everything from your drivers to your hardware is optimally set up. If everything else fails, you may need to keep this slider one or more notches to the left of Full, however this is typically not recommended as it reduces your performance.
Enable Write Combining: Write Combining is a technique which merges multiple operations into a single read or write, increasing graphics performance. However just like Fast Writes (See the Essential Optimization section), having it enabled may cause problems and exacerbate instabilities on various system configurations. For most people, I recommend ticking 'Enable Write Combining' as it increases performance and should not cause any problems. However if you continually experience crashes, particularly the 'infinite loop' error, you can try unticking this setting to see if things improve.
Color Management
This section lists the 'color profiles' your monitor uses to determine how to display colors correctly. Correct color display in this sense means showing colors on the screen precisely as they were intended to be displayed by the developers of the software.
The correct color profile for your monitor is typically placed as an .ICM file in the \WINDOWS\system32\spool\drivers\color\ directory when you install your monitor drivers. Your monitor drivers are usually contained on the driver CD which came with your monitor. If you haven't installed these already, I strongly recommend you do so now, and if necessary, manually search for the correct .ICM file and place it in the directory mentioned above. If you do not have a driver disk, or cannot find it, then you should search the internet for your monitor manufacturer's website, and/or your monitor's brand and model number, and find the latest drivers.
When you have placed the .ICM file in the directory above, click the Add button here, highlight the file and click Add again to add it to the list. Then select the relevant item in the list and click 'Set As Default', then click the Apply button to use it.
The next section looks at the ATI Catalyst Control Center settings in detail.
|
|