
ATI Catalyst Tweak Guide
[Page 11] Overclocking & Conclusion
The modern graphics card is a lot like a small computer by itself. It has a Graphics Processing Unit (GPU) which is the graphics equivalent of a Central Processing Unit (CPU), it sits on a motherboard-like Printed Circuit Board (PCB), and has its own Video RAM. And just like a computer system, the components on a video card can be "overclocked" to increase performance. Overclocking a graphics card involves increasing the frequency at which particular video components perform their functions. For more details on basic overclocking theory, read the detailed Overclocking chapter of my TweakGuides Tweaking Companion.
The two components of a video card which can be overclocked are the GPU (also called the Engine or Core), and the Video RAM (also called VRAM or just Memory). You can overclock one or both of these components, with varying results based on a number of factors, but generally resulting in an increase in performance the higher you overclock each component.
To overclock your video card, you'll need a tool which allows you to change the clock speeds of the Core and the VRAM. For Radeon XT or X1000 series graphics cards, you can use the built-in OverDrive functionality (See the ATI Control Center section). This allows safer overclocking, because OverDrive constantly checks to ensure your graphics card is not in any danger of overheating and thus being permanently damaged. However by the same token this can prevent you from reaching higher overclocks. Furthermore, ATI graphics cards which don't have a built-in temperature sensor cannot use OverDrive and hence require a third-party overclocking tool. The reliable tools I suggest you use are:
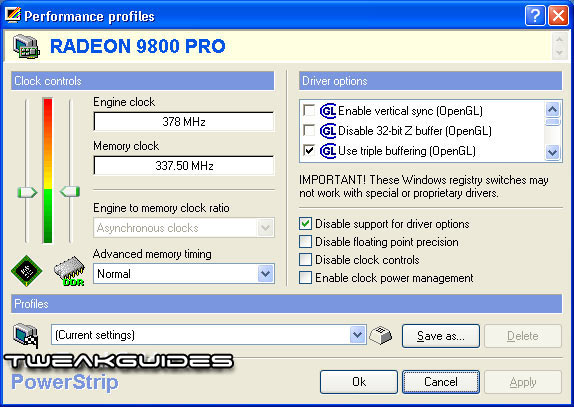
PowerStrip: You can download this utility from the PowerStrip Website. It is a fully functional free trial version, however you will need to purchase the software to keep using it after 30 days. Once installed and run, PowerStrip sits as a small monitor icon in the System Tray. To access the overclocking functionality, right-click on this system tray icon and select Performance Profiles>Configure. In the Performance Profiles dialog box, you can use the two sliders to adjust your clock speeds, with the left one affecting Engine (Core) clocks, and the right Memory clock speed.
ATI Tray Tools: As covered on the previous pages of this guide, you can download and use the free ATI Tray Tools utility to overclock your ATI graphics card.
Note: If you want to use the ATI Overdrive functionality, you will have to make sure the 'ATI Hotkey Poller' Service is enabled (See page 4). If you're using a third party overclocking utility like ATI Tool or ATI Tray Tools, you will need to disable the 'ATI Hotkey Poller' Service.
The Warnings
Whenever the word 'Overclocking' is used, you have to get used to seeing the following facts:
If overclocking scares you, or you simply cannot afford to replace your video card on the off-chance it gets damaged, it's best to steer clear of it. Everyone these days seems to flippantly recommend that you overclock your components the second you have them installed in your machine, but the truth of the matter is that there is a risk of damage and some people do not want to take such a risk - and that's fair enough.
The Procedure
To overclock your video card, make sure you have selected to change the 3D clock speeds (for cards which allow separate 2D/3D clock speeds) and simply increase the clock speed of the Core/Engine/3D component, and/or the clock speed of the Memory, both of which are measured in MHz. The Core generates graphics data, and depending on your CPU and the rest of your system specifications, increasing the core speed can result in a small or large performance improvement. The Memory transfers information to/from the Core, and increasing its speed can once again improve performance either slightly or significantly, in conjunction with your Core speed and the speed of the rest of your system.
As a general rule, if you have a fast graphics card and a slow CPU, then overclocking your graphics card yields less performance improvements. If you have a fast CPU and a slower graphics card, then overclocking the graphics card can show greater improvement. The reason for this is that if the graphics card is the 'weak link' or 'bottleneck' in the equation, and a particular game requires more graphical power and speed, then quite clearly overclocking the graphics card can show more of an improvement than in situations where the CPU or the rest of your system is the weak point. For example if you have a Radeon X1900 graphics card and a 1.6Ghz CPU, overclocking the graphics card really won't improve performance as such since the CPU is the bottleneck.
The whole overclocking procedure is similar to this:
1. Select a component to overclock (Core or Memory).
2. Increase its clock speed by a small increment, e.g. 5MHz.
3. Run a game or a benchmark for a short period (See Benchmarking & Stress Testing further below), testing to see if you get any crashes/freezes, stuttering, or 'Artifacts' (small graphical anomalies, such as white dots, strange color blocks or flickering textures).
4. Repeat steps 2 and 3, until you experience a problem - this means you've reached the current limit of your overclock for that component.
5. Reduce the clock speed by at least 5MHz to provide safe headroom.
6. Repeat the entire procedure for the other component (Core or Memory).
7. Once you believe you have both a stable and fast overclock, do a much longer run of benchmarking and/or play some games for a longer period of time (e.g. 2 hours), paying particular attention to any small artifacts which may appear, indicating the need to reduce the overclock ever so slightly and/or increase cooling.
That is basically how graphics card overclocking is done. It can sometimes provide a very noticeable improvement in performance, but if you have an old or low-end graphics card, or if your graphics card does not have hardware support for the functionality demanded by newer games - like Pixel Shaders, Vertex Shaders or DirectX10, then overclocking cannot surmount this handicap.
Cooling
One of the major factors in obtaining a stable overclock is cooling. As components are taken beyond their original specifications with overclocking, so too are their cooling requirements. Just like a motor vehicle engine requires a radiator system and a fan to draw out the heat from the block and cool things down, so too a graphics card typically has a metal heatsink and fan to first draw out the heat from around the GPU and then blow cool air on the heatsink to help dissipate all that heat into the surrounding air. Under normal circumstances, the heatsink and fan combo on your graphics card does its job relatively well. However in a closed case with other components also pumping out heat, the temperatures rise to a point where any overclocking can tip the balance from stable to unstable, particularly in warmer months. As soon as you start experiencing freezes and crashes, and strange blocks or lines of colors appearing on your screen, or even small white dots, then you know that additional cooling is quite likely. Even if you don't overclock the card, when ambient temperatures are very high, you will need to provide additional cooling. To supply plenty of fresh cool air to the graphics card, try doing one or more of the following:
Remember however that beyond a certain point, no amount of cooling, even refrigerator-like 'VapoChill' units, can remove all the heat being generated right near the component. The component will simply hit a wall at which you cannot overclock it any more without doing permanent damage and creating constant system instability and graphical anomalies. Don't push to or beyond this point unless you like to spend money replacing the component.
That covers the basics of overclocking a graphics card. Overclocking is not all that hard to do - the trick is in getting a good balance between speed and stability. I urge you to make sure that you err on the side of stability, since a system that crashes, even if it's not often, can be extremely counter-productive to enjoyable gaming.
Benchmarking & Stress Testing
Regardless of whether your graphics card is overclocked or not, you will want to measure its performance and also test to see if the card is stable under full load. This is particularly relevant if you have made some adjustments or tweaks, and you want to objectively measure whether they improve overall graphics performance or stability. The process of coming up with an objective 'score' with which you can compare performance with others and yourself is called benchmarking. Benchmarking tools also serve a dual purpose. Because of their system-intensive nature, they are great for use as stress testers. Running them continuously is a good simulation of running a graphically intense game, and can bring out instabilities and problems very quickly, allowing you to detect and diagnose problems more rapidly, and also to determine whether your overclock is too unstable for daily use.
There are several free programs which provide benchmarking functionality and also double as good stress testers. I strongly suggest you read the Benchmarking & Stress Testing chapter (XP version) or Performance Measurement & Diagnostics chapter (Vista version) of my TweakGuides Tweaking Companion for more details and download links. Of course one of the best ways to test for stability and performance is to play your favorite games for quite a while, and if your system crashes, freezes or displays any anomalies then your graphics card, indeed your entire system, may not be totally stable. Once again refer to the TweakGuides Tweaking Companion and take the time to go through it, steadily checking and optimizing all your settings.
Conclusion
If you've reached this point you have a great deal of patience, but hopefully that patience has been rewarded with some improvements in your system's graphical performance not to mention improved stability and a better understanding of how your graphics card and its settings work. I realize the guide is long, and it might be hard to follow all the advice provided, but I do hope that it serves a useful role in being a central information resource for the configuration and optimization of the ATI Catalyst drivers.
If you have any constructive feedback you wish to let me know about please Email Me, especially if you feel any of the information in this guide is in error. Bear in mind that I can't provide any Tech Support, and I cannot provide personalized tweaking advice or purchasing advice.
I hope you found this guide useful, and I also hope you get the chance to read the other guides on this site to help you even further.
|
|